Quick Installation Guide
Page 5
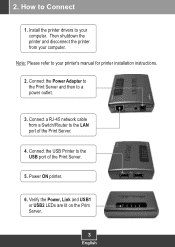
Connect the Power Adapter to the Print Server and then to Connect 1. How to a power outlet. 3. 2. Install the printer drivers to your printer's manual for printer installation instructions. 2. Then shutdown the printer and disconnect the printer from a Switch/Router to the USB port of the Print Server. 4. Connect the USB Printer to the LAN port of the Print Server. 5. Power ON printer. 6. Note: Please refer to your computer. Connect a RJ-45 network cable from your computer. Verify the Power, Link and USB1 or USB2 LEDs are lit on the Print Server. 3 English
Connect the Power Adapter to the Print Server and then to Connect 1. How to a power outlet. 3. 2. Install the printer drivers to your printer's manual for printer installation instructions. 2. Then shutdown the printer and disconnect the printer from a Switch/Router to the USB port of the Print Server. 4. Connect the USB Printer to the LAN port of the Print Server. 5. Power ON printer. 6. Note: Please refer to your computer. Connect a RJ-45 network cable from your computer. Verify the Power, Link and USB1 or USB2 LEDs are lit on the Print Server. 3 English
Quick Installation Guide
Page 10
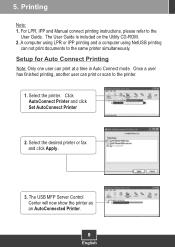
..., IPP and Manual connect printing instructions, please refer to the same printer simultaneously. Select the desired printer or fax and click Apply. 3. A computer using LPR or IPP printing and a computer using NetUSB printing can not print documents to the User Guide. Click AutoConnect Printer and click Set AutoConnect Printer 2. 5. The USB MFP Server Control Center will...
..., IPP and Manual connect printing instructions, please refer to the same printer simultaneously. Select the desired printer or fax and click Apply. 3. A computer using LPR or IPP printing and a computer using NetUSB printing can not print documents to the User Guide. Click AutoConnect Printer and click Set AutoConnect Printer 2. 5. The USB MFP Server Control Center will...
Quick Installation Guide
Page 17
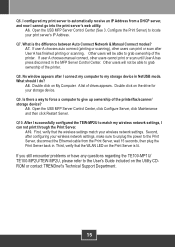
... contact TRENDnet's Technical Support Department. 15 A6. Other users will be able to the User's Guide included on the drive for your wireless network settings. If user A chooses manual connect, other users can not print through the Print Server. I configured my print server to ...Print Server, wait 15 seconds, then plug the Print Server back in the MFP Server Control Center. A7. Other users will not be able to the Print Server, disconnect the Ethernet cable from a DHCP server, and now I do? If you still encounter problems or have any questions regarding the TE100-MP1U/ TE100...
... contact TRENDnet's Technical Support Department. 15 A6. Other users will be able to the User's Guide included on the drive for your wireless network settings. If user A chooses manual connect, other users can not print through the Print Server. I configured my print server to ...Print Server, wait 15 seconds, then plug the Print Server back in the MFP Server Control Center. A7. Other users will not be able to the Print Server, disconnect the Ethernet cable from a DHCP server, and now I do? If you still encounter problems or have any questions regarding the TE100-MP1U/ TE100...
User's Guide
Page 2
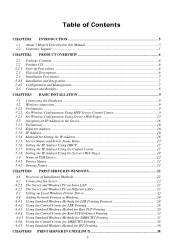
... Pages 19 Name of USB Device ...21 Printer Names...21 Storage Names ...21 CHAPTER4 PRINT SERVER IN WINDOWS 22 4.1 Overview of Installation Methods 22 4.2 Connecting the Server...22 4.2.1 The Server and Windows PC on Same LAN 23 4.2.2 The Server and Windows PC on Different LANs 23 4.3 Setting up Local Windows Printer Driver 23 4.4 Adding Network...
... Pages 19 Name of USB Device ...21 Printer Names...21 Storage Names ...21 CHAPTER4 PRINT SERVER IN WINDOWS 22 4.1 Overview of Installation Methods 22 4.2 Connecting the Server...22 4.2.1 The Server and Windows PC on Same LAN 23 4.2.2 The Server and Windows PC on Different LANs 23 4.3 Setting up Local Windows Printer Driver 23 4.4 Adding Network...
User's Guide
Page 5
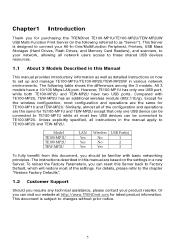
... Port(s) 1 2 2 To fully benefit from this manual are based on how to set up and manage TE100-MP1U/TE100-MP2U/TEW-MP2UW in the manual apply to TE100-MP1U while at http://www.TRENDnet.com for latest product information. The instructions described in ... following referred to TE100-MP2U. Chapter1 Introduction Thank you for purchasing the TRENDnet TE100-MP1U/TE100-MP2U/TEW-MP2UW USB Multi-Function Print Server (in a new Server. Compared with basic networking principles. Or you can reset this Manual This manual provides introductory information as well as "Server"). Except for the...
... Port(s) 1 2 2 To fully benefit from this manual are based on how to set up and manage TE100-MP1U/TE100-MP2U/TEW-MP2UW in the manual apply to TE100-MP1U while at http://www.TRENDnet.com for latest product information. The instructions described in ... following referred to TE100-MP2U. Chapter1 Introduction Thank you for purchasing the TRENDnet TE100-MP1U/TE100-MP2U/TEW-MP2UW USB Multi-Function Print Server (in a new Server. Compared with basic networking principles. Or you can reset this Manual This manual provides introductory information as well as "Server"). Except for the...
User's Guide
Page 16
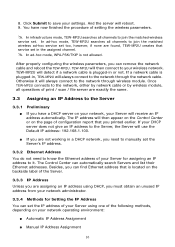
...matched wireless service set the IP address of your Server using one of the following methods, depending on the backside label of print / scan / file server are assigning an IP address using DHCP, you printed earlier. You have a DHCP server on the page of your settings. Once TEW-MP2U... network, your network operating environment: „ Automatic IP Address Assignment „ Manual IP Address Assignment 16 If your DHCP server does not give an IP address to the Server, the Server will reboot. 9. 8. And the server will use the Default IP address: 192.168.1.100. „ If you are...
...matched wireless service set the IP address of your Server using one of the following methods, depending on the backside label of print / scan / file server are assigning an IP address using DHCP, you printed earlier. You have a DHCP server on the page of your settings. Once TEW-MP2U... network, your network operating environment: „ Automatic IP Address Assignment „ Manual IP Address Assignment 16 If your DHCP server does not give an IP address to the Server, the Server will reboot. 9. 8. And the server will use the Default IP address: 192.168.1.100. „ If you are...
User's Guide
Page 38
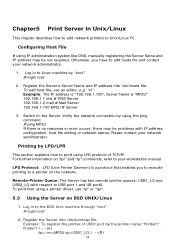
... or error occurs, there may be problems with respect to your workstation manual. Printer1:\ ---(A) :lp=:rm=MP2U:rp=USB1_LQ:\ ---(B) 38 Chapter5 Print Server in to Linux machine by "root". # login root 2. Register the Server's Server Name and IP address into /etc/printcap file. Switch on the network...Please contact your network administrator. 1. Log in Unix/Linux This chapter describes how to add network printers to print using IP administration system like DNS, manually registering the Server Name and IP address may be not required. Example: The IP address is "192.168.1.100...
... or error occurs, there may be problems with respect to your workstation manual. Printer1:\ ---(A) :lp=:rm=MP2U:rp=USB1_LQ:\ ---(B) 38 Chapter5 Print Server in to Linux machine by "root". # login root 2. Register the Server's Server Name and IP address into /etc/printcap file. Switch on the network...Please contact your network administrator. 1. Log in Unix/Linux This chapter describes how to add network printers to print using IP administration system like DNS, manually registering the Server Name and IP address may be not required. Example: The IP address is "192.168.1.100...
User's Guide
Page 58
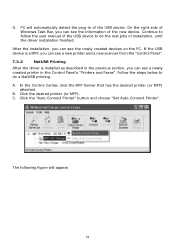
... printer in of installation, until the driver installation finished. In the Control Center, click the MFP Server that has the desired printer (or MFP) attached. C. The following figure will automatically detect the ...After the installation, you can see the information of the USB device to follow the user manual of the new device. Click the "Auto Connect Printer" button and choose "Set Auto-...the steps below to do the rest jobs of the USB device. Continue to do a NetUSB printing. Click the desired printer (or MFP). On the right side of Windows Task Bar, you can see...
... printer in of installation, until the driver installation finished. In the Control Center, click the MFP Server that has the desired printer (or MFP) attached. C. The following figure will automatically detect the ...After the installation, you can see the information of the USB device to follow the user manual of the new device. Click the "Auto Connect Printer" button and choose "Set Auto-...the steps below to do the rest jobs of the USB device. Continue to do a NetUSB printing. Click the desired printer (or MFP). On the right side of Windows Task Bar, you can see...

User's Guide
Page 60
...click the scanner icon in the Control Panel's "Scanners and Cameras", and choose "Get picture using manual "connect" and "disconnect" rather than "Auto Connect Print". Then, the print job will be issued to break the association between the Windows printer and the physical printer, just ...Printer List". 7.3.3 NetUSB Scanning After the driver is issued. Then try to issue a print job to manually connect the scanner (or MFP). I. In the Control Center, click the MFP Server that printer. After all print jobs are finished, click the "Disconnect" button. Of course you login Windows. A....
...click the scanner icon in the Control Panel's "Scanners and Cameras", and choose "Get picture using manual "connect" and "disconnect" rather than "Auto Connect Print". Then, the print job will be issued to break the association between the Windows printer and the physical printer, just ...Printer List". 7.3.3 NetUSB Scanning After the driver is issued. Then try to issue a print job to manually connect the scanner (or MFP). I. In the Control Center, click the MFP Server that printer. After all print jobs are finished, click the "Disconnect" button. Of course you login Windows. A....

User's Guide
Page 84
... Address: 0.0.0.0 z SysContact: sales@trendnet.com z SysName: TRENDnet TE100-MP1U (or TE100-MP2U or TEW-MP2U) USB MFP Server z SysLocation: www.trendnet.com z EnableAuthenTrap: 2 (disable) z SNMPv3: Disabled - DNS Server: none Supported Protocols z LPR Printing: Enabled z IPP Printing: Enabled z Raw TCP/JetDirect Printing: Enabled - Privacy Password: None 84 TCP Port (USB2): 9101 z SMB/CIFS Print/File Server: Enabled - Passive Mode: Enabled - Manual DNS: None (Disabled). Internet...
... Address: 0.0.0.0 z SysContact: sales@trendnet.com z SysName: TRENDnet TE100-MP1U (or TE100-MP2U or TEW-MP2U) USB MFP Server z SysLocation: www.trendnet.com z EnableAuthenTrap: 2 (disable) z SNMPv3: Disabled - DNS Server: none Supported Protocols z LPR Printing: Enabled z IPP Printing: Enabled z Raw TCP/JetDirect Printing: Enabled - Privacy Password: None 84 TCP Port (USB2): 9101 z SMB/CIFS Print/File Server: Enabled - Passive Mode: Enabled - Manual DNS: None (Disabled). Internet...