
Quick Installation Guide
Page 6
Enter the User name and Password, and then click Login. 3. Then click Finish. 3. Follow the InstallShield Wizard instructions. User Name: admin Password: admin 4 English Insert the Utility CD-ROM into your computer's CD-ROM Drive and then click Install Utility. 2. Configure the Print Server 1. Click the Print Server and click Configure Server. 4.
Enter the User name and Password, and then click Login. 3. Then click Finish. 3. Follow the InstallShield Wizard instructions. User Name: admin Password: admin 4 English Insert the Utility CD-ROM into your computer's CD-ROM Drive and then click Install Utility. 2. Configure the Print Server 1. Click the Print Server and click Configure Server. 4.

Quick Installation Guide
Page 8
... your encryption key. Then click Apply. Enter the User name and Password, and then click Login. Click Wireless. Configure Wireless Settings (TEW-MP2U only) 1. If you do not know your encryption key, contact your network administrator or logon to restart the Print Server. 6 English Enter the SSID of your wireless router. 4. Click the...
... your encryption key. Then click Apply. Enter the User name and Password, and then click Login. Click Wireless. Configure Wireless Settings (TEW-MP2U only) 1. If you do not know your encryption key, contact your network administrator or logon to restart the Print Server. 6 English Enter the SSID of your wireless router. 4. Click the...

User's Guide
Page 8
... high performance and reliability combined with low power consumption. 2. Monitoring: The Server's web pages and user software allow you to quickly update and enhance its operational features when new Server software becomes available. 8 Future Proof: The firmware stored in a reliable and easy...to Install: The Server installs, operates, and is managed in the Server's Flash memory can assign administrator name and password to continuously monitor the status of connected USB devices. 6. This allows you to restrict login. 5. Flexibility: The Server supports print/File/Scan sharing in...
... high performance and reliability combined with low power consumption. 2. Monitoring: The Server's web pages and user software allow you to quickly update and enhance its operational features when new Server software becomes available. 8 Future Proof: The firmware stored in a reliable and easy...to Install: The Server installs, operates, and is managed in the Server's Flash memory can assign administrator name and password to continuously monitor the status of connected USB devices. 6. This allows you to restrict login. 5. Flexibility: The Server supports print/File/Scan sharing in...
User's Guide
Page 10
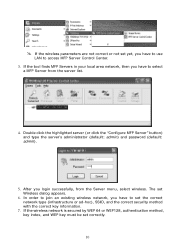
... Center. 3. # If the wireless parameters are not correct or not set yet, you have to use LAN to select a MFP Server from the Server menu, select wireless. After you have to set the correct network type (infrastructure or ad-hoc), SSID, and the correct security method with the ...correct key information. 7. In order to join an existing wireless network, you login successfully, from the server list. 4. If the wireless network is secured by WEP 64 or WEP128, authentication method, key index, and WEP key must be set Wireless dialog appears...
... Center. 3. # If the wireless parameters are not correct or not set yet, you have to use LAN to select a MFP Server from the Server menu, select wireless. After you have to set the correct network type (infrastructure or ad-hoc), SSID, and the correct security method with the ...correct key information. 7. In order to join an existing wireless network, you login successfully, from the server list. 4. If the wireless network is secured by WEP 64 or WEP128, authentication method, key index, and WEP key must be set Wireless dialog appears...
User's Guide
Page 13
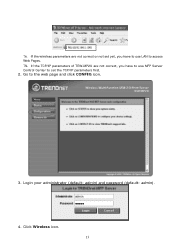
Login your administrator (default: admin) and password (default: admin). 4. Click Wireless icon. 13 Go to set yet, you have to use LAN to access Web Pages. # If the TCP/IP parameters of TEW-MP2U are not correct, you have to use MFP Server Control Center to the web page and click CONFIG icon. 3. # If the wireless parameters are not correct or not set the TCP/IP parameters first. 2.
Login your administrator (default: admin) and password (default: admin). 4. Click Wireless icon. 13 Go to set yet, you have to use LAN to access Web Pages. # If the TCP/IP parameters of TEW-MP2U are not correct, you have to use MFP Server Control Center to the web page and click CONFIG icon. 3. # If the wireless parameters are not correct or not set the TCP/IP parameters first. 2.

User's Guide
Page 18
14. After you have logged in successfully, select TCP/IP from the Server's menu. The Set IP Address dialog appears. 18 Double click the highlight list and enter the Server's administrator (default: admin) and password (default: admin). 15.
14. After you have logged in successfully, select TCP/IP from the Server's menu. The Set IP Address dialog appears. 18 Double click the highlight list and enter the Server's administrator (default: admin) and password (default: admin). 15.

User's Guide
Page 20
Click the button corresponding to your choice of IP setting methods (static or 20 Enter administrator (default: admin) and password (default: admin). 5. Click TCP/IP icon. 6. 4.
Click the button corresponding to your choice of IP setting methods (static or 20 Enter administrator (default: admin) and password (default: admin). 5. Click TCP/IP icon. 6. 4.

User's Guide
Page 43
Click on the Specify button to specify SMB server Authentication. ii. iii. C. Click on the Forward button. 43 Fill in the Workgroup, Server Name, User name and Password in Authentication window and then click on the OK button. Networked Windows (SMB): i.
Click on the Specify button to specify SMB server Authentication. ii. iii. C. Click on the Forward button. 43 Fill in the Workgroup, Server Name, User name and Password in Authentication window and then click on the OK button. Networked Windows (SMB): i.
User's Guide
Page 47
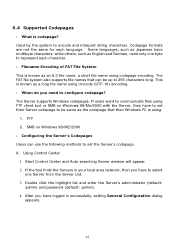
...Control Center 1. Codepage formats are not the same for each character. - The Server supports Windows codepages. FTP 2. Double click the highlight list and enter the Server's administrator (default: admin) and password (default: admin). 4. After you have logged in your local area network, ...then you need only one Server from the Server List. 3. 6.4 Supported Codepages - Some languages, such as...
...Control Center 1. Codepage formats are not the same for each character. - The Server supports Windows codepages. FTP 2. Double click the highlight list and enter the Server's administrator (default: admin) and password (default: admin). 4. After you have logged in your local area network, ...then you need only one Server from the Server List. 3. 6.4 Supported Codepages - Some languages, such as...

User's Guide
Page 48
B. Select your administrator (default: admin) and password (default: admin). 3. Go to the web page, click CONFIG 2. After you have logged in successfully, setting General Configuration dialog appears. 48 Using Server's Web Pages 1. Login your codepage form File Server Codepage box and click Apply. 5.
B. Select your administrator (default: admin) and password (default: admin). 3. Go to the web page, click CONFIG 2. After you have logged in successfully, setting General Configuration dialog appears. 48 Using Server's Web Pages 1. Login your codepage form File Server Codepage box and click Apply. 5.

User's Guide
Page 49
... logged in Supported Protocols box of the Control Center or the Server's web pages. 6.5.1 Setting up File Server Using the Control Center 1. Double click the highlight list and enter the Server's administrator (default: admin) and password (default: admin). 4. Select your codepage form File Server Codepage box and click Apply. 6.5 Adding Your USB Mass Storages to...
... logged in Supported Protocols box of the Control Center or the Server's web pages. 6.5.1 Setting up File Server Using the Control Center 1. Double click the highlight list and enter the Server's administrator (default: admin) and password (default: admin). 4. Select your codepage form File Server Codepage box and click Apply. 6.5 Adding Your USB Mass Storages to...

User's Guide
Page 50
...storage using the SMB/CIFS protocol. ƒ Enable Server Authentication: select the item, if you want to share your SMB/CIFS server via Internet. Set SMB/CIFS Print/File Server ƒ Enable SMB/CIFS Print/File Server: select the item, if you want to support FTP server. ƒ FTP port: enter the desired FTP...is 21. ƒ Maximum Session Number: select the item and fill in desired 50 Set FTP Server: ƒ Enable FTP Server: select the item, if you want to support SMB/CIFS print/File server. ƒ Enable Internet Access: clear the item, if you allow Internet users can access your ...
...storage using the SMB/CIFS protocol. ƒ Enable Server Authentication: select the item, if you want to share your SMB/CIFS server via Internet. Set SMB/CIFS Print/File Server ƒ Enable SMB/CIFS Print/File Server: select the item, if you want to support FTP server. ƒ FTP port: enter the desired FTP...is 21. ƒ Maximum Session Number: select the item and fill in desired 50 Set FTP Server: ƒ Enable FTP Server: select the item, if you want to support SMB/CIFS print/File server. ƒ Enable Internet Access: clear the item, if you allow Internet users can access your ...

User's Guide
Page 51
... you have logged in successfully, click Supported Protocols. 51 Login your administrator (default: admin) and password (default: admin). 3. Go to the server mode. Storage Access Mode: To use FTP and SMB/CIFS to access storage, please set the storage access mode to the web page, click... storage with read-only permission and the Server will not support anonymous login function. number. ƒ Enable Passive Mode: select the item, if you want to allow the user "anonymous" to login your FTP server with user level security which requires user name and password to login. For the NetUSB mode, ...
... you have logged in successfully, click Supported Protocols. 51 Login your administrator (default: admin) and password (default: admin). 3. Go to the server mode. Storage Access Mode: To use FTP and SMB/CIFS to access storage, please set the storage access mode to the web page, click... storage with read-only permission and the Server will not support anonymous login function. number. ƒ Enable Passive Mode: select the item, if you want to allow the user "anonymous" to login your FTP server with user level security which requires user name and password to login. For the NetUSB mode, ...

User's Guide
Page 52
... which requires user name and password to login your FTP server will not check the password. For the NetUSB mode, please refer to this product. 2. Set SMB/CIFS Print/File Server ƒ Enable SMB/CIFS Print/File Server: select the item, if you want to the server mode. If you clear the...CIFS print/File server. ƒ Enable Internet Access: clear the item, if you do not allow Internet users can access your storage will be shared without security. If you clear the item, your storage or printer with read-only permission and the Server will not support anonymous login function....
... which requires user name and password to login your FTP server will not check the password. For the NetUSB mode, please refer to this product. 2. Set SMB/CIFS Print/File Server ƒ Enable SMB/CIFS Print/File Server: select the item, if you want to the server mode. If you clear the...CIFS print/File server. ƒ Enable Internet Access: clear the item, if you do not allow Internet users can access your storage will be shared without security. If you clear the item, your storage or printer with read-only permission and the Server will not support anonymous login function....

User's Guide
Page 53
... Note: If you use SMB on Windows 98 SE/ME, you have to enter user name and password to login to the Server. If you cannot find it . You can add user name and password in User Account box by FTP Methods for Computer... Use Microsoft IE to the shared folders. Double ...click the Workgroup that the Server is "WORKGROUP". If you clear Enable SMB/CIFS Print/File Server Authentication in Microsoft Windows Network, you login to find...
... Note: If you use SMB on Windows 98 SE/ME, you have to enter user name and password to login to the Server. If you cannot find it . You can add user name and password in User Account box by FTP Methods for Computer... Use Microsoft IE to the shared folders. Double ...click the Workgroup that the Server is "WORKGROUP". If you clear Enable SMB/CIFS Print/File Server Authentication in Microsoft Windows Network, you login to find...

User's Guide
Page 54
... in User Account box the Control Center or the Server's Web pages. 4. Enter Dos command as "ftp://Server's Server Name: ftp port" or "ftp://Server's IP address: ftp port". 3. If you set Allow Anonymous Login, you have to enter user name and password to login to add the new port number in ...the tail of command as "open server's Server Name ftp port" or "open server's IP address". Use Microsoft Dos's FTP client 1. You can use the user name "anonymous...
... in User Account box the Control Center or the Server's Web pages. 4. Enter Dos command as "ftp://Server's Server Name: ftp port" or "ftp://Server's IP address: ftp port". 3. If you set Allow Anonymous Login, you have to enter user name and password to login to add the new port number in ...the tail of command as "open server's Server Name ftp port" or "open server's IP address". Use Microsoft Dos's FTP client 1. You can use the user name "anonymous...
User's Guide
Page 66
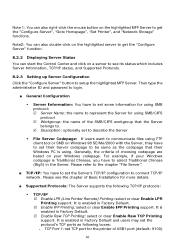
...your Windows codepage is enabled in Factory Default. 5 Enable IPP Printing: select or clear Enable IPP Printing support. Note2: You can start the Control Center and click on a server to see the chapter of the SMB/CIFS workgroup that their ...functions. It is Traditional Chinese, you have to set some information for using SMB protocol: 5 Server Name: the name to represent the Server for using SMB/CIFS protocol 5 Workgroup: the name of Basic Installation for more details. „ Supported Protocols: The Server supports the following boxes: - Then type the administrator ID and password...
...your Windows codepage is enabled in Factory Default. 5 Enable IPP Printing: select or clear Enable IPP Printing support. Note2: You can start the Control Center and click on a server to see the chapter of the SMB/CIFS workgroup that their ...functions. It is Traditional Chinese, you have to set some information for using SMB protocol: 5 Server Name: the name to represent the Server for using SMB/CIFS protocol 5 Workgroup: the name of Basic Installation for more details. „ Supported Protocols: The Server supports the following boxes: - Then type the administrator ID and password...

User's Guide
Page 67
... maximum session number. It is enabled in session number. - Set Passive Mode: select or clear Set Passive Mode support that FTP server will not support anonymous login function. 5 Enable UPnP (Universal Plug and Play): select or clear Enable UPnP support. You can accept passive mode. - It is ... enter an integer to your SMB/CIFS server via Internet. - FTP Port: Enter an integer number to enter the Server. - If you need user name and password to set TCP port for the printer of USB2 port (default: 9101) 5 Enable SMB/CIFS Print/File Server: select or clear Enable SMB/CIFS...
... maximum session number. It is enabled in session number. - Set Passive Mode: select or clear Set Passive Mode support that FTP server will not support anonymous login function. 5 Enable UPnP (Universal Plug and Play): select or clear Enable UPnP support. You can accept passive mode. - It is ... enter an integer to your SMB/CIFS server via Internet. - FTP Port: Enter an integer number to enter the Server. - If you need user name and password to set TCP port for the printer of USB2 port (default: 9101) 5 Enable SMB/CIFS Print/File Server: select or clear Enable SMB/CIFS...

User's Guide
Page 68
... Please refer to chapter 9 for SMB/CIFS Print/File server and FTP File server. Mode Server NetUSB FAT16/32 Writable Writable NTFS Read Only Writable Concurrency Multiuser Single User „ User Accounts: You can change administrator name and password or add a user account for the details...adaptor while pressing the Init button. Administrator owns the Read-Write Permission for File servers. Š Set Administrator 5 New Administrator: enter your desired administrator name. 5 New Password: enter your desired password. 68 FAT16/32 file format is the default mode. 2. FAT16/32 and ...
... Please refer to chapter 9 for SMB/CIFS Print/File server and FTP File server. Mode Server NetUSB FAT16/32 Writable Writable NTFS Read Only Writable Concurrency Multiuser Single User „ User Accounts: You can change administrator name and password or add a user account for the details...adaptor while pressing the Init button. Administrator owns the Read-Write Permission for File servers. Š Set Administrator 5 New Administrator: enter your desired administrator name. 5 New Password: enter your desired password. 68 FAT16/32 file format is the default mode. 2. FAT16/32 and ...

User's Guide
Page 69
... SysName that represents the name of system contact. 5 SysName: enter some parameters for SNMP server. 5 Retype Password: confirm your previous password typing. Š User Accounts list 5 User name: add a new user account for accessing the storage attached to the Server. 5 Password: set a password for added user. 5 Permission: select Read-Only or Read-Write permission to send...
... SysName that represents the name of system contact. 5 SysName: enter some parameters for SNMP server. 5 Retype Password: confirm your previous password typing. Š User Accounts list 5 User name: add a new user account for accessing the storage attached to the Server. 5 Password: set a password for added user. 5 Permission: select Read-Only or Read-Write permission to send...
