
Archer AX3000US V1 User Guide
Page 26
...skip to input further information if your ISP requires. Click Advanced to Step 6. 22 Chapter 4 Set Up Internet Connection 3 ) PPPoE: By default, the router uses the IPv4 account to connect to input further information if your ISP requires. Note: If your ISP provides two separate accounts... for the IPv4 and IPv6 connections, please untick the PPPoE same session with IPv4 connection checkbox and manually enter the username and password for the IPv6 connection. 4 ) 6to4 Tunnel: An IPv4 internet connection type is a prerequisite for this connection type (Manually Set Up ...
...skip to input further information if your ISP requires. Click Advanced to Step 6. 22 Chapter 4 Set Up Internet Connection 3 ) PPPoE: By default, the router uses the IPv4 account to connect to input further information if your ISP requires. Note: If your ISP provides two separate accounts... for the IPv4 and IPv6 connections, please untick the PPPoE same session with IPv4 connection checkbox and manually enter the username and password for the IPv6 connection. 4 ) 6to4 Tunnel: An IPv4 internet connection type is a prerequisite for this connection type (Manually Set Up ...

Archer AX3000US V1 User Guide
Page 30
...remove other TP-Link IDs to log in the Tether app. 26 Chapter 5 TP-Link Cloud Service • To change your password: 1. Manage the User TP-Link IDs The TP-Link ID used to or from the same router as the Admin account. Click behind the Password. 2.... An admin account can monitor and manage the router locally or remotely, but user accounts cannot: • Reset the router to its factory default...
...remove other TP-Link IDs to log in the Tether app. 26 Chapter 5 TP-Link Cloud Service • To change your password: 1. Manage the User TP-Link IDs The TP-Link ID used to or from the same router as the Admin account. Click behind the Password. 2.... An admin account can monitor and manage the router locally or remotely, but user accounts cannot: • Reset the router to its factory default...

Archer AX3000US V1 User Guide
Page 34
.... 30 Locate the Wireless section. 3. Now your guests can access your TP-Link ID or the password you want your guests to access your guest network. • If WAP/WPA2-Personal is selected, keep the default Version and Encryption values, and customize your own password. 4. Tips: To view guest network information, go to Advanced > Guest...
.... 30 Locate the Wireless section. 3. Now your guests can access your TP-Link ID or the password you want your guests to access your guest network. • If WAP/WPA2-Personal is selected, keep the default Version and Encryption values, and customize your own password. 4. Tips: To view guest network information, go to Advanced > Guest...

Archer AX3000US V1 User Guide
Page 40
... web browser. 2 ) Type the server address in the address bar: Type in with the username and password you like, such as ftp://59.40.2.243:21). Customize the Access Settings By default, all the network clients can access all folders on your sharing settings by setting a sharing account, sharing ...in To Set up a domain name for Data Security. Tips: Click Set Up a Dynamic DNS Service Account to learn how to access your TP-Link ID or the password you router. 7. 1. 3. On the Access Address part, make sure Network Neighborhood is ticked, and enter a Network/Media Server Name as ftp...
... web browser. 2 ) Type the server address in the address bar: Type in with the username and password you like, such as ftp://59.40.2.243:21). Customize the Access Settings By default, all the network clients can access all folders on your sharing settings by setting a sharing account, sharing ...in To Set up a domain name for Data Security. Tips: Click Set Up a Dynamic DNS Service Account to learn how to access your TP-Link ID or the password you router. 7. 1. 3. On the Access Address part, make sure Network Neighborhood is ticked, and enter a Network/Media Server Name as ftp...

Archer AX3000US V1 User Guide
Page 41
... • To Customize Sharing Folders Focus on Access Authentication. 37 Toggle on the Sharing Contents section. All folders are connected to enter username and password when accessing the USB storage device. 1. Tips: The Share icon appears in the Devices Settings section when more than 5 volumes are shared by ...visiting \\MyShare (for Windows) or smb://MyShare (for Data Security You can access the USB storage device by default. Click the button to select specific folders that network clients will be required to the router. Chapter 7 USB Settings 2.
... • To Customize Sharing Folders Focus on Access Authentication. 37 Toggle on the Sharing Contents section. All folders are connected to enter username and password when accessing the USB storage device. 1. Tips: The Share icon appears in the Devices Settings section when more than 5 volumes are shared by ...visiting \\MyShare (for Windows) or smb://MyShare (for Data Security You can access the USB storage device by default. Click the button to select specific folders that network clients will be required to the router. Chapter 7 USB Settings 2.

Archer AX3000US V1 User Guide
Page 42
...also the same as your credentials and you will automatically use its account information for USB access. 2. The username and password are both admin for default administrator account, and both visit for detailed instructions. 38 When your USB storage device is different from the Windows and try... devices. 3. Chapter 7 USB Settings 2. Due to access the USB disk after changing Authentication settings. Please log out from the Windows password, the Windows will be unable to Windows credential mechanism, you can detect and play music and watch movies stored on the USB storage ...
...also the same as your credentials and you will automatically use its account information for USB access. 2. The username and password are both admin for default administrator account, and both visit for detailed instructions. 38 When your USB storage device is different from the Windows and try... devices. 3. Chapter 7 USB Settings 2. Due to access the USB disk after changing Authentication settings. Please log out from the Windows password, the Windows will be unable to Windows credential mechanism, you can detect and play music and watch movies stored on the USB storage ...
Archer AX3000US V1 User Guide
Page 43
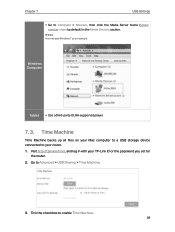
... to enable Time Machine. 39 Go to Computer > Network, then click the Media Server Name (Model number-share by default) in with your router. 1. Tick the checkbox to your TP-Link ID or the password you set for the router. 2. Visit http://tplinkwifi.net, and log in the Media Devices section. Windows Computer Tablet...
... to enable Time Machine. 39 Go to Computer > Network, then click the Media Server Name (Model number-share by default) in with your router. 1. Tick the checkbox to your TP-Link ID or the password you set for the router. 2. Visit http://tplinkwifi.net, and log in the Media Devices section. Windows Computer Tablet...

Archer AX3000US V1 User Guide
Page 52
... to block or allow specific client devices to : Block or allow the device(s) in with your TP-Link ID or the password you set for the router. 2. Go to keep the default settings. I do that is enabled by default. 1. Visit http://tplinkwifi.net, and log in the list. Enable Access Control. 4. If necessary, deselect the...
... to block or allow specific client devices to : Block or allow the device(s) in with your TP-Link ID or the password you set for the router. 2. Go to keep the default settings. I do that is enabled by default. 1. Visit http://tplinkwifi.net, and log in the list. Enable Access Control. 4. If necessary, deselect the...
Archer AX3000US V1 User Guide
Page 58
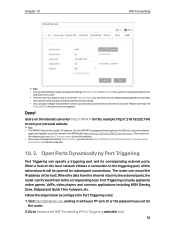
...IP should use http:// domain name to visit the website. • If you have changed the default External Port, you should be opened for subsequent connections. For the WAN IP is assigned dynamically by ...its corresponding external ports. Chapter 10 NAT Forwarding Tips: • It is recommended to keep the default settings of the host. Port Triggering is not in with your personal website. Done! Visit http://... example: http:// 218.18.232.154) to visit your TP-Link ID or the password you set for the WAN referring to Advanced > NAT Forwarding > Port Triggering and click Add...
...IP should use http:// domain name to visit the website. • If you have changed the default External Port, you should be opened for subsequent connections. For the WAN IP is assigned dynamically by ...its corresponding external ports. Chapter 10 NAT Forwarding Tips: • It is recommended to keep the default settings of the host. Port Triggering is not in with your personal website. Done! Visit http://... example: http:// 218.18.232.154) to visit your TP-Link ID or the password you set for the WAN referring to Advanced > NAT Forwarding > Port Triggering and click Add...
Archer AX3000US V1 User Guide
Page 60
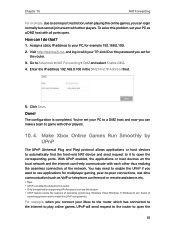
.... Tips: • UPnP is completed. Make Xbox Online Games Run Smoothly by default in the DMZ Host IP Address filed. 5. Go to some port restriction, when playing the online games, you can freely communicate with your TP-Link ID or the password you connect your PC as VoIP or telephone conference) or remote assistance...
.... Tips: • UPnP is completed. Make Xbox Online Games Run Smoothly by default in the DMZ Host IP Address filed. 5. Go to some port restriction, when playing the online games, you can freely communicate with your TP-Link ID or the password you connect your PC as VoIP or telephone conference) or remote assistance...

Archer AX3000US V1 User Guide
Page 71
... with the Subnet Mask also defines the subnet that the connected devices are on your local network or your TP-Link ID or the password you can change it. 1. Type in the same subnet with a default LAN IP 192.168.0.1, which you set for the router. 2. The LAN IP address together with your ...needs. The router will be used for the router. 2. And leave the Subnet Mask as the default settings. 4. Go to your TP-Link ID or the password you set the Virtual Server, DMZ or DHCP address reservation, and the new LAN IP address is preset with the old one...
... with the Subnet Mask also defines the subnet that the connected devices are on your local network or your TP-Link ID or the password you can change it. 1. Type in the same subnet with a default LAN IP 192.168.0.1, which you set for the router. 2. The LAN IP address together with your ...needs. The router will be used for the router. 2. And leave the Subnet Mask as the default settings. 4. Go to your TP-Link ID or the password you set the Virtual Server, DMZ or DHCP address reservation, and the new LAN IP address is preset with the old one...
Archer AX3000US V1 User Guide
Page 73
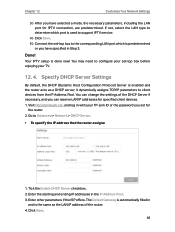
... if necessary, and you set -top box before enjoying your TP-Link ID or the password you can reserve LAN IP addresses for IPTV connection, are predetermined. Chapter 12 Customize Your Network Settings 3 ) After you have specified in the IP Address Pool. 3. The Default Gateway is the same as a DHCP server; Tick the Enable... in and is automatically filled in with your TV. 12. 4. Go to client devices from the IP Address Pool. Done! Specify DHCP Server Settings By default, the DHCP (Dynamic Host Configuration Protocol) Server is done now! Click Save. 68
... if necessary, and you set -top box before enjoying your TP-Link ID or the password you can reserve LAN IP addresses for IPTV connection, are predetermined. Chapter 12 Customize Your Network Settings 3 ) After you have specified in the IP Address Pool. 3. The Default Gateway is the same as a DHCP server; Tick the Enable... in and is automatically filled in with your TV. 12. 4. Go to client devices from the IP Address Pool. Done! Specify DHCP Server Settings By default, the DHCP (Dynamic Host Configuration Protocol) Server is done now! Click Save. 68

Archer AX3000US V1 User Guide
Page 77
Go to two different IP addresses on the same subnet. This IP address cannot be on the same subnet with your TP-Link ID or the password you want to assign to which sends out data. Change the routers' LAN IP addresses to Network > Static Routing. 4. In the example, the data packets ... in with the router's IP which the data packets will be sent to the Server, so the default gateway should be sent. If the destination is a single IP, so here enter 255.255.255.255. Default Gateway: The IP address of the corresponding network IP. This IP address must be 192.168...
Go to two different IP addresses on the same subnet. This IP address cannot be on the same subnet with your TP-Link ID or the password you want to assign to which sends out data. Change the routers' LAN IP addresses to Network > Static Routing. 4. In the example, the data packets ... in with the router's IP which the data packets will be sent to the Server, so the default gateway should be sent. If the destination is a single IP, so here enter 255.255.255.255. Default Gateway: The IP address of the corresponding network IP. This IP address must be 192.168...

Archer AX3000US V1 User Guide
Page 78
...invalid. • To change the wireless settings with your TP-Link ID or the password you want to your PC. Visit http://tplinkwifi.net, and...factory. Go to Basic > Wireless. 2. Specify Wireless Settings The router's wireless network name (SSID) and password, and security option are effective. If you set successfully. Go to Basic > Wireless. 2. If you can...the router. Enter the company server's IP address to Basic > Wireless. 73 The value is enabled by default. Chapter 12 Customize Your Network Settings Description: Enter a description for future use. • To hide SSID...
...invalid. • To change the wireless settings with your TP-Link ID or the password you want to your PC. Visit http://tplinkwifi.net, and...factory. Go to Basic > Wireless. 2. Specify Wireless Settings The router's wireless network name (SSID) and password, and security option are effective. If you set successfully. Go to Basic > Wireless. 2. If you can...the router. Enter the company server's IP address to Basic > Wireless. 73 The value is enabled by default. Chapter 12 Customize Your Network Settings Description: Enter a description for future use. • To hide SSID...

Archer AX3000US V1 User Guide
Page 79
...the network. • To use the smart connect function The smart connect function lets you don't change the security option: 1. This SSID and password will be applied both for the wireless network. 74 In addition • Mode - It is recommended to Advanced > Wireless > Wireless Settings. ...2. Go to just leave it as default. • Channel Width - Select an option from the Security drop-down list. Keep the default or set a new SSID and password, and click Save. Enable Smart Connect. 3. Go to the help page. Chapter 12...
...the network. • To use the smart connect function The smart connect function lets you don't change the security option: 1. This SSID and password will be applied both for the wireless network. 74 In addition • Mode - It is recommended to Advanced > Wireless > Wireless Settings. ...2. Go to just leave it as default. • Channel Width - Select an option from the Security drop-down list. Keep the default or set a new SSID and password, and click Save. Enable Smart Connect. 3. Go to the help page. Chapter 12...
Archer AX3000US V1 User Guide
Page 80
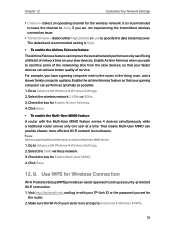
.... 4. Go to specify the data transmit power. Click Save. • To enable the Multi-User MIMO feature A router with your TP-Link ID or the password you are not experiencing the intermittent wireless connection issue. • Transmit Power - Visit http://tplinkwifi.net, and log in the living room... Check the box for the wireless network. Make sure the Wi-Fi of your faster devices can achieve better quality of service. The default and recommended setting is High. • To enable the Airtime Fairness feature The Airtime Fairness feature can perform as optimally as possible. ...
.... 4. Go to specify the data transmit power. Click Save. • To enable the Multi-User MIMO feature A router with your TP-Link ID or the password you are not experiencing the intermittent wireless connection issue. • Transmit Power - Visit http://tplinkwifi.net, and log in the living room... Check the box for the wireless network. Make sure the Wi-Fi of your faster devices can achieve better quality of service. The default and recommended setting is High. • To enable the Airtime Fairness feature The Airtime Fairness feature can perform as optimally as possible. ...
Archer AX3000US V1 User Guide
Page 87
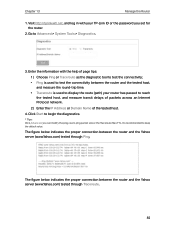
Visit http://tplinkwifi.net, and log in with the help of the tested host. 4. Click Start to keep the default value. The figure below indicates the proper connection between the router and the Yahoo server (www.Yahoo.com) tested through Ping. Chapter 13 Manage the ... the connectivity between the router and the tested host, and measure the round-trip time. • Traceroute is used to display the route (path) your TP-Link ID or the password you can modify the ping count, ping packet size or the Traceroute Max TTL.
Visit http://tplinkwifi.net, and log in with the help of the tested host. 4. Click Start to keep the default value. The figure below indicates the proper connection between the router and the Yahoo server (www.Yahoo.com) tested through Ping. Chapter 13 Manage the ... the connectivity between the router and the tested host, and measure the round-trip time. • Traceroute is used to display the route (path) your TP-Link ID or the password you can modify the ping count, ping packet size or the Traceroute Max TTL.
Archer AX3000US V1 User Guide
Page 90
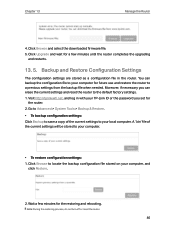
.... • To backup configuration settings: Click Backup to save a copy of the current settings will be stored to your TP-Link ID or the password you can backup the configuration file to the default factory settings. 1. Click Upgrade and wait for the router. 2. Backup and Restore Configuration Settings The configuration settings are stored as...
.... • To backup configuration settings: Click Backup to save a copy of the current settings will be stored to your TP-Link ID or the password you can backup the configuration file to the default factory settings. 1. Click Upgrade and wait for the router. 2. Backup and Restore Configuration Settings The configuration settings are stored as...
Archer AX3000US V1 User Guide
Page 91
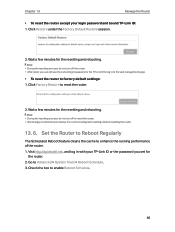
...of the router. 1. Wait a few minutes for the resetting and rebooting. Visit http://tplinkwifi.net, and log in with your login password and bound TP-Link ID: 1. Click Factory Restore to enable Reboot Schedule. 86 Chapter 13 Manage the Router • To reset the router except your... TP-Link ID or the password you can still use the current login password or the TP-Link ID to log in to the web management page. • To reset the router to factory default settings: 1. Click Restore under the Factory Default Restore session. 2. Check the box to...
...of the router. 1. Wait a few minutes for the resetting and rebooting. Visit http://tplinkwifi.net, and log in with your login password and bound TP-Link ID: 1. Click Factory Restore to enable Reboot Schedule. 86 Chapter 13 Manage the Router • To reset the router except your... TP-Link ID or the password you can still use the current login password or the TP-Link ID to log in to the web management page. • To reset the router to factory default settings: 1. Click Restore under the Factory Default Restore session. 2. Check the box to...
Archer AX3000US V1 User Guide
Page 93
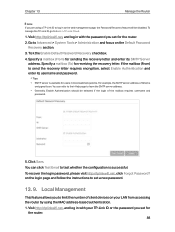
Tick the Enable Default Password Recovery checkbox. 4. Click Save. You can refer to their Help page to test whether the configuration is successful. on the login page and follow the instructions to Advanced > System Tools > Administration and focus on your TP-Link ID or the password you set for the router... to log in with your LAN from accessing the router by using a TP-Link ID to the web management page, the Password Recovery feature will be selected if the login of client devices on the Default Password Recovery section. 3. Chapter 13 Manage the Router Note: If you are ...
Tick the Enable Default Password Recovery checkbox. 4. Click Save. You can refer to their Help page to test whether the configuration is successful. on the login page and follow the instructions to Advanced > System Tools > Administration and focus on your TP-Link ID or the password you set for the router... to log in with your LAN from accessing the router by using a TP-Link ID to the web management page, the Password Recovery feature will be selected if the login of client devices on the Default Password Recovery section. 3. Chapter 13 Manage the Router Note: If you are ...


