
Recording Guide for Filmmakers and DSLR Cameras
Page 1
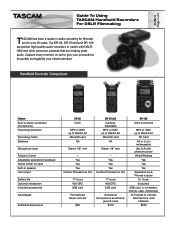
.../24-bit MicroSD card AA Stereo 1/8" mini - Our DR-05, DR-07mkII and DR-100 are perfect high-quality audio recorders to 96k/24-bit MicroSD card AA Stereo 1/8" mini - Handheld Recorder Comparison Feature Built-in stereo condenser microphones Recording resolution Recording media Batteries Microphone input Remote Control Adjustable speed/pitch playback Stereo limiter on -set to connect external mics, dual batteries $329 Yes Yes Yes Combo Phones/Line Out 17 hours WS-DR2 2GB card Full-featured stereo recorder $99 DR-07mkII Cardioid, adjustable MP3 or WAV...
.../24-bit MicroSD card AA Stereo 1/8" mini - Our DR-05, DR-07mkII and DR-100 are perfect high-quality audio recorders to 96k/24-bit MicroSD card AA Stereo 1/8" mini - Handheld Recorder Comparison Feature Built-in stereo condenser microphones Recording resolution Recording media Batteries Microphone input Remote Control Adjustable speed/pitch playback Stereo limiter on -set to connect external mics, dual batteries $329 Yes Yes Yes Combo Phones/Line Out 17 hours WS-DR2 2GB card Full-featured stereo recorder $99 DR-07mkII Cardioid, adjustable MP3 or WAV...
DR-05 & DR-07mkII tested media list
Page 1
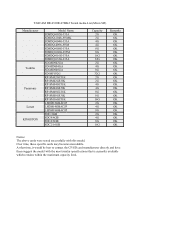
At that time, it would be best to contact the CF/SD card manufacturer directly and have them suggest the model with this model. TASCAM DR-05/DR-07MK2 Tested media List (Micro SD) Manufacturer Toshiba Panasonic Lexar KINGSTON Model Name SDSDQ-002G-J35A SDSDQ-2048-J95MK SDSDQ-004G-J35A SDSDQ-4096-J95M SDSDQ-008G-J35A ...OK OK OK OK OK OK OK OK OK OK OK OK OK OK OK OK OK OK Notice: The above cards were tested successfully with the most similar specifications that is currently available which remains within the maximum capacity limit. Over time, these specific cards may become unavailable.
At that time, it would be best to contact the CF/SD card manufacturer directly and have them suggest the model with this model. TASCAM DR-05/DR-07MK2 Tested media List (Micro SD) Manufacturer Toshiba Panasonic Lexar KINGSTON Model Name SDSDQ-002G-J35A SDSDQ-2048-J95MK SDSDQ-004G-J35A SDSDQ-4096-J95M SDSDQ-008G-J35A ...OK OK OK OK OK OK OK OK OK OK OK OK OK OK OK OK OK OK Notice: The above cards were tested successfully with the most similar specifications that is currently available which remains within the maximum capacity limit. Over time, these specific cards may become unavailable.

DR-07mkII version 1.01 release notes
Page 1
... on the screen. No Update File appears if there is no need to update it. The unit starts up in update mode, and the update file appears on and operating, the Auto Record function would not occur in some cases. Use the file without the "._" at Step 3 above. The actual display differs. DR-07@# Release Notes Updates Always use the included USB cable to connect it with "._" added to the beginning of the firmware name...
... on the screen. No Update File appears if there is no need to update it. The unit starts up in update mode, and the update file appears on and operating, the Auto Record function would not occur in some cases. Use the file without the "._" at Step 3 above. The actual display differs. DR-07@# Release Notes Updates Always use the included USB cable to connect it with "._" added to the beginning of the firmware name...

DR-07mkII Owner's Manual
Page 7
... 27 Bottom Panel 28 Home Screen 29 Recording Screen 32 Playback Control screen 34 Menu item list 35 Using menus 36 Basic operation 37 3-Preparation 38 Powering the unit 38 Using AA batteries 38 Using an AC adaptor (sold separately).........38 Using USB bus power 39 Start-up & shutdown 40 Starting up the unit 40 Shutting down 41 Resume function 41 Setting the date and time 42 Inserting and removing microSD cards.......43 Inserting the microSD...
... 27 Bottom Panel 28 Home Screen 29 Recording Screen 32 Playback Control screen 34 Menu item list 35 Using menus 36 Basic operation 37 3-Preparation 38 Powering the unit 38 Using AA batteries 38 Using an AC adaptor (sold separately).........38 Using USB bus power 39 Start-up & shutdown 40 Starting up the unit 40 Shutting down 41 Resume function 41 Setting the date and time 42 Inserting and removing microSD cards.......43 Inserting the microSD...

DR-07mkII Owner's Manual
Page 8
... the unit and making connections......54 Recording with the built-in mics 54 Recording with external mics (MIC IN)........54 Recording an external device (EXT IN)........54 Adjusting the input level 55 Manually adjusting the input level 55 Using the Level Control Function 57 Recording 59 Recording playback and input sounds together (overdubbing 60 Select the file you want to overdub 61 Selecting file format 61 Simultaneous listening to playback and input sound (Monitor Mix 62 Adjusting the input level (simple adjustment 63 Start the overdubbing 65 Recording automatically (AUTO REC...
... the unit and making connections......54 Recording with the built-in mics 54 Recording with external mics (MIC IN)........54 Recording an external device (EXT IN)........54 Adjusting the input level 55 Manually adjusting the input level 55 Using the Level Control Function 57 Recording 59 Recording playback and input sounds together (overdubbing 60 Select the file you want to overdub 61 Selecting file format 61 Simultaneous listening to playback and input sound (Monitor Mix 62 Adjusting the input level (simple adjustment 63 Start the overdubbing 65 Recording automatically (AUTO REC...

DR-07mkII Owner's Manual
Page 9
... Selecting files for playback (skip 87 Playback 87 Pausing 87 Stopping 87 Rewinding and fast-forwarding (search)....88 Repeat playback (REPEAT 88 Special Playback Control Functions 89 Playback Control Screen 89 Repeated Playback of Selection (Loop Playback 90 Changing the playback speed (VSA 91 Using the playback equalizer (PLAY EQ)...... 92 Moving back a few seconds for replay (jump-back playback 93 7-Quick Operations 94 Features of the QUICK button 94 Quick menu screen 95 Closing the Quick menu screen 97 Deleting the selected file (Quick Delete...
... Selecting files for playback (skip 87 Playback 87 Pausing 87 Stopping 87 Rewinding and fast-forwarding (search)....88 Repeat playback (REPEAT 88 Special Playback Control Functions 89 Playback Control Screen 89 Repeated Playback of Selection (Loop Playback 90 Changing the playback speed (VSA 91 Using the playback equalizer (PLAY EQ)...... 92 Moving back a few seconds for replay (jump-back playback 93 7-Quick Operations 94 Features of the QUICK button 94 Quick menu screen 95 Closing the Quick menu screen 97 Deleting the selected file (Quick Delete...
DR-07mkII Owner's Manual
Page 14
... audio recorder that you will enjoy using this recorder for many years to be used during recording and playback • Auto-record function starts recording automatically when a set sound input level is detected • Can start recording a new file automatically when a maximum file size set in advance is reached without interrupting recording 14 TASCAM DR-07MKII We hope that uses microSD/ microSDHC cards as a new file • Built-in 0.3 W monaural output speaker • Built-in effect (reverb) can also download the Owner's Manual...
... audio recorder that you will enjoy using this recorder for many years to be used during recording and playback • Auto-record function starts recording automatically when a set sound input level is detected • Can start recording a new file automatically when a maximum file size set in advance is reached without interrupting recording 14 TASCAM DR-07MKII We hope that uses microSD/ microSDHC cards as a new file • Built-in 0.3 W monaural output speaker • Built-in effect (reverb) can also download the Owner's Manual...

DR-07mkII Owner's Manual
Page 15
... settings screens for playback speed control and IN-OUT loop • Tuner function to tune musical instruments • Self-timer function to start recording after a set period of time. • Jump back and play function allows the last several seconds of the currently played file to be replayed again by simply pressing a button • REC DELAY function can be used to avoid recording the sound of pressing the RECORD button • Playlist function • DIVIDE function allows files...
... settings screens for playback speed control and IN-OUT loop • Tuner function to tune musical instruments • Self-timer function to start recording after a set period of time. • Jump back and play function allows the last several seconds of the currently played file to be replayed again by simply pressing a button • REC DELAY function can be used to avoid recording the sound of pressing the RECORD button • Playlist function • DIVIDE function allows files...

DR-07mkII Owner's Manual
Page 23
... to turn the unit's power ON or OFF. 5 + button When the Home or TUNER screen is stopped at its beginning, the unit will be displayed in speaker or / LINE OUT jack. When the IN and OUT points are set in the track and the Playback Control screen is displayed, press this button to the previous mark. Press this button to return to open , use the button to change the setting of the selected item. 6 MENU button...
... to turn the unit's power ON or OFF. 5 + button When the Home or TUNER screen is stopped at its beginning, the unit will be displayed in speaker or / LINE OUT jack. When the IN and OUT points are set in the track and the Playback Control screen is displayed, press this button to the previous mark. Press this button to return to open , use the button to change the setting of the selected item. 6 MENU button...

DR-07mkII Owner's Manual
Page 25
... end of the track, pressing this button to start playback. Press this button to display the Quick Menu screen. 2-Names and Functions of Parts w QUICK button When playing back, stopped, paused or in recording standby in the Home Screen or when the Playback Control screen is displayed, press this button during playback or when playback is stopped to skip to beginning of the unit when the button is pressed. • Stopped: delete, division, or level alignment for file/folder operations. Press this button to be shown...
... end of the track, pressing this button to start playback. Press this button to display the Quick Menu screen. 2-Names and Functions of Parts w QUICK button When playing back, stopped, paused or in recording standby in the Home Screen or when the Playback Control screen is displayed, press this button during playback or when playback is stopped to skip to beginning of the unit when the button is pressed. • Stopped: delete, division, or level alignment for file/folder operations. Press this button to be shown...

DR-07mkII Owner's Manual
Page 33
...: seconds. TASCAM DR-07MKII 33 If the remaining recording time on the card is less than the remaining time until the selected max file size is reached appears in decibels (dB) Peak recording level values are shown on the card is reached, the remaining recording time on the display to indicate that the input level can be given to display the pull-up window that will automatically be changed using these buttons.
...: seconds. TASCAM DR-07MKII 33 If the remaining recording time on the card is less than the remaining time until the selected max file size is reached appears in decibels (dB) Peak recording level values are shown on the card is reached, the remaining recording time on the display to indicate that the input level can be given to display the pull-up window that will automatically be changed using these buttons.

DR-07mkII Owner's Manual
Page 52
..., 512M, 1G, 2G(default) NOTE • If the maximum set file size is exceeded during recording, the unit will automatically continue recording in a new file. • Depending on the file format, the amount of the setting value (in parentheses). • Recording automatically stops if recording time exceeds 24 hours. 10 Press the (HOME) [ª] button to return to the Home Screen. 52 TASCAM DR-07MKII Set where to select REC SETTING, and press the...
..., 512M, 1G, 2G(default) NOTE • If the maximum set file size is exceeded during recording, the unit will automatically continue recording in a new file. • Depending on the file format, the amount of the setting value (in parentheses). • Recording automatically stops if recording time exceeds 24 hours. 10 Press the (HOME) [ª] button to return to the Home Screen. 52 TASCAM DR-07MKII Set where to select REC SETTING, and press the...

DR-07mkII Owner's Manual
Page 53
... factory default is OFF, but you are made in battery. If set this to select the following input settings are recording with a built-in this unit as offensive wind noise from the speakers may also be set when recording/in power may damage such microphones. • Use headphones to monitor, the sound TASCAM DR-07MKII 53 Use the built-in effects of the low cut filter. Use the  or ¯ button...
... factory default is OFF, but you are made in battery. If set this to select the following input settings are recording with a built-in this unit as offensive wind noise from the speakers may also be set when recording/in power may damage such microphones. • Use headphones to monitor, the sound TASCAM DR-07MKII 53 Use the built-in effects of the low cut filter. Use the  or ¯ button...

DR-07mkII Owner's Manual
Page 54
... external audio device with external mics (MIC IN) Connect an external mic to the MIC/EXT IN connector. Other audio equipment or external sound source CAUTION • Reduce the output level of excessively large input signals. 4-Recording Placing the unit and making connections Recording with the built-in mics Point the mics at the sound source and place the unit in a stable location where there is connected to the MIC/EXT IN jack. 54 TASCAM DR-07MKII Recording an external device (EXT IN) Use a stereo miniplug cable to connect...
... external audio device with external mics (MIC IN) Connect an external mic to the MIC/EXT IN connector. Other audio equipment or external sound source CAUTION • Reduce the output level of excessively large input signals. 4-Recording Placing the unit and making connections Recording with the built-in mics Point the mics at the sound source and place the unit in a stable location where there is connected to the MIC/EXT IN jack. 54 TASCAM DR-07MKII Recording an external device (EXT IN) Use a stereo miniplug cable to connect...

DR-07mkII Owner's Manual
Page 58
... actual recording. TIP When recording live performances with large volume changes. Recording will continue to be raised manually if required. Select the peak reduction mode in the peak reduction mode. This allows recording level setting to be changed manually. Otherwise, the recording level will be performed before starting recording. In such a case, lower the recording level or keep proper distance between the unit and the source. 58 TASCAM DR-07MKII In this mode, the recording level...
... actual recording. TIP When recording live performances with large volume changes. Recording will continue to be raised manually if required. Select the peak reduction mode in the peak reduction mode. This allows recording level setting to be changed manually. Otherwise, the recording level will be performed before starting recording. In such a case, lower the recording level or keep proper distance between the unit and the source. 58 TASCAM DR-07MKII In this mode, the recording level...

DR-07mkII Owner's Manual
Page 69
... be displayed as that of files and folders would be the same as 23:59:59. NOTE For the same file size, the possible recording time differs depending on the file type selected. TASCAM DR-07MKII 69 Use the + or − button to the Home Screen. REC SETTINGscreen appears. 3 Use the + or − button to select REC SETTING, and press the Á button. Furthermore, if the recording time is exceeded. 1 Press the MENU button to...
... be displayed as that of files and folders would be the same as 23:59:59. NOTE For the same file size, the possible recording time differs depending on the file type selected. TASCAM DR-07MKII 69 Use the + or − button to the Home Screen. REC SETTINGscreen appears. 3 Use the + or − button to select REC SETTING, and press the Á button. Furthermore, if the recording time is exceeded. 1 Press the MENU button to...

DR-07mkII Owner's Manual
Page 83
The display returns to the Home Screen, and the selected track starts playing. In addition, the folder that contains this folder. TASCAM DR-07MKII 83 For an explanation of the playback area folder set to FOLDER, if you want to play. A file list of the folder that contains the file selected in this track becomes the playback area regardless of how to use the + or − button to select the folder that contains the track (file) you...
The display returns to the Home Screen, and the selected track starts playing. In addition, the folder that contains this folder. TASCAM DR-07MKII 83 For an explanation of the playback area folder set to FOLDER, if you want to play. A file list of the folder that contains the file selected in this track becomes the playback area regardless of how to use the + or − button to select the folder that contains the track (file) you...

DR-07mkII Owner's Manual
Page 88
... playback one time. (This setting is the ordinary playback mode.) SINGLE: The selected track is played repeatedly. CONTINUOUS (default): All tracks in the playback area are played in the selected playback area are played back repeatedly. The icon appears on the Home Screen. PLAY SETTINGscreen appears. 3 Use the + or − button to select REPEAT, and press the ¯ or Á button. 88 TASCAM DR-07MKII 4 Use the + or − button to accelerate the search speed...
... playback one time. (This setting is the ordinary playback mode.) SINGLE: The selected track is played repeatedly. CONTINUOUS (default): All tracks in the playback area are played in the selected playback area are played back repeatedly. The icon appears on the Home Screen. PLAY SETTINGscreen appears. 3 Use the + or − button to select REPEAT, and press the ¯ or Á button. 88 TASCAM DR-07MKII 4 Use the + or − button to accelerate the search speed...

DR-07mkII Owner's Manual
Page 94
... the Quick menu screen for deletion, division, and level alignment (enhancing the perceived overall sound pressure) of the current track. 7-Quick Operations Features of the QUICK button The QUICK button serves for the following purposes. • While the Home Screen is open during recording, track increment occurs to work with a selected file or folder appears if the BROWSEscreen or the PLAYLISTscreen is open. • Switches CALIBand INPUTLEVELon the TUNER screen. 94 TASCAM DR-07MKII NOTE The QUICK button...
... the Quick menu screen for deletion, division, and level alignment (enhancing the perceived overall sound pressure) of the current track. 7-Quick Operations Features of the QUICK button The QUICK button serves for the following purposes. • While the Home Screen is open during recording, track increment occurs to work with a selected file or folder appears if the BROWSEscreen or the PLAYLISTscreen is open. • Switches CALIBand INPUTLEVELon the TUNER screen. 94 TASCAM DR-07MKII NOTE The QUICK button...

DR-07mkII Owner's Manual
Page 117
... USB cable (if used for USB bus power supply) is firmly connected. • Confirm that the USB cable (if used for USB bus power supply) is not connected via a USB hub. ªª The unit does not function. • Confirm that the HOLD switch is not set in the direction of the monitoring system minimized? TASCAM DR-07MKII 117 If these measures do not work . • If you are trying to play a WAV file...
... USB cable (if used for USB bus power supply) is firmly connected. • Confirm that the USB cable (if used for USB bus power supply) is not connected via a USB hub. ªª The unit does not function. • Confirm that the HOLD switch is not set in the direction of the monitoring system minimized? TASCAM DR-07MKII 117 If these measures do not work . • If you are trying to play a WAV file...


