

100 SS-R200 SS-CDR200 Owners Manual
Page 2
... radiate radio frequency energy and, if not installed and used in the equipment. (d) The Waste Electrical and Electronic Equipment (WEEE) symbol, which case the user will help save valuable resources and prevent any potential negative effects on the rear panel. NO USER-SERVICEABLE PARTS INSIDE. Please record the model number and serial number and retain them for compliance could void the user's authority to persons...
... radiate radio frequency energy and, if not installed and used in the equipment. (d) The Waste Electrical and Electronic Equipment (WEEE) symbol, which case the user will help save valuable resources and prevent any potential negative effects on the rear panel. NO USER-SERVICEABLE PARTS INSIDE. Please record the model number and serial number and retain them for compliance could void the user's authority to persons...

100 SS-R200 SS-CDR200 Owners Manual
Page 6
... of discs 11 User registration 11 2 − Names and functions of parts 12 Front panel 12 Rear panel 15 TASCAM RC-SS2 wired remote control 16 Home Screen 17 Home Screen FUNCTION status display 18 Recording Screen 19 Recording Screen FUNCTION status display ....19 Menu structure 20 Menu operation basics 21 Menu operation procedures 21 3 − Preparations 23 Making connections 23 Turning the power ON/OFF 24 Setting the date and time 24 Adjusting the display 24 Adjusting the display contrast 24 Adjusting the display and indicator brightness...
... of discs 11 User registration 11 2 − Names and functions of parts 12 Front panel 12 Rear panel 15 TASCAM RC-SS2 wired remote control 16 Home Screen 17 Home Screen FUNCTION status display 18 Recording Screen 19 Recording Screen FUNCTION status display ....19 Menu structure 20 Menu operation basics 21 Menu operation procedures 21 3 − Preparations 23 Making connections 23 Turning the power ON/OFF 24 Setting the date and time 24 Adjusting the display 24 Adjusting the display contrast 24 Adjusting the display and indicator brightness...
100 SS-R200 SS-CDR200 Owners Manual
Page 7
... 14 − Using control I/O (SS-CDR200/SS-R200 only 76 Using the RS-232C connector 76 Using the parallel connector 76 15 − Message list 78 Error messages 78 Warning messages 78 Operation messages 79 16 − Troubleshooting 80 17 − Specifications 81 Media and file formats 81 Inputs and outputs 81 Analog audio inputs and outputs 81 Digital audio inputs and outputs 81 Control inputs and outputs 81 Audio performance 81 Backup memory 82 General 82 Dimensional drawings 83 TASCAM SS-CDR200/SS-R200/SS-R100 7
... 14 − Using control I/O (SS-CDR200/SS-R200 only 76 Using the RS-232C connector 76 Using the parallel connector 76 15 − Message list 78 Error messages 78 Warning messages 78 Operation messages 79 16 − Troubleshooting 80 17 − Specifications 81 Media and file formats 81 Inputs and outputs 81 Analog audio inputs and outputs 81 Digital audio inputs and outputs 81 Control inputs and outputs 81 Audio performance 81 Backup memory 82 General 82 Dimensional drawings 83 TASCAM SS-CDR200/SS-R200/SS-R100 7
100 SS-R200 SS-CDR200 Owners Manual
Page 8
... digital audio inputs and outputs • Included wired remote control allow reliable remote operation • Control and character input using this manual so that you can be downloaded from the SS-CDR200. We hope that you understand correct operating procedures and can also be set as desired using TASCAM RC-20 Direct Play Remote (sold separately) • Flash start function enables instant playback starting • Pitch control, key control and other parts on the main unit and external devices are indicated like this: HOME/ DISPLAY...
... digital audio inputs and outputs • Included wired remote control allow reliable remote operation • Control and character input using this manual so that you can be downloaded from the SS-CDR200. We hope that you understand correct operating procedures and can also be set as desired using TASCAM RC-20 Direct Play Remote (sold separately) • Flash start function enables instant playback starting • Pitch control, key control and other parts on the main unit and external devices are indicated like this: HOME/ DISPLAY...

100 SS-R200 SS-CDR200 Owners Manual
Page 9
..., contact your unauthorized recording, reproduction or distribution thereof may result in revenue-generating broadcast systems (terrestrial, satellite, cable and/or other distribution channels), streaming applications (via Internet, intranets and/or other networks), other content distribution systems (pay-audio or audio-on-demand applications and the like) or on physical media (compact discs, digital versatile discs, semiconductor chips, hard drives, memory cards and the like...
..., contact your unauthorized recording, reproduction or distribution thereof may result in revenue-generating broadcast systems (terrestrial, satellite, cable and/or other distribution channels), streaming applications (via Internet, intranets and/or other networks), other content distribution systems (pay-audio or audio-on-demand applications and the like) or on physical media (compact discs, digital versatile discs, semiconductor chips, hard drives, memory cards and the like...

100 SS-R200 SS-CDR200 Owners Manual
Page 12
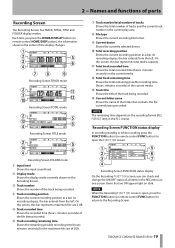
... mode FOLDER mode 6 MENU [JOG] button Press this to return to select the current folder. After a disc is inserted part way, it will automatically be pulled in recording standby to the Home Screen. Press when the Home Screen is open to search backward while outputting sound. Press this button again to return to the Home Screen. 12 TASCAM SS-CDR200/SS-R200/SS-R100 Press this button while pressing and holding the SHIFT button to start A-B repeat playback mode...
... mode FOLDER mode 6 MENU [JOG] button Press this to return to select the current folder. After a disc is inserted part way, it will automatically be pulled in recording standby to the Home Screen. Press when the Home Screen is open to search backward while outputting sound. Press this button again to return to the Home Screen. 12 TASCAM SS-CDR200/SS-R200/SS-R100 Press this button while pressing and holding the SHIFT button to start A-B repeat playback mode...

100 SS-R200 SS-CDR200 Owners Manual
Page 13
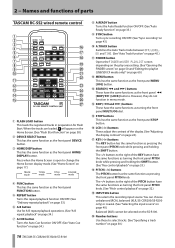
... button to erase the character at the cursor position. 0 , [LOCK] button During playback or when in menu mode, use to connect stereo headphones. CAUTION Before connecting headphones, minimize the volume with this button when the Home Screen is open to open the FUNCTION screen. r REMOTE jack (2.5 mm dia TRS) Connect a TASCAM RC-3F footswitch or TASCAM RC-20 Direct Play Remote control (both as a dial and as a button. [Dial functions] When the Home Screen is open, turn ON/OFF the panel lock function...
... button to erase the character at the cursor position. 0 , [LOCK] button During playback or when in menu mode, use to connect stereo headphones. CAUTION Before connecting headphones, minimize the volume with this button when the Home Screen is open to open the FUNCTION screen. r REMOTE jack (2.5 mm dia TRS) Connect a TASCAM RC-3F footswitch or TASCAM RC-20 Direct Play Remote control (both as a dial and as a button. [Dial functions] When the Home Screen is open, turn ON/OFF the panel lock function...
100 SS-R200 SS-CDR200 Owners Manual
Page 16
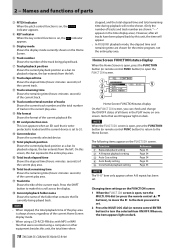
... TASCAM SS-CDR200/SS-R200/SS-R100 8 A.READY button Turns the Auto Ready function ON/OFF. (See "Auto Ready function" on page 35.) 9 SYNC button Turns sync recording ON/OFF. (See "Sync recording" on page 43.) 0 A.TRACK button Switches the Auto Track mode between OFF, LEVEL, DD and TIME. (See "Auto Track function" on page 45.) q FINDER button Opens the FINDER or USER PLAYLIST screen depending on the play area setting. (See "Opening the FINDER screen" on page 50 and "Editing the playlist (USB/SD/CF media...
... TASCAM SS-CDR200/SS-R200/SS-R100 8 A.READY button Turns the Auto Ready function ON/OFF. (See "Auto Ready function" on page 35.) 9 SYNC button Turns sync recording ON/OFF. (See "Sync recording" on page 43.) 0 A.TRACK button Switches the Auto Track mode between OFF, LEVEL, DD and TIME. (See "Auto Track function" on page 45.) q FINDER button Opens the FINDER or USER PLAYLIST screen depending on the play area setting. (See "Opening the FINDER screen" on page 50 and "Editing the playlist (USB/SD/CF media...
100 SS-R200 SS-CDR200 Owners Manual
Page 18
... item appears light on the FUNCTION screen. r Total playback position Shows the current playback position as a bar. NOTE • When stopped, the total playback time of the play area is open the FUNCTION screen. No. Changing item settings on the Home Screen. 6 Track number Shows the number of the current playback file. NOTE When the FUNCTION screen is always shown, regardless of the current Home Screen display mode. • When using a CD-R/CD-RW disc with MP3 or...
... item appears light on the FUNCTION screen. r Total playback position Shows the current playback position as a bar. NOTE • When stopped, the total playback time of the play area is open the FUNCTION screen. No. Changing item settings on the Home Screen. 6 Track number Shows the number of the current playback file. NOTE When the FUNCTION screen is always shown, regardless of the current Home Screen display mode. • When using a CD-R/CD-RW disc with MP3 or...
100 SS-R200 SS-CDR200 Owners Manual
Page 19
... the current track number in the REC menu). r Current folder name Shows the name of the track being recorded. e Track title Shows the title of the folder that are ON appear light on dark. Recording Screen FUNCTION status display On the Recording FUNCTION screen, you press the HOME/DISPLAY button (or remote control HOME/DISP button), the information shown in the REC menu on the recording format (REC FORMAT item in the current play area. 8 File type Shows the current recording file format. 9 Current device Shows the...
... the current track number in the REC menu). r Current folder name Shows the name of the track being recorded. e Track title Shows the title of the folder that are ON appear light on dark. Recording Screen FUNCTION status display On the Recording FUNCTION screen, you press the HOME/DISPLAY button (or remote control HOME/DISP button), the information shown in the REC menu on the recording format (REC FORMAT item in the current play area. 8 File type Shows the current recording file format. 9 Current device Shows the...

100 SS-R200 SS-CDR200 Owners Manual
Page 21
.... Use the cursor 5 and b buttons on the screen): Turn the MULTI JOG dial. PLAY OTHERS menu item Function MONO MIX Mono playback setting EOM TRACK EOM function setting EOM MEDIA EOM function setting RESUME Resume playback setting POWER ON PLAY Power-on the display (, is shown at the top and/or bottom of parts Main menu item Submenu item Function Reference MEMORY FORMAT Format USB, SD, and CF media Page 27 BRIGHTNESS Display and indicator brightness settings Page 24 KEYBOARD Keyboard type setting CLOCK ADJUST Time setting RS...
.... Use the cursor 5 and b buttons on the screen): Turn the MULTI JOG dial. PLAY OTHERS menu item Function MONO MIX Mono playback setting EOM TRACK EOM function setting EOM MEDIA EOM function setting RESUME Resume playback setting POWER ON PLAY Power-on the display (, is shown at the top and/or bottom of parts Main menu item Submenu item Function Reference MEMORY FORMAT Format USB, SD, and CF media Page 27 BRIGHTNESS Display and indicator brightness settings Page 24 KEYBOARD Keyboard type setting CLOCK ADJUST Time setting RS...

100 SS-R200 SS-CDR200 Owners Manual
Page 24
... display contrast and brightness as necessary. When completed, the Home Screen opens. The SS-R100 does not have the 5.RS-232C menu item. 3 Select CLOCK ADJUST. Setting the date and time The date and time is added to the recorded file based on the built-in the current device, a NO MEDIA message appears. Turning the power OFF: Press the POWER switch to the Home Screen. Startup screen 4 Press the MULTI JOG dial or , [LOCK] button (or remote control...
... display contrast and brightness as necessary. When completed, the Home Screen opens. The SS-R100 does not have the 5.RS-232C menu item. 3 Select CLOCK ADJUST. Setting the date and time The date and time is added to the recorded file based on the built-in the current device, a NO MEDIA message appears. Turning the power OFF: Press the POWER switch to the Home Screen. Startup screen 4 Press the MULTI JOG dial or , [LOCK] button (or remote control...
100 SS-R200 SS-CDR200 Owners Manual
Page 29
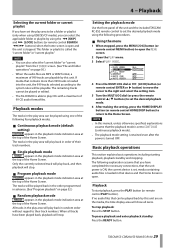
... using USB/SD/CF media), you have been played back, playback will stop. This folder or playlist is turned OFF. Playback modes The tracks in the play area can select the applicable folder or playlist by using the m [SKIP] and , [LOCK] buttons (or remote control SEARCH m/, buttons) when the home screen is stopped. Setting the playback mode Use the front panel of the unit and the included TASCAM RC-SS2 remote control to set the desired playback mode using one of the Home Screen. To pause playback...
... using USB/SD/CF media), you have been played back, playback will stop. This folder or playlist is turned OFF. Playback modes The tracks in the play area can select the applicable folder or playlist by using the m [SKIP] and , [LOCK] buttons (or remote control SEARCH m/, buttons) when the home screen is stopped. Setting the playback mode Use the front panel of the unit and the included TASCAM RC-SS2 remote control to set the desired playback mode using one of the Home Screen. To pause playback...

100 SS-R200 SS-CDR200 Owners Manual
Page 40
... formats can have loaded recordable USB/SD/CF media or a CD-R/CD-RW disc (SS-CDR200 only), completed the necessary connections and turned the unit's power ON. However, you can also copy or convert and copy audio files between input sources. A.BAL. (SS-CDR200/SS-R200 only) Signals from the unit, all the files on page 26.) • You can copy WAV files from the remote control Press the INPUT SEL button on the SS-CDR200. • When using media...
... formats can have loaded recordable USB/SD/CF media or a CD-R/CD-RW disc (SS-CDR200 only), completed the necessary connections and turned the unit's power ON. However, you can also copy or convert and copy audio files between input sources. A.BAL. (SS-CDR200/SS-R200 only) Signals from the unit, all the files on page 26.) • You can copy WAV files from the remote control Press the INPUT SEL button on the SS-CDR200. • When using media...
100 SS-R200 SS-CDR200 Owners Manual
Page 41
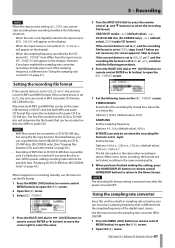
.... 5 Turn the MULTI JOG dial (or press the remote control 5 and b buttons) to USB, SD or CF, the unit can only be a stereo file or a mono file. Setting the recording file format If the current device is set to CD-R/ CD-RW discs (SS-CDR200 only). (See "Copying files between CDs and other media" on page 43.) When stopped or in the same sound quality. 8 When you have finished making the setting, press the HOME/DISPLAY button...
.... 5 Turn the MULTI JOG dial (or press the remote control 5 and b buttons) to USB, SD or CF, the unit can only be a stereo file or a mono file. Setting the recording file format If the current device is set to CD-R/ CD-RW discs (SS-CDR200 only). (See "Copying files between CDs and other media" on page 43.) When stopped or in the same sound quality. 8 When you have finished making the setting, press the HOME/DISPLAY button...
100 SS-R200 SS-CDR200 Owners Manual
Page 42
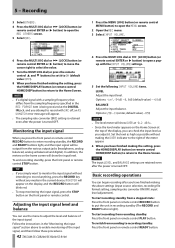
... the REC FORMAT item is turned OFF. To start recording from recording standby: Press the front panel or remote control PLAY button. To start recording standby from the sampling frequency specified in the current device. 5 - C (center, default value) - In addition, the meters on the front panel or remote control. To switch from the various output jacks (headphones, analog balanced, analog unbalanced and digital). Follow the instructions in recording standby (The RECORD and READY buttons light). NOTE • If a digital signal...
... the REC FORMAT item is turned OFF. To start recording from recording standby: Press the front panel or remote control PLAY button. To start recording standby from the sampling frequency specified in the current device. 5 - C (center, default value) - In addition, the meters on the front panel or remote control. To switch from the various output jacks (headphones, analog balanced, analog unbalanced and digital). Follow the instructions in recording standby (The RECORD and READY buttons light). NOTE • If a digital signal...
100 SS-R200 SS-CDR200 Owners Manual
Page 43
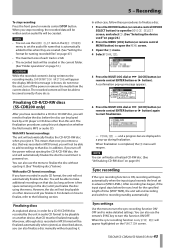
... turn off the power or remove the media from the current device. You will be played back by the unit in audio CD format, the unit will not be able to be playable on other than this unit depend on whether the file format is powered-on that is automatically added to files when they are displayed in MP3 format, you stop recording: Press the front panel or remote control STOP button. Sync settings Use...
... turn off the power or remove the media from the current device. You will be played back by the unit in audio CD format, the unit will not be able to be playable on other than this unit depend on whether the file format is powered-on that is automatically added to files when they are displayed in MP3 format, you stop recording: Press the front panel or remote control STOP button. Sync settings Use...
100 SS-R200 SS-CDR200 Owners Manual
Page 56
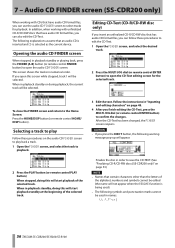
... have audio CD format files, you open this screen while stopped, track 1 will start playback of the selected track. If you can use the audio CD FINDER screen to select tracks for the selected track. CAUTION • If you can also edit the CD-Text. Opening the audio CD FINDER screen When stopped, in numerical order. This screen shows the tracks in playback standby or playing back, press the FINDER [A-B] button (or remote control FINDER button...
... have audio CD format files, you open this screen while stopped, track 1 will start playback of the selected track. If you can use the audio CD FINDER screen to select tracks for the selected track. CAUTION • If you can also edit the CD-Text. Opening the audio CD FINDER screen When stopped, in numerical order. This screen shows the tracks in playback standby or playing back, press the FINDER [A-B] button (or remote control FINDER button...

100 SS-R200 SS-CDR200 Owners Manual
Page 71
... is turned OFF. TASCAM RC-3F Footswitch (sold separately) connected to set the digital output format. 12 − Other settings and media information Footswitch control You can be set to the setting made with similar recordings MODE 2: Basic transport control MODE 3: Pitch control Setting the digital output format The digital output format of this unit can operate this unit using a TASCAM RC-3F footswitch (sold separately) Setting up a footswitch 1 Press the MENU [JOG] button (or remote control MENU button) to open the MENU screen. 2 Open the UTILITY menu. 3 Select DIGITAL...
... is turned OFF. TASCAM RC-3F Footswitch (sold separately) connected to set the digital output format. 12 − Other settings and media information Footswitch control You can be set to the setting made with similar recordings MODE 2: Basic transport control MODE 3: Pitch control Setting the digital output format The digital output format of this unit can operate this unit using a TASCAM RC-3F footswitch (sold separately) Setting up a footswitch 1 Press the MENU [JOG] button (or remote control MENU button) to open the MENU screen. 2 Open the UTILITY menu. 3 Select DIGITAL...
SS-CDR200 RS-232C documentation
Page 14
... when this command is sent with request data ([FF]), the controlled device sends the CLOCK DATA RETURN command [A7]. The sync rec mode can be turned on or off using the SYNC REC SELECT command [38]. RS-232C Protocol Specifications Rev. 1.00 SS-CDR200/SS-R200 ・CLOCK DATA PRESET CLOCK DATA PRESET sets the date and time information for the controlled device. Ones digit of the month. [Example] 0802231234: February 23, 2008 / 12...
... when this command is sent with request data ([FF]), the controlled device sends the CLOCK DATA RETURN command [A7]. The sync rec mode can be turned on or off using the SYNC REC SELECT command [38]. RS-232C Protocol Specifications Rev. 1.00 SS-CDR200/SS-R200 ・CLOCK DATA PRESET CLOCK DATA PRESET sets the date and time information for the controlled device. Ones digit of the month. [Example] 0802231234: February 23, 2008 / 12...

