Implementation Guide
Page 3
... As part of languages ■ Advanced features, such as the Symantec Alerting Service and Technical Account Manager role, offer enhanced response and proactive security support Please visit our Web site for current information on product feature/ function, installation, and configuration, as well as Symantec Security Response to provide Alerting Services and Virus Definition Updates for...
... As part of languages ■ Advanced features, such as the Symantec Alerting Service and Technical Account Manager role, offer enhanced response and proactive security support Please visit our Web site for current information on product feature/ function, installation, and configuration, as well as Symantec Security Response to provide Alerting Services and Virus Definition Updates for...
Implementation Guide
Page 11
... a slave node using the serial console 80 Compact flash initial configuration 83 Default login accounts 84 Starting the Network Security console About the Network Security console 85 Network Security console requirements 85 Console requirements on Windows 86 Console requirements on Linux 86 Installing the ... licensing ...91 Bandwidth licensing options 92 Installing licenses 92 Requesting a license file 94 Determining the serial numbers 94 Determining the Symantec System ID 94 Requesting the license file 95 Installing a license file 96 Installing a license file on a master node 96...
... a slave node using the serial console 80 Compact flash initial configuration 83 Default login accounts 84 Starting the Network Security console About the Network Security console 85 Network Security console requirements 85 Console requirements on Windows 86 Console requirements on Linux 86 Installing the ... licensing ...91 Bandwidth licensing options 92 Installing licenses 92 Requesting a license file 94 Determining the serial numbers 94 Determining the Symantec System ID 94 Requesting the license file 95 Installing a license file 96 Installing a license file on a master node 96...
Implementation Guide
Page 32
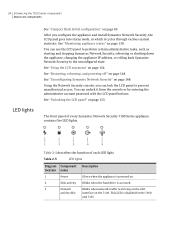
...LED is accessed. See "Unconfiguring Symantec Network Security" on page 148. Using the Network Security console, you configure the appliance and install Symantec Network Security, the LCD panel goes into status mode, in which it from the console or by entering the administrator account password with the LCD panel buttons... 83. Table 2-5 describes the function of every Symantec Network Security 7100 Series appliance contains five LED lights. The front panel of each LED light. Blinks when the hard drive is disabled for the 7160 and 7161. After you can lock the LCD panel to the...
...LED is accessed. See "Unconfiguring Symantec Network Security" on page 148. Using the Network Security console, you configure the appliance and install Symantec Network Security, the LCD panel goes into status mode, in which it from the console or by entering the administrator account password with the LCD panel buttons... 83. Table 2-5 describes the function of every Symantec Network Security 7100 Series appliance contains five LED lights. The front panel of each LED light. Blinks when the hard drive is disabled for the 7160 and 7161. After you can lock the LCD panel to the...
Implementation Guide
Page 75
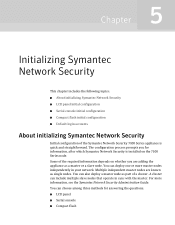
...as part of a cluster. A cluster can deploy one or more information, see the Symantec Network Security Administration Guide. Some of the required information depends on the 7100 Series node. You can choose among...Symantec Network Security This chapter includes the following topics: ■ About initializing Symantec Network Security ■ LCD panel initial configuration ■ Serial console initial configuration ■ Compact flash initial configuration ■ Default login accounts About initializing Symantec Network Security Initial configuration of the Symantec Network Security...
...as part of a cluster. A cluster can deploy one or more information, see the Symantec Network Security Administration Guide. Some of the required information depends on the 7100 Series node. You can choose among...Symantec Network Security This chapter includes the following topics: ■ About initializing Symantec Network Security ■ LCD panel initial configuration ■ Serial console initial configuration ■ Compact flash initial configuration ■ Default login accounts About initializing Symantec Network Security Initial configuration of the Symantec Network Security...
Implementation Guide
Page 79
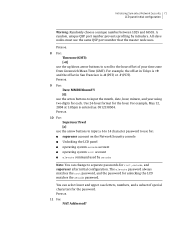
... the master node uses. All slave nodes must use for root, secadm, and superuser after initial configuration. Initializing Symantec Network Security 71 LCD panel initial configuration Warning: Randomly choose a unique number between 1025 and 65535. Use 24-hour format ...to input a 6 to 14 character password to separate passwords for : ■ superuser account on the Network Security console ■ Unlocking the LCD panel ■ operating system secadm account ■ operating system root account ■ elevate command used by intruders. For example, May 12, 2004 at 1:05pm ...
... the master node uses. All slave nodes must use for root, secadm, and superuser after initial configuration. Initializing Symantec Network Security 71 LCD panel initial configuration Warning: Randomly choose a unique number between 1025 and 65535. Use 24-hour format ...to input a 6 to 14 character password to separate passwords for : ■ superuser account on the Network Security console ■ Unlocking the LCD panel ■ operating system secadm account ■ operating system root account ■ elevate command used by intruders. For example, May 12, 2004 at 1:05pm ...

Implementation Guide
Page 83
...Symantec Network Security 75 LCD panel initial configuration Warning: The Master Node Pswd you input here must use the arrow buttons to change to separate passwords for root and secadm after initial configuration. On a slave node, the QSP port number is +9 and the offset in the Network Security...is -8 (PST) or -7 (PDT). Use this password for: ■ Unlocking the LCD panel ■ operating system secadm account ■ operating system root account ■ elevate command used for unlocking the LCD matches the secadm password. See "Configuring appliance nodes" on page 102. A ...
...Symantec Network Security 75 LCD panel initial configuration Warning: The Master Node Pswd you input here must use the arrow buttons to change to separate passwords for root and secadm after initial configuration. On a slave node, the QSP port number is +9 and the offset in the Network Security...is -8 (PST) or -7 (PDT). Use this password for: ■ Unlocking the LCD panel ■ operating system secadm account ■ operating system root account ■ elevate command used for unlocking the LCD matches the secadm password. See "Configuring appliance nodes" on page 102. A ...
Implementation Guide
Page 87
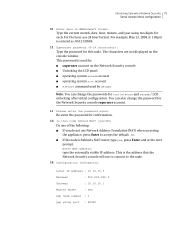
... router, type yes, press Enter, and at 1:05pm is used for: ■ superuser account on the console window. For example, May 12, 2004 at the next prompt: Enter NAT address: type the externally visible IP address. Initializing Symantec Network Security 79 Serial console initial configuration 10 Enter date in MMDDhhmmYY format: Type the current...
... router, type yes, press Enter, and at 1:05pm is used for: ■ superuser account on the console window. For example, May 12, 2004 at the next prompt: Enter NAT address: type the externally visible IP address. Initializing Symantec Network Security 79 Serial console initial configuration 10 Enter date in MMDDhhmmYY format: Type the current...
Implementation Guide
Page 89
...Master Node Sync Password you have finished this procedure and installed Symantec Network Security. 9 Enter the master node number (default 1): Press Enter to the host. This is provided later in the Network Security console. The root and elevate passwords are linked together, as...9632; operating system secadm account ■ operating system root account and elevate command Note: You can change the passwords for a slave node. 8 Enter the local node number (default 2): Press Enter to communicate with this slave node. Initializing Symantec Network Security 81 Serial console initial ...
...Master Node Sync Password you have finished this procedure and installed Symantec Network Security. 9 Enter the master node number (default 1): Press Enter to the host. This is provided later in the Network Security console. The root and elevate passwords are linked together, as...9632; operating system secadm account ■ operating system root account and elevate command Note: You can change the passwords for a slave node. 8 Enter the local node number (default 2): Press Enter to communicate with this slave node. Initializing Symantec Network Security 81 Serial console initial ...
Implementation Guide
Page 92
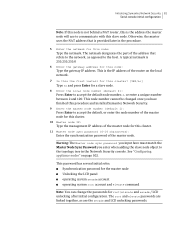
... hard drive. 5 The appliance automatically runs the Symantec Network Security silent installation using a serial terminal application. Occasionally you may need root permissions to perform a task, use the secadm login account to perform certain Symantec Network Security functions on the appliance, the passwords are written ...connect to view system log files. The password you assign to start Symantec Network Security. Under normal operation, all tasks can access the secadm and root accounts from the Network Security console. Any errors are changed for unlocking the LCD panel, either ...
... hard drive. 5 The appliance automatically runs the Symantec Network Security silent installation using a serial terminal application. Occasionally you may need root permissions to perform a task, use the secadm login account to perform certain Symantec Network Security functions on the appliance, the passwords are written ...connect to view system log files. The password you assign to start Symantec Network Security. Under normal operation, all tasks can access the secadm and root accounts from the Network Security console. Any errors are changed for unlocking the LCD panel, either ...

Implementation Guide
Page 97
...the administration IP address of the appliance. The NAT address is not configured behind a NAT router, the console connects to Symantec Network Security on Windows 1 Double-click the shortcut to the local IP address of the appliance into the Hostname text box. If...IP address, which you input during initial configuration. To launch the console on your desktop. 2 In Symantec Network Security Console, enter the administration IP address of the appliance. This account has the highest level of the appliance. 4 In the Username text box, enter superuser The superuser ...
...the administration IP address of the appliance. The NAT address is not configured behind a NAT router, the console connects to Symantec Network Security on Windows 1 Double-click the shortcut to the local IP address of the appliance into the Hostname text box. If...IP address, which you input during initial configuration. To launch the console on your desktop. 2 In Symantec Network Security Console, enter the administration IP address of the appliance. This account has the highest level of the appliance. 4 In the Username text box, enter superuser The superuser ...
Implementation Guide
Page 98
...the required memory for the appliance. The port number is set during initial configuration. 90 Starting the Network Security console Launching the console To launch the console on the Network Security console. 6 In the Passphrase text box, enter the superuser passphrase that was set during initial ...installed. This account has the highest level of the appliance into the Hostname text box. See "Using the correct administration IP address" on page 89. 4 In the Port text box, enter the qspproxy (QSP) port number for the application. 3 In Symantec Network Security, enter the...
...the required memory for the appliance. The port number is set during initial configuration. 90 Starting the Network Security console Launching the console To launch the console on the Network Security console. 6 In the Passphrase text box, enter the superuser passphrase that was set during initial ...installed. This account has the highest level of the appliance into the Hostname text box. See "Using the correct administration IP address" on page 89. 4 In the Port text box, enter the qspproxy (QSP) port number for the application. 3 In Symantec Network Security, enter the...

Implementation Guide
Page 103
... Note that the parentheses are part of the appliance. To determine the Symantec System ID on a licensed appliance 1 In the Network Security console, on page 94. See "Determining the Symantec System ID" on Devices, right-click the 7100 Series node object. ...2 Click Admin > Licensing. 3 In License Information, in the upper right corner, the Symantec System ID is displayed. Licensing 95 Installing licenses 2 Connect to the appliance with the superuser account...
... Note that the parentheses are part of the appliance. To determine the Symantec System ID on a licensed appliance 1 In the Network Security console, on page 94. See "Determining the Symantec System ID" on Devices, right-click the 7100 Series node object. ...2 Click Admin > Licensing. 3 In License Information, in the upper right corner, the Symantec System ID is displayed. Licensing 95 Installing licenses 2 Connect to the appliance with the superuser account...
Implementation Guide
Page 104
...on a master node 1 Save the license file to the computer where you installed the Network Security console. You can rename the file with a descriptive name. 2 Log in to the Network Security console with the superuser account. 3 In License Information, do one of the following: ■ Click Browse to ...from the Network Security console. To install a license file on the Web page to complete and submit the online licensing form. 96 Licensing Installing licenses Note: A license file that was issued for a particular machine cannot be used on another machine. 2 Access the Symantec licensing ...
...on a master node 1 Save the license file to the computer where you installed the Network Security console. You can rename the file with a descriptive name. 2 Log in to the Network Security console with the superuser account. 3 In License Information, do one of the following: ■ Click Browse to ...from the Network Security console. To install a license file on the Web page to complete and submit the online licensing form. 96 Licensing Installing licenses Note: A license file that was issued for a particular machine cannot be used on another machine. 2 Access the Symantec licensing ...
Implementation Guide
Page 107
... install the file onto the 7100 Series node from License Information. Calling for help ■ Symantec System ID: The Symantec System ID from the Network Security console. Installing the additive license file After you must supply the following : ■ Click ...Browse to navigate to the location of the following information to complete and submit the online licensing form. Licensing 99 Calling for help Customers with the superuser account...
... install the file onto the 7100 Series node from License Information. Calling for help ■ Symantec System ID: The Symantec System ID from the Network Security console. Installing the additive license file After you must supply the following : ■ Click ...Browse to navigate to the location of the following information to complete and submit the online licensing form. Licensing 99 Calling for help Customers with the superuser account...
Implementation Guide
Page 146
...files and backups Managing log files and backups Symantec Network Security provides a way to automate log file rotation to securely copy the files across the network. This section includes the following topics: ■ Rotating log files with SCP ■ Backing up your account on the 7100 Series node and install the... : ■ On Devices, right-click the 7100 Series node object on which you must support SSH and SCP. You can configure Symantec Network Security to transfer log files to generate SSH keys on the target host. You can choose from the pull-down list in Select Node. ...
...files and backups Managing log files and backups Symantec Network Security provides a way to automate log file rotation to securely copy the files across the network. This section includes the following topics: ■ Rotating log files with SCP ■ Backing up your account on the 7100 Series node and install the... : ■ On Devices, right-click the 7100 Series node object on which you must support SSH and SCP. You can configure Symantec Network Security to transfer log files to generate SSH keys on the target host. You can choose from the pull-down list in Select Node. ...
Implementation Guide
Page 147
..., click True. 5 In Destination Host for SCP, type the target host name or IP address. 6 In User Account for SCP, type user name to transfer files to on the target host. Click OK. 2 In Symantec Network Security Configuration Parameters, under Log and Database Parameters, set values for each of the following: ■ On Devices...
..., click True. 5 In Destination Host for SCP, type the target host name or IP address. 6 In User Account for SCP, type user name to transfer files to on the target host. Click OK. 2 In Symantec Network Security Configuration Parameters, under Log and Database Parameters, set values for each of the following: ■ On Devices...
Implementation Guide
Page 166
...The serial console is available by entering the elevate command if you can access basic Symantec Network Security and administrative commands. You must log in using a serial terminal application with a valid account name and password. You can connect the provided serial console cable from the appliance...■ help Explanation Displays this list of commands. The secadm user is now changed and the appliance automatically reboots. The secadm account can execute any button. You can gain root privileges by connecting the serial port on page 77. See "Starting a serial ...
...The serial console is available by entering the elevate command if you can access basic Symantec Network Security and administrative commands. You must log in using a serial terminal application with a valid account name and password. You can connect the provided serial console cable from the appliance...■ help Explanation Displays this list of commands. The secadm user is now changed and the appliance automatically reboots. The secadm account can execute any button. You can gain root privileges by connecting the serial port on page 77. See "Starting a serial ...
Implementation Guide
Page 167
... console" on page 76. ■ start Starts Symantec Network Security if it is then ready for the Symantec Enterprise Security Architecture (SESA) bridge. See "Stopping Network Security from the serial console" on page 149. ■ unconfigure Resets Symantec Network Security on page 151. ■ stop Stops Symantec Network Security. SESA provides an option for the secadm account. Administrative commands: ■ date Changes the date...
... console" on page 76. ■ start Starts Symantec Network Security if it is then ready for the Symantec Enterprise Security Architecture (SESA) bridge. See "Stopping Network Security from the serial console" on page 149. ■ unconfigure Resets Symantec Network Security on page 151. ■ stop Stops Symantec Network Security. SESA provides an option for the secadm account. Administrative commands: ■ date Changes the date...
Implementation Guide
Page 168
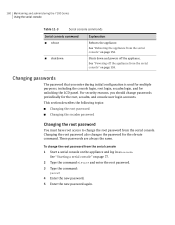
For security reasons, you enter during initial configuration is used for multiple purposes, including the console login, root login, secadm login, and for unlocking the LCD panel. ... the appliance. See "Starting a serial console" on page 152. Changing the root password also changes the password for the root, secadm, and console user login accounts.
For security reasons, you enter during initial configuration is used for multiple purposes, including the console login, root login, secadm login, and for unlocking the LCD panel. ... the appliance. See "Starting a serial console" on page 152. Changing the root password also changes the password for the root, secadm, and console user login accounts.

Implementation Guide
Page 203
...-line mode 56 passive mode 56 power 62 power supplies 28 removable drive 27 7161 about 20 back panel 20 cabling 62 in-line mode 64 passive mode 64 power 66 power supplies 28 removable drive 27 A account root 158 secadm 158 adding appliance 187 host name 161 in-line pair 111... options 103 protection policy 119 response rule 124 slave node 74, 75, 81, 83 administration IP address 89 advanced network options 104, 106, 147 alarm 62, 66 power supply 28, 55, 63 alert security 3 alerting capabilities 31 mode 31 alerts in passive mode 30 analysis 10, 31, 34, 42, 127 of traffic...
...-line mode 56 passive mode 56 power 62 power supplies 28 removable drive 27 7161 about 20 back panel 20 cabling 62 in-line mode 64 passive mode 64 power 66 power supplies 28 removable drive 27 A account root 158 secadm 158 adding appliance 187 host name 161 in-line pair 111... options 103 protection policy 119 response rule 124 slave node 74, 75, 81, 83 administration IP address 89 advanced network options 104, 106, 147 alarm 62, 66 power supply 28, 55, 63 alert security 3 alerting capabilities 31 mode 31 alerts in passive mode 30 analysis 10, 31, 34, 42, 127 of traffic...