Implementation Guide
Page 3
... of service for our Web-accessible Knowledge Base. For example, the Technical Support group works with the other functional areas within Symantec to -the-minute information ■ Upgrade insurance that delivers automatic software upgrade protection ■ Content Updates for virus definitions and security signatures that ensure the highest level of protection ■ Global support from the Product Home Page, select the Licensing and Registration link.
... of service for our Web-accessible Knowledge Base. For example, the Technical Support group works with the other functional areas within Symantec to -the-minute information ■ Upgrade insurance that delivers automatic software upgrade protection ■ Content Updates for virus definitions and security signatures that ensure the highest level of protection ■ Global support from the Product Home Page, select the Licensing and Registration link.
Implementation Guide
Page 5
... will be that the hardware component of this license, and as follows: You may not: A. B. use the Recovery Software solely to restore the Appliance to the written documentation accompanying the Appliance for each a "License Module") which accompanies the appliance You have been licensed to support Your authorized use the Software solely as part of the Appliance. some firewall products utilize updated firewall rules; Your sole remedy...
... will be that the hardware component of this license, and as follows: You may not: A. B. use the Recovery Software solely to restore the Appliance to the written documentation accompanying the Appliance for each a "License Module") which accompanies the appliance You have been licensed to support Your authorized use the Software solely as part of the Appliance. some firewall products utilize updated firewall rules; Your sole remedy...
Implementation Guide
Page 9
... 17 About 7100 Series models 17 Model 7120 ...18 Model 7160 ...19 Model 7161 ...20 About core components 21 LCD panel ...22 LED lights ...24 Serial port ...25 USB ports ...25 Compact flash adapter 25 About additional components 27 Removable disk drive 27 Dual redundant power supplies 28 Deploying the 7100 Series About deploying the 7100 Series 29 Deployment options 29 Bandwidth licensing options 30 Passive mode 30 In-line mode 31 Blocking and alerting...
... 17 About 7100 Series models 17 Model 7120 ...18 Model 7160 ...19 Model 7161 ...20 About core components 21 LCD panel ...22 LED lights ...24 Serial port ...25 USB ports ...25 Compact flash adapter 25 About additional components 27 Removable disk drive 27 Dual redundant power supplies 28 Deploying the 7100 Series About deploying the 7100 Series 29 Deployment options 29 Bandwidth licensing options 30 Passive mode 30 In-line mode 31 Blocking and alerting...

Implementation Guide
Page 13
... the Network Security console 132 Node status parameters 132 Interface status parameters 133 In-line pair status parameters 134 Interface group status parameters 136 Maintaining and administering the 7100 Series About maintaining and administering the appliance 137 Managing log files and backups 138 Rotating log files with SCP 138 Generating SSH keys 138 Using SCP to rotate log files 139 Backing up and restoring 140 Backing up a configuration 141 Restoring a configuration 141 About the compact flash 142 Making...
... the Network Security console 132 Node status parameters 132 Interface status parameters 133 In-line pair status parameters 134 Interface group status parameters 136 Maintaining and administering the 7100 Series About maintaining and administering the appliance 137 Managing log files and backups 138 Rotating log files with SCP 138 Generating SSH keys 138 Using SCP to rotate log files 139 Backing up and restoring 140 Backing up a configuration 141 Restoring a configuration 141 About the compact flash 142 Making...
Implementation Guide
Page 14
... disabling LCD locking 156 Changing the IP address 156 Using the serial console 158 About serial console commands 158 Changing passwords 160 Changing the root password 160 Changing the secadm password 161 Installing the SESA bridge 161 Preparing to use SESA 161 Running install-bridge 163 Uninstalling the SESA bridge 164 Starting the SESA agent manually 165 Stopping the SESA agent manually 165 Re-imaging and unconfiguring About re-imaging and unconfiguring 167 Unconfiguring Symantec Network Security...
... disabling LCD locking 156 Changing the IP address 156 Using the serial console 158 About serial console commands 158 Changing passwords 160 Changing the root password 160 Changing the secadm password 161 Installing the SESA bridge 161 Preparing to use SESA 161 Running install-bridge 163 Uninstalling the SESA bridge 164 Starting the SESA agent manually 165 Stopping the SESA agent manually 165 Re-imaging and unconfiguring About re-imaging and unconfiguring 167 Unconfiguring Symantec Network Security...
Implementation Guide
Page 21
... access the online knowledge base for troubleshooting information. This document provides specifications for all 7100 Series models as well as safety warnings and certification information. Describes the removable hard drive in this guide, using index format. This guide explains how to operate the Symantec Network Security 7100 Series appliance (printed and PDF). ■ Symantec Network Security 716x Service Manual (printed and PDF). Lists product specifications and provides safety instructions and certifications. Introduction 13 About the documentation set for the Symantec Network...
... access the online knowledge base for troubleshooting information. This document provides specifications for all 7100 Series models as well as safety warnings and certification information. Describes the removable hard drive in this guide, using index format. This guide explains how to operate the Symantec Network Security 7100 Series appliance (printed and PDF). ■ Symantec Network Security 716x Service Manual (printed and PDF). Lists product specifications and provides safety instructions and certifications. Introduction 13 About the documentation set for the Symantec Network...

Implementation Guide
Page 33
... or Symantec Network Security software for administrative tasks, and when troubleshooting. USB ports There are two USB ports on page 158. Introducing the 7100 Series components 25 About core components Table 2-5 LED lights Diagram Component Description location name 4 Network Blinks when there is network traffic on the eth0 interface activity (Tx) on the 16 character LCD screen. You can connect a null modem RS232 cable from the Symantec Network Security 7100 Series to the appliance using a serial...
... or Symantec Network Security software for administrative tasks, and when troubleshooting. USB ports There are two USB ports on page 158. Introducing the 7100 Series components 25 About core components Table 2-5 LED lights Diagram Component Description location name 4 Network Blinks when there is network traffic on the eth0 interface activity (Tx) on the 16 character LCD screen. You can connect a null modem RS232 cable from the Symantec Network Security 7100 Series to the appliance using a serial...

Implementation Guide
Page 45
... ports called port groups. Connects to the in use on the appliance. Port group 0 6 - Port group 2 8 - The Net A port of the network that connect to the network and to one USB connection per bypass unit. Power Supply 2 5 - Each bypass unit also has a USB port for your network devices to some devices. The Net B port of each port group on the appliance. Power Supply 1 4 - Consult the documentation for communication with the appliance. You may need a crossover cable...
... ports called port groups. Connects to the in use on the appliance. Port group 0 6 - Port group 2 8 - The Net A port of the network that connect to the network and to one USB connection per bypass unit. Power Supply 2 5 - Each bypass unit also has a USB port for your network devices to some devices. The Net B port of each port group on the appliance. Power Supply 1 4 - Consult the documentation for communication with the appliance. You may need a crossover cable...

Implementation Guide
Page 46
... in -line pair that port group. If the appliance has a hardware or software failure, fail-open is associated with one side of the network. App B always connects to a specific setting on page 115. To change the port group to online mode, you must start a sensor on bypass unit interfaces The interface link parameters, including speed and duplex mode, should not force the link speed or duplex mode to the odd-numbered interface (for example, re1000g0...
... in -line pair that port group. If the appliance has a hardware or software failure, fail-open is associated with one side of the network. App B always connects to a specific setting on page 115. To change the port group to online mode, you must start a sensor on bypass unit interfaces The interface link parameters, including speed and duplex mode, should not force the link speed or duplex mode to the odd-numbered interface (for example, re1000g0...

Implementation Guide
Page 48
... top right corners of each port in online mode. Power supply 2 The PS2 LED glows when power supply 2 is receiving data on the USB connection. Figure 3-7 shows the bypass unit rear panel LED configuration. The P3 LED glows when port group 3 is operating in online mode. 40 Deploying the 7100 Series Deployment options Table 3-4 Bypass unit front panel LED descriptions Diagram LED label LED name location Description 0 P0...
... top right corners of each port in online mode. Power supply 2 The PS2 LED glows when power supply 2 is receiving data on the USB connection. Figure 3-7 shows the bypass unit rear panel LED configuration. The P3 LED glows when port group 3 is operating in online mode. 40 Deploying the 7100 Series Deployment options Table 3-4 Bypass unit front panel LED descriptions Diagram LED label LED name location Description 0 P0...
Implementation Guide
Page 57
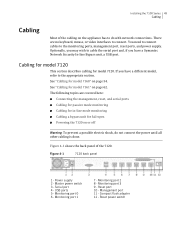
...appropriate section. Power supply 2 - Reset port 10 - Compact flash adapter 12 - Monitoring port 0 6 - Management port 11 - You need to connect cables to connect. See "Cabling for model 7161" on page 54. USB ports 5 - There are covered here: ■ Connecting the management, reset, and serial ports ■ Cabling for passive mode monitoring ■ Cabling for in-line mode monitoring ■ Cabling a bypass unit for model 7120. Optionally, you may wish to cable the serial port and, if you have a Symantec Network Security In-line Bypass unit, a USB port. If...
...appropriate section. Power supply 2 - Reset port 10 - Compact flash adapter 12 - Monitoring port 0 6 - Management port 11 - You need to connect cables to connect. See "Cabling for model 7161" on page 54. USB ports 5 - There are covered here: ■ Connecting the management, reset, and serial ports ■ Cabling for passive mode monitoring ■ Cabling for in-line mode monitoring ■ Cabling a bypass unit for model 7120. Optionally, you may wish to cable the serial port and, if you have a Symantec Network Security In-line Bypass unit, a USB port. If...

Implementation Guide
Page 61
... appliance. 5 On the bypass unit, connect Net B of the network. 6 Using the USB cable, plug one USB connector into the Mgmt USB port on the 7120 appliance, and plug the other side of cable. Do not force the link speed or duplex mode to the other connector into either USB port on the 2 In-line Bypass unit. Installing the 7100 Series 53 Cabling implemented as 10/100/1000Base-T.
... appliance. 5 On the bypass unit, connect Net B of the network. 6 Using the USB cable, plug one USB connector into the Mgmt USB port on the 7120 appliance, and plug the other side of cable. Do not force the link speed or duplex mode to the other connector into either USB port on the 2 In-line Bypass unit. Installing the 7100 Series 53 Cabling implemented as 10/100/1000Base-T.
Implementation Guide
Page 68
... cabling instructions carefully to the 7100 Series and powering both on, all port groups are initially in bypass mode. Note: After connecting the bypass unit to match each in-line interface pair with its associated port group on your appliance. 5 On the bypass unit, connect Net B of port group 0 to select a crossover cable if your network devices to port group 3. To cable in -line pair, use the Ethernet cables provided with port...
... cabling instructions carefully to the 7100 Series and powering both on, all port groups are initially in bypass mode. Note: After connecting the bypass unit to match each in-line interface pair with its associated port group on your appliance. 5 On the bypass unit, connect Net B of port group 0 to select a crossover cable if your network devices to port group 3. To cable in -line pair, use the Ethernet cables provided with port...

Implementation Guide
Page 91
... Done installing. Please reboot. At the SNS7100> prompt, to reboot and start Symantec Network Security, type: reboot Compact flash initial configuration If you have a compact flash card with a Symantec Network Security configuration already written to it, you have entered all of the appliance. 2 Reboot the appliance to make a correction or are correct. As part of Symantec Network Security. During initial configuration, lab personnel can use the compact flash to configure the new node as planned. Initializing Symantec Network Security...
... Done installing. Please reboot. At the SNS7100> prompt, to reboot and start Symantec Network Security, type: reboot Compact flash initial configuration If you have a compact flash card with a Symantec Network Security configuration already written to it, you have entered all of the appliance. 2 Reboot the appliance to make a correction or are correct. As part of Symantec Network Security. During initial configuration, lab personnel can use the compact flash to configure the new node as planned. Initializing Symantec Network Security...

Implementation Guide
Page 97
... when used to the local IP address of the appliance. If the appliance is set during initial configuration. The port number is not configured behind a NAT router, the console connects to log in on the Network Security console. 5 In the Passphrase text box, enter the superuser passphrase that was set during initial configuration of the appliance into the Hostname text box. Launching the console on Linux This section describes how to Symantec Network Security...
... when used to the local IP address of the appliance. If the appliance is set during initial configuration. The port number is not configured behind a NAT router, the console connects to log in on the Network Security console. 5 In the Passphrase text box, enter the superuser passphrase that was set during initial configuration of the appliance into the Hostname text box. Launching the console on Linux This section describes how to Symantec Network Security...
Implementation Guide
Page 98
... text box. See "Using the correct administration IP address" on the Network Security console. 6 In the Passphrase text box, enter the superuser passphrase that was set during initial configuration. For example: /usr/local/bin/java -jar -Xmx256m snsadmin.jar The option -Xmx256m allots the required memory for the appliance. 90 Starting the Network Security console Launching the console To launch the console on Linux 1 Change to log in the command.
... text box. See "Using the correct administration IP address" on the Network Security console. 6 In the Passphrase text box, enter the superuser passphrase that was set during initial configuration. For example: /usr/local/bin/java -jar -Xmx256m snsadmin.jar The option -Xmx256m allots the required memory for the appliance. 90 Starting the Network Security console Launching the console To launch the console on Linux 1 Change to log in the command.

Implementation Guide
Page 155
... is connected to enter a key or password. To view a configuration file 1 Do one of the default router for DNS Server 1 and DNS Server 2. 8 Click OK. 9 In the Save Config File window, click Save. See "Making a non-bootable compact flash card" on the node hard drive. This encryption is an automatic process and does not require you want to view from the pull-down list. 4 Click OK. 5 In Appliance Network Configuration, in Netmask, type...
... is connected to enter a key or password. To view a configuration file 1 Do one of the default router for DNS Server 1 and DNS Server 2. 8 Click OK. 9 In the Save Config File window, click Save. See "Making a non-bootable compact flash card" on the node hard drive. This encryption is an automatic process and does not require you want to view from the pull-down list. 4 Click OK. 5 In Appliance Network Configuration, in Netmask, type...
Implementation Guide
Page 169
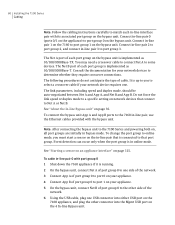
... be resolved ■ Make the Symantec Network Security SIP file available on the SESA Manager If your Domain Name Service (DNS) server cannot resolve the appliance host name, you can access it directly from the CD or copy it to change the secadm password from the serial console. To change the secadm password from the serial console 1 Start a serial console on the Management Console CD. You can make it locally resolvable by adding it...
... be resolved ■ Make the Symantec Network Security SIP file available on the SESA Manager If your Domain Name Service (DNS) server cannot resolve the appliance host name, you can access it directly from the CD or copy it to change the secadm password from the serial console. To change the secadm password from the serial console 1 Start a serial console on the Management Console CD. You can make it locally resolvable by adding it...
Implementation Guide
Page 176
... for initial configuration after unconfiguring Symantec Network Security. Running Unconfigure in the Network Security console. The 7100 Series is broken and you must use this process removes all new settings. The node is provided as updating by using Symantec LiveUpdate. Normally an upgrade is also removed from the topology in the Network Security console You can unconfigure Symantec Network Security on the appliance. The node object is erased, including the IP address, passwords, and node...
... for initial configuration after unconfiguring Symantec Network Security. Running Unconfigure in the Network Security console. The 7100 Series is broken and you must use this process removes all new settings. The node is provided as updating by using Symantec LiveUpdate. Normally an upgrade is also removed from the topology in the Network Security console You can unconfigure Symantec Network Security on the appliance. The node object is erased, including the IP address, passwords, and node...

Implementation Guide
Page 204
... 25 backup 145 backup/restore 144 bootable 171, 172 card 26 creating on Imaging Server 172 creating on serial console 171 ejecting 25 initial configuration 83, 146 mounting 26 non-bootable 143 non-bootable on Linux 143 non-bootable on Windows 143 restore 145 use new card 143 uses of 25 changing elevate password 160 IP 156 LCD panel password 161 root password 160 secadm password 161 CIDR format, in Networks tab...
... 25 backup 145 backup/restore 144 bootable 171, 172 card 26 creating on Imaging Server 172 creating on serial console 171 ejecting 25 initial configuration 83, 146 mounting 26 non-bootable 143 non-bootable on Linux 143 non-bootable on Windows 143 restore 145 use new card 143 uses of 25 changing elevate password 160 IP 156 LCD panel password 161 root password 160 secadm password 161 CIDR format, in Networks tab...