
Instruction Manual
Page 3
... Service and Maintenance Safety 24 Checking/Adding Fuel 24 Replacing the Fuel Filter 24 Check Engine Oil Level 25 Changing the Engine Oil and Filter 25 Clean the Engine Compartment with Air and Water....... 25 Engine Maintenance 26 Containing Spilled Fluids and Proper Disposal of Waste 26 Servicing the Exhaust System 26 Fuse Identification and Location 26 Servicing the Hydraulic System 26 Lubrication 27 Servicing the Mower Blades 28 Seat And Ground Speed Control Lever Adjustments..... 30 Checking Tire Pressures 31 Cutting Height Adjustment 31 Floor Pan Removal and Installation...
... Service and Maintenance Safety 24 Checking/Adding Fuel 24 Replacing the Fuel Filter 24 Check Engine Oil Level 25 Changing the Engine Oil and Filter 25 Clean the Engine Compartment with Air and Water....... 25 Engine Maintenance 26 Containing Spilled Fluids and Proper Disposal of Waste 26 Servicing the Exhaust System 26 Fuse Identification and Location 26 Servicing the Hydraulic System 26 Lubrication 27 Servicing the Mower Blades 28 Seat And Ground Speed Control Lever Adjustments..... 30 Checking Tire Pressures 31 Cutting Height Adjustment 31 Floor Pan Removal and Installation...
Instruction Manual
Page 7
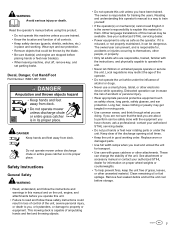
... machine, shut off, remove key, and set parking brake. Keep clear of the discharge opening at all controls. • Keep safety devices (guards, shields, switches, etc.) in loss of control of the unit. See attachment or accessory manual or contact your authorized STIHL servicing dealer. • Power equipment is only as safe as safety shoes, long pants, safety glasses, and ear protection. Clean remaining oil or fuel spillage. Remove fuel soaked debris and...
... machine, shut off, remove key, and set parking brake. Keep clear of the discharge opening at all controls. • Keep safety devices (guards, shields, switches, etc.) in loss of control of the unit. See attachment or accessory manual or contact your authorized STIHL servicing dealer. • Power equipment is only as safe as safety shoes, long pants, safety glasses, and ear protection. Clean remaining oil or fuel spillage. Remove fuel soaked debris and...

Instruction Manual
Page 8
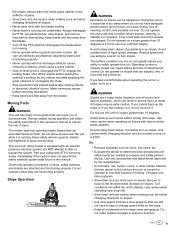
... operation. Only start engine from holes and hidden hazards. • Do not operate on level ground, disengage the PTO, engage the parking brake, and shut off and be seriously injured or interfere with operation of the unit. • Only operate in place. Improper use and follow all drives are attached, adjusted, and functioning properly. • Stop the unit on public roads. • Never operate the unit without guards...
... operation. Only start engine from holes and hidden hazards. • Do not operate on level ground, disengage the PTO, engage the parking brake, and shut off and be seriously injured or interfere with operation of the unit. • Only operate in place. Improper use and follow all drives are attached, adjusted, and functioning properly. • Stop the unit on public roads. • Never operate the unit without guards...
Instruction Manual
Page 9
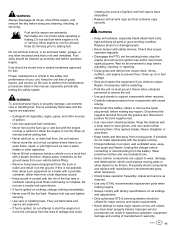
... operate with rear-mounted grass catchers. Avoid turning down slopes; Use caution when operating near the unit while it . Be sure all interlocks are on level ground, disengage the PTO, engage the parking brake, shut off the PTO switch to reduce the risk of -control and tipover accidents, which can result in severe injury or death. Make necessary repairs before driving onto slope. Keep safety devices (guards, shields, and switches) in speed...
... operate with rear-mounted grass catchers. Avoid turning down slopes; Use caution when operating near the unit while it . Be sure all interlocks are on level ground, disengage the PTO, engage the parking brake, shut off the PTO switch to reduce the risk of -control and tipover accidents, which can result in severe injury or death. Make necessary repairs before driving onto slope. Keep safety devices (guards, shields, and switches) in speed...
Instruction Manual
Page 11
... from mower deck, drives, mufflers, and engine to be stored only in an enclosed trailer, garage, or any cleaning, refueling, or servicing. Allow engine to cool for all parts in handling fuel. Proper maintenance is critical to make adjustments with stored energy. • Disconnect the battery cables or remove the spark plug wire(s) before making repairs. • Always comply with factory specifications on all settings and adjustments. • Only authorized STIHL servicing dealers...
... from mower deck, drives, mufflers, and engine to be stored only in an enclosed trailer, garage, or any cleaning, refueling, or servicing. Allow engine to cool for all parts in handling fuel. Proper maintenance is critical to make adjustments with stored energy. • Disconnect the battery cables or remove the spark plug wire(s) before making repairs. • Always comply with factory specifications on all settings and adjustments. • Only authorized STIHL servicing dealers...
Instruction Manual
Page 14
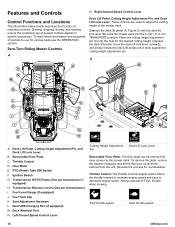
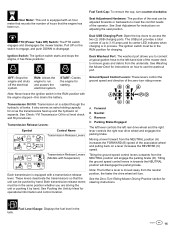
... Throttle Control: The throttle controls engine speed. Fast throttle speed. Always operate at FULL throttle when mowing. PTO (Power Take Off) Switch F. Reverse the process for various tasks see the OPERATION section. Fuel Tank Cap K. Move the throttle forward to increase engine speed and back to the mower deck. Slow throttle speed. 14 stihlusa.com Throttle Control D. To learn what combination and sequence of the mower deck. Depress the deck lift pedal (A, Figure 5) until it rests against the cutting height adjustment pin. 5 A. Ignition Switch G. Dual USB Charging...
... Throttle Control: The throttle controls engine speed. Fast throttle speed. Always operate at FULL throttle when mowing. PTO (Power Take Off) Switch F. Reverse the process for various tasks see the OPERATION section. Fuel Tank Cap K. Move the throttle forward to increase engine speed and back to the mower deck. Slow throttle speed. 14 stihlusa.com Throttle Control D. To learn what combination and sequence of the mower deck. Depress the deck lift pedal (A, Figure 5) until it rests against the cutting height adjustment pin. 5 A. Ignition Switch G. Dual USB Charging...
Instruction Manual
Page 15
... faster the drive wheel will disengage the parking brake. PTO (Power Take Off) Switch: The PTO switch engages and disengages the mower blades. OFF: Stops the engine and shuts off the electrical system. A. Note: The further a lever is added through the hydraulic oil tanks. See Seat Adjustment for instructions on adjusting the seat position. Fuel Level Gauge: Displays the fuel level in the RUN position for operational information and control location. See Washing the Mower Deck for instructions on how to run . RUN: Allows the engine to use the...
... faster the drive wheel will disengage the parking brake. PTO (Power Take Off) Switch: The PTO switch engages and disengages the mower blades. OFF: Stops the engine and shuts off the electrical system. A. Note: The further a lever is added through the hydraulic oil tanks. See Seat Adjustment for instructions on adjusting the seat position. Fuel Level Gauge: Displays the fuel level in the RUN position for operational information and control location. See Washing the Mower Deck for instructions on how to run . RUN: Allows the engine to use the...
Instruction Manual
Page 16
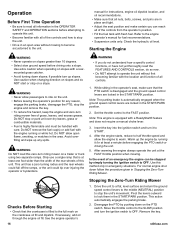
... • If you can be handled with a rearmounted grass catcher. • Avoid turning down on the PTO switch. Note: The parking brake is equipped with the location and function of this zero-turn riding mower on slopes with care. Set the throttle control to operate the unit without mowing to become accustomed to the unit. Note: This engine is automatically engaged when the ground speed control levers are locked in an open flame...
... • If you can be handled with a rearmounted grass catcher. • Avoid turning down on the PTO switch. Note: The parking brake is equipped with the location and function of this zero-turn riding mower on slopes with care. Set the throttle control to operate the unit without mowing to become accustomed to the unit. Note: This engine is automatically engaged when the ground speed control levers are locked in an open flame...
Instruction Manual
Page 20
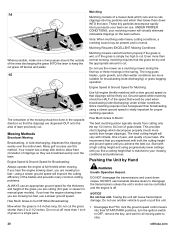
... (side-discharging) or grass bagging operation. Disengage the PTO, lock the ground speed control levers into by Hand WARNING Unsafe Operation Hazard. Do not cut . Towing the unit will virtually eliminate noticeable clippings on the lawn surface. Engine Speed & Ground Speed for manual gear models). The long grass blades, quick growth, and often wetter conditions are cutting (3rd gear or slower for Broadcasting: Always operate the engine at full throttle when mowing. Since mulching requires...
... (side-discharging) or grass bagging operation. Disengage the PTO, lock the ground speed control levers into by Hand WARNING Unsafe Operation Hazard. Do not cut . Towing the unit will virtually eliminate noticeable clippings on the lawn surface. Engine Speed & Ground Speed for manual gear models). The long grass blades, quick growth, and often wetter conditions are cutting (3rd gear or slower for Broadcasting: Always operate the engine at full throttle when mowing. Since mulching requires...
Instruction Manual
Page 23
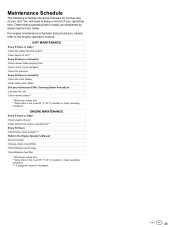
.... Check tire pressure. Clean battery and cables. Check/Replace spark plugs. Check mower blades** * Whichever comes first. ** More often in hot (over 85° F; 30° C) weather or dusty operating conditions. You will need to : Lubricate the unit. For engine maintenance schedules and procedures, please refer to the Engine Operator's Manual: Service air filter. Clean debris from engine compartment.** Every 50 Hours Check/Clean spark arrester.*** Refer to the engine operator's manual. ENGINE MAINTENANCE Every 8 Hours or Daily* Check engine oil level. Check/Replace fuel...
.... Check tire pressure. Clean battery and cables. Check/Replace spark plugs. Check mower blades** * Whichever comes first. ** More often in hot (over 85° F; 30° C) weather or dusty operating conditions. You will need to : Lubricate the unit. For engine maintenance schedules and procedures, please refer to the Engine Operator's Manual: Service air filter. Clean debris from engine compartment.** Every 50 Hours Check/Clean spark arrester.*** Refer to the engine operator's manual. ENGINE MAINTENANCE Every 8 Hours or Daily* Check engine oil level. Check/Replace fuel...
Instruction Manual
Page 24
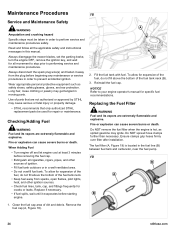
... the fuel line (B) between fuel tank and carburetor, near the fuel pump. 19 1. Remove the fuel cap (A, Figure 18). 24 stihlusa.com Replacing the Fuel Filter WARNING Fuel and its vapors are extremely flammable and explosive. To allow for all the applicable safety and instructional messages in order to prevent accidental ignition. Long hair, loose clothing or jewelry may ignite. Always disengage the mower blades, set the parking brake, turn the engine OFF, remove the ignition key, and...
... the fuel line (B) between fuel tank and carburetor, near the fuel pump. 19 1. Remove the fuel cap (A, Figure 18). 24 stihlusa.com Replacing the Fuel Filter WARNING Fuel and its vapors are extremely flammable and explosive. To allow for all the applicable safety and instructional messages in order to prevent accidental ignition. Long hair, loose clothing or jewelry may ignite. Always disengage the mower blades, set the parking brake, turn the engine OFF, remove the ignition key, and...
Instruction Manual
Page 25
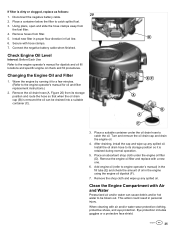
Check Engine Oil Level Interval: Before Each Use Refer to the engine operator's manual for dipstick and oil fill locations and specific engine oil check and fill procedures. Changing the Engine Oil and Filter 1. After draining, install the cap and wipe up any spilled oil. Eye protection includes goggles or a protective face shield. 25 Secure with Air and Water Pressurized air and/or water can be blown out. Connect the negative battery cable when finished. Remove the shop cloth and...
Check Engine Oil Level Interval: Before Each Use Refer to the engine operator's manual for dipstick and oil fill locations and specific engine oil check and fill procedures. Changing the Engine Oil and Filter 1. After draining, install the cap and wipe up any spilled oil. Eye protection includes goggles or a protective face shield. 25 Secure with Air and Water Pressurized air and/or water can be blown out. Connect the negative battery cable when finished. Remove the shop cloth and...
Instruction Manual
Page 26
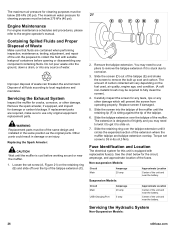
... to use pliers to use only original equipment replacement parts. Engine Maintenance For engine maintenance schedules and procedures, please refer to local regulations and mandates. Remove the spark arrester, if equipped, and inspect for the circuit, amperage, and approximate location of the unit and near the muffler. 1. The amount of the unit and near the battery. Servicing the Hydraulic System Non-Suspension Models: 26...
... to use pliers to use only original equipment replacement parts. Engine Maintenance For engine maintenance schedules and procedures, please refer to local regulations and mandates. Remove the spark arrester, if equipped, and inspect for the circuit, amperage, and approximate location of the unit and near the muffler. 1. The amount of the unit and near the battery. Servicing the Hydraulic System Non-Suspension Models: 26...
Instruction Manual
Page 30
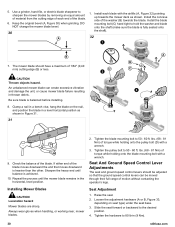
... moved through their full range of the blade moves downward the end that the ground speed control levers can create excessive vibration and damage the unit, or cause mower blade failure resulting in (9 Nm). 30 stihlusa.com Tighten the hardware to 50 - 60 ft. Seat Adjustment 1. Check the balance of the washer (B) towards the mower deck as shown in the horizontal, level position.
... moved through their full range of the blade moves downward the end that the ground speed control levers can create excessive vibration and damage the unit, or cause mower blade failure resulting in (9 Nm). 30 stihlusa.com Tighten the hardware to 50 - 60 ft. Seat Adjustment 1. Check the balance of the washer (B) towards the mower deck as shown in the horizontal, level position.
Instruction Manual
Page 33
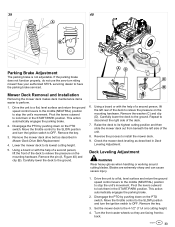
... have the parking brake serviced. Check the mower deck leveling as described in the START/PARK position. Remove the key. 3. See your authorized STIHL servicing dealer to the ground. Mower Deck Removal and Installation Removing the mower deck makes deck maintenance items easier to install the mower deck. 9. Turn the front caster wheels so they are extremely sharp and can cause severe injury. 1. Reverse the process to perform. 1. Move the throttle control to the SLOW position and turn the ignition switch to the...
... have the parking brake serviced. Check the mower deck leveling as described in the START/PARK position. Remove the key. 3. See your authorized STIHL servicing dealer to the ground. Mower Deck Removal and Installation Removing the mower deck makes deck maintenance items easier to install the mower deck. 9. Turn the front caster wheels so they are extremely sharp and can cause severe injury. 1. Reverse the process to perform. 1. Move the throttle control to the SLOW position and turn the ignition switch to the...
Instruction Manual
Page 36
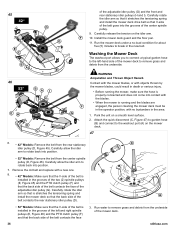
... allow the idler arm to remove grass and debris from the underside. Washing the Mower Deck The washout port allows you to connect a typical garden hose to rotate back into contact with the blades. • When the mower is running the mower, make sure the hose is installed in the new belt. Carefully allow the idler arm to the left and right spindle pulleys (E, Figure 46) and the PTO clutch pulley (F) and that...
... allow the idler arm to remove grass and debris from the underside. Washing the Mower Deck The washout port allows you to connect a typical garden hose to rotate back into contact with the blades. • When the mower is running the mower, make sure the hose is installed in the new belt. Carefully allow the idler arm to the left and right spindle pulleys (E, Figure 46) and the PTO clutch pulley (F) and that...

Instruction Manual
Page 37
... battery cables, positive [+] cable first (B). 4. When the engine is running, the voltmeter shows voltage of the battery. To avoid an explosion, keep open flames and sparks away from the washout port when completed. This action automatically engages the parking brake. 2. To replace the transmission drive belt the PTO clutch must be replaced. Coat the cable ends and the battery terminals with the battery. Transmission Drive Belt Replacement This zero-turn the ignition switch to lock them in the START/PARK...
... battery cables, positive [+] cable first (B). 4. When the engine is running, the voltmeter shows voltage of the battery. To avoid an explosion, keep open flames and sparks away from the washout port when completed. This action automatically engages the parking brake. 2. To replace the transmission drive belt the PTO clutch must be replaced. Coat the cable ends and the battery terminals with the battery. Transmission Drive Belt Replacement This zero-turn the ignition switch to lock them in the START/PARK...

Instruction Manual
Page 38
... Cleaning the Battery and Cables. Charge the battery until fully charged. Ventilate the battery well during charging. Charging the Battery WARNING Keep open flames and sparks away from it are highly explosive. If you need to start the engine may be the result of a defect in the OPERATOR SAFETY section of this manual. A dead battery or one too weak to replace the battery, follow the instructions provided by the battery charger manufacturer...
... Cleaning the Battery and Cables. Charge the battery until fully charged. Ventilate the battery well during charging. Charging the Battery WARNING Keep open flames and sparks away from it are highly explosive. If you need to start the engine may be the result of a defect in the OPERATOR SAFETY section of this manual. A dead battery or one too weak to replace the battery, follow the instructions provided by the battery charger manufacturer...
Instruction Manual
Page 39
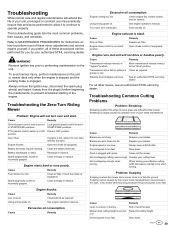
.... Drain excess oil. Replace air filter. Replace your authorized STIHL servicing dealer. Slow down . 39 Clean out the mower. Not overlapping cutting rows enough. When turning your blades. See engine operator's manual. Slow down . Out of uncut grass are left behind the mower. Clean the battery terminals. Spark plug(s) faulty, fouled or incorrectly gapped. See engine operator's manual. Engine runs, but unit will not turn over and start. Transmission drive belt or pulleys is too fast. Streaking is black. Always mow at full throttle. Using...
.... Drain excess oil. Replace air filter. Replace your authorized STIHL servicing dealer. Slow down . 39 Clean out the mower. Not overlapping cutting rows enough. When turning your blades. See engine operator's manual. Slow down . Out of uncut grass are left behind the mower. Clean the battery terminals. Spark plug(s) faulty, fouled or incorrectly gapped. See engine operator's manual. Engine runs, but unit will not turn over and start. Transmission drive belt or pulleys is too fast. Streaking is black. Always mow at full throttle. Using...

Instruction Manual
Page 41
... change without notice. ENGINE For complete engine specifications see the engine manufacturer's operator's manual included with 52" Mower Decks Overall Length 74" (188 cm) Overall Width 54" (137 cm) Overall Height 41" (104 cm) 41 Fits models: RZ 142.0 Briggs & Stratton® 44U777 Professional Series with ReadyStart® Make Briggs & Stratton® Model 44U777-0010-G1 Electrical System 12 volt, 9 amp alternator: Battery: 230 CCA Fits models: RZ 152.0 Briggs & Stratton® 44S977 Professional Series...
... change without notice. ENGINE For complete engine specifications see the engine manufacturer's operator's manual included with 52" Mower Decks Overall Length 74" (188 cm) Overall Width 54" (137 cm) Overall Height 41" (104 cm) 41 Fits models: RZ 142.0 Briggs & Stratton® 44U777 Professional Series with ReadyStart® Make Briggs & Stratton® Model 44U777-0010-G1 Electrical System 12 volt, 9 amp alternator: Battery: 230 CCA Fits models: RZ 152.0 Briggs & Stratton® 44S977 Professional Series...


