

Instruction Manual
Page 3
... recycled. 1 Introduction 2 2 Guide to Using this Manual 2 2.1 Signal Words 2 2.2 Symbols in Text 3 3 Main Parts 4 3.1 Pressure Washer 4 3.2 Spray Attachment 5 4 Safety Symbols on the Product 5 4.1 Pressure Washer 5 5 IMPORTANT SAFETY INSTRUCTIONS 6 5.1 General Safety Warnings and Instructions 6 5.2 Intended Use 8 5.3 Operator 8 5.4 Personal Protective Equipment 9 5.5 Pressure Washer 9 5.6 Power Supply Cord 10 5.7 Connecting the Water Supply 11 5.8 Using the Pressure Washer 11 6 Maintenance, Repair and Storage 16 6.1 Warnings and Instructions 16 7 Before Starting Work 17...
... recycled. 1 Introduction 2 2 Guide to Using this Manual 2 2.1 Signal Words 2 2.2 Symbols in Text 3 3 Main Parts 4 3.1 Pressure Washer 4 3.2 Spray Attachment 5 4 Safety Symbols on the Product 5 4.1 Pressure Washer 5 5 IMPORTANT SAFETY INSTRUCTIONS 6 5.1 General Safety Warnings and Instructions 6 5.2 Intended Use 8 5.3 Operator 8 5.4 Personal Protective Equipment 9 5.5 Pressure Washer 9 5.6 Power Supply Cord 10 5.7 Connecting the Water Supply 11 5.8 Using the Pressure Washer 11 6 Maintenance, Repair and Storage 16 6.1 Warnings and Instructions 16 7 Before Starting Work 17...

Instruction Manual
Page 7
... 6 4.1 Pressure Washer 8 The following safety symbols are found on the pressure 9 7 washer: To reduce the risk of electric shock. 20 Holder for Detergent Spray Set For storing the detergent spray set. # Rating Plate Contains electrical information and the product's serial number. 3.2 Spray Attachment 1 2 345 English 4 Retaining Latch Locks/unlocks the spray gun trigger. 5 Spray Gun Trigger Opens and closes the valve in the instruction manual.
... 6 4.1 Pressure Washer 8 The following safety symbols are found on the pressure 9 7 washer: To reduce the risk of electric shock. 20 Holder for Detergent Spray Set For storing the detergent spray set. # Rating Plate Contains electrical information and the product's serial number. 3.2 Spray Attachment 1 2 345 English 4 Retaining Latch Locks/unlocks the spray gun trigger. 5 Spray Gun Trigger Opens and closes the valve in the instruction manual.

Instruction Manual
Page 8
... all times. 8) Follow the maintenance instructions specified in a dry, secure place that cannot be accessed by children or other body parts away from the power supply if the power supply cord is provided with the controls. 4) Stay alert - Store the pressure washer indoors in the manual. 9) This product is damaged, @ 12. Additional important warnings and instructions are doing. 5) Do not operate the...
... all times. 8) Follow the maintenance instructions specified in a dry, secure place that cannot be accessed by children or other body parts away from the power supply if the power supply cord is provided with the controls. 4) Stay alert - Store the pressure washer indoors in the manual. 9) This product is damaged, @ 12. Additional important warnings and instructions are doing. 5) Do not operate the...

Instruction Manual
Page 9
..." (GFCI) built into the power supply cord. English ■ This pressure washer is provided with the product - Running several devices on labels and in instruction manual. Failure to direction of fluids below the skin, never direct spray jet towards self, other persons or 0458-620-8621-A 7 use only high pressure hoses and accessories rated for powering a single electric device. Use only genuine STIHL replacement parts. - To...
..." (GFCI) built into the power supply cord. English ■ This pressure washer is provided with the product - Running several devices on labels and in instruction manual. Failure to direction of fluids below the skin, never direct spray jet towards self, other persons or 0458-620-8621-A 7 use only high pressure hoses and accessories rated for powering a single electric device. Use only genuine STIHL replacement parts. - To...
Instruction Manual
Page 10
... work. - Check with wet hands. - Take a break if you are tired. Do not remove ground pin. - Inspect cord before using - This product is designed for cleaning solid surfaces and other electrical appliances or equipment, sockets or power cords. Do not use pressure washer if its original design. 5.3 Operator WARNING ■ Working with a ground fault circuit interrupter built into the cord plug. Do not operate the pressure washer...
... work. - Check with wet hands. - Take a break if you are tired. Do not remove ground pin. - Inspect cord before using - This product is designed for cleaning solid surfaces and other electrical appliances or equipment, sockets or power cords. Do not use pressure washer if its original design. 5.3 Operator WARNING ■ Working with a ground fault circuit interrupter built into the cord plug. Do not operate the pressure washer...

Instruction Manual
Page 11
.... - Check that it is cracked or damaged. ■ To reduce the risk of personal injury to the operator and bystanders: - Never use with this pressure washer should consult their use a pressure washer that provides insulation when operating the pressure washer. ■ Aqueous aerosols may be extremely dangerous. 5 IMPORTANT SAFETY INSTRUCTIONS ■ According to STIHL's current knowledge, the electric motor of this specific model are...
.... - Check that it is cracked or damaged. ■ To reduce the risk of personal injury to the operator and bystanders: - Never use with this pressure washer should consult their use a pressure washer that provides insulation when operating the pressure washer. ■ Aqueous aerosols may be extremely dangerous. 5 IMPORTANT SAFETY INSTRUCTIONS ■ According to STIHL's current knowledge, the electric motor of this specific model are...

Instruction Manual
Page 12
... authorized STIHL servicing dealer before using the pressure washer. For information on one way. To reduce the risk of parts that only identical STIHL replacement parts be checked before further operation. ■ Genuine STIHL replacement parts are specifically designed to damage or stress. - Never work with a qualified electrician if you are not authorized or approved by STIHL may result in GFCI before use a damaged power supply cord or plug. - Use...
... authorized STIHL servicing dealer before using the pressure washer. For information on one way. To reduce the risk of parts that only identical STIHL replacement parts be checked before further operation. ■ Genuine STIHL replacement parts are specifically designed to damage or stress. - Never work with a qualified electrician if you are not authorized or approved by STIHL may result in GFCI before use a damaged power supply cord or plug. - Use...

Instruction Manual
Page 13
... STIHL servicing dealer. Do not connect the pressure washer directly to prevent water flowing back from the pressure washer into the potable water system. - Do not use an appropriate water filter or find an alternative water source. Never operate a pressure washer that the spray gun trigger and retaining latch move freely. If your pressure washer for proper condition and operation before starting...
... STIHL servicing dealer. Do not connect the pressure washer directly to prevent water flowing back from the pressure washer into the potable water system. - Do not use an appropriate water filter or find an alternative water source. Never operate a pressure washer that the spray gun trigger and retaining latch move freely. If your pressure washer for proper condition and operation before starting...
Instruction Manual
Page 14
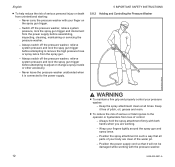
... is connected to adjust or change a spray nozzle or other accessory. - Position the spray attachment in such a way that it free of pitch, oil, grease and resin. ■ To reduce the risk of serious or fatal injuries to the operator or bystanders from the power supply before attempting to the power supply. 5 IMPORTANT SAFETY INSTRUCTIONS 5.8.2 Holding and Controlling the Pressure Washer 0000-GXX...
... is connected to adjust or change a spray nozzle or other accessory. - Position the spray attachment in such a way that it free of pitch, oil, grease and resin. ■ To reduce the risk of serious or fatal injuries to the operator or bystanders from the power supply before attempting to the power supply. 5 IMPORTANT SAFETY INSTRUCTIONS 5.8.2 Holding and Controlling the Pressure Washer 0000-GXX...
Instruction Manual
Page 17
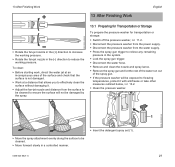
...Start work at all times. - Always use the detergent in the dosage specified in permanent damage. - In the event of your eye(s): Do not rub. Always connect and turn on the water supply to the pump before changing or adjusting any of clean water. - Never direct the spray at least 15 minutes and seek medical attention. ■ Running the pressure... INSTRUCTIONS - Do not direct the high-pressure jet into your body away from the water jet at the greatest effective distance from the surface being cleaned. - Be especially careful when spraying softer materials such as a simple cut....
...Start work at all times. - Always use the detergent in the dosage specified in permanent damage. - In the event of your eye(s): Do not rub. Always connect and turn on the water supply to the pump before changing or adjusting any of clean water. - Never direct the spray at least 15 minutes and seek medical attention. ■ Running the pressure... INSTRUCTIONS - Do not direct the high-pressure jet into your body away from the water jet at the greatest effective distance from the surface being cleaned. - Be especially careful when spraying softer materials such as a simple cut....

Instruction Manual
Page 18
... around the motor is cracked or damaged. Drain the detergent spray set or secure it so that cannot be accessed by authorized STIHL servicing dealers. ■ Unintentional starting : - Never use your pressure washer if the casing around the motor is cracked or damaged. 6 Maintenance, Repair and Storage 6.1 Warnings and Instructions WARNING ■ There are no signs of the power supply cord and plug are not...
... around the motor is cracked or damaged. Drain the detergent spray set or secure it so that cannot be accessed by authorized STIHL servicing dealers. ■ Unintentional starting : - Never use your pressure washer if the casing around the motor is cracked or damaged. 6 Maintenance, Repair and Storage 6.1 Warnings and Instructions WARNING ■ There are no signs of the power supply cord and plug are not...
Instruction Manual
Page 19
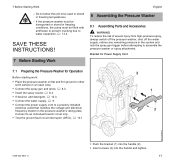
... (1) into the handle (2). ► Insert screws (3) into the handle and tighten. 17 If the pressure washer must be filled with antifreeze to prevent cracking due to assemble the pressure washer or spray attachment. Bracket for Power Supply Cord 7.1 Preparing the Pressure Washer for Operation Before starting work: ► Place the pressure washer on the pressure washer's rating plate. Connect to a properly installed electrical outlet that matches...
... (1) into the handle (2). ► Insert screws (3) into the handle and tighten. 17 If the pressure washer must be filled with antifreeze to prevent cracking due to assemble the pressure washer or spray attachment. Bracket for Power Supply Cord 7.1 Preparing the Pressure Washer for Operation Before starting work: ► Place the pressure washer on the pressure washer's rating plate. Connect to a properly installed electrical outlet that matches...
Instruction Manual
Page 22
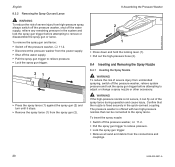
.... ► Pull the spray gun trigger to relieve pressure. ► Lock the spray gun trigger. 21 ► Press the spray lance (1) against the spray gun (2) and turn until it can be connected to adjust or change a spray nozzle or other accessory. The pressure washer is offered with two high-pressure nozzles that the nozzle is not secure, it stops. ► Remove the...
.... ► Pull the spray gun trigger to relieve pressure. ► Lock the spray gun trigger. 21 ► Press the spray lance (1) against the spray gun (2) and turn until it can be connected to adjust or change a spray nozzle or other accessory. The pressure washer is offered with two high-pressure nozzles that the nozzle is not secure, it stops. ► Remove the...

Instruction Manual
Page 23
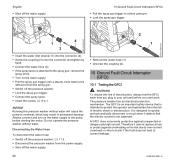
...the power supply before attempting to adjust or change a spray nozzle or other accessory. 9 Connecting the Water Supply 4 1 1 2 English 0000-GXX-4352-A0 0000-GXX-4353-A0 3 2 ► If you want to insert the fan-jet nozzle, position the...high-pressure nozzle (1) as far as it will go into the coupling (4). ► Once attached, pull on the spray lance. 8.4.2 Removing the Spray Nozzle WARNING To reduce the risk of water hose: 30 ft. (10 m) - To remove the spray nozzle: ► Switch off the pressure washer, @ 11.2. ► Pull the spray gun trigger to relieve pressure. ► Lock...
...the power supply before attempting to adjust or change a spray nozzle or other accessory. 9 Connecting the Water Supply 4 1 1 2 English 0000-GXX-4352-A0 0000-GXX-4353-A0 3 2 ► If you want to insert the fan-jet nozzle, position the...high-pressure nozzle (1) as far as it will go into the coupling (4). ► Once attached, pull on the spray lance. 8.4.2 Removing the Spray Nozzle WARNING To reduce the risk of water hose: 30 ft. (10 m) - To remove the spray nozzle: ► Switch off the pressure washer, @ 11.2. ► Pull the spray gun trigger to relieve pressure. ► Lock...
Instruction Manual
Page 24
... Interruptor (GFCI) ► Pull the spray gun trigger to relieve pressure. ► Lock the spray gun trigger. 2 1 4 3 ► Insert the water inlet strainer (1) into the connector (2). ► Screw the coupling (3) onto the connector and tighten by hand. ► Connect the water hose (4). ► If the spray lance is attached to the pump before you start work. Disconnecting the Water...
... Interruptor (GFCI) ► Pull the spray gun trigger to relieve pressure. ► Lock the spray gun trigger. 2 1 4 3 ► Insert the water inlet strainer (1) into the connector (2). ► Screw the coupling (3) onto the connector and tighten by hand. ► Connect the water hose (4). ► If the spray lance is attached to the pump before you start work. Disconnecting the Water...
Instruction Manual
Page 26
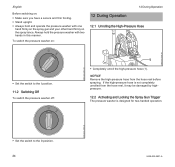
... Remove the high-pressure hose from the hose reel, it may be damaged by highpressure. 12.2 Activating and Locking the Spray Gun Trigger The pressure washer is designed for two-handed operation. 0000-GXX-4358-A0 ► Set the switch to the I position. 11.2 Switching Off To switch the pressure washer off: 0000-GXX-4357-A0 1 ► Completely unroll the high-pressure hose (1). To switch the pressure...
... Remove the high-pressure hose from the hose reel, it may be damaged by highpressure. 12.2 Activating and Locking the Spray Gun Trigger The pressure washer is designed for two-handed operation. 0000-GXX-4358-A0 ► Set the switch to the I position. 11.2 Switching Off To switch the pressure washer off: 0000-GXX-4357-A0 1 ► Completely unroll the high-pressure hose (1). To switch the pressure...

Instruction Manual
Page 28
..., the following nozzles may be cleaned. ► When applying detergent, start at all times and never direct the high-pressure jet toward animals. Always wear proper clothing and protective apparel, including proper eye protection, when operating your body away from painted, ...Attach the detergent spray set . ► Re-attach the fan-jet nozzle or rotary-jet nozzle. ► Spray the surface until it is clean and any remaining pressure in the system and lock the spray gun trigger before attempting to insert, adjust or remove the spray nozzle. ► Switch off detergent, start...
..., the following nozzles may be cleaned. ► When applying detergent, start at all times and never direct the high-pressure jet toward animals. Always wear proper clothing and protective apparel, including proper eye protection, when operating your body away from painted, ...Attach the detergent spray set . ► Re-attach the fan-jet nozzle or rotary-jet nozzle. ► Spray the surface until it is clean and any remaining pressure in the system and lock the spray gun trigger before attempting to insert, adjust or remove the spray nozzle. ► Switch off detergent, start...
Instruction Manual
Page 29
... transportation or storage: ► Switch off the pressure washer, @ 11.2. ► Disconnect the pressure washer from the power supply. ► Disconnect the pressure washer from the water supply. ► Press the spray gun trigger to relieve any remaining pressure in the system. ► Lock the spray gun trigger. ► Disconnect the water hose. ► Remove and clean the nozzle and spray...
... transportation or storage: ► Switch off the pressure washer, @ 11.2. ► Disconnect the pressure washer from the power supply. ► Disconnect the pressure washer from the water supply. ► Press the spray gun trigger to relieve any remaining pressure in the system. ► Lock the spray gun trigger. ► Disconnect the water hose. ► Remove and clean the nozzle and spray...
Instruction Manual
Page 35
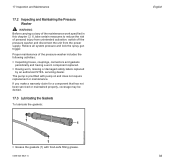
... make a warranty claim for a component that has not been serviced or maintained properly, coverage may be denied. 17.3 Lubricating the Gaskets To lubricate the gaskets: 1 1 1 ► Grease the gaskets (1) with pump oil and does not require replacement or maintenance. Relieve all system pressure and lock the spray gun trigger. Proper maintenance of personal injury from unintended activation: switch off the pressure washer and...
... make a warranty claim for a component that has not been serviced or maintained properly, coverage may be denied. 17.3 Lubricating the Gaskets To lubricate the gaskets: 1 1 1 ► Grease the gaskets (1) with pump oil and does not require replacement or maintenance. Relieve all system pressure and lock the spray gun trigger. Proper maintenance of personal injury from unintended activation: switch off the pressure washer and...

Instruction Manual
Page 38
...;F (40 °C) Water Supply - If the operating characteristics or the appearance of water supply Pressure Water throughput Weight Spray gun trigger is unlocked. English 19 Specifications 19.1 STIHL RE 110 PLUS For household use. - Maximum Pressure: 15 MPa (2170 psi) - Maximum water temperature in this manual. Minimum length of Intertek. Spray Gun trigger is locked. Frequency: 60 Hz - Maximum water temperature: 104...
...;F (40 °C) Water Supply - If the operating characteristics or the appearance of water supply Pressure Water throughput Weight Spray gun trigger is unlocked. English 19 Specifications 19.1 STIHL RE 110 PLUS For household use. - Maximum Pressure: 15 MPa (2170 psi) - Maximum water temperature in this manual. Minimum length of Intertek. Spray Gun trigger is locked. Frequency: 60 Hz - Maximum water temperature: 104...


