
Operating Instructions
Page 4
... of Contents Techniques for Better Recording 7 Getting Started Step 1: Checking the Contents of the PCM recorder 21 Basic Operations Recording 22 Listening 26 Deleting 30 Other Recording Operations Changing the Recording Method 32 Recording using the menu ........17 Step 5: Setting the Language to replace batteries 14 To operate with an external microphone 46 Recording from other equipment ........47 4 GB...
... of Contents Techniques for Better Recording 7 Getting Started Step 1: Checking the Contents of the PCM recorder 21 Basic Operations Recording 22 Listening 26 Deleting 30 Other Recording Operations Changing the Recording Method 32 Recording using the menu ........17 Step 5: Setting the Language to replace batteries 14 To operate with an external microphone 46 Recording from other equipment ........47 4 GB...
Operating Instructions
Page 7
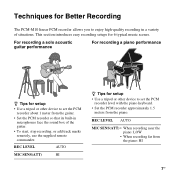
... the PCM recorder approximately 1.5 meters from the piano. For recording a solo acoustic guitar performance For recording a piano performance z Tips for setup • Use a tripod or other device to set the PCM recorder about 1 meter from the piano: HI 7GB This section introduces easy recording setups for Better Recording The PCM-M10 linear PCM recorder allows you to enjoy high-quality recording in microphones face...
... the PCM recorder approximately 1.5 meters from the piano. For recording a solo acoustic guitar performance For recording a piano performance z Tips for setup • Use a tripod or other device to set the PCM recorder about 1 meter from the piano: HI 7GB This section introduces easy recording setups for Better Recording The PCM-M10 linear PCM recorder allows you to enjoy high-quality recording in microphones face...
Operating Instructions
Page 8
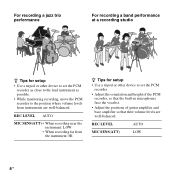
... volume levels from the instrument: HI z Tips for setup • Use a tripod or other device to set the PCM recorder. • Adjust the orientation and height of the PCM recorder, so that the built-in microphones face the vocalist. • Adjust the positions of guitar amplifier and base amplifier so that their volume levels are...
... volume levels from the instrument: HI z Tips for setup • Use a tripod or other device to set the PCM recorder. • Adjust the orientation and height of the PCM recorder, so that the built-in microphones face the vocalist. • Adjust the positions of guitar amplifier and base amplifier so that their volume levels are...
Operating Instructions
Page 9
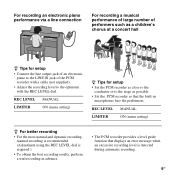
... number of performers such as possible. • Set the PCM recorder so that the built-in advance. • The PCM recorder provides a level guide function that displays an error message when an excessive recording level is required.) • To obtain the best recording results, perform a trial recording in microphones face the performers. REC LEVEL MANUAL LIMITER ON (menu...
... number of performers such as possible. • Set the PCM recorder so that the built-in advance. • The PCM recorder provides a level guide function that displays an error message when an excessive recording level is required.) • To obtain the best recording results, perform a trial recording in microphones face the performers. REC LEVEL MANUAL LIMITER ON (menu...

Operating Instructions
Page 11
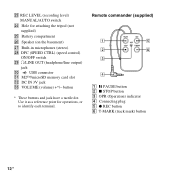
Getting Started Index to parts and controls Front L (repeat) A-B button M DISPLAY button N REC LEVEL (recording level) dial O POWER/HOLD switch P REMOTE jack Q ACCESS indicator R T-MARK (track mark) button S Strap hole Rear A Peak level L/R (-12 dB... F > FF/ v (fast-forward/up) button G . FR/ V (fast-rewind/down) button H x STOP button I X PAUSE button/indicator J N PLAY/ENTER button/indicator* K z REC (record) button/indicator T LINE IN (line input) jack U MIC SENS(ATT) (microphone sensitivity (attenuator)) HI/LOW (high/ low) switch V m (microphone) jack (Plug In Power compatible)* 11GB
Getting Started Index to parts and controls Front L (repeat) A-B button M DISPLAY button N REC LEVEL (recording level) dial O POWER/HOLD switch P REMOTE jack Q ACCESS indicator R T-MARK (track mark) button S Strap hole Rear A Peak level L/R (-12 dB... F > FF/ v (fast-forward/up) button G . FR/ V (fast-rewind/down) button H x STOP button I X PAUSE button/indicator J N PLAY/ENTER button/indicator* K z REC (record) button/indicator T LINE IN (line input) jack U MIC SENS(ATT) (microphone sensitivity (attenuator)) HI/LOW (high/ low) switch V m (microphone) jack (Plug In Power compatible)* 11GB
Operating Instructions
Page 12
W REC LEVEL (recording level) MANUAL/AUTO switch X Hole for operations, or to identify each terminal. button * These buttons and jack have a tactile dot. Remote commander (supplied) 1 X PAUSE button 2 x ... (track mark) button 12 GB Use it as a reference point for attaching the tripod (not supplied) Y Battery compartment Z Speaker (on the basement) wj Built-in microphones (stereo) wk DPC (SPEED CTRL) (speed control) ON/OFF switch wl i/LINE OUT (headphone/line output) jack e; USB connector ea M2™/microSD memory card...
W REC LEVEL (recording level) MANUAL/AUTO switch X Hole for operations, or to identify each terminal. button * These buttons and jack have a tactile dot. Remote commander (supplied) 1 X PAUSE button 2 x ... (track mark) button 12 GB Use it as a reference point for attaching the tripod (not supplied) Y Battery compartment Z Speaker (on the basement) wj Built-in microphones (stereo) wk DPC (SPEED CTRL) (speed control) ON/OFF switch wl i/LINE OUT (headphone/line output) jack e; USB connector ea M2™/microSD memory card...

Operating Instructions
Page 23
...the selected folder. Basic Operations Starting recording (automatic recording) 1 Set the REC LEVEL switch to "AUTO," and press z REC in the stop mode to be recorded, and press X PAUSE, or N PLAY/ENTER. phones X PAUSE N PLAY/ ENTER 23GB You can change the microphone sensitivity with the MIC SENS(ATT...) switch. 2 Turn the built-in microphones in the direction of the source to enter the recording standby mode. z REC X...
...the selected folder. Basic Operations Starting recording (automatic recording) 1 Set the REC LEVEL switch to "AUTO," and press z REC in the stop mode to be recorded, and press X PAUSE, or N PLAY/ENTER. phones X PAUSE N PLAY/ ENTER 23GB You can change the microphone sensitivity with the MIC SENS(ATT...) switch. 2 Turn the built-in microphones in the direction of the source to enter the recording standby mode. z REC X...
Operating Instructions
Page 33
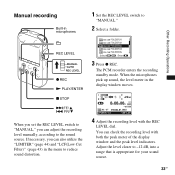
...REC LEVEL dial. You can adjust the recording level manually, according to -12 dB, into a range that is appropriate for your sound source. 33GB Adjust the level closer to the sound source. The PCM recorder enters the recording standby mode. When the microphones pick up sound, the level meter ...in the display window moves. 4 Adjust the recording level with both the peak meter of the display window and the peak ...
...REC LEVEL dial. You can adjust the recording level manually, according to -12 dB, into a range that is appropriate for your sound source. 33GB Adjust the level closer to the sound source. The PCM recorder enters the recording standby mode. When the microphones pick up sound, the level meter ...in the display window moves. 4 Adjust the recording level with both the peak meter of the display window and the peak ...
Operating Instructions
Page 36
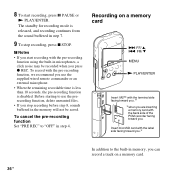
... remote commander or an external microphone. • When the remaining recordable time is less than 10 seconds, the pre-recording function is released, and recording continues from the sound buffered in step 7. 9 To stop recording before step 8, sounds buffered in the memory will not be recorded when you . Insert microSD... M2™ with the terminal side facing toward you .* *when you are inserting a memory card with the back side of the PCM recorder facing toward you.* In addition to the built-in memory, you use the prerecording function, delete unwanted files. • If you stop...
... remote commander or an external microphone. • When the remaining recordable time is less than 10 seconds, the pre-recording function is released, and recording continues from the sound buffered in step 7. 9 To stop recording before step 8, sounds buffered in the memory will not be recorded when you . Insert microSD... M2™ with the terminal side facing toward you .* *when you are inserting a memory card with the back side of the PCM recorder facing toward you.* In addition to the built-in memory, you use the prerecording function, delete unwanted files. • If you stop...

Operating Instructions
Page 42
... the microphone sensitivity 42 GB 3 Press > FF/ v or . The larger the value of the bit number, the larger amount of data it takes and the better the sound quality. z About the sampling frequency and quantifying bit number • Sampling frequency is converted into a digital signal ...(A/D conversion) per second. MP3 44.10kHz/64kbps** MP3 44.10kHz/128kbps MP3 44.10kHz/320kbps * default setting ** for 1second of audio. P Note You cannot set the recording mode while recording. LPCM 22.05kHz/16bit LPCM 44.10kHz/16bit...
... the microphone sensitivity 42 GB 3 Press > FF/ v or . The larger the value of the bit number, the larger amount of data it takes and the better the sound quality. z About the sampling frequency and quantifying bit number • Sampling frequency is converted into a digital signal ...(A/D conversion) per second. MP3 44.10kHz/64kbps** MP3 44.10kHz/128kbps MP3 44.10kHz/320kbps * default setting ** for 1second of audio. P Note You cannot set the recording mode while recording. LPCM 22.05kHz/16bit LPCM 44.10kHz/16bit...
Operating Instructions
Page 43
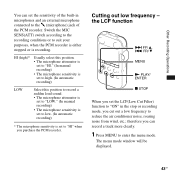
...is set the sensitivity of the built-in the stop or recording mode, you purchase the PCM recorder. Cutting out low frequency - therefore you can set to "HI" when you cut out a low frequency to the m (microphone) jack of the PCM recorder. The menu mode window will be displayed. 43GB Switch ...the MIC SENS(ATT) switch according to the recording conditions or to enter the menu mode. HI (high)* Usually select this position. •...
...is set the sensitivity of the built-in the stop or recording mode, you purchase the PCM recorder. Cutting out low frequency - therefore you can set to "HI" when you cut out a low frequency to the m (microphone) jack of the PCM recorder. The menu mode window will be displayed. 43GB Switch ...the MIC SENS(ATT) switch according to the recording conditions or to enter the menu mode. HI (high)* Usually select this position. •...
Operating Instructions
Page 46
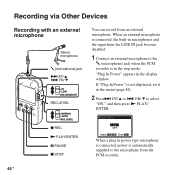
...). 2 Press> FF/ v or . z REC N PLAY/ENTER X PAUSE x STOP When a plug in power type microphone is connected, power is in microphones and the input from the LINE IN jack become disabled. 1 Connect an external microphone to the m (microphone) jack when the PCM recorder is automatically supplied to select "ON," and then press N PLAY/ ENTER. If "Plug In...
...). 2 Press> FF/ v or . z REC N PLAY/ENTER X PAUSE x STOP When a plug in power type microphone is connected, power is in microphones and the input from the LINE IN jack become disabled. 1 Connect an external microphone to the m (microphone) jack when the PCM recorder is automatically supplied to select "ON," and then press N PLAY/ ENTER. If "Plug In...
Operating Instructions
Page 47
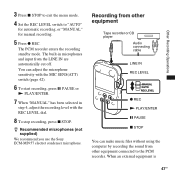
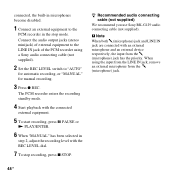
... connected to "AUTO" for automatic recording, or "MANUAL" for manual recording. 5 Press z REC. Other Recording Operations 3 Press x STOP to exit the menu mode. 4 Set the REC LEVEL switch to the PCM recorder. When an external equipment is 47GB z Recommended microphones (not supplied) We recommend you use the Sony ECM-MS957 electret condenser microphone. The built-in step 4, adjust...
... connected to "AUTO" for automatic recording, or "MANUAL" for manual recording. 5 Press z REC. Other Recording Operations 3 Press x STOP to exit the menu mode. 4 Set the REC LEVEL switch to the PCM recorder. When an external equipment is 47GB z Recommended microphones (not supplied) We recommend you use the Sony ECM-MS957 electret condenser microphone. The built-in step 4, adjust...
Operating Instructions
Page 48
.... z Recommended audio connecting cable (not supplied) We recommend you use Sony RK-G129 audio connecting cable (not supplied). When using a Sony audio connecting cable (not supplied). 2 Set the REC LEVEL switch to the PCM recorder in the stop recording, press x STOP. connected, the built-in microphones become disabled. 1 Connect an external equipment to "AUTO" for automatic...
.... z Recommended audio connecting cable (not supplied) We recommend you use Sony RK-G129 audio connecting cable (not supplied). When using a Sony audio connecting cable (not supplied). 2 Set the REC LEVEL switch to the PCM recorder in the stop recording, press x STOP. connected, the built-in microphones become disabled. 1 Connect an external equipment to "AUTO" for automatic...
Operating Instructions
Page 50
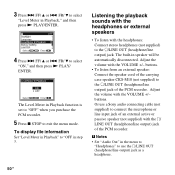
...an external speaker: Connect the speaker cord of the carrying case speaker CKS-M10 (not supplied) to "OFF in speaker will be automatically disconnected. P Notes • Set...Sony audio connecting cable (not supplied) to exit the menu mode. Listening the playback sounds with the headphones or external speakers • To listen with the i/ LINE OUT (headphone/line output) jack of the PCM recorder.... FR/ V to select "Level Meter in Playback function is set to "OFF" when you purchase the PCM recorder. 5 Press x STOP to connect the microphone or line input ...
...an external speaker: Connect the speaker cord of the carrying case speaker CKS-M10 (not supplied) to "OFF in speaker will be automatically disconnected. P Notes • Set...Sony audio connecting cable (not supplied) to exit the menu mode. Listening the playback sounds with the headphones or external speakers • To listen with the i/ LINE OUT (headphone/line output) jack of the PCM recorder.... FR/ V to select "Level Meter in Playback function is set to "OFF" when you purchase the PCM recorder. 5 Press x STOP to connect the microphone or line input ...
Operating Instructions
Page 82
... currently being selected becomes full. 82 GB Select this option to connect an external recorder such as a tape recorder for recording playback sound of the PCM recorder. OFF: The PCM recorder does not supply power to the connected Plug In Power type microphone. The new recording is selected, you cannot adjust output volume with the Plug In Power function...
... currently being selected becomes full. 82 GB Select this option to connect an external recorder such as a tape recorder for recording playback sound of the PCM recorder. OFF: The PCM recorder does not supply power to the connected Plug In Power type microphone. The new recording is selected, you cannot adjust output volume with the Plug In Power function...

Operating Instructions
Page 92
... the built-in microphones The built-in summer) - In circumstances where you bend down, the unit may drop into the water and may get wet. 92 GB On handling • Do not subject the PCM recorder to strong wind or water. Anywhere extremely hot. ... the unit in the pocket of the PCM recorder. • Do not place the recorder in a bathroom - If you touch the unit with the windows closed (especially in microphones are highperformance electret condenser microphones. You can perform recording operations without touching the PCM recorder. • Roaring noise from wind, or...
... the built-in microphones The built-in summer) - In circumstances where you bend down, the unit may drop into the water and may get wet. 92 GB On handling • Do not subject the PCM recorder to strong wind or water. Anywhere extremely hot. ... the unit in the pocket of the PCM recorder. • Do not place the recorder in a bathroom - If you touch the unit with the windows closed (especially in microphones are highperformance electret condenser microphones. You can perform recording operations without touching the PCM recorder. • Roaring noise from wind, or...

Operating Instructions
Page 97
Input/Output • Microphone jack (minijack, stereo), input for 24 bit) General Speaker Approx. 16 mm (21/32 inches) dia. Input impedance: 22 kΩ - Output level: 20 mW + 20 ...;)/microSD memory card slot Playback speed control (DPC) +100% to -noise ratio (S/N) (Input from the LINE IN jack and output from LINE OUT jack when recording/playing back LPCM) 87 dB (1 kHz IHF-A) (for plug in .) Mass (JEITA)*4 Approx. 187 g (6 5/8 oz.) including 2 LR6 (size AA) alkaline batteries *4 Measured value by the...
Input/Output • Microphone jack (minijack, stereo), input for 24 bit) General Speaker Approx. 16 mm (21/32 inches) dia. Input impedance: 22 kΩ - Output level: 20 mW + 20 ...;)/microSD memory card slot Playback speed control (DPC) +100% to -noise ratio (S/N) (Input from the LINE IN jack and output from LINE OUT jack when recording/playing back LPCM) 87 dB (1 kHz IHF-A) (for plug in .) Mass (JEITA)*4 Approx. 187 g (6 5/8 oz.) including 2 LR6 (size AA) alkaline batteries *4 Measured value by the...

Operating Instructions
Page 98
Please ask the dealer for detailed information. Optional accessories Memory Stick Micro™ (M2™) MS-A1GD, MS-A2GD, MS-A4GD, MS-A8GU2, MSA16GU2 Stereo headphones MDR-7502, MDR7509HD Electret condenser microphone ECM-MS957 Audio connecting cable RK-G129 Rechargeable battery NH-AA-B2K Battery charger BCG-34HS2K Carrying case speaker CKS-M10 Wind screen AD-PCM2 Tripod VCT-PCM1 Your dealer may not handle some of the above listed optional accessories. Design and specifications are subject to change without notice. 98 GB
Please ask the dealer for detailed information. Optional accessories Memory Stick Micro™ (M2™) MS-A1GD, MS-A2GD, MS-A4GD, MS-A8GU2, MSA16GU2 Stereo headphones MDR-7502, MDR7509HD Electret condenser microphone ECM-MS957 Audio connecting cable RK-G129 Rechargeable battery NH-AA-B2K Battery charger BCG-34HS2K Carrying case speaker CKS-M10 Wind screen AD-PCM2 Tripod VCT-PCM1 Your dealer may not handle some of the above listed optional accessories. Design and specifications are subject to change without notice. 98 GB
Operating Instructions
Page 103
...is displayed and • 99 tracks have been recorded. Therefore you cannot operate the PCM you store them on the PCM recorder is pressed, the case is touched, or the PCM recorder is held, so that are too loud. Delete some of the connected microphone was placed near an AC power source, a ...fluorescent lamp or a mobile phone during recording or playback. &#...
...is displayed and • 99 tracks have been recorded. Therefore you cannot operate the PCM you store them on the PCM recorder is pressed, the case is touched, or the PCM recorder is held, so that are too loud. Delete some of the connected microphone was placed near an AC power source, a ...fluorescent lamp or a mobile phone during recording or playback. &#...

