
Operating Instructions
Page 3
... automatically - Dolby D level 23 Locking discs - Discs Using PBC functions - Table of controls 10 Main unit 10 Card remote commander RM-X170 12 Getting Started Resetting the unit 14 Performing initial settings 14 Preparing the card remote commander 14 Basic Operations Listening to the radio 15 Playing discs 17 Advanced Operations...
... automatically - Dolby D level 23 Locking discs - Discs Using PBC functions - Table of controls 10 Main unit 10 Card remote commander RM-X170 12 Getting Started Resetting the unit 14 Performing initial settings 14 Preparing the card remote commander 14 Basic Operations Listening to the radio 15 Playing discs 17 Advanced Operations...
Operating Instructions
Page 10
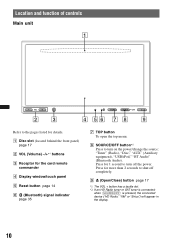
... pressed, the connected device ("HD Radio," "XM" or "Sirius") will appear in the display. 10 Press for the card remote commander D Display window/touch panel E Reset button page 14 F (Bluetooth) signal indicator page 35 G TOP button To open the top menu. A Disc slot (located behind the front panel) page 17 B VOL...
... pressed, the connected device ("HD Radio," "XM" or "Sirius") will appear in the display. 10 Press for the card remote commander D Display window/touch panel E Reset button page 14 F (Bluetooth) signal indicator page 35 G TOP button To open the top menu. A Disc slot (located behind the front panel) page 17 B VOL...
Operating Instructions
Page 14
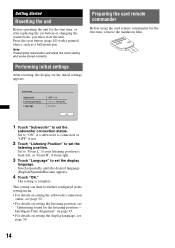
...• For details on setting the display language, see "Optimizing sound for the first time, remove the insulation film. Note Pressing the reset button will erase the clock setting and some stored contents. Set to "Front L" if your listening position is connected, or "OFF" ... Touch "OK." Intelligent Time Alignment" on page 45. • For details on setting the listening position, see page 50. 14 Getting Started Resetting the unit Before operating the unit for the initial settings appears. Initial Setting Subwoofer Listening Position Language OFF / ON Front L / Front R English...
...• For details on setting the display language, see "Optimizing sound for the first time, remove the insulation film. Note Pressing the reset button will erase the clock setting and some stored contents. Set to "Front L" if your listening position is connected, or "OFF" ... Touch "OK." Intelligent Time Alignment" on page 45. • For details on setting the listening position, see page 50. 14 Getting Started Resetting the unit Before operating the unit for the initial settings appears. Initial Setting Subwoofer Listening Position Language OFF / ON Front L / Front R English...

Operating Instructions
Page 44
...the ring tone of registered devices; Touch "Yes" in single steps, between -8 and +8. Back ATT Top EQ7 Tune : Custom 0 62 Hz 0 157 Hz 0 396 Hz Reset 15 0 0 1 kHz 2.5 kHz OK 0 0 6.3 kHz 16 kHz 12:00 4 Touch +/- of each frequency to answer automatically after 3 seconds. - "Long": to adjust...The setting is complete. "Device List"*1 (page 36) Shows the list of this unit displayed on the connected device. (Default setting: "Sony Automotive") For details on the setting of keyboard, see their levels. "EC/NC Mode" (Echo Canceller/Noise Canceller Mode) Reduces echo and ...
...the ring tone of registered devices; Touch "Yes" in single steps, between -8 and +8. Back ATT Top EQ7 Tune : Custom 0 62 Hz 0 157 Hz 0 396 Hz Reset 15 0 0 1 kHz 2.5 kHz OK 0 0 6.3 kHz 16 kHz 12:00 4 Touch +/- of each frequency to answer automatically after 3 seconds. - "Long": to adjust...The setting is complete. "Device List"*1 (page 36) Shows the list of this unit displayed on the connected device. (Default setting: "Sony Automotive") For details on the setting of keyboard, see their levels. "EC/NC Mode" (Echo Canceller/Noise Canceller Mode) Reduces echo and ...
Operating Instructions
Page 46
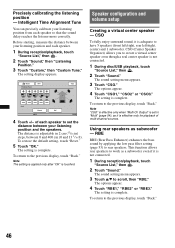
... "CSO1," "CSO2" or "CSO3." This function allows rear speakers to set to the previous display, touch "Back." To restore the default setting, touch "Reset." 5 Touch "OK." RBE RBE (Rear Bass Enhancer) enhances the bass sound by applying the low pass filter setting (page 53) to scroll, then "...the distance between 0 and 400 cm (0 and 13 1/10 ft). of multi-channel sources. Back ATT Top Position Tune 100 100 100 100 100 (cm) Reset OK 15 12:00 4 Touch +/- The sound setting menu appears. 3 Touch v/V to rear speakers. To return to "Multi" (page 54), as subwoofer...
... "CSO1," "CSO2" or "CSO3." This function allows rear speakers to set to the previous display, touch "Back." To restore the default setting, touch "Reset." 5 Touch "OK." RBE RBE (Rear Bass Enhancer) enhances the bass sound by applying the low pass filter setting (page 53) to scroll, then "...the distance between 0 and 400 cm (0 and 13 1/10 ft). of multi-channel sources. Back ATT Top Position Tune 100 100 100 100 100 (cm) Reset OK 15 12:00 4 Touch +/- The sound setting menu appears. 3 Touch v/V to rear speakers. To return to "Multi" (page 54), as subwoofer...
Operating Instructions
Page 47
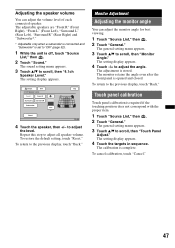
...To return to adjust all speaker volume. The setting display appears. 4 Touch the targets in sequence. To restore the default setting, touch "Reset." The calibration is required if the touching position does not correspond with the proper item. 1 Touch "Source List," then . 2 Touch "... 1 Touch "Source List," then . 2 Touch "General." Back ATT 4.1ch Speaker Level Front L Front R Surround L Surround R Subwoofer 0 Reset Top 12:00 4 Touch the speaker, then +/- Monitor Adjustment Adjusting the monitor angle You can adjust the volume level of each connected speaker.
...To return to adjust all speaker volume. The setting display appears. 4 Touch the targets in sequence. To restore the default setting, touch "Reset." The calibration is required if the touching position does not correspond with the proper item. 1 Touch "Source List," then . 2 Touch "... 1 Touch "Source List," then . 2 Touch "General." Back ATT 4.1ch Speaker Level Front L Front R Surround L Surround R Subwoofer 0 Reset Top 12:00 4 Touch the speaker, then +/- Monitor Adjustment Adjusting the monitor angle You can adjust the volume level of each connected speaker.

Operating Instructions
Page 57
...Back Marker Mirror 1 2 3 Turn off engine but keep the key in the rear monitor. Reversing the picture Touch "Mirror." A mirror reversed picture appears. Reset 2 Select the line to edit. 3 Edit the line. Notes • When backing up (or the shift lever is set to not display the picture from...video or audio) of each connected device, the background screen can display the picture from the rear view camera. To restore the default setting, touch "Reset." 57 To return to scroll, then "AUX1 Input" or "AUX2 Input." 3 Touch "Audio" or "Video." The picture from a rear view ...
...Back Marker Mirror 1 2 3 Turn off engine but keep the key in the rear monitor. Reversing the picture Touch "Mirror." A mirror reversed picture appears. Reset 2 Select the line to edit. 3 Edit the line. Notes • When backing up (or the shift lever is set to not display the picture from...video or audio) of each connected device, the background screen can display the picture from the rear view camera. To restore the default setting, touch "Reset." 57 To return to scroll, then "AUX1 Input" or "AUX2 Input." 3 Touch "Audio" or "Video." The picture from a rear view ...

Operating Instructions
Page 64
... tuning is not connected properly. Before going through the checklist below, check the connection and operating procedures. Support site http://esupport.sony.com http://www.sony.com/mobileAV General No power is being supplied to the power supply lead of the power antenna (aerial) control lead. t Store... t Tuning stops too frequently: Set "Local" to "OFF" (page 16). The power antenna (aerial) does not have been erased. • The reset button has been pressed. t Touch anywhere on the unit until the display appears. • "M.OFF" is touched and the Monitor Off function is not ...
... tuning is not connected properly. Before going through the checklist below, check the connection and operating procedures. Support site http://esupport.sony.com http://www.sony.com/mobileAV General No power is being supplied to the power supply lead of the power antenna (aerial) control lead. t Store... t Tuning stops too frequently: Set "Local" to "OFF" (page 16). The power antenna (aerial) does not have been erased. • The reset button has been pressed. t Touch anywhere on the unit until the display appears. • "M.OFF" is touched and the Monitor Off function is not ...
Operating Instructions
Page 65
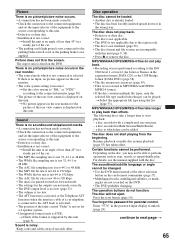
... perform operations such as DTS). MP3/WMA/AAC/JPEG/MPEG-4 files do not function. For details, see the manual supplied with the disc. Press the reset button (page 14). Disc operation The disc cannot be able to the connected monitor (page 50). • The picture of the direct selection button on...
... perform operations such as DTS). MP3/WMA/AAC/JPEG/MPEG-4 files do not function. For details, see the manual supplied with the disc. Press the reset button (page 14). Disc operation The disc cannot be able to the connected monitor (page 50). • The picture of the direct selection button on...
Operating Instructions
Page 68
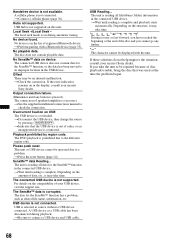
... the structure, it may take time. Playback prohibited by pressing (SOURCE/OFF). t Press the reset button (page 14). The data for the SensMe™ function in the display, consult your nearest Sony dealer. A USB device or a USB cable has been disconnected during automatic tuning. Depending on ...began. 68 The DVD playback is complete. SensMe™ data Reading... t Wait until reading is prohibited due to check the connection. Please push reset. Depending on this unit. No device is reading all data for the SensMe™ function has a problem, such as source without a USB ...
... the structure, it may take time. Playback prohibited by pressing (SOURCE/OFF). t Press the reset button (page 14). The data for the SensMe™ function in the display, consult your nearest Sony dealer. A USB device or a USB cable has been disconnected during automatic tuning. Depending on ...began. 68 The DVD playback is complete. SensMe™ data Reading... t Wait until reading is prohibited due to check the connection. Please push reset. Depending on this unit. No device is reading all data for the SensMe™ function has a problem, such as source without a USB ...

Operating Instructions
Page 71
... camera input (Camera Input) 51 Rear view camera settings (Rear View Camera Setting) 57 Receive menu (Receive Menu) 16 Repeat play (Repeat) 24, 26, 32 Reset 14 Resume play 19 Ring tone (Ringtone) 44 Rotary commander (Rotary Commander) 51 S Screen aspect ratio (Aspect) 49, 53 Screen settings (Screen) 53 Security function...
... camera input (Camera Input) 51 Rear view camera settings (Rear View Camera Setting) 57 Receive menu (Receive Menu) 16 Repeat play (Repeat) 24, 26, 32 Reset 14 Resume play 19 Ring tone (Ringtone) 44 Rotary commander (Rotary Commander) 51 S Screen aspect ratio (Aspect) 49, 53 Screen settings (Screen) 53 Security function...

Operating Instructions
Page 220
If you have any questions/problems regarding this product, try the following: 1 Read Troubleshooting in Thailand Note: Stored data may be erased. 3 Please contact (U.S.A. only); Call 1-800-222-7669 URL http://www.SONY.com http://www.sony.net/ Sony Corporation Printed in these Operating Instructions. 2 Reset the unit.
If you have any questions/problems regarding this product, try the following: 1 Read Troubleshooting in Thailand Note: Stored data may be erased. 3 Please contact (U.S.A. only); Call 1-800-222-7669 URL http://www.SONY.com http://www.sony.net/ Sony Corporation Printed in these Operating Instructions. 2 Reset the unit.


