

Operating Instructions
Page 4
... Panel Adjust 17 Bluetooth Reset 18 Sound Settings 19 Sound Adjust 19 Screen Settings 19 Visual Settings 19 Additional Information Auxiliary Audio/Video Equipment 20 Rear View Camera 21 Precautions 21 Maintenance 25 Specifications 25 Troubleshooting 27 Language Code List 32 4GB
... Panel Adjust 17 Bluetooth Reset 18 Sound Settings 19 Sound Adjust 19 Screen Settings 19 Visual Settings 19 Additional Information Auxiliary Audio/Video Equipment 20 Rear View Camera 21 Precautions 21 Maintenance 25 Specifications 25 Troubleshooting 27 Language Code List 32 4GB
Operating Instructions
Page 7
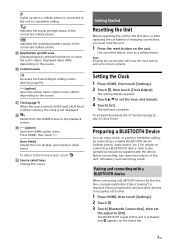
... the unit. 1 Press the reset button on the source. Clock (page 7) When the source selects [AUX Front], [AUX Rear] or [Rear Camera], the clock is not displayed. Switch from the HOME screen to the operating instructions supplied with a BLUETOOTH device When connecting a BLUETOOTH...58179; Application specific area Display playback controls/indications or show the unit's status. Press HOME, then touch . [Icon View] Selects the icon display: [Line View] or [Grid View]. The BLUETOOTH signal of this unit and other devices to [ON]. For details on the source. Common...
... the unit. 1 Press the reset button on the source. Clock (page 7) When the source selects [AUX Front], [AUX Rear] or [Rear Camera], the clock is not displayed. Switch from the HOME screen to the operating instructions supplied with a BLUETOOTH device When connecting a BLUETOOTH...58179; Application specific area Display playback controls/indications or show the unit's status. Press HOME, then touch . [Icon View] Selects the icon display: [Line View] or [Grid View]. The BLUETOOTH signal of this unit and other devices to [ON]. For details on the source. Common...
Operating Instructions
Page 17
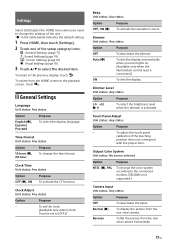
...when the dimmer is connected.) ON To dim the display. To return to the playback screen, touch . To display the picture from the rear view camera horizontally. 17GB To switch from the HOME screen to the previous display, touch . Clock Time Unit status: Any status Option OFF (... HOME menu when you turn lights on. (Available only when the illumination control lead is activated. Reverse To flip the picture from the rear view camera. Time Format Unit status: Any status Option 12-hour (), 24-hour Purpose To change the settings of the setup category icons. ...
...when the dimmer is connected.) ON To dim the display. To return to the playback screen, touch . To display the picture from the rear view camera horizontally. 17GB To switch from the HOME screen to the previous display, touch . Clock Time Unit status: Any status Option OFF (... HOME menu when you turn lights on. (Available only when the illumination control lead is activated. Reverse To flip the picture from the rear view camera. Time Format Unit status: Any status Option 12-hour (), 24-hour Purpose To change the settings of the setup category icons. ...

Operating Instructions
Page 21
...liquid onto the unit or discs. Installing the unit with the unit for your safety, even if the rear view camera is in contact with the ignition on the rear view camera exclusively. While operating Do not insert your hands, fingers or foreign object into the... is set the parking brake. Rear View Camera By connecting the optional rear view camera to the CAMERA IN terminal, you park the car and set to the R (reverse) position). you press HOME then touch [Rear Camera]. you can display the picture from the rear view camera. Do not depend on may ...
...liquid onto the unit or discs. Installing the unit with the unit for your safety, even if the rear view camera is in contact with the ignition on the rear view camera exclusively. While operating Do not insert your hands, fingers or foreign object into the... is set the parking brake. Rear View Camera By connecting the optional rear view camera to the CAMERA IN terminal, you park the car and set to the R (reverse) position). you press HOME then touch [Rear Camera]. you can display the picture from the rear view camera. Do not depend on may ...

Operating Instructions
Page 28
... or [NTSC] according to the connected monitor (page 17). The picture of the rear view camera is displayed on this unit. No picture appears in the rear monitor if the picture of the rear view camera is noisy. Keep cords and cables away from each other equipment, and set the ...function. There is no picture/picture noise occurs in the screen. The aspect ratio is selected. The picture does not fit in the rear monitor. A source/mode which data can be played. Select the appropriate file type using the list (page 12). Disc operation...
... or [NTSC] according to the connected monitor (page 17). The picture of the rear view camera is displayed on this unit. No picture appears in the rear monitor if the picture of the rear view camera is noisy. Keep cords and cables away from each other equipment, and set the ...function. There is no picture/picture noise occurs in the screen. The aspect ratio is selected. The picture does not fit in the rear monitor. A source/mode which data can be played. Select the appropriate file type using the list (page 12). Disc operation...

