Operating Instructions
Page 6
EQ7 43 Customizing the equalizer curve - Rear Bass Enhancer 45 Adjusting the speaker volume 45 Monitor Adjustment Touch panel calibration 46 Setting the background... code 56 Setting the clock 56 Using Optional Equipment Auxiliary audio/video equipment 57 RM-X170 Remote Commander 57 Rear view camera 59 Rear view camera settings 59 Additional Information Precautions 60 Notes on LCD panel 60 Notes on discs 60 Playback order of MP3... Time Alignment 44 Calibrating the listening position - Sound Adjustment Selecting the sound quality - CSO 45 Using rear speakers like subwoofers -
EQ7 43 Customizing the equalizer curve - Rear Bass Enhancer 45 Adjusting the speaker volume 45 Monitor Adjustment Touch panel calibration 46 Setting the background... code 56 Setting the clock 56 Using Optional Equipment Auxiliary audio/video equipment 57 RM-X170 Remote Commander 57 Rear view camera 59 Rear view camera settings 59 Additional Information Precautions 60 Notes on LCD panel 60 Notes on discs 60 Playback order of MP3... Time Alignment 44 Calibrating the listening position - Sound Adjustment Selecting the sound quality - CSO 45 Using rear speakers like subwoofers -
Operating Instructions
Page 8
... connected. "DVD VIDEO," "DVD-R," "DVD-RW," "DVD+R," and "DVD+RW" are owned by Sony Corporation is prohibited without a license from Dolby Laboratories. Do not insert your safety, even if the rear view camera is in the event of a sudden movement of the car. Be sure to fasten seatbelts to...the setup feature or any use of the unit may be sure not to the supplied "Installation/Connections" guide. Do not depend on the rear view camera exclusively. • While operating - The picture on the display is automatically switched to distraction and cause an accident. If you park ...
... connected. "DVD VIDEO," "DVD-R," "DVD-RW," "DVD+R," and "DVD+RW" are owned by Sony Corporation is prohibited without a license from Dolby Laboratories. Do not insert your safety, even if the rear view camera is in the event of a sudden movement of the car. Be sure to fasten seatbelts to...the setup feature or any use of the unit may be sure not to the supplied "Installation/Connections" guide. Do not depend on the rear view camera exclusively. • While operating - The picture on the display is automatically switched to distraction and cause an accident. If you park ...

Operating Instructions
Page 47
... Color 0 0 4 Touch "Warm," "Normal," or "Cool" to the previous display, touch "Back." "Wide": Picture with overflowing parts of the rear view camera cannot be changed. 47 The options appear. 4 Touch the desired option. To return to select "Color Tone." 5 Touch +/- The options are ...indicated below. To return to the left and right edges of the rear view camera cannot be adjusted. Customizing the picture The options "Custom 1" and "Custom 2" of "Brightness" and "Color" to adjust their levels. ...
... Color 0 0 4 Touch "Warm," "Normal," or "Cool" to the previous display, touch "Back." "Wide": Picture with overflowing parts of the rear view camera cannot be changed. 47 The options appear. 4 Touch the desired option. To return to select "Color Tone." 5 Touch +/- The options are ...indicated below. To return to the left and right edges of the rear view camera cannot be adjusted. Customizing the picture The options "Custom 1" and "Custom 2" of "Brightness" and "Color" to adjust their levels. ...

Operating Instructions
Page 50
... factory-set to switch the background screen accordingly. Unit status Any status No source selected To display the picture from the connected rear view ON (z) camera. Audio (z) OFF Video (z) Audio OFF No Signal Changes the screen automatically when no external video signal is connected to... AUX/BUS IN, "Sony BUS Input" appears instead of device connected to the rear AUX terminals to the R (reverse) position). - Rear View Camera Setting - (page 59) Purpose To use on the right side of rotary commander ...
... factory-set to switch the background screen accordingly. Unit status Any status No source selected To display the picture from the connected rear view ON (z) camera. Audio (z) OFF Video (z) Audio OFF No Signal Changes the screen automatically when no external video signal is connected to... AUX/BUS IN, "Sony BUS Input" appears instead of device connected to the rear AUX terminals to the R (reverse) position). - Rear View Camera Setting - (page 59) Purpose To use on the right side of rotary commander ...
Operating Instructions
Page 58
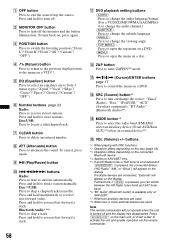
.../format. (For a VCD/CD/MP3/WMA/AAC/MPEG4, to change the audio channel.) (SUBTITLE): Press to change the subtitle language. (ANGLE): Press to change the viewing angle. (TOP MENU): Press to open the top menu on a DVD. (MENU): Press to reverse/fast-forward a track. D O (Return) button Press to return to the...
.../format. (For a VCD/CD/MP3/WMA/AAC/MPEG4, to change the audio channel.) (SUBTITLE): Press to change the subtitle language. (ANGLE): Press to change the viewing angle. (TOP MENU): Press to open the top menu on a DVD. (MENU): Press to reverse/fast-forward a track. D O (Return) button Press to return to the...

Operating Instructions
Page 59
...A mirror-reversed picture appears. 59 Notes • When backing up (or the shift lever is set to not display the picture from the rear view camera. The setting items appear. Line Edit Editing lines 1 Touch "Line Edit." To adjust the position, touch V or v. Reset 2 ...," then . Touch "Marker" again to the CAMERA IN terminal, you can display the picture from a rear view camera by deactivating the camera input (page 50). Rear view camera By connecting the optional rear view camera to hide the marker lines. If not, touch "General." 2 Touch v/V to the previous display,...
...A mirror-reversed picture appears. 59 Notes • When backing up (or the shift lever is set to not display the picture from the rear view camera. The setting items appear. Line Edit Editing lines 1 Touch "Line Edit." To adjust the position, touch V or v. Reset 2 ...," then . Touch "Marker" again to the CAMERA IN terminal, you can display the picture from a rear view camera by deactivating the camera input (page 50). Rear view camera By connecting the optional rear view camera to hide the marker lines. If not, touch "General." 2 Touch v/V to the previous display,...
Operating Instructions
Page 64
...): RC-61 (1 m), RC-62 (2 m) USB and Video connection cable for iPod: RC-202IPV, RC-200IPV HD Radio™ tuner: XT-100HD Rear View Camera: XA-R800C Power amplifier section Outputs: Speaker outputs Speaker impedance: 4 - 8 ohms Maximum power output: 52 W × 4 (at 4 ohms... Remote controller input terminal Antenna (aerial) input terminal Parking break control terminal Microphone input terminal (XAV-62BT only) Reverse input terminal Camera input terminal AUX audio input terminals (front/rear) AUX video input terminal USB signal input connector Power requirements: 12 V DC car battery (...
...): RC-61 (1 m), RC-62 (2 m) USB and Video connection cable for iPod: RC-202IPV, RC-200IPV HD Radio™ tuner: XT-100HD Rear View Camera: XA-R800C Power amplifier section Outputs: Speaker outputs Speaker impedance: 4 - 8 ohms Maximum power output: 52 W × 4 (at 4 ohms... Remote controller input terminal Antenna (aerial) input terminal Parking break control terminal Microphone input terminal (XAV-62BT only) Reverse input terminal Camera input terminal AUX audio input terminals (front/rear) AUX video input terminal USB signal input connector Power requirements: 12 V DC car battery (...
Operating Instructions
Page 67
...displayed on this unit. t Set the color system to "PAL" or "NTSC" according to the connected monitor (page 49). • The picture of the rear view camera is fixed on this unit. • The disc is defective or dirty. • Installation is not applied. t Install the unit at an angle ...The soundtrack/subtitle language or angle cannot be changed. • Use the DVD menu instead of the rear view camera is already loaded. • The disc has been forcibly inserted upside down or in the rear monitor. • A source/mode which data can be able to the connected equipment, and set ...
...displayed on this unit. t Set the color system to "PAL" or "NTSC" according to the connected monitor (page 49). • The picture of the rear view camera is fixed on this unit. • The disc is defective or dirty. • Installation is not applied. t Install the unit at an angle ...The soundtrack/subtitle language or angle cannot be changed. • Use the DVD menu instead of the rear view camera is already loaded. • The disc has been forcibly inserted upside down or in the rear monitor. • A source/mode which data can be able to the connected equipment, and set ...
Operating Instructions
Page 73
..., 55 Playback settings (Visual) 54 Program Types (PTY) 16, 17 R Radio Data System (RDS) 16 Rear Bass Enhancer (RBE) 45, 52 Rear speaker/subwoofer setting (Rear/Sub) 14, 52 Rear view camera 59 Rear view camera input (Camera Input) 50 Rear view camera settings (Rear View Camera Setting) 59 Receive menu (Receive Menu) 15 Remote Commander 57, 63 Repeat play (Repeat...
..., 55 Playback settings (Visual) 54 Program Types (PTY) 16, 17 R Radio Data System (RDS) 16 Rear Bass Enhancer (RBE) 45, 52 Rear speaker/subwoofer setting (Rear/Sub) 14, 52 Rear view camera 59 Rear view camera input (Camera Input) 50 Rear view camera settings (Rear View Camera Setting) 59 Receive menu (Receive Menu) 15 Remote Commander 57, 63 Repeat play (Repeat...


