
Operating Instructions
Page 5
... Connections and Preparations Unpacking 7 Step 1: Installing the Projector ...........8 Before Setting Up the Projector ... 9 Installing the Projector and a Screen 10 Step 2: Connecting the Projector .....13 Connecting to a DVD Player/ Recorder or Digital Tuner 13 Connecting to Video Equipment 15 Connecting to a Computer ..........16 Step 3:...Quality of a Signal from the Computer 44 Others Troubleshooting 45 Warning Indicators 46 Message Lists 47 Replacing the Lamp 48 Replacing the Air Filter 49 Specifications 51 Input Signals and Adjustable/setting Items 53 Preset Signals 55 Ceiling...
... Connections and Preparations Unpacking 7 Step 1: Installing the Projector ...........8 Before Setting Up the Projector ... 9 Installing the Projector and a Screen 10 Step 2: Connecting the Projector .....13 Connecting to a DVD Player/ Recorder or Digital Tuner 13 Connecting to Video Equipment 15 Connecting to a Computer ..........16 Step 3:...Quality of a Signal from the Computer 44 Others Troubleshooting 45 Warning Indicators 46 Message Lists 47 Replacing the Lamp 48 Replacing the Air Filter 49 Specifications 51 Input Signals and Adjustable/setting Items 53 Preset Signals 55 Ceiling...
Operating Instructions
Page 6
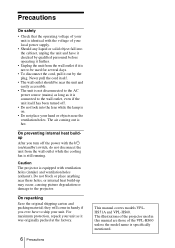
Precautions On safety • Check that the operating voltage of your unit is identical with the voltage of the VPL-HS60 unless the model name is specifically mentioned. Caution The projector is equipped with the I/1 (on . • Do not place your unit as it is still running. On repacking Save the original ..., causing picture degradation or damage to ship your local power supply. • Should any liquid or solid object fall into the lens while the lamp is on /standby) switch, do not disconnect the unit from the wall outlet if it is hot. Never pull the cord itself has been ...
Precautions On safety • Check that the operating voltage of your unit is identical with the voltage of the VPL-HS60 unless the model name is specifically mentioned. Caution The projector is equipped with the I/1 (on . • Do not place your unit as it is still running. On repacking Save the original ..., causing picture degradation or damage to ship your local power supply. • Should any liquid or solid object fall into the lens while the lamp is on /standby) switch, do not disconnect the unit from the wall outlet if it is hot. Never pull the cord itself has been ...

Operating Instructions
Page 30
button 1 Press ADJ PIC. ADJ PIC button CONTRAST +/- Contrast t Brightness t Color t Hue t Sharpness R Lamp Control r Black Level Adj. LIGHT INPUT DYNAMIC STANDARD CINEMA PICTURE MODE USER 1 USER 2 USER 3 ENTER APA ADJ PIC MENU WIDE MODE RCP RESET REAL COLOR ...
button 1 Press ADJ PIC. ADJ PIC button CONTRAST +/- Contrast t Brightness t Color t Hue t Sharpness R Lamp Control r Black Level Adj. LIGHT INPUT DYNAMIC STANDARD CINEMA PICTURE MODE USER 1 USER 2 USER 3 ENTER APA ADJ PIC MENU WIDE MODE RCP RESET REAL COLOR ...

Operating Instructions
Page 38
...Processing) You can adjust the picture using Real Color Processing and store the settings. Off: The feature does not function. For the VPL-HS51A only Using the specified controller, "ImageDirector*" supplied as a CD-ROM allows you to adjust, set and store the favorite ... see "Adjusting the Picture Using Real Color Processing." (1 page 32) 38 Picture Menu Lamp Control Switches the lamp wattage during projection. Off: Cancels this feature. Off: Cancels this feature. When the video signal with Macintosh. Once the settings are stored, you to "Low." Adjustable range is...
...Processing) You can adjust the picture using Real Color Processing and store the settings. Off: The feature does not function. For the VPL-HS51A only Using the specified controller, "ImageDirector*" supplied as a CD-ROM allows you to adjust, set and store the favorite ... see "Adjusting the Picture Using Real Color Processing." (1 page 32) 38 Picture Menu Lamp Control Switches the lamp wattage during projection. Off: Cancels this feature. Off: Cancels this feature. When the video signal with Macintosh. Once the settings are stored, you to "Low." Adjustable range is...
Operating Instructions
Page 40
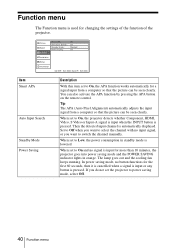
... the APA function works automatically for changing the settings of the function of the projector. You can be seen clearly. Set to Off when you want to On, the projector detects whether Component, HDMI, Video, S Video or Input-A signal is input when the INPUT button is pressed. Then the ...or any button is pressed. Function menu The Function menu is automatically displayed. The lamp goes out and the cooling fan keeps running. When set to switch the channel manually. When set the projector to Low, the power consumption in orange. In power saving mode, no input ...
... the APA function works automatically for changing the settings of the function of the projector. You can be seen clearly. Set to Off when you want to On, the projector detects whether Component, HDMI, Video, S Video or Input-A signal is input when the INPUT button is pressed. Then the ...or any button is pressed. Function menu The Function menu is automatically displayed. The lamp goes out and the cooling fan keeps running. When set to switch the channel manually. When set the projector to Low, the power consumption in orange. In power saving mode, no input ...
Operating Instructions
Page 43
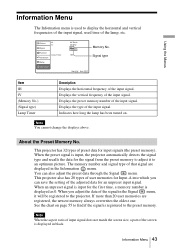
... Description Displays the horizontal frequency of the input signal. Indicates how long the lamp has been turned on page 55 to find if the signal is registered to the projector. When the preset signal is input, the projector automatically detects the signal type and recalls the data for the first time, a... data through the Signal menu. Displays the preset memory number of the input signal. Displays the type of the input signal. This projector has 32 types of the lamp, etc. Note When the aspect ratio of input signal does not match the screen size, a part of the screen is used ...
... Description Displays the horizontal frequency of the input signal. Indicates how long the lamp has been turned on page 55 to find if the signal is registered to the projector. When the preset signal is input, the projector automatically detects the signal type and recalls the data for the first time, a... data through the Signal menu. Displays the preset memory number of the input signal. Displays the type of the input signal. This projector has 32 types of the lamp, etc. Note When the aspect ratio of input signal does not match the screen size, a part of the screen is used ...

Operating Instructions
Page 45
... Symptom No picture. The picture from the VIDEO or S VIDEO INPUT connector is colored strange. c Set the computer signal to output only to replace a lamp and air filter, etc. Leave the projector for about one minute before turning on the...the contrast or brightness in the Setup menu to the input signal. (1 page 42) c Select "Computer," "Component" or "Video GBR" for about two hours with the power on . c Adjust "Dot Phase" for "Input-A Signal Sel." Power Symptom Cause... Picture" of the Picture menu properly. (1 page 37) c Adjust the focus with qualified Sony personnel.
... Symptom No picture. The picture from the VIDEO or S VIDEO INPUT connector is colored strange. c Set the computer signal to output only to replace a lamp and air filter, etc. Leave the projector for about one minute before turning on the...the contrast or brightness in the Setup menu to the input signal. (1 page 42) c Select "Computer," "Component" or "Video GBR" for about two hours with the power on . c Adjust "Dot Phase" for "Input-A Signal Sel." Power Symptom Cause... Picture" of the Picture menu properly. (1 page 37) c Adjust the focus with qualified Sony personnel.
Operating Instructions
Page 46
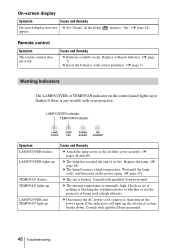
... . Cause and Remedy c Batteries could be weak. LAMP/COVER indicator TEMP/FAN indicator LAMP/ COVER TEMP/ FAN POWER SAVING ON/ STANDBY Symptom LAMP/COVER flashes. TEMP/FAN flashes. Consult with qualified Sony personnel. Wait until the lamp cools, and then turn on the control panel lights...to see if nothing is blocking the ventilation holes or whether or not the projector is unusually high. c The internal temperature is being used at high altitudes. Consult with qualified Sony personnel. 46 Troubleshooting LAMP/COVER and TEMP/FAN light up . Check to "On." (1 page 42...
... . Cause and Remedy c Batteries could be weak. LAMP/COVER indicator TEMP/FAN indicator LAMP/ COVER TEMP/ FAN POWER SAVING ON/ STANDBY Symptom LAMP/COVER flashes. TEMP/FAN flashes. Consult with qualified Sony personnel. Wait until the lamp cools, and then turn on the control panel lights...to see if nothing is blocking the ventilation holes or whether or not the projector is unusually high. c The internal temperature is being used at high altitudes. Consult with qualified Sony personnel. 46 Troubleshooting LAMP/COVER and TEMP/FAN light up . Check to "On." (1 page 42...

Operating Instructions
Page 47
... Mode". (1 page 41) c If this message is blocking the ventilation holes. c Check to see if nothing is displayed when using the projector at an altitude of the connected computer to high altitude mode on the remote control or the control panel. c Set "Input-A Signal Sel."...off the power. Switch to SVGA. Frequency is input from the computer. (1 page 42) Please replace the LAMP. Please replace the filter. High temp.! Caution messages Message x Not applicable! min. Replace the lamp. (1 page 48) Tip c To erase the message from the screen, press any button on ? in...
... Mode". (1 page 41) c If this message is blocking the ventilation holes. c Check to see if nothing is displayed when using the projector at an altitude of the connected computer to high altitude mode on the remote control or the control panel. c Set "Input-A Signal Sel."...off the power. Switch to SVGA. Frequency is input from the computer. (1 page 42) Please replace the LAMP. Please replace the filter. High temp.! Caution messages Message x Not applicable! min. Replace the lamp. (1 page 48) Tip c To erase the message from the screen, press any button on ? in...

Operating Instructions
Page 48
... it is stable after using the projector Turn off the projector and unplug the AC power cord. 2 Place a protective sheet (cloth) beneath the projector. Do not tilt the lamp unit. Replacing the Lamp The lamp used for the lamp to standby mode. If you touch the lamp, you can see its underside. If... you replace the lamp, wait for at least an hour for the light source has...
... it is stable after using the projector Turn off the projector and unplug the AC power cord. 2 Place a protective sheet (cloth) beneath the projector. Do not tilt the lamp unit. Replacing the Lamp The lamp used for the lamp to standby mode. If you touch the lamp, you can see its underside. If... you replace the lamp, wait for at least an hour for the light source has...

Operating Instructions
Page 49
Others Check that the ON/STANDBY indicator lights in red. 9 Point the remote control at the projector and press the following buttons on the remote control in the following order for less than five seconds each: RESET,
Others Check that the ON/STANDBY indicator lights in red. 9 Point the remote control at the projector and press the following buttons on the remote control in the following order for less than five seconds each: RESET,
Operating Instructions
Page 51
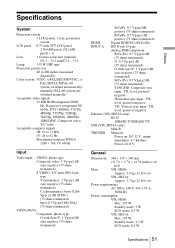
...1.6 times zoom lens (manual) f21.3 - 34.1 mm/F2.4 - 3.16 Lamp 135 W UHP type Projection picture size 40 to 200 inches (measured diagonally) Color... WXGA 1280 u 768, fV: 60 Hz Input Video input VIDEO: phono type Composite video: 1 Vp-p±2 dB sync negative (75 ohms terminated) S VIDEO: Y/C mini DIN 4-pin type Y (luminance): ...inches) (w/ h/d) Mass VPL-HS60: Approx. 5.6 kg (12 lb 6 oz) VPL-HS51A: Approx. 5.7 kg (12 lb 6 oz) Power requirements AC 100 to 240 V, 0.8-1.95 A, 50/60 Hz Power consumption VPL-HS60: Max. 195 W Standby mode: 3 W ECO mode: 0.5 W VPL-HS51A: Max. 195 ...
...1.6 times zoom lens (manual) f21.3 - 34.1 mm/F2.4 - 3.16 Lamp 135 W UHP type Projection picture size 40 to 200 inches (measured diagonally) Color... WXGA 1280 u 768, fV: 60 Hz Input Video input VIDEO: phono type Composite video: 1 Vp-p±2 dB sync negative (75 ohms terminated) S VIDEO: Y/C mini DIN 4-pin type Y (luminance): ...inches) (w/ h/d) Mass VPL-HS60: Approx. 5.6 kg (12 lb 6 oz) VPL-HS51A: Approx. 5.7 kg (12 lb 6 oz) Power requirements AC 100 to 240 V, 0.8-1.95 A, 50/60 Hz Power consumption VPL-HS60: Max. 195 W Standby mode: 3 W ECO mode: 0.5 W VPL-HS51A: Max. 195 ...
Operating Instructions
Page 52
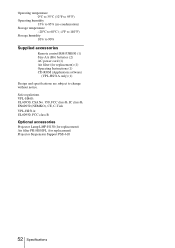
Safe regulations VPL-HS60: UL60950, CSA No. 950, FCC class B, IC class B, EN60950 (NEMKO), CE, C-Tick VPL-HS51A: UL60950, FCC class B Optional accessories Projector Lamp LMP-H130 (for replacement) Air filter PK-HS10FL (for replacement) (1) Operating Instructions (1) CD-ROM (Application software) (VPL-HS51A only) (1) Design and specifications are subject to 90% Supplied accessories Remote control RM-PJHS50...
Safe regulations VPL-HS60: UL60950, CSA No. 950, FCC class B, IC class B, EN60950 (NEMKO), CE, C-Tick VPL-HS51A: UL60950, FCC class B Optional accessories Projector Lamp LMP-H130 (for replacement) Air filter PK-HS10FL (for replacement) (1) Operating Instructions (1) CD-ROM (Application software) (VPL-HS51A only) (1) Design and specifications are subject to 90% Supplied accessories Remote control RM-PJHS50...

Operating Instructions
Page 54
... z z z HDMI - - z (preset memory numbers 3, 4, 5, 6 only) z : Adjustable/can be set - : Not adjustable/cannot be set Signal menu Item Dot Phase H size Shift Wide Mode Video or S video (Y/C) - - - z Input signal Component Video GBR - - - - z (preset (preset (preset memory memory memory numbers numbers numbers 3,4,7,8,9 only) 3,4,7,8,9 only) 3,4,7,8 only) z z z z z z z z z z z : Adjustable/can be set - : Not adjustable/cannot be set 54...
... z z z HDMI - - z (preset memory numbers 3, 4, 5, 6 only) z : Adjustable/can be set - : Not adjustable/cannot be set Signal menu Item Dot Phase H size Shift Wide Mode Video or S video (Y/C) - - - z Input signal Component Video GBR - - - - z (preset (preset (preset memory memory memory numbers numbers numbers 3,4,7,8,9 only) 3,4,7,8,9 only) 3,4,7,8 only) z z z z z z z z z z z : Adjustable/can be set - : Not adjustable/cannot be set 54...
Operating Instructions
Page 60
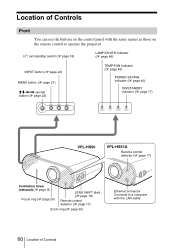
I/1 (on the remote control to operate the projector. Location of Controls Front You can use the buttons on the control panel with the same names as those on /standby) switch (1 page 18) LAMP/COVER indicator (1 page 46) INPUT button (1 page 24) MENU button (1 page 21) M/m/
I/1 (on the remote control to operate the projector. Location of Controls Front You can use the buttons on the control panel with the same names as those on /standby) switch (1 page 18) LAMP/COVER indicator (1 page 46) INPUT button (1 page 24) MENU button (1 page 21) M/m/

Operating Instructions
Page 62
Bottom Lamp cover (1 page 48) Ventilation holes (intake) (1 page 9) Adjusters (1 page 20) Projector suspension support attachment holes (1 page 58) 62 Location of Controls
Bottom Lamp cover (1 page 48) Ventilation holes (intake) (1 page 9) Adjusters (1 page 20) Projector suspension support attachment holes (1 page 58) 62 Location of Controls

Operating Instructions
Page 64
... C Ceiling Installation 57 Cinema Black Pro 38 Color 37 Color System 42 Color Temp 38 Connecting Computer 16 DVD Player/Recorder or Digital Tuner 13 Video Equipment 15 Contrast 37 D DDE 38 Dot Phase 39 F fH 43 Function menu 40 fV 43 G Gamma Correction 38 H H Size 39 HDMI ...Altitude Mode 41 Hue 37 I Illumination 41 Image Flip 41 Information menu 43 Input-A Signal Sel 42 Installation menu 41 Installing the Projector and a Screen .10, 57 L Lamp Timer 43 Language 42 Lens shift feature 18 Location of Controls Bottom 62 Front 60 Rear 61 M Menu clearing 36 Function menu ...
... C Ceiling Installation 57 Cinema Black Pro 38 Color 37 Color System 42 Color Temp 38 Connecting Computer 16 DVD Player/Recorder or Digital Tuner 13 Video Equipment 15 Contrast 37 D DDE 38 Dot Phase 39 F fH 43 Function menu 40 fV 43 G Gamma Correction 38 H H Size 39 HDMI ...Altitude Mode 41 Hue 37 I Illumination 41 Image Flip 41 Information menu 43 Input-A Signal Sel 42 Installation menu 41 Installing the Projector and a Screen .10, 57 L Lamp Timer 43 Language 42 Lens shift feature 18 Location of Controls Bottom 62 Front 60 Rear 61 M Menu clearing 36 Function menu ...

Operating Instructions
Page 65
Others R Real Color Processing 32, 38 Remote control inserting the batteries 7 location of controls 63 Replacing the Lamp 48 Reset resettable items 36 resetting the items 36 S Selecting the menu language 21 Setup menu 42 Sharpness 37 Shift 39 Signal menu 39 Smart APA 40 Standby Mode 40 Status 42 Supplied accessories 7 T Title Area 39 Troubleshooting 45 V V Keystone 41 V Position 39 Ventilation holes 9 W Warning Indicators 46 WIDE MODE 26 Wide Mode 26, 39 Index 65
Others R Real Color Processing 32, 38 Remote control inserting the batteries 7 location of controls 63 Replacing the Lamp 48 Reset resettable items 36 resetting the items 36 S Selecting the menu language 21 Setup menu 42 Sharpness 37 Shift 39 Signal menu 39 Smart APA 40 Standby Mode 40 Status 42 Supplied accessories 7 T Title Area 39 Troubleshooting 45 V V Keystone 41 V Position 39 Ventilation holes 9 W Warning Indicators 46 WIDE MODE 26 Wide Mode 26, 39 Index 65


