Operating Instructions
Page 1
Please check with your local Sony Authorized Dealer. © 2017 Sony Corporation 4-698-369-12 (1) Data Projector Operating Instructions Before operating the unit, please read this manual and supplied Quick Reference Manual thoroughly and retain it for future reference. VPL-DX271/DX241/DX221 VPL-DW241 Not all models are available in all countries and area.
Please check with your local Sony Authorized Dealer. © 2017 Sony Corporation 4-698-369-12 (1) Data Projector Operating Instructions Before operating the unit, please read this manual and supplied Quick Reference Manual thoroughly and retain it for future reference. VPL-DX271/DX241/DX221 VPL-DW241 Not all models are available in all countries and area.
Operating Instructions
Page 2
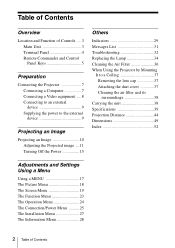
Table of Contents Overview Location and Function of Controls .... 3 Main Unit 3 Terminal Panel 4 Remote Commander and Control Panel Keys 5 Preparation Connecting the Projector 7 Connecting a Computer 7 Connecting a Video equipment .... 8 Connecting to an external device 9 Supplying the power to the external device 9 Projecting ... Power 15 Others Indicators 29 Messages List 31 Troubleshooting 32 Replacing the Lamp 34 Cleaning the Air Filter 36 When Using the Projector by Mounting It to a Ceiling 37 Removing the lens cap 37 Attaching the dust cover 37 Cleaning the air filter and ...
Table of Contents Overview Location and Function of Controls .... 3 Main Unit 3 Terminal Panel 4 Remote Commander and Control Panel Keys 5 Preparation Connecting the Projector 7 Connecting a Computer 7 Connecting a Video equipment .... 8 Connecting to an external device 9 Supplying the power to the external device 9 Projecting ... Power 15 Others Indicators 29 Messages List 31 Troubleshooting 32 Replacing the Lamp 34 Cleaning the Air Filter 36 When Using the Projector by Mounting It to a Ceiling 37 Removing the lens cap 37 Attaching the dust cover 37 Cleaning the air filter and ...
Operating Instructions
Page 6
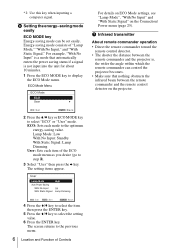
.... Energy-saving mode consists of Controls For details on ECO Mode settings, see "Lamp Mode", "With No Input" and "With Static Signal" on the projector. The setting items appear. ECO: Sets each item of the ECO mode menu as you desire (go to display the ECO Mode menu. f Setting the... energy-saving mode easily ECO MODE key Energy-saving mode can control the projector becomes. • Make sure that automatically enters the power saving status if a signal is , the wider the angle within which the remote commander can ...
.... Energy-saving mode consists of Controls For details on ECO Mode settings, see "Lamp Mode", "With No Input" and "With Static Signal" on the projector. The setting items appear. ECO: Sets each item of the ECO mode menu as you desire (go to display the ECO Mode menu. f Setting the... energy-saving mode easily ECO MODE key Energy-saving mode can control the projector becomes. • Make sure that automatically enters the power saving status if a signal is , the wider the angle within which the remote commander can ...
Operating Instructions
Page 7
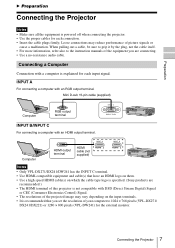
... also to 1024 × 768 pixels (VPL-DX271/ DX241/DX221) or 1280 × 800 pixels (VPL-DW241) for the external monitor. Loose connections may vary depending on which the cable type logo is specified. (Sony products are connecting. • Use a no-resistance audio cable. Preparation B Preparation Connecting the Projector Notes • Make sure all the...
... also to 1024 × 768 pixels (VPL-DX271/ DX241/DX221) or 1280 × 800 pixels (VPL-DW241) for the external monitor. Loose connections may vary depending on which the cable type logo is specified. (Sony products are connecting. • Use a no-resistance audio cable. Preparation B Preparation Connecting the Projector Notes • Make sure all the...

Operating Instructions
Page 8
...HDMI cable (not supplied) Notes • Only VPL-DX271/DX241/DW241 has the INPUT C terminal. • Use HDMI-compatible equipment and cable(s) that have an HDMI logo on which the cable type logo is set to 720p. 8 Connecting the Projector Mini D-sub 15-pin cable (not supplied)... Control) Signal. • Use a high speed HDMI cable(s) on them. • The HDMI terminal of the INPUT C terminal is specified. (Sony products are explained for each input signal. Video cable (not supplied) Video equipment Video output terminal INPUT A For connecting video equipment with an HDMI output...
...HDMI cable (not supplied) Notes • Only VPL-DX271/DX241/DW241 has the INPUT C terminal. • Use HDMI-compatible equipment and cable(s) that have an HDMI logo on which the cable type logo is set to 720p. 8 Connecting the Projector Mini D-sub 15-pin cable (not supplied)... Control) Signal. • Use a high speed HDMI cable(s) on them. • The HDMI terminal of the INPUT C terminal is specified. (Sony products are explained for each input signal. Video cable (not supplied) Video equipment Video output terminal INPUT A For connecting video equipment with an HDMI output...
Operating Instructions
Page 9
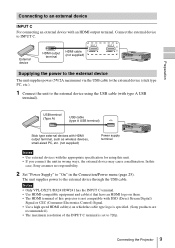
Notes • Only VPL-DX271/DX241/DW241 has the INPUT C terminal. • Use HDMI-compatible equipment and cable(s) that have an HDMI logo on them. • The HDMI terminal of this projector is not compatible with DSD (Direct Stream Digital) Signal or CEC (Consumer Electronics Control) Signal.... • Use a high speed HDMI cable(s) on which the cable type logo is specified. (Sony products are recommended.) • The maximum ...
Notes • Only VPL-DX271/DX241/DW241 has the INPUT C terminal. • Use HDMI-compatible equipment and cable(s) that have an HDMI logo on them. • The HDMI terminal of this projector is not compatible with DSD (Direct Stream Digital) Signal or CEC (Consumer Electronics Control) Signal.... • Use a high speed HDMI cable(s) on which the cable type logo is specified. (Sony products are recommended.) • The maximum ...
Operating Instructions
Page 10
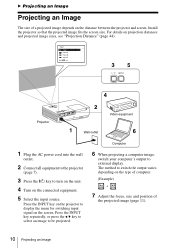
...projected image sizes, see "Projection Distance" (page 44). Input Video Input-A Input-B Input-C Sel 35 Projector 4 2 Video equipment 1 Wall outlet 6 1 Plug the AC power cord into the wall outlet. 2 Connect all equipment to the projector (page 7). 3 Press the ?/1 key to be projected. Computer 6 When projecting a computer image, .... B Projecting an Image Projecting an Image The size of the projected image (page 11). 10 Projecting an Image Install the projector so that the projected image fits the screen size. For details on the connected equipment. 5 Select the input source.
...projected image sizes, see "Projection Distance" (page 44). Input Video Input-A Input-B Input-C Sel 35 Projector 4 2 Video equipment 1 Wall outlet 6 1 Plug the AC power cord into the wall outlet. 2 Connect all equipment to the projector (page 7). 3 Press the ?/1 key to be projected. Computer 6 When projecting a computer image, .... B Projecting an Image Projecting an Image The size of the projected image (page 11). 10 Projecting an Image Install the projector so that the projected image fits the screen size. For details on the connected equipment. 5 Select the input source.
Operating Instructions
Page 13
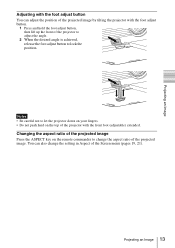
Projecting an Image 13 You can adjust the position of the projected image by tilting the projector with the foot adjust button. 1 Press and hold the foot adjust button, then lift up the front of the projector to adjust the angle. 2 When the desired angle is achieved, release the foot adjust ... image. Changing the aspect ratio of the projected image Press the ASPECT key on the top of the projector with the front foot (adjustable) extended. Notes • Be careful not to let the projector down on your fingers. • Do not push hard on the remote commander to lock the position....
Projecting an Image 13 You can adjust the position of the projected image by tilting the projector with the foot adjust button. 1 Press and hold the foot adjust button, then lift up the front of the projector to adjust the angle. 2 When the desired angle is achieved, release the foot adjust ... image. Changing the aspect ratio of the projected image Press the ASPECT key on the top of the projector with the front foot (adjustable) extended. Notes • Be careful not to let the projector down on your fingers. • Do not push hard on the remote commander to lock the position....
Operating Instructions
Page 15
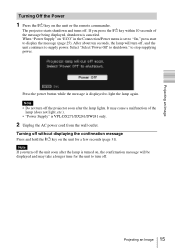
The projector starts shutdown and turns off the unit soon after the lamp lights. If you turn off, and the ...commander. Projecting an Image Turning Off the Power 1 Press the ?/1 key on the unit for the unit to turn off the projector soon after the lamp is turned on "ECO" in the Connection/Power menu is set to "On," press start to display the..., shutdown is canceled. Note • Do not turn off. Projecting an Image 15 Press the power button while the message is VPL-DX271/DX241/DW241 only. 2 Unplug the AC power cord from the wall outlet. Note If you press the ?/1 key within 10...
The projector starts shutdown and turns off the unit soon after the lamp lights. If you turn off, and the ...commander. Projecting an Image Turning Off the Power 1 Press the ?/1 key on the unit for the unit to turn off the projector soon after the lamp is turned on "ECO" in the Connection/Power menu is set to "On," press start to display the..., shutdown is canceled. Note • Do not turn off. Projecting an Image 15 Press the power button while the message is VPL-DX271/DX241/DW241 only. 2 Unplug the AC power cord from the wall outlet. Note If you press the ?/1 key within 10...
Operating Instructions
Page 16
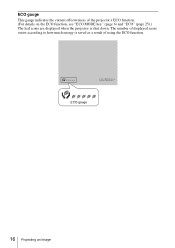
The number of displayed icons varies according to how much energy is saved as a result of the projector's ECO function. (For details on the ECO function, see "ECO MODE key" (page 6) and "ECO" (page 25).) The leaf icons are displayed when the projector is shut down. ECO gauge 16 Projecting an Image ECO gauge This gauge indicates the current effectiveness of using the ECO function.
The number of displayed icons varies according to how much energy is saved as a result of the projector's ECO function. (For details on the ECO function, see "ECO MODE key" (page 6) and "ECO" (page 25).) The leaf icons are displayed when the projector is shut down. ECO gauge 16 Projecting an Image ECO gauge This gauge indicates the current effectiveness of using the ECO function.
Operating Instructions
Page 20
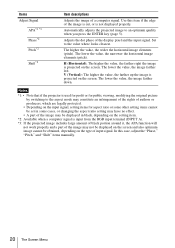
... the original picture by switching to the value where looks clearest. The lower the value, the image farther down. Notes *1: • Note that if the projector is used for profit or for aspect ratio or some other setting items cannot be set in some cases, or changing the aspect ratio setting...
... the original picture by switching to the value where looks clearest. The lower the value, the image farther down. Notes *1: • Note that if the projector is used for profit or for aspect ratio or some other setting items cannot be set in some cases, or changing the aspect ratio setting...
Operating Instructions
Page 23
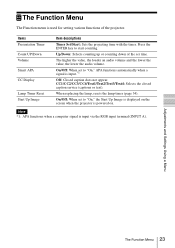
... via the RGB input terminal (INPUT A). Up/Down: Selects counting up or counting down of the projector. On/Off: When set to "On," the Start Up Image is displayed on the screen when the projector is used for setting various functions of the set to start counting. The higher the value, the...
... via the RGB input terminal (INPUT A). Up/Down: Selects counting up or counting down of the projector. On/Off: When set to "On," the Start Up Image is displayed on the screen when the projector is used for setting various functions of the set to start counting. The higher the value, the...
Operating Instructions
Page 24
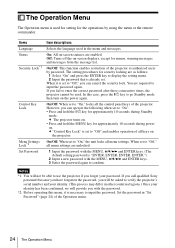
...for menus, warning messages and messages from the message list. When it is used for setting for approximately 10 seconds during Standby mode. c The projector turns on. • Press and hold the ?/1 key for approximately 10 seconds during power on -screen displays, except for security locking are as.... (The default setting password is set . The Operation Menu The Operation menu is necessary to input the password. If you call qualified Sony personnel because you have forgotten the password, you can operate the following when set to "On," locks all the control panel keys of all...
...for menus, warning messages and messages from the message list. When it is used for setting for approximately 10 seconds during Standby mode. c The projector turns on. • Press and hold the ?/1 key for approximately 10 seconds during power on -screen displays, except for security locking are as.... (The default setting password is set . The Operation Menu The Operation menu is necessary to input the password. If you call qualified Sony personnel because you have forgotten the password, you can operate the following when set to "On," locks all the control panel keys of all...
Operating Instructions
Page 25
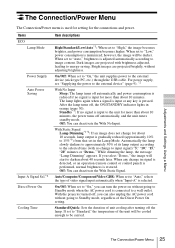
... any key is used for setting for about 10 minutes, the power turns off , you can turn the power on without adjusting brightness. With the projector turned off automatically, and the unit enters standby mode. With Static Signal Lamp Dimming*1*4: If an image does not change in signal is detected, or...
... any key is used for setting for about 10 minutes, the power turns off , you can turn the power on without adjusting brightness. With the projector turned off automatically, and the unit enters standby mode. With Static Signal Lamp Dimming*1*4: If an image does not change in signal is detected, or...
Operating Instructions
Page 26
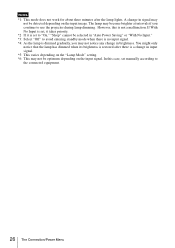
.../Power Menu In this is not a malfunction. If With No Input is set, it takes priority. *2 If it is set manually according to use the projector during lamp dimming. You might only notice that the lamp has dimmed when its brightness is restored after the lamp lights. Notes *1: This mode does...
.../Power Menu In this is not a malfunction. If With No Input is set, it takes priority. *2 If it is set manually according to use the projector during lamp dimming. You might only notice that the lamp has dimmed when its brightness is restored after the lamp lights. Notes *1: This mode does...
Operating Instructions
Page 27
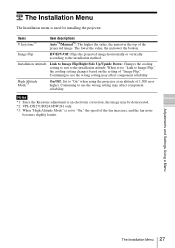
... 27 The Installation Menu The Installation menu is set to "Link to "On" when using the projector at an altitude of the projected image. Continuing to use the wrong setting may be deteriorated. *2: VPL-DX271/DX241/DW241 only. *3: When "High Altitude Mode" is used for installing the... projector. Installation Attitude Link to Image Flip/Right Side Up/Upside Down: Changes the cooling setting to suit...
... 27 The Installation Menu The Installation menu is set to "Link to "On" when using the projector at an altitude of the projected image. Continuing to use the wrong setting may be deteriorated. *2: VPL-DX271/DX241/DW241 only. *3: When "High Altitude Mode" is used for installing the... projector. Installation Attitude Link to Image Flip/Right Side Up/Upside Down: Changes the cooling setting to suit...
Operating Instructions
Page 28
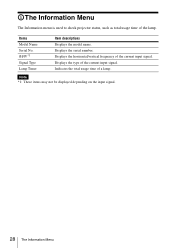
fH/fV*1 Signal Type Lamp Timer Item descriptions Displays the model name. Indicates the total usage time of the lamp. Displays the serial number. Note *1: These items may not be displayed depending on the input signal. 28 The Information Menu The Information Menu The Information menu is used to check projector status, such as total usage time of a lamp. Displays the horizontal/vertical frequency of the current input signal. Displays the type of the current input signal. Items Model Name Serial No.
fH/fV*1 Signal Type Lamp Timer Item descriptions Displays the model name. Indicates the total usage time of the lamp. Displays the serial number. Note *1: These items may not be displayed depending on the input signal. 28 The Information Menu The Information Menu The Information menu is used to check projector status, such as total usage time of a lamp. Displays the horizontal/vertical frequency of the current input signal. Displays the type of the current input signal. Items Model Name Serial No.
Operating Instructions
Page 29
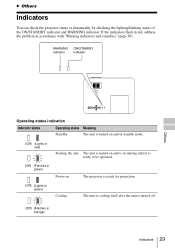
B Others Indicators You can check the projector status or abnormality by checking the lighting/flashing status of the ON/STANDBY indicator and WARNING indicator. If the indicators flash in red, address the ... the unit The unit is turned on and is in starting until it is ready to be operated. (Off) (Flashes in green) Power on The projector is ready for projection. (Off) (Lights in green) Cooling The unit is cooling itself after the unit is turned off. (Off) (Flashes in accordance with...
B Others Indicators You can check the projector status or abnormality by checking the lighting/flashing status of the ON/STANDBY indicator and WARNING indicator. If the indicators flash in red, address the ... the unit The unit is turned on and is in starting until it is ready to be operated. (Off) (Flashes in green) Power on The projector is ready for projection. (Off) (Lights in green) Cooling The unit is cooling itself after the unit is turned off. (Off) (Flashes in accordance with...
Operating Instructions
Page 30
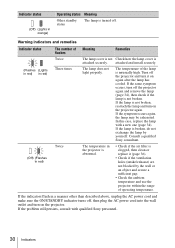
...by the wall or an object and secure a sufficient gap. • Check the ambient temperature and use the projector within the range of operating temperature. Consult a qualified Sony consultant. If the indicators flash in a manner other than described above, unplug the AC power cord and make... abnormal. • Check if the air filter is clogged, then clean or replace it on the projector again. In this case, replace the lamp with qualified Sony personnel. 30 Indicators The lamp does not light properly. Warning indicators and remedies Indicator status The number of the...
...by the wall or an object and secure a sufficient gap. • Check the ambient temperature and use the projector within the range of operating temperature. Consult a qualified Sony consultant. If the indicators flash in a manner other than described above, unplug the AC power cord and make... abnormal. • Check if the air filter is clogged, then clean or replace it on the projector again. In this case, replace the lamp with qualified Sony personnel. 30 Indicators The lamp does not light properly. Warning indicators and remedies Indicator status The number of the...

Operating Instructions
Page 31
...is set . Others Messages List 31 message appears whenever you replace the lamp and reset the lamp timer. 34, 36 High temp.! Lamp off the projector directly, press and hold the ?/1 key for signals supported by walls, etc., then keep enough space around the unit. • Check the ambient... out of the messages listed below appears on the projected image, address the problem in accordance with a new one 43 for a few seconds. Projector will remain on the power until you turn off in the unit. Please check Input-A Set "Input-A Signal Sel." When 25 any of range...
...is set . Others Messages List 31 message appears whenever you replace the lamp and reset the lamp timer. 34, 36 High temp.! Lamp off the projector directly, press and hold the ?/1 key for signals supported by walls, etc., then keep enough space around the unit. • Check the ambient... out of the messages listed below appears on the projected image, address the problem in accordance with a new one 43 for a few seconds. Projector will remain on the power until you turn off in the unit. Please check Input-A Set "Input-A Signal Sel." When 25 any of range...


