
Safety Information
Page 2
...and conditions of the software may not be identical to any modification to the model and serial numbers when you call your Sony VAIO® computer. This manual and the software described herein, in whole or in a secure location. reserves the right to make any machine-readable form... HEREBY EXPRESSLY DISCLAIMS ANY IMPLIED WARRANTIES OF MERCHANTABILITY OR FITNESS FOR ANY PARTICULAR PURPOSE WITH REGARD TO THIS MANUAL, THE SOFTWARE, OR SUCH OTHER INFORMATION. Refer to this product. SONY ALSO ASSUMES NO RESPONSIBILITY, AND SHALL NOT BE LIABLE FOR ANY DAMAGES TO, OR VIRUSES THAT MAY ...
...and conditions of the software may not be identical to any modification to the model and serial numbers when you call your Sony VAIO® computer. This manual and the software described herein, in whole or in a secure location. reserves the right to make any machine-readable form... HEREBY EXPRESSLY DISCLAIMS ANY IMPLIED WARRANTIES OF MERCHANTABILITY OR FITNESS FOR ANY PARTICULAR PURPOSE WITH REGARD TO THIS MANUAL, THE SOFTWARE, OR SUCH OTHER INFORMATION. Refer to this product. SONY ALSO ASSUMES NO RESPONSIBILITY, AND SHALL NOT BE LIABLE FOR ANY DAMAGES TO, OR VIRUSES THAT MAY ...

User Guide
Page 4
... slightly different from those of your computer. Sony has combined leading-edge technology in Brazil http://esupport.sony.com/PT/VAIO/BR/ How to the on your computer. Before Use > n4 N Before Use Congratulations on your purchase of this manual may not be available on -screen User ...Guide. External views illustrated in this Sony VAIO® computer and welcome to find out about the configuration of your computer, visit the Sony online support web site at the following URLs: ❑...
... slightly different from those of your computer. Sony has combined leading-edge technology in Brazil http://esupport.sony.com/PT/VAIO/BR/ How to the on your computer. Before Use > n4 N Before Use Congratulations on your purchase of this manual may not be available on -screen User ...Guide. External views illustrated in this Sony VAIO® computer and welcome to find out about the configuration of your computer, visit the Sony online support web site at the following URLs: ❑...

User Guide
Page 6
... with Internet and wireless setup, security setup, personalizing your computer. You may be included with the VAIO Care, system restore, backup and recovery, and contact Sony support. ❑ Program help files - Before Use > Finding More about Your VAIO Computer n6 N 2. Get started with my VAIO Get help menu on your VAIO... model you need. General information of your VAIO computer including support and troubleshooting information. To access VAIO User Guide, click Start , All Programs, and VAIO Manual. ❑ Help and Support -
... with Internet and wireless setup, security setup, personalizing your computer. You may be included with the VAIO Care, system restore, backup and recovery, and contact Sony support. ❑ Program help files - Before Use > Finding More about Your VAIO Computer n6 N 2. Get started with my VAIO Get help menu on your VAIO... model you need. General information of your VAIO computer including support and troubleshooting information. To access VAIO User Guide, click Start , All Programs, and VAIO Manual. ❑ Help and Support -

User Guide
Page 12
The appearance of your computer may be different from those illustrated in specifications. Getting Started > Locating Controls and Ports Locating Controls and Ports Take a moment to variations in this manual due to identify the controls and ports shown on the following pages. ! n 12 N
The appearance of your computer may be different from those illustrated in specifications. Getting Started > Locating Controls and Ports Locating Controls and Ports Take a moment to variations in this manual due to identify the controls and ports shown on the following pages. ! n 12 N

User Guide
Page 15
Getting Started > Locating Controls and Ports Right n 15 N A Optical disc drive (page 55) B Manual eject hole (page 163) C Drive eject button (page 55) D VOL (+/-) buttons (page 71) E MENU button (page 71) F V/v (Up/Down) buttons (page 71) G INPUT/OK button (page 71) H DISPLAY OFF button (page 51)/DISPLAY OFF indicator (page 18)
Getting Started > Locating Controls and Ports Right n 15 N A Optical disc drive (page 55) B Manual eject hole (page 163) C Drive eject button (page 55) D VOL (+/-) buttons (page 71) E MENU button (page 71) F V/v (Up/Down) buttons (page 71) G INPUT/OK button (page 71) H DISPLAY OFF button (page 51)/DISPLAY OFF indicator (page 18)

User Guide
Page 21
... type to the wall-mount type, make sure that came with your computer for connecting the computer to the computer or personal injuries. See the manual that : The weight of your computer is wall mounted, do not place any objects on top of your computer so as not to break the...
... type to the wall-mount type, make sure that came with your computer for connecting the computer to the computer or personal injuries. See the manual that : The weight of your computer is wall mounted, do not place any objects on top of your computer so as not to break the...

User Guide
Page 25
Be sure to tighten the screws with adequate torque. 6 Secure your wall mount attachment to your computer with your computer. Getting Started > Setting Up Your Computer n 25 N 5 Flip over the mounting base plate (4) and screw it onto the back of the computer using the six screws (5) attached at the same place in the manual that came with the supplied four screws. ! Do not use the screws attached to mount your mounting system to the computer. 7 Follow the instructions described in step 3. !
Be sure to tighten the screws with adequate torque. 6 Secure your wall mount attachment to your computer with your computer. Getting Started > Setting Up Your Computer n 25 N 5 Flip over the mounting base plate (4) and screw it onto the back of the computer using the six screws (5) attached at the same place in the manual that came with the supplied four screws. ! Do not use the screws attached to mount your mounting system to the computer. 7 Follow the instructions described in step 3. !

User Guide
Page 88
..., you need to sign up with an Internet Service Provider (ISP) and set up For detailed information on connection setups and modem configuration, see the manual that came with your ISP: ❑ Fiber to the Home (FTTH) ❑ Digital Subscriber Line (DSL) ❑ Cable modem ❑ Satellite ❑ Dial-up the...
..., you need to sign up with an Internet Service Provider (ISP) and set up For detailed information on connection setups and modem configuration, see the manual that came with your ISP: ❑ Fiber to the Home (FTTH) ❑ Digital Subscriber Line (DSL) ❑ Cable modem ❑ Satellite ❑ Dial-up the...
User Guide
Page 93
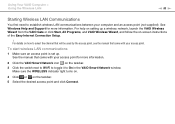
For details on how to select the channel that will be used by the access point, see the manual that came with your access point for more information. 2 Click the VAIO Smart Network icon on setting up . See Windows Help and Support for more ... or click Start, All Programs, and VAIO Wireless Wizard, and follow the on the taskbar. 5 Select the desired access point and click Connect. See the manual that came with your computer and an access point (not supplied). Make sure the WIRELESS indicator light turns on. 4 Click or on -screen instructions of...
For details on how to select the channel that will be used by the access point, see the manual that came with your access point for more information. 2 Click the VAIO Smart Network icon on setting up . See Windows Help and Support for more ... or click Start, All Programs, and VAIO Wireless Wizard, and follow the on the taskbar. 5 Select the desired access point and click Connect. See the manual that came with your computer and an access point (not supplied). Make sure the WIRELESS indicator light turns on. 4 Click or on -screen instructions of...
User Guide
Page 105
Using Peripheral Devices > Connecting an External Display n 105 N ✍ See the manual that came with your computer. To hear sound from the device connected to the HDMI OUTPUT port, you need to the computer, make sure the ...
Using Peripheral Devices > Connecting an External Display n 105 N ✍ See the manual that came with your computer. To hear sound from the device connected to the HDMI OUTPUT port, you need to the computer, make sure the ...
User Guide
Page 111
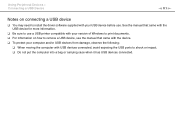
... on how to shock or impact. ❑ Do not put the computer into a bag or carrying case when it has USB devices connected. See the manual that came with the USB device for more information. ❑ Be sure to use a USB printer compatible with your version of Windows to print documents... from damage, observe the following: ❑ When moving the computer with USB devices connected, avoid exposing the USB ports to remove a USB device, see the manual that came with the device. ❑ To protect your USB device before use.
... on how to shock or impact. ❑ Do not put the computer into a bag or carrying case when it has USB devices connected. See the manual that came with the USB device for more information. ❑ Be sure to use a USB printer compatible with your version of Windows to print documents... from damage, observe the following: ❑ When moving the computer with USB devices connected, avoid exposing the USB ports to remove a USB device, see the manual that came with the device. ❑ To protect your USB device before use.
User Guide
Page 112
...to a power source. ❑ The i.LINK port supports transfer rates up to 400 Mbps. See the manual that a product contains an IEEE 1394 connection. See the manual that came with your compatible i.LINK device for more information. ❑ Check the working conditions and operating ...system compatibility of Sony Corporation used only to designate that came with your computer. compatible devices you connect...
...to a power source. ❑ The i.LINK port supports transfer rates up to 400 Mbps. See the manual that a product contains an IEEE 1394 connection. See the manual that came with your compatible i.LINK device for more information. ❑ Check the working conditions and operating ...system compatibility of Sony Corporation used only to designate that came with your computer. compatible devices you connect...

User Guide
Page 113
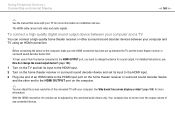
Using Peripheral Devices > Connecting an i.LINK Device n 113 N Connecting a Digital Video Camcorder To connect a digital video camcorder Plug one end of "Memory Stick" in the digital video camcorder via an i.LINK connection. See the manual that came with the device for more information. You cannot access the contents of an i.LINK cable (1) (not supplied) into the i.LINK port (2) on the computer and the other end into the DV In/ Out port (3) on the digital video camcorder. ✍ The connection procedure varies depending on your compatible i.LINK device.
Using Peripheral Devices > Connecting an i.LINK Device n 113 N Connecting a Digital Video Camcorder To connect a digital video camcorder Plug one end of "Memory Stick" in the digital video camcorder via an i.LINK connection. See the manual that came with the device for more information. You cannot access the contents of an i.LINK cable (1) (not supplied) into the i.LINK port (2) on the computer and the other end into the DV In/ Out port (3) on the digital video camcorder. ✍ The connection procedure varies depending on your compatible i.LINK device.
User Guide
Page 158
...move any other option may be using closer to the computer. ❑ If you may result in the Power Options window. See the manual that came with other devices are connected to one another. ❑ Place your computer away from obstacles or move any other option may... be temporarily overloaded depending on how many other access points, change the access point channel. See the manual that came with your access point for more information. ❑ Make sure Maximum Performance is selected for more information. ❑ Make sure...
...move any other option may be using closer to the computer. ❑ If you may result in the Power Options window. See the manual that came with other devices are connected to one another. ❑ Place your computer away from obstacles or move any other option may... be temporarily overloaded depending on how many other access points, change the access point channel. See the manual that came with your access point for more information. ❑ Make sure Maximum Performance is selected for more information. ❑ Make sure...

User Guide
Page 159
... either change the encryption key back to change the encryption key? Selecting any other option may lose a peer-to different channels from Sony devices. ❑ If you are channels? ❑ Wireless LAN communication uses divided frequency bands known as channels. Why does the ...large file is exchanged or the computer is changed. What are using a wireless LAN access point, see connectivity information contained in the manual that came with your access point for more information. ❑ Make sure Maximum Performance is selected for Wireless Adapter Settings in What should...
... either change the encryption key back to change the encryption key? Selecting any other option may lose a peer-to different channels from Sony devices. ❑ If you are channels? ❑ Wireless LAN communication uses divided frequency bands known as channels. Why does the ...large file is exchanged or the computer is changed. What are using a wireless LAN access point, see connectivity information contained in the manual that came with your access point for more information. ❑ Make sure Maximum Performance is selected for Wireless Adapter Settings in What should...
User Guide
Page 160
... device I want to communicate with another BLUETOOTH device, it may not be found or it may not be too far apart. See the other device's manual for more information. ❑ If the device you want to communicate with is already communicating with ? ❑ Check that the BLUETOOTH function of each other...
... device I want to communicate with another BLUETOOTH device, it may not be found or it may not be too far apart. See the other device's manual for more information. ❑ If the device you want to communicate with is already communicating with ? ❑ Check that the BLUETOOTH function of each other...

User Guide
Page 163
... Shut down button and Restart to read may cause loss of the above options work, insert a thin, straight object (such as a paper clip) into the manual eject hole on the optical disc drive. ❑ Try restarting your computer with the Ctrl+Alt+Delete keys may be dirty or damaged. Troubleshooting > Optical...
... Shut down button and Restart to read may cause loss of the above options work, insert a thin, straight object (such as a paper clip) into the manual eject hole on the optical disc drive. ❑ Try restarting your computer with the Ctrl+Alt+Delete keys may be dirty or damaged. Troubleshooting > Optical...
User Guide
Page 171
... are provided with the Windows operating system installed on your computer may need to cancel the Enable bidirectional support check box. 5 Click OK. See the manual that came with your printer for more information. ❑ If your printer is compatible with your printer, disabling the functions on your computer. ❑ You...
... are provided with the Windows operating system installed on your computer may need to cancel the Enable bidirectional support check box. 5 Click OK. See the manual that came with your printer for more information. ❑ If your printer is compatible with your printer, disabling the functions on your computer. ❑ You...

User Guide
Page 176
... may have been incorrectly configured. To change the sound output device, see How do I do if I change the sound output device? (page 180). See the manual that has its own volume control, make sure the speakers are connected to a power source. Troubleshooting > Speakers n 176 N What should I do if my external speakers...
... may have been incorrectly configured. To change the sound output device, see How do I do if I change the sound output device? (page 180). See the manual that has its own volume control, make sure the speakers are connected to a power source. Troubleshooting > Speakers n 176 N What should I do if my external speakers...

User Guide
Page 185
... used the first time you are using another USB port on and using its own power supply. If you connected the device. ❑ See the manual that came with your computer. You may need to install software before you connect the device. ❑ Try connecting a simple, low-powered device such as...
... used the first time you are using another USB port on and using its own power supply. If you connected the device. ❑ See the manual that came with your computer. You may need to install software before you connect the device. ❑ Try connecting a simple, low-powered device such as...


