
Operating Instructions
Page 3
... Network cable connection .......... 21 To connect the Network Media Receiver to a network 25 Assigning a fixed IP address to the computer 27 4 Connect power 29 5 Configure wireless LAN settings .. 30 Using the software keyboard ...... 32 6 Change the settings of the Network Media Receiver to match the network connection 33 7 Configure settings at...
... Network cable connection .......... 21 To connect the Network Media Receiver to a network 25 Assigning a fixed IP address to the computer 27 4 Connect power 29 5 Configure wireless LAN settings .. 30 Using the software keyboard ...... 32 6 Change the settings of the Network Media Receiver to match the network connection 33 7 Configure settings at...

Operating Instructions
Page 4
... the TV type 56 To control the file playback method 57 To change the display language .. 57 About the Standby, STATUS and WIRELESS indicators 58 Meaning of STATUS and WIRELESS indicators during hardware diagnosis 59 Notes on Use 60 Specifications 62 Getting Help 63 Troubleshooting Power 64 Power does not come on...
... the TV type 56 To control the file playback method 57 To change the display language .. 57 About the Standby, STATUS and WIRELESS indicators 58 Meaning of STATUS and WIRELESS indicators during hardware diagnosis 59 Notes on Use 60 Specifications 62 Getting Help 63 Troubleshooting Power 64 Power does not come on...

Operating Instructions
Page 10
...the standby indicator is lit red, the unit is in green. See "Getting Help" (page 63). 2 Remote control sensor (page 15) 3 STATUS indicator (page 58) 4 WIRELESS indicator (page 58) Side view 1 Ventilation holes 2 SET UP button (page 54) Press this button to display the "System Settings" screen. 10 For details, see... up in brackets ( ). Front view 1 POWER button/standby indicator (pages 29, 38, 58) Press this button when the standby indicator is connected, visit the Sony Web site for additional instructions. Names of parts This section briefly identifies the parts of the unit.
...the standby indicator is lit red, the unit is in green. See "Getting Help" (page 63). 2 Remote control sensor (page 15) 3 STATUS indicator (page 58) 4 WIRELESS indicator (page 58) Side view 1 Ventilation holes 2 SET UP button (page 54) Press this button to display the "System Settings" screen. 10 For details, see... up in brackets ( ). Front view 1 POWER button/standby indicator (pages 29, 38, 58) Press this button when the standby indicator is connected, visit the Sony Web site for additional instructions. Names of parts This section briefly identifies the parts of the unit.

Operating Instructions
Page 11
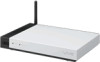
Introduction Rear view 1 1 DC IN 5.2V connector (page 29) 2 COMPONENT VIDEO OUT connectors (page 19) 3 S VIDEO OUT connector (page 18) 4 VIDEO OUT connector AUDIO OUT (left/right) connectors (page 18) 5 OPTICAL OUT connector (page 20) 6 NETWORK connector (pages 25, 26, 27) 7 Antenna When connecting the unit to a wireless LAN, raise the antenna to the upright position by rotating it clockwise. 11
Introduction Rear view 1 1 DC IN 5.2V connector (page 29) 2 COMPONENT VIDEO OUT connectors (page 19) 3 S VIDEO OUT connector (page 18) 4 VIDEO OUT connector AUDIO OUT (left/right) connectors (page 18) 5 OPTICAL OUT connector (page 20) 6 NETWORK connector (pages 25, 26, 27) 7 Antenna When connecting the unit to a wireless LAN, raise the antenna to the upright position by rotating it clockwise. 11

Operating Instructions
Page 13
...connection Using the Ethernet cable connection, the Network Media Receiver is connected to -Peer) mode is best suited to the computer via a wireless LAN access point. Note If both network interfaces are possible. The illustration below shows an example for connecting multiple devices on the number of... computers and type of equipment, various configurations are used at the same time, the network interface specified in wireless LAN infrastructure mode (access point network mode). Ad-Hoc (Peer-to the computer using a network cable. To connect the Network Media ...
...connection Using the Ethernet cable connection, the Network Media Receiver is connected to -Peer) mode is best suited to the computer via a wireless LAN access point. Note If both network interfaces are possible. The illustration below shows an example for connecting multiple devices on the number of... computers and type of equipment, various configurations are used at the same time, the network interface specified in wireless LAN infrastructure mode (access point network mode). Ad-Hoc (Peer-to the computer using a network cable. To connect the Network Media ...

Operating Instructions
Page 14
...of the Network Media Receiver. Connect power c Page 29 Connect the supplied AC adapter to the Network Media Receiver to the computer via a wireless connection, without using router)". 7. When using a network cable connection, this step is not required. 4. Prepare the remote control for use The...ready The steps necessary to prepare the unit for operating of the TV monitor. It is "Automatic assignment (using a network cable, several wireless LAN settings must be configured. 14 When using a network cable. The default setting is also possible to make the connection to the TV...
...of the Network Media Receiver. Connect power c Page 29 Connect the supplied AC adapter to the Network Media Receiver to the computer via a wireless connection, without using router)". 7. When using a network cable connection, this step is not required. 4. Prepare the remote control for use The...ready The steps necessary to prepare the unit for operating of the TV monitor. It is "Automatic assignment (using a network cable, several wireless LAN settings must be configured. 14 When using a network cable. The default setting is also possible to make the connection to the TV...

Operating Instructions
Page 21
Note Make sure that the power cord is not required when using a wireless connection between the Network Media Receiver and the computer. Network cable connection To connect the Network Media Receiver to "4 Connect power" (page 29). Proceed to ...
Note Make sure that the power cord is not required when using a wireless connection between the Network Media Receiver and the computer. Network cable connection To connect the Network Media Receiver to "4 Connect power" (page 29). Proceed to ...

Operating Instructions
Page 30
...RETURN :Return 6 Use the V/v buttons to select "System Settings" , and press the SELECT button. The "Network Settings" screen appears. 30 5 Configure wireless LAN settings Use the screens displayed on your computer via a network cable, skip this procedure, and go to "6 Change the settings of buttons on the... for the location of the Network Media Receiver to match the network connection" (page 33). The standby indicator changes to configure the wireless LAN settings. If you are connecting the Network Media Receiver to your TV to green, and the "Select a server..." screen appears on...
...RETURN :Return 6 Use the V/v buttons to select "System Settings" , and press the SELECT button. The "Network Settings" screen appears. 30 5 Configure wireless LAN settings Use the screens displayed on your computer via a network cable, skip this procedure, and go to "6 Change the settings of buttons on the... for the location of the Network Media Receiver to match the network connection" (page 33). The standby indicator changes to configure the wireless LAN settings. If you are connecting the Network Media Receiver to your TV to green, and the "Select a server..." screen appears on...

Operating Instructions
Page 31
... encrypt data Index of key used to encrypt data Key used to encrypt data 2 Select the settings appropriate to the documentation for the wireless LAN environment. 1 On the "Network Settings" screen, use the V/v buttons to enter the SSID and Key Phrase. The Network Media... restarts and enters Standby mode. 8 Repeat steps 3 to 6 to bring up the "Network Settings" screen again. 9 Configure the settings for your wireless network. When the message about restarting the Network Media Receiver appears, select "OK", and press the SELECT button. A software keyboard appears on page 32...
... encrypt data Index of key used to encrypt data Key used to encrypt data 2 Select the settings appropriate to the documentation for the wireless LAN environment. 1 On the "Network Settings" screen, use the V/v buttons to enter the SSID and Key Phrase. The Network Media... restarts and enters Standby mode. 8 Repeat steps 3 to 6 to bring up the "Network Settings" screen again. 9 Configure the settings for your wireless network. When the message about restarting the Network Media Receiver appears, select "OK", and press the SELECT button. A software keyboard appears on page 32...

Operating Instructions
Page 32
... V/v/B/b buttons to select "Enter", and press the SELECT button. Use this display to enter the full string for the selected mode are shown on the "Wireless LAN Configurations" screen. The entered character string is set at the character cursor position in the display field. 3 Repeat steps 1 and 2 to input a character string...
... V/v/B/b buttons to select "Enter", and press the SELECT button. Use this display to enter the full string for the selected mode are shown on the "Wireless LAN Configurations" screen. The entered character string is set at the character cursor position in the display field. 3 Repeat steps 1 and 2 to input a character string...
Operating Instructions
Page 44
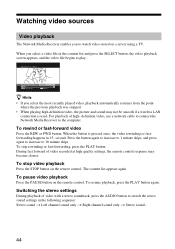
... video file begins to play. second. During fast forward of video recorded at high quality settings, the remote control response may not be smooth if a wireless LAN connection is pressed once, the video rewinding or fastforwarding happens in 15- To stop rewinding or fast-forwarding, press the PLAY button. To resume...
... video file begins to play. second. During fast forward of video recorded at high quality settings, the remote control response may not be smooth if a wireless LAN connection is pressed once, the video rewinding or fastforwarding happens in 15- To stop rewinding or fast-forwarding, press the PLAY button. To resume...

Operating Instructions
Page 52
Notes • Depending on the settings and usage environment or on the connected computer, this function may not be available, especially with computers connected via wireless LAN. • When the computer is in Standby or Hibernate mode. The "System Properties" screen appears on the Windows taskbar, and click "Control Panel". 2 In ...
Notes • Depending on the settings and usage environment or on the connected computer, this function may not be available, especially with computers connected via wireless LAN. • When the computer is in Standby or Hibernate mode. The "System Properties" screen appears on the Windows taskbar, and click "Control Panel". 2 In ...

Operating Instructions
Page 55
... TV Type 56 Default setting Standard Definition TV Network Settings - • Network Type 30 Wired LAN • IP Address 34 Automatic assignment (using router) • Wireless LAN Configurations 30 - Settings available on some TV sets.
... TV Type 56 Default setting Standard Definition TV Network Settings - • Network Type 30 Wired LAN • IP Address 34 Automatic assignment (using router) • Wireless LAN Configurations 30 - Settings available on some TV sets.

Operating Instructions
Page 56
... press the SELECT button. Note If you perform the steps described below, the following settings are reset to the default settings: • Network Type • Wireless LAN Configurations • IP address • Playback preference (page 57) • Music repeat and shuffle settings • Slide show interval setting (page 51) • Slide...
... press the SELECT button. Note If you perform the steps described below, the following settings are reset to the default settings: • Network Type • Wireless LAN Configurations • IP address • Playback preference (page 57) • Music repeat and shuffle settings • Slide show interval setting (page 51) • Slide...

Operating Instructions
Page 57
... SELECT button. 57 Advanced Features To change the display language To change the language in which the Network Media Receiver menu screens are played in a wireless LAN environment. • "High quality mode" When files are displayed, proceed as follows. 1 At the "System Settings" screen, use the V/v buttons to widely supported formats...
... SELECT button. 57 Advanced Features To change the display language To change the language in which the Network Media Receiver menu screens are played in a wireless LAN environment. • "High quality mode" When files are displayed, proceed as follows. 1 At the "System Settings" screen, use the V/v buttons to widely supported formats...
Operating Instructions
Page 58
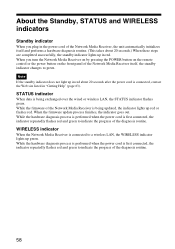
... is performed when the power cord is first connected, the indicator repeatedly flashes red and green to a wireless LAN, the WIRELESS indicator lights up red or flashes red. WIRELESS indicator When the Network Media Receiver is connected to indicate the progress of the diagnosis routine. 58 About the... connected, contact the Web site listed in "Getting Help" (page 63). STATUS indicator When data is being exchanged over the wired or wireless LAN, the STATUS indicator flashes green. While the firmware of the Network Media Receiver is being updated, the indicator lights up green. When...
... is performed when the power cord is first connected, the indicator repeatedly flashes red and green to a wireless LAN, the WIRELESS indicator lights up red or flashes red. WIRELESS indicator When the Network Media Receiver is connected to indicate the progress of the diagnosis routine. 58 About the... connected, contact the Web site listed in "Getting Help" (page 63). STATUS indicator When data is being exchanged over the wired or wireless LAN, the STATUS indicator flashes green. While the firmware of the Network Media Receiver is being updated, the indicator lights up green. When...

Operating Instructions
Page 59
...the interval from when the power cord is connected until the standby indicator lights up, the STATUS and WIRELESS indicators show the progress of the hardware diagnosis routine, as follows: STATUS WIRELESS Meaning Off Off Start hardware diagnosis Off Red Check initial loader software Off Green Check secondary software Red Off... Red Red Initialize and check basic software Red Green Check internal CPU hardware Green Off Check internal LAN circuitry Green Red Check internal wireless LAN circuitry Green Green Normal completion of hardware diagnosis Advanced Features 59
...the interval from when the power cord is connected until the standby indicator lights up, the STATUS and WIRELESS indicators show the progress of the hardware diagnosis routine, as follows: STATUS WIRELESS Meaning Off Off Start hardware diagnosis Off Red Check initial loader software Off Green Check secondary software Red Off... Red Red Initialize and check basic software Red Green Check internal CPU hardware Green Off Check internal LAN circuitry Green Red Check internal wireless LAN circuitry Green Green Normal completion of hardware diagnosis Advanced Features 59

Operating Instructions
Page 62
... VAIO Media Version 4.1 or later or VAIO Media Server Version 4.1 or later (preinstalled or upgraded) • Computer with antenna) Wireless communication 2.4 GHz wireless LAN (built-in) (IEEE 802.11b/g compliant, Wi-Fi certified) 1 2 1 Actual transmission speed (IEEE 802.11b rated ... (line outputs: RCA jack L/R (1)) Optical digital output (square connector (1)) Network connector (10BASE-T/100BASE-TX (1)) IEEE 802.11b/g wireless network (with DLNA HNv1 compliant software installed Supplied accessories See page 9. Rated transmission speed values represent the theoretical maximum, which may not...
... VAIO Media Version 4.1 or later or VAIO Media Server Version 4.1 or later (preinstalled or upgraded) • Computer with antenna) Wireless communication 2.4 GHz wireless LAN (built-in) (IEEE 802.11b/g compliant, Wi-Fi certified) 1 2 1 Actual transmission speed (IEEE 802.11b rated ... (line outputs: RCA jack L/R (1)) Optical digital output (square connector (1)) Network connector (10BASE-T/100BASE-TX (1)) IEEE 802.11b/g wireless network (with DLNA HNv1 compliant software installed Supplied accessories See page 9. Rated transmission speed values represent the theoretical maximum, which may not...

Operating Instructions
Page 65
... the network is correctly configured. c Check whether the correct TV manufacturer code has been set again (page 16). 65 This may be the case if a wireless LAN card or another type of TV sets.) (page 16) c After replacing the batteries, the manufacturer code must be started up automatically by turning on...
... the network is correctly configured. c Check whether the correct TV manufacturer code has been set again (page 16). 65 This may be the case if a wireless LAN card or another type of TV sets.) (page 16) c After replacing the batteries, the manufacturer code must be started up automatically by turning on...

Operating Instructions
Page 66
...button on the remote control, the screen will be operating under a high traffic load. c Disconnect the power cord from dropped frames c If a wireless LAN is connected correctly to the TV (page 18). Stop virus scanning before using the Network Media Receiver, or do not use the Network Media... image is distorted c The network bandwidth (the amount of data that the network can carry in green) (page 38). c The bandwidth of a wireless LAN changes according to the computer, adjust the position of the Network Media Receiver and access point. Picture or sound sometimes stops or is shown...
...button on the remote control, the screen will be operating under a high traffic load. c Disconnect the power cord from dropped frames c If a wireless LAN is connected correctly to the TV (page 18). Stop virus scanning before using the Network Media Receiver, or do not use the Network Media... image is distorted c The network bandwidth (the amount of data that the network can carry in green) (page 38). c The bandwidth of a wireless LAN changes according to the computer, adjust the position of the Network Media Receiver and access point. Picture or sound sometimes stops or is shown...