
Operating Instructions
Page 3
... the Network Media Receiver to a network 25 Assigning a fixed IP address to the computer 27 4 Connect power 29 5 Configure wireless LAN settings .. 30 Using the software keyboard ...... 32 6 Change the settings of the Network Media Receiver to match the network connection 33 7 Configure settings at the computer 35 Operation Operation flow...
... the Network Media Receiver to a network 25 Assigning a fixed IP address to the computer 27 4 Connect power 29 5 Configure wireless LAN settings .. 30 Using the software keyboard ...... 32 6 Change the settings of the Network Media Receiver to match the network connection 33 7 Configure settings at the computer 35 Operation Operation flow...

Operating Instructions
Page 6
... 49) • Listen to background music during a slide show (page 50) The VAIO Web site always has the latest information and allows you to download software upgrades that may be useful in "Getting Help" (page 63). 6
... 49) • Listen to background music during a slide show (page 50) The VAIO Web site always has the latest information and allows you to download software upgrades that may be useful in "Getting Help" (page 63). 6

Operating Instructions
Page 14
... adapter to the Network Media Receiver to the requirements of the TV monitor. The default setting is "Automatic assignment (using a VAIO computer, the VAIO Media software must be changed, setting whether to obtain an IP address automatically or use differ, depending on the network environment, some settings of the Network Media...
... adapter to the Network Media Receiver to the requirements of the TV monitor. The default setting is "Automatic assignment (using a VAIO computer, the VAIO Media software must be changed, setting whether to obtain an IP address automatically or use differ, depending on the network environment, some settings of the Network Media...

Operating Instructions
Page 31
.... 2 Use the V/v buttons to select "Wireless LAN", and press the SELECT button. 3 Use the V/v/B/b buttons to select "OK", and press the SELECT button. A software keyboard appears on the screen to enable you can make the settings listed below. For instructions on using the... software keyboard, refer to "Using the software keyboard" on settings for your wireless network. The Network Media Receiver restarts and enters Standby mode. 8 Repeat steps 3 to 6 to bring up the "Network...
.... 2 Use the V/v buttons to select "Wireless LAN", and press the SELECT button. 3 Use the V/v/B/b buttons to select "OK", and press the SELECT button. A software keyboard appears on the screen to enable you can make the settings listed below. For instructions on using the... software keyboard, refer to "Using the software keyboard" on settings for your wireless network. The Network Media Receiver restarts and enters Standby mode. 8 Repeat steps 3 to 6 to bring up the "Network...

Operating Instructions
Page 32
... "Number", "abc", "ABC", or "Symbol", and press the SELECT button. The selected character appears at the SSID or Key Phrase, and the Software Keyboard display closes. To enter a space Use the V/v/B/b buttons to select "Enter", and press the SELECT button. The entire string entered so far ...is complete, use the V/v/B/b buttons to select "Space", and press the SELECT button. 32 Using the software keyboard The software keyboard appears on the screen whenever SSID or Key Phrase is selected on the screen. 2 Use the V/v/B/b buttons to select the desired ...
... "Number", "abc", "ABC", or "Symbol", and press the SELECT button. The selected character appears at the SSID or Key Phrase, and the Software Keyboard display closes. To enter a space Use the V/v/B/b buttons to select "Enter", and press the SELECT button. The entire string entered so far ...is complete, use the V/v/B/b buttons to select "Space", and press the SELECT button. 32 Using the software keyboard The software keyboard appears on the screen whenever SSID or Key Phrase is selected on the screen. 2 Use the V/v/B/b buttons to select the desired ...

Operating Instructions
Page 35
... be configured again. • When using . Setup 7 Configure settings at the computer Configure the connected computer to enable access from with the media content server software you are using a VAIO computer, you must first install VAIO Media 4.1 or later. 35
... be configured again. • When using . Setup 7 Configure settings at the computer Configure the connected computer to enable access from with the media content server software you are using a VAIO computer, you must first install VAIO Media 4.1 or later. 35
Operating Instructions
Page 46
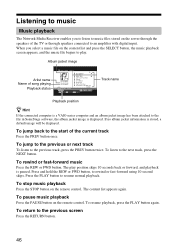
... ALL SELECT :Select RETURN :Return OPTIONS :Options Track name Playback position z Hint If the connected computer is displayed. To listen to the file in SonicStage software, the album jacket image is a VAIO series computer and an album jacket image has been attached to the next track, press the NEXT button. The...
... ALL SELECT :Select RETURN :Return OPTIONS :Options Track name Playback position z Hint If the connected computer is displayed. To listen to the file in SonicStage software, the album jacket image is a VAIO series computer and an album jacket image has been attached to the next track, press the NEXT button. The...

Operating Instructions
Page 59
... routine, as follows: STATUS WIRELESS Meaning Off Off Start hardware diagnosis Off Red Check initial loader software Off Green Check secondary software Red Off Initialize and check internal memory Red Red Initialize and check basic software Red Green Check internal CPU hardware Green Off Check internal LAN circuitry Green Red Check internal wireless...
... routine, as follows: STATUS WIRELESS Meaning Off Off Start hardware diagnosis Off Red Check initial loader software Off Green Check secondary software Red Off Initialize and check internal memory Red Red Initialize and check basic software Red Green Check internal CPU hardware Green Off Check internal LAN circuitry Green Red Check internal wireless...
Operating Instructions
Page 60
...to the equipment. • Install the Network Media Receiver so that is subject to moisture or rapid temperature change. - In no event will Sony Corporation be liable for extended periods of an emergency. • Do not drop the Network Media Receiver. Carefully follow the instructions of the user...or alcohol, as these compounds may cause damage to three hours. Avoid getting the connectors wet. • Do not use for any label printing software and label products. Use of the drive. Notes on the disc nor scratch or otherwise damage the disc. • When using a disc with...
...to the equipment. • Install the Network Media Receiver so that is subject to moisture or rapid temperature change. - In no event will Sony Corporation be liable for extended periods of an emergency. • Do not drop the Network Media Receiver. Carefully follow the instructions of the user...or alcohol, as these compounds may cause damage to three hours. Avoid getting the connectors wet. • Do not use for any label printing software and label products. Use of the drive. Notes on the disc nor scratch or otherwise damage the disc. • When using a disc with...

Operating Instructions
Page 61
• Do not touch the data side of your drive. Sony assumes no liability for any liquid on your discs. • Return discs to their cases when not in use in order to prevent data damage. &#... unused disc. Always keep the disc clean. • To clean a disc, lightly wipe it , as shown below. Please thoroughly read instruction notes of your label software and label sheets. • Do not store discs in locations subject to high humidity, high temperatures, direct sunlight, or high levels of dust. • Take...
• Do not touch the data side of your drive. Sony assumes no liability for any liquid on your discs. • Return discs to their cases when not in use in order to prevent data damage. &#... unused disc. Always keep the disc clean. • To clean a disc, lightly wipe it , as shown below. Please thoroughly read instruction notes of your label software and label sheets. • Do not store discs in locations subject to high humidity, high temperatures, direct sunlight, or high levels of dust. • Take...

Operating Instructions
Page 62
... (3)) Audio outputs (line outputs: RCA jack L/R (1)) Optical digital output (square connector (1)) Network connector (10BASE-T/100BASE-TX (1)) IEEE 802.11b/g wireless network (with DLNA HNv1 compliant software installed Supplied accessories See page 9. Power requirements Input: 100 - 240 V AC ±10% 50/60 Hz, 0.5 A Output: 5.2 V DC, 2.9 A Power consumption Approx. 15 W (maximum ..., WMA*, ATRAC3*, ATRAC3plus* Still images: JPEG, PNG, Bitmap*, GIF*, TIFF* * Playback capability depends on distance between equipment, presence of obstacles, system configuration, RF conditions, software, etc.
... (3)) Audio outputs (line outputs: RCA jack L/R (1)) Optical digital output (square connector (1)) Network connector (10BASE-T/100BASE-TX (1)) IEEE 802.11b/g wireless network (with DLNA HNv1 compliant software installed Supplied accessories See page 9. Power requirements Input: 100 - 240 V AC ±10% 50/60 Hz, 0.5 A Output: 5.2 V DC, 2.9 A Power consumption Approx. 15 W (maximum ..., WMA*, ATRAC3*, ATRAC3plus* Still images: JPEG, PNG, Bitmap*, GIF*, TIFF* * Playback capability depends on distance between equipment, presence of obstacles, system configuration, RF conditions, software, etc.

Operating Instructions
Page 63
...476-6972). For customers in the United States and Canada ❑ Sony Online Support provides instant access to http://www.vaio-link.com/ 63 Advanced Features For customers in Europe ❑ VAIO-link. For support addresses and phone numbers, refer to information on commonly encountered... serches for the corresponding solutions online. You can visit Sony Online Support at: http://www.sony.com/pcsupport ❑ The Sony Customer Information Service Center offers information about your Network Media Receiver or the software, refer to the following: ❑ This guide explains...
...476-6972). For customers in the United States and Canada ❑ Sony Online Support provides instant access to http://www.vaio-link.com/ 63 Advanced Features For customers in Europe ❑ VAIO-link. For support addresses and phone numbers, refer to information on commonly encountered... serches for the corresponding solutions online. You can visit Sony Online Support at: http://www.sony.com/pcsupport ❑ The Sony Customer Information Service Center offers information about your Network Media Receiver or the software, refer to the following: ❑ This guide explains...

Operating Instructions
Page 66
... AC outlet, reconnect it, and turn on . c The bandwidth of a wireless LAN changes according to the TV (page 18). c If an antivirus program or similar software is distorted c The network bandwidth (the amount of the Network Media Receiver and access point. Stop virus scanning before using the Network Media Receiver, or...
... AC outlet, reconnect it, and turn on . c The bandwidth of a wireless LAN changes according to the TV (page 18). c If an antivirus program or similar software is distorted c The network bandwidth (the amount of the Network Media Receiver and access point. Stop virus scanning before using the Network Media Receiver, or...

Operating Instructions
Page 67
... in "Having the computer start up automatically" on page 52. Disable the Internet Connection Firewall (ICF) or Windows Firewall. z Hint You can start the server software again. c If you are using VAIO Media, refer to the VAIO Media Help. Troubleshooting Connection, registration Cannot connect to a computer c Check whether the computer is...
... in "Having the computer start up automatically" on page 52. Disable the Internet Connection Firewall (ICF) or Windows Firewall. z Hint You can start the server software again. c If you are using VAIO Media, refer to the VAIO Media Help. Troubleshooting Connection, registration Cannot connect to a computer c Check whether the computer is...

Operating Instructions
Page 68
...following items: • If the Network Media Receiver is connected directly to a single computer, is not adequate. c Verify that the server software has been started on the remote control, select "Refresh", and press the SELECT button (page 40). If you are established correctly. Can... the network connections are using VAIO Media, refer to a computer after performing a hard disk drive recovery on "Select a server..." Start the software as appropriate for the computer name to the computer. Starting up on the computer c Perform the steps in to appear in is the crossover ...
...following items: • If the Network Media Receiver is connected directly to a single computer, is not adequate. c Verify that the server software has been started on the remote control, select "Refresh", and press the SELECT button (page 40). If you are established correctly. Can... the network connections are using VAIO Media, refer to a computer after performing a hard disk drive recovery on "Select a server..." Start the software as appropriate for the computer name to the computer. Starting up on the computer c Perform the steps in to appear in is the crossover ...
Quick Start Guide
Page 9
... to make the connection to the TV via a wireless connection, without using a different kind of computer, corresponding settings must be configured. 9 VGP-MR100QSG(GB)_2-580-488-11(1) Connect power c Page 24 Connect the supplied AC adapter to the Network Media Receiver to match the c ...Media Receiver to computer via a network cable c Page 16 Connect the Network Media Receiver to the computer using a VAIO computer, the VAIO Media software must be configured. Connect the Network Media Receiver to a TV c Page 13 Select a suitable connector and cable according to the requirements of ...
... to make the connection to the TV via a wireless connection, without using a different kind of computer, corresponding settings must be configured. 9 VGP-MR100QSG(GB)_2-580-488-11(1) Connect power c Page 24 Connect the supplied AC adapter to the Network Media Receiver to match the c ...Media Receiver to computer via a network cable c Page 16 Connect the Network Media Receiver to the computer using a VAIO computer, the VAIO Media software must be configured. Connect the Network Media Receiver to a TV c Page 13 Select a suitable connector and cable according to the requirements of ...

Quick Start Guide
Page 26
The "Wireless LAN Configurations" screen appears. A software keyboard appears on settings for your wireless LAN, refer to enter the SSID and Key Phrase.... about restarting the Network Media Receiver appears, select "OK", and press the SELECT button. For instructions on using the software keyboard, refer to "Using the software keyboard" on page 27. 3 Use the V/v/B/b buttons to select "Wireless LAN Configurations", and press the SELECT button.... for your wireless LAN access point and router. The Network Media Receiver restarts and enters Standby mode. 26 VGP-MR100QSG(GB)_2-580-488-11(1)
The "Wireless LAN Configurations" screen appears. A software keyboard appears on settings for your wireless LAN, refer to enter the SSID and Key Phrase.... about restarting the Network Media Receiver appears, select "OK", and press the SELECT button. For instructions on using the software keyboard, refer to "Using the software keyboard" on page 27. 3 Use the V/v/B/b buttons to select "Wireless LAN Configurations", and press the SELECT button.... for your wireless LAN access point and router. The Network Media Receiver restarts and enters Standby mode. 26 VGP-MR100QSG(GB)_2-580-488-11(1)

Quick Start Guide
Page 27
... V/v/B/b buttons to select "Enter", and press the SELECT button. Use the V/v/B/b buttons to select "Space", and press the SELECT button. 27 VGP-MR100QSG(GB)_2-580-488-11(1) To delete the character positioned immediately before the character Use the V/v/B/b buttons to select the desired character, and press... the SELECT button. The key input buttons for the SSID or Key Phrase field. 4 When the input is cleared. Using the software keyboard The software keyboard appears on the screen whenever SSID or Key Phrase is set at the character cursor position in the display field. 3 Repeat steps ...
... V/v/B/b buttons to select "Enter", and press the SELECT button. Use the V/v/B/b buttons to select "Space", and press the SELECT button. 27 VGP-MR100QSG(GB)_2-580-488-11(1) To delete the character positioned immediately before the character Use the V/v/B/b buttons to select the desired character, and press... the SELECT button. The key input buttons for the SSID or Key Phrase field. 4 When the input is cleared. Using the software keyboard The software keyboard appears on the screen whenever SSID or Key Phrase is set at the character cursor position in the display field. 3 Repeat steps ...

Quick Start Guide
Page 30
... Setup, refer to the VAIO Media help. 7 Configure settings at the computer Configure the connected computer to enable access from with the media content server software you must first install VAIO Media 4.1 or later. 30 VGP-MR100QSG(GB)_2-580-488-11(1)
... Setup, refer to the VAIO Media help. 7 Configure settings at the computer Configure the connected computer to enable access from with the media content server software you must first install VAIO Media 4.1 or later. 30 VGP-MR100QSG(GB)_2-580-488-11(1)
Marketing Specifications
Page 2
... recommended for more information.) Available with VAIO® Personal Computers with VAIO Media™ software ver. 2.0 or later: Recorded Television Playback (Non Digital Rights Management protected content) Digital... San Diego, CA 92127 • 1-800-222-7669 • www.sony.com ® Last Updated 2005-03-23 VGP-MR100U VAIO® RoomLink™ Network Media Receiver Features and Benefits s The ...from a VAIO® PC equipped with your big screen TV from room to room. - It enables you to set-up on your living room. - VAIO® PCs with VAIO Media™ pre-installed,...
... recommended for more information.) Available with VAIO® Personal Computers with VAIO Media™ software ver. 2.0 or later: Recorded Television Playback (Non Digital Rights Management protected content) Digital... San Diego, CA 92127 • 1-800-222-7669 • www.sony.com ® Last Updated 2005-03-23 VGP-MR100U VAIO® RoomLink™ Network Media Receiver Features and Benefits s The ...from a VAIO® PC equipped with your big screen TV from room to room. - It enables you to set-up on your living room. - VAIO® PCs with VAIO Media™ pre-installed,...
