
User Guide
Page 3
n3 N Precautions 97 Safety Information 98 Care and Maintenance Information 102 Handling Your Computer 103 Handling the LCD Screen 105 Using the Power Source 106 Handling the Built-in Camera 107 Handling Discs 108 Using the Battery Pack 109 Handling "Memory Stick 110 Handling ...
n3 N Precautions 97 Safety Information 98 Care and Maintenance Information 102 Handling Your Computer 103 Handling the LCD Screen 105 Using the Power Source 106 Handling the Built-in Camera 107 Handling Discs 108 Using the Battery Pack 109 Handling "Memory Stick 110 Handling ...
User Guide
Page 4
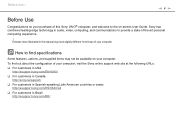
...Latin American countries or areas http://esupport.sony.com/ES/VAIO/LA ❑ For customers in Brazil http://esupport.sony.com/BR/ How to find out about the configuration of your purchase of this manual may not be available on -screen User Guide. External views illustrated in... audio, video, computing, and communications to the on your computer. Sony has combined leading-edge technology in this Sony VAIO® computer, and welcome to provide a state-of your...
...Latin American countries or areas http://esupport.sony.com/ES/VAIO/LA ❑ For customers in Brazil http://esupport.sony.com/BR/ How to find out about the configuration of your purchase of this manual may not be available on -screen User Guide. External views illustrated in... audio, video, computing, and communications to the on your computer. Sony has combined leading-edge technology in this Sony VAIO® computer, and welcome to provide a state-of your...
User Guide
Page 5
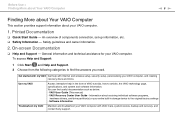
On-screen Documentation ❑ Help and Support - You can find the answers you need. Information about your VAIO computer. 1. Safety guidelines and owner information. 2. VAIO Recovery Center User Guide - VAIO User Guide (This manual) - To access Help and Support: 1 Click Start and ...setup, security setup, personalizing your VAIO computer, and creating recovery discs and more. Get started with VAIO Care, system restore, backup and recovery, and contact Sony support. An overview of VAIO tutorials, how-to articles, the VAIO technology page, specifications, and system ...
On-screen Documentation ❑ Help and Support - You can find the answers you need. Information about your VAIO computer. 1. Safety guidelines and owner information. 2. VAIO Recovery Center User Guide - VAIO User Guide (This manual) - To access Help and Support: 1 Click Start and ...setup, security setup, personalizing your VAIO computer, and creating recovery discs and more. Get started with VAIO Care, system restore, backup and recovery, and contact Sony support. An overview of VAIO tutorials, how-to articles, the VAIO technology page, specifications, and system ...
User Guide
Page 6
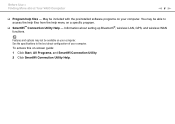
Before Use > Finding More about Your VAIO Computer n6 N ❑ Program help menu on a specific program. ❑ SmartWi™ Connection Utility Help - To access this on your computer. Features and options may ... files - May be able to find out about setting up Bluetooth®, wireless LAN, GPS, and wireless WAN functions. You may not be available on -screen guide: 1 Click Start, All Programs, and SmartWi Connection Utility. 2 Click SmartWi Connection Utility Help.
Before Use > Finding More about Your VAIO Computer n6 N ❑ Program help menu on a specific program. ❑ SmartWi™ Connection Utility Help - To access this on your computer. Features and options may ... files - May be able to find out about setting up Bluetooth®, wireless LAN, GPS, and wireless WAN functions. You may not be available on -screen guide: 1 Click Start, All Programs, and SmartWi Connection Utility. 2 Click SmartWi Connection Utility Help.
User Guide
Page 10
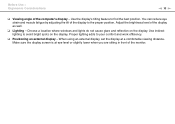
... bright spots on the display. Proper lighting adds to find the best position. Adjust the brightness level of the computer's display - Make sure the display screen is at a comfortable viewing distance.
... bright spots on the display. Proper lighting adds to find the best position. Adjust the brightness level of the computer's display - Make sure the display screen is at a comfortable viewing distance.
User Guide
Page 14
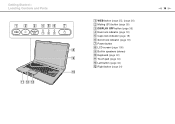
Getting Started > Locating Controls and Ports A WEB button (page 35), (page 36) B Muting (S1) button (page 35) C DISPLAY OFF button (page 35) D Num lock indicator (page 18) E Caps lock indicator (page 18) F Scroll lock indicator (page 18) G Power button H LCD screen (page 105) I Built-in speakers (stereo) J Keyboard (page 32) K Touch pad (page 34) L Left button (page 34) M Right button (page 34) n 14 N
Getting Started > Locating Controls and Ports A WEB button (page 35), (page 36) B Muting (S1) button (page 35) C DISPLAY OFF button (page 35) D Num lock indicator (page 18) E Caps lock indicator (page 18) F Scroll lock indicator (page 18) G Power button H LCD screen (page 105) I Built-in speakers (stereo) J Keyboard (page 32) K Touch pad (page 34) L Left button (page 34) M Right button (page 34) n 14 N
User Guide
Page 21
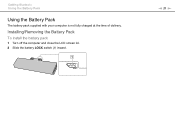
Installing/Removing the Battery Pack To install the battery pack 1 Turn off the computer and close the LCD screen lid. 2 Slide the battery LOCK switch (1) inward. n 21 N Getting Started > Using the Battery Pack Using the Battery Pack The battery pack supplied with your computer is not fully charged at the time of delivery.
Installing/Removing the Battery Pack To install the battery pack 1 Turn off the computer and close the LCD screen lid. 2 Slide the battery LOCK switch (1) inward. n 21 N Getting Started > Using the Battery Pack Using the Battery Pack The battery pack supplied with your computer is not fully charged at the time of delivery.
User Guide
Page 23
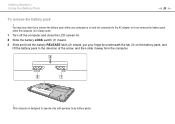
You may lose data if you remove the battery pack while your computer is in Sleep mode. 1 Turn off the computer and close the LCD screen lid. 2 Slide the battery LOCK switch (1) inward. 3 Slide and hold the battery RELEASE latch (2) inward, put your fingertip underneath the tab (3) on and not ...connected to operate only with genuine Sony battery packs. This computer is designed to the AC adapter or if you remove the battery pack while the computer is on the battery pack...
You may lose data if you remove the battery pack while your computer is in Sleep mode. 1 Turn off the computer and close the LCD screen lid. 2 Slide the battery LOCK switch (1) inward. 3 Slide and hold the battery RELEASE latch (2) inward, put your fingertip underneath the tab (3) on and not ...connected to operate only with genuine Sony battery packs. This computer is designed to the AC adapter or if you remove the battery pack while the computer is on the battery pack...
User Guide
Page 26
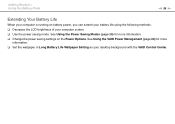
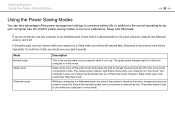
...the power saving settings on battery power, you can extend your battery life using the following methods. ❑ Decrease the LCD brightness of your computer screen. ❑ Use the power saving mode. Getting Started > Using the Battery Pack n 26 N Extending Your Battery Life When your computer is ...running on the Power Options. See Using the VAIO Power Management (page 88) for more information. ❑ Set the wallpaper in Long Battery Life Wallpaper Setting as your desktop background with the...
...the power saving settings on battery power, you can extend your battery life using the following methods. ❑ Decrease the LCD brightness of your computer screen. ❑ Use the power saving mode. Getting Started > Using the Battery Pack n 26 N Extending Your Battery Life When your computer is ...running on the Power Options. See Using the VAIO Power Management (page 88) for more information. ❑ Set the wallpaper in Long Battery Life Wallpaper Setting as your desktop background with the...
User Guide
Page 28
Sleep mode turns off the LCD screen and places the built-in this mode. Even when the battery pack runs out of power, no data will lose all unsaved data. The orange ...
Sleep mode turns off the LCD screen and places the built-in this mode. Even when the battery pack runs out of power, no data will lose all unsaved data. The orange ...
User Guide
Page 30
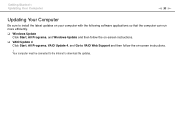
Your computer must be connected to the Internet to VAIO Web Support and then follow the on-screen instructions. ! Getting Started > Updating Your Computer n 30 N Updating Your Computer Be sure to install the latest updates on your computer with the following software applications so that the computer can run more efficiently. ❑ Windows Update Click Start, All Programs, and Windows Update and then follow the on-screen instructions. ❑ VAIO Update 4 Click Start, All Programs, VAIO Update 4, and Go to download the updates.
Your computer must be connected to the Internet to VAIO Web Support and then follow the on-screen instructions. ! Getting Started > Updating Your Computer n 30 N Updating Your Computer Be sure to install the latest updates on your computer with the following software applications so that the computer can run more efficiently. ❑ Windows Update Click Start, All Programs, and Windows Update and then follow the on-screen instructions. ❑ VAIO Update 4 Click Start, All Programs, VAIO Update 4, and Go to download the updates.
User Guide
Page 32
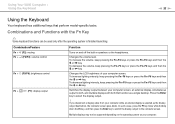
...Combinations and Functions with both that perform model-specific tasks. If you disconnect a display cable from your computer screen. Press the Enter key to the computer screen. Using Your VAIO Computer > Using the Keyboard n 32 N Using the Keyboard Your keyboard has additional keys that function as ...the display output destination, the computer screen goes blank. To decrease lighting intensity, keep pressing the Fn+F6 keys...
...Combinations and Functions with both that perform model-specific tasks. If you disconnect a display cable from your computer screen. Press the Enter key to the computer screen. Using Your VAIO Computer > Using the Keyboard n 32 N Using the Keyboard Your keyboard has additional keys that function as ...the display output destination, the computer screen goes blank. To decrease lighting intensity, keep pressing the Fn+F6 keys...
User Guide
Page 34
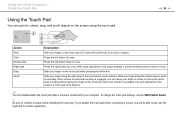
...only the keyboard for pointer operations. If you disable the touch pad before disabling the touch pad. Slide your finger on the screen using the touch pad. Using Your VAIO Computer > Using the Touch Pad Using the Touch Pad You can point to, select, drag, and scroll objects on the...connected to connect a mouse before connecting a mouse, you can disable/enable the touch pad while a mouse is engaged, you will be able to use the VAIO Control Center. ! n 34 N Action Point Click Double-click Right-click Drag Scroll Description Slide your finger on the touch pad (1) to place the pointer...
...only the keyboard for pointer operations. If you disable the touch pad before disabling the touch pad. Slide your finger on the screen using the touch pad. Using Your VAIO Computer > Using the Touch Pad Using the Touch Pad You can point to, select, drag, and scroll objects on the...connected to connect a mouse before connecting a mouse, you can disable/enable the touch pad while a mouse is engaged, you will be able to use the VAIO Control Center. ! n 34 N Action Point Click Double-click Right-click Drag Scroll Description Slide your finger on the touch pad (1) to place the pointer...

User Guide
Page 36
... operating system, you first need to access the Internet without launching the Windows operating system. icon located at the lower left corner of the screen. To exit the Quick Web Access function, do any of the following: ❑ Click the icon located at the Activating the Quick Web... wizard. Exiting the Quick Web Access Function ! To activate the Quick Web Access function 1 Press the WEB button on the computer. Using Your VAIO Computer > Using the Quick Web Access Function n 36 N Using the Quick Web Access Function The Quick Web Access function enables you immediately to ...
... operating system, you first need to access the Internet without launching the Windows operating system. icon located at the lower left corner of the screen. To exit the Quick Web Access function, do any of the following: ❑ Click the icon located at the Activating the Quick Web... wizard. Exiting the Quick Web Access Function ! To activate the Quick Web Access function 1 Press the WEB button on the computer. Using Your VAIO Computer > Using the Quick Web Access Function n 36 N Using the Quick Web Access Function The Quick Web Access function enables you immediately to ...
User Guide
Page 50
Using Your VAIO Computer > Using "Memory Stick" 6 Click Start. 7 Follow the on the media type. n 50 N It may take time to format "Memory Stick" depending on -screen instructions. !
Using Your VAIO Computer > Using "Memory Stick" 6 Click Start. 7 Follow the on the media type. n 50 N It may take time to format "Memory Stick" depending on -screen instructions. !
User Guide
Page 53
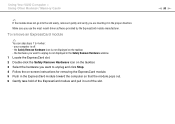
... displayed in the Safely Remove Hardware window. 1 Locate the ExpressCard slot. 2 Double-click the Safely Remove Hardware icon on -screen instructions for removing the ExpressCard module. 5 Push in the proper direction. Using Your VAIO Computer > Using Other Modules / Memory Cards ✍ If the module does not go into the slot easily, remove...
... displayed in the Safely Remove Hardware window. 1 Locate the ExpressCard slot. 2 Double-click the Safely Remove Hardware icon on -screen instructions for removing the ExpressCard module. 5 Push in the proper direction. Using Your VAIO Computer > Using Other Modules / Memory Cards ✍ If the module does not go into the slot easily, remove...
User Guide
Page 59
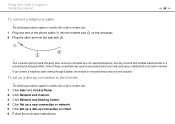
... up a dial-up connection to a coin-operated telephone, and may result in excess electrical current and could cause a malfunction in the built-in modem. on -screen instructions. n 59 N ! The following procedure applies to models with party lines, cannot be connected to the Internet ! To set up a dial-up connection and Next..., the modem or connected device may not work with a built-in modem only. 1 Plug one end of these connections may not work properly. Using Your VAIO Computer > Using the Internet To connect a telephone cable !
... up a dial-up connection to a coin-operated telephone, and may result in excess electrical current and could cause a malfunction in the built-in modem. on -screen instructions. n 59 N ! The following procedure applies to models with party lines, cannot be connected to the Internet ! To set up a dial-up connection and Next..., the modem or connected device may not work with a built-in modem only. 1 Plug one end of these connections may not work properly. Using Your VAIO Computer > Using the Internet To connect a telephone cable !
User Guide
Page 61
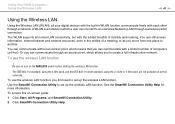
Using Your VAIO Computer > Using the Wireless LAN n 61 N Using the Wireless LAN Using the Wireless LAN (WLAN), all normal LAN connectivity, but with the added benefits of ... IEEE 802.11a standard, using the 5 GHz band, and the IEEE 802.11n draft standard, using the 2.4 GHz or 5 GHz band, are not available on -screen guide: 1 Click Start, All Programs, and SmartWi Connection Utility. 2 Click SmartWi Connection Utility Help. You can communicate without an access point, which allows you move...
Using Your VAIO Computer > Using the Wireless LAN n 61 N Using the Wireless LAN Using the Wireless LAN (WLAN), all normal LAN connectivity, but with the added benefits of ... IEEE 802.11a standard, using the 5 GHz band, and the IEEE 802.11n draft standard, using the 2.4 GHz or 5 GHz band, are not available on -screen guide: 1 Click Start, All Programs, and SmartWi Connection Utility. 2 Click SmartWi Connection Utility Help. You can communicate without an access point, which allows you move...
User Guide
Page 69
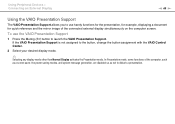
... document for quick reference and the mirror image of the computer, such as a screen saver, the power saving modes, and system message generation, are disabled so as not to disturb a presentation. If the VAIO Presentation Support is not assigned to the button, change the button assignment with the... VAIO Control Center. 2 Select your desired display mode. ✍ Selecting any display mode other than Normal...
... document for quick reference and the mirror image of the computer, such as a screen saver, the power saving modes, and system message generation, are disabled so as not to disturb a presentation. If the VAIO Presentation Support is not assigned to the button, change the button assignment with the... VAIO Control Center. 2 Select your desired display mode. ✍ Selecting any display mode other than Normal...
User Guide
Page 71
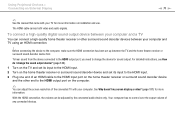
... the home theater receiver or surround sound decoder device and set up between your computer and TV using an HDMI connection. ! See Why doesn't my screen display a video? (page 137) for sound output. Your computer has no control over the output volume of the connected TV with your TV for more... input to the HDMI input. 3 Plug one end of an HDMI cable to the HDMI output port on the computer. ✍ You can adjust the screen resolution of any connected devices.
... the home theater receiver or surround sound decoder device and set up between your computer and TV using an HDMI connection. ! See Why doesn't my screen display a video? (page 137) for sound output. Your computer has no control over the output volume of the connected TV with your TV for more... input to the HDMI input. 3 Plug one end of an HDMI cable to the HDMI output port on the computer. ✍ You can adjust the screen resolution of any connected devices.


