

User Guide
Page 3
n3 N Precautions 98 Safety Information 99 Care and Maintenance Information 103 Handling Your Computer 104 Handling the LCD Screen 106 Using the Power Source 107 Handling the Built-in Camera 108 Handling Discs 109 Using the Battery Pack 110 Handling "Memory Stick 111 ...
n3 N Precautions 98 Safety Information 99 Care and Maintenance Information 103 Handling Your Computer 104 Handling the LCD Screen 106 Using the Power Source 107 Handling the Built-in Camera 108 Handling Discs 109 Using the Battery Pack 110 Handling "Memory Stick 111 ...

User Guide
Page 12
... shown on the following pages. Front A Built-in MOTION EYE camera (page 36) B Built-in MOTION EYE camera indicator (page 18) C Built-in microphone (monaural) D LCD screen (page 106) E Built-in speakers (stereo) F Keyboard (page 32) G Charge indicator (page 18) H Disc drive indicator (page 18) I WIRELESS switch (page 59), (page 62...
... shown on the following pages. Front A Built-in MOTION EYE camera (page 36) B Built-in MOTION EYE camera indicator (page 18) C Built-in microphone (monaural) D LCD screen (page 106) E Built-in speakers (stereo) F Keyboard (page 32) G Charge indicator (page 18) H Disc drive indicator (page 18) I WIRELESS switch (page 59), (page 62...

User Guide
Page 21
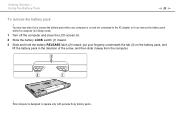
Getting Started > Using the Battery Pack Using the Battery Pack The battery pack supplied with your computer is not fully charged at the time of delivery. Installing/Removing the Battery Pack To install the battery pack 1 Turn off the computer and close the LCD screen lid. 2 Slide the battery LOCK switch (1) inward. n 21 N
Getting Started > Using the Battery Pack Using the Battery Pack The battery pack supplied with your computer is not fully charged at the time of delivery. Installing/Removing the Battery Pack To install the battery pack 1 Turn off the computer and close the LCD screen lid. 2 Slide the battery LOCK switch (1) inward. n 21 N
User Guide
Page 23
This computer is in Sleep mode. 1 Turn off the computer and close the LCD screen lid. 2 Slide the battery LOCK switch (1) inward. 3 Slide and hold the battery RELEASE latch (2) inward, put your computer is on the battery pack, and ... (3) on and not connected to the AC adapter or if you remove the battery pack while the computer is designed to operate only with genuine Sony battery packs. Getting Started > Using the Battery Pack n 23 N To remove the battery pack !
This computer is in Sleep mode. 1 Turn off the computer and close the LCD screen lid. 2 Slide the battery LOCK switch (1) inward. 3 Slide and hold the battery RELEASE latch (2) inward, put your computer is on the battery pack, and ... (3) on and not connected to the AC adapter or if you remove the battery pack while the computer is designed to operate only with genuine Sony battery packs. Getting Started > Using the Battery Pack n 23 N To remove the battery pack !

User Guide
Page 26
... power saving settings on battery power, you can extend your battery life using the following methods. ❑ Decrease the LCD brightness of your desktop background with the VAIO Control Center. See Using the VAIO Power Management (page 90) for more information. ❑ Set the wallpaper in Long Battery Life Wallpaper Setting as your...
... power saving settings on battery power, you can extend your battery life using the following methods. ❑ Decrease the LCD brightness of your desktop background with the VAIO Control Center. See Using the VAIO Power Management (page 90) for more information. ❑ Set the wallpaper in Long Battery Life Wallpaper Setting as your...

User Guide
Page 28
... off . The green power indicator light is lit while the computer is in use your computer for a long period of time while it off the LCD screen and places the built-in storage device(s) and the CPU into Hibernate mode or turn it is in this mode. Your computer comes out...
... off . The green power indicator light is lit while the computer is in use your computer for a long period of time while it off the LCD screen and places the built-in storage device(s) and the CPU into Hibernate mode or turn it is in this mode. Your computer comes out...

User Guide
Page 32
Changes the LCD brightness of an image or a document displayed on some software. Fn + / (F9/...key, and then press the Enter key to switch the display output to select the display output. ! Using Your VAIO Computer > Using the Keyboard n 32 N Using the Keyboard Your keyboard has additional keys that function as the display ...): display output Function Turns on your computer screen, an external display, simultaneous output to both, and multiple displays with the VAIO Control Center for more information. To increase lighting intensity, keep pressing the Fn+F5 keys or press the Fn+F5 keys...
Changes the LCD brightness of an image or a document displayed on some software. Fn + / (F9/...key, and then press the Enter key to switch the display output to select the display output. ! Using Your VAIO Computer > Using the Keyboard n 32 N Using the Keyboard Your keyboard has additional keys that function as the display ...): display output Function Turns on your computer screen, an external display, simultaneous output to both, and multiple displays with the VAIO Control Center for more information. To increase lighting intensity, keep pressing the Fn+F5 keys or press the Fn+F5 keys...

User Guide
Page 98
... N Precautions This section describes safety guidelines and precautions to help you protect your VAIO computer from potential damage. ❑ Safety Information (page 99) ❑ Care and Maintenance Information (page 103) ❑ Handling Your Computer (page 104) ❑ Handling the LCD Screen (page 106) ❑ Using the Power Source (page 107) ❑ Handling...
... N Precautions This section describes safety guidelines and precautions to help you protect your VAIO computer from potential damage. ❑ Safety Information (page 99) ❑ Care and Maintenance Information (page 103) ❑ Handling Your Computer (page 104) ❑ Handling the LCD Screen (page 106) ❑ Using the Power Source (page 107) ❑ Handling...

User Guide
Page 103
... may damage the finish of the disc from the center out. ❑ If the disc is sensitive to pressure. Discs ❑ Proper care of the LCD screen. Do not use any remaining moisture with a blower brush or a soft brush. Rubbing the surface could damage the screen.... LCD Screen Use a soft, dry cloth to its edges and use a soft cloth to wipe the surface from the center out. Do not rub the cover, ...
... may damage the finish of the disc from the center out. ❑ If the disc is sensitive to pressure. Discs ❑ Proper care of the LCD screen. Do not use any remaining moisture with a blower brush or a soft brush. Rubbing the surface could damage the screen.... LCD Screen Use a soft, dry cloth to its edges and use a soft cloth to wipe the surface from the center out. Do not rub the cover, ...

User Guide
Page 105
..., be sensitive to pressure or added stress, and exerting pressure may be sure to hold the base with one hand and gently lift the LCD screen lid with both hands. ❑ Use a carrying case specially designed to malfunction. To carry the computer with the lid open the computer..., hold the computer with the other. The LCD screen may damage the screen or cause it to carry your computer. Precautions > Handling Your Computer n 105 N ❑ To avoid losing data when...
..., be sensitive to pressure or added stress, and exerting pressure may be sure to hold the base with one hand and gently lift the LCD screen lid with both hands. ❑ Use a carrying case specially designed to malfunction. To carry the computer with the lid open the computer..., hold the computer with the other. The LCD screen may damage the screen or cause it to carry your computer. Precautions > Handling Your Computer n 105 N ❑ To avoid losing data when...

User Guide
Page 106
... time. This is normal and does not indicate a malfunction. ❑ The LCD screen is not a malfunction. Sony assumes no liability for selection, as it . Be sure to prevent residual images. ❑ The LCD screen becomes warm during operation. You may scratch the LCD screen or soil it may , however, see tiny black points and...
... time. This is normal and does not indicate a malfunction. ❑ The LCD screen is not a malfunction. Sony assumes no liability for selection, as it . Be sure to prevent residual images. ❑ The LCD screen becomes warm during operation. You may scratch the LCD screen or soil it may , however, see tiny black points and...

User Guide
Page 140
See Using the Battery Pack (page 21) for more information. ❑ If the display output is in LCD (Video) Sleep mode, press any key to the external display, press the Fn+F7 keys. See Combinations and Functions with the Fn Key (page 32) ...
See Using the Battery Pack (page 21) for more information. ❑ If the display output is in LCD (Video) Sleep mode, press any key to the external display, press the Fn+F7 keys. See Combinations and Functions with the Fn Key (page 32) ...

User Guide
Page 142
... information. ❑ The video memory of your computer screen. What should I do if my screen is disconnected, you can check the total amount of the LCD screen. Stop video playback, change the display output to brighten your computer may be insufficient for changing the display output. Right-click on your computer...
... information. ❑ The video memory of your computer screen. What should I do if my screen is disconnected, you can check the total amount of the LCD screen. Stop video playback, change the display output to brighten your computer may be insufficient for changing the display output. Right-click on your computer...

User Guide
Page 143
...the power status icon on the taskbar and select Power Options. 2 Click Change plan settings on the right of my screen changes? ❑ LCD brightness, adjusted by the Fn+F5/F6 keys, is only temporary and may be restored to Normal mode from Sleep or Hibernate mode. Troubleshooting... > Display n 143 N What should I do if the LCD brightness of the current power plan. 3 Click Change advanced power settings. 4 Select the Advanced settings tab. 5 Double-click Display. 6 Double-click Display ...
...the power status icon on the taskbar and select Power Options. 2 Click Change plan settings on the right of my screen changes? ❑ LCD brightness, adjusted by the Fn+F5/F6 keys, is only temporary and may be restored to Normal mode from Sleep or Hibernate mode. Troubleshooting... > Display n 143 N What should I do if the LCD brightness of the current power plan. 3 Click Change advanced power settings. 4 Select the Advanced settings tab. 5 Double-click Display. 6 Double-click Display ...


