
User Guide
Page 2
... ...7 Ergonomic Considerations ...11 Getting Started ...13 Locating Controls and Ports...14 About the Indicator Lights ...20 Connecting a Power Source ...21 Using the Battery Pack ...22 Shutting Down Your Computer Safely ...28 Using Your VAIO Computer ...29 Using the Keyboard ...30 Using the Touch Pad ...31 Using Special-function Buttons ...32 Using the...
... ...7 Ergonomic Considerations ...11 Getting Started ...13 Locating Controls and Ports...14 About the Indicator Lights ...20 Connecting a Power Source ...21 Using the Battery Pack ...22 Shutting Down Your Computer Safely ...28 Using Your VAIO Computer ...29 Using the Keyboard ...30 Using the Touch Pad ...31 Using Special-function Buttons ...32 Using the...

User Guide
Page 3
n3 N Using Peripheral Devices...72 Connecting External Speakers ...73 Connecting an External Display ...74 Selecting Display Modes...81 Using the Multiple Monitors Function ...83 Connecting an External Microphone ...86 Connecting a Universal Serial Bus (USB) Device...87 Connecting a Printer ...90 Connecting an i.LINK Device ...91 Connecting to a Network (LAN) ...93 Customizing Your VAIO Computer ...94 Setting the Password ...95 Setting Up Your Computer with VAIO Control Center 100 Using the Power Saving Modes ...101 Upgrading Your VAIO Computer...106 Adding and Removing Memory...107
n3 N Using Peripheral Devices...72 Connecting External Speakers ...73 Connecting an External Display ...74 Selecting Display Modes...81 Using the Multiple Monitors Function ...83 Connecting an External Microphone ...86 Connecting a Universal Serial Bus (USB) Device...87 Connecting a Printer ...90 Connecting an i.LINK Device ...91 Connecting to a Network (LAN) ...93 Customizing Your VAIO Computer ...94 Setting the Password ...95 Setting Up Your Computer with VAIO Control Center 100 Using the Power Saving Modes ...101 Upgrading Your VAIO Computer...106 Adding and Removing Memory...107

User Guide
Page 4
n4 N Precautions ...113 On Handling the LCD Screen ...114 On Using the Power Source ...115 On Handling Your Computer...116 On Using the Built-in MOTION EYE Camera...118 On Handling Floppy Disks ...119 On Handling Discs ...120 ...
n4 N Precautions ...113 On Handling the LCD Screen ...114 On Using the Power Source ...115 On Handling Your Computer...116 On Using the Built-in MOTION EYE Camera...118 On Handling Floppy Disks ...119 On Handling Discs ...120 ...

User Guide
Page 13
... the supplied accessories connected and set up your computer with your computer. n 13 N Getting Started Getting Started This section describes how to start up your VAIO computer. ! Before starting your computer for example, a printer, an external hard disk drive, a scanner, and so on) at a time, following ...the manufacturers' instructions. ❑ Locating Controls and Ports (page 14) ❑ About the Indicator Lights (page 20) ❑ Connecting a Power Source (page 21) ❑ Using the Battery Pack (page 22) ❑ Shutting Down Your Computer Safely (page 28)
... the supplied accessories connected and set up your computer with your computer. n 13 N Getting Started Getting Started This section describes how to start up your VAIO computer. ! Before starting your computer for example, a printer, an external hard disk drive, a scanner, and so on) at a time, following ...the manufacturers' instructions. ❑ Locating Controls and Ports (page 14) ❑ About the Indicator Lights (page 20) ❑ Connecting a Power Source (page 21) ❑ Using the Battery Pack (page 22) ❑ Shutting Down Your Computer Safely (page 28)
User Guide
Page 17
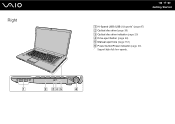
Right n 17 N Getting Started A Hi-Speed USB (USB 2.0) ports* (page 87) B Optical disc drive (page 36) C Optical disc drive indicator (page 20) D Drive eject button (page 36) E Manual eject hole (page 151) F Power button/Power indicator (page 20) * Support high-/full-/low- speeds.
Right n 17 N Getting Started A Hi-Speed USB (USB 2.0) ports* (page 87) B Optical disc drive (page 36) C Optical disc drive indicator (page 20) D Drive eject button (page 36) E Manual eject hole (page 151) F Power button/Power indicator (page 20) * Support high-/full-/low- speeds.

User Guide
Page 20
...numeric keypad is not active when the indicator is being read from or written to the hard disk drive or the optical disc media. Indicator Power 1 Charge Built-in MOTION EYE camera Media Access Optical disc drive Hard disk drive/Optical disc drive Num lock Caps lock Scroll lock WIRELESS ... media is placed into Sleep mode or turn off . See Charging the Battery Pack (page 25) for more wireless options are enabled in the VAIO Smart Network window. Letters appear in use . Illuminates while the battery pack is being read from or written to change how you scroll the display...
...numeric keypad is not active when the indicator is being read from or written to the hard disk drive or the optical disc media. Indicator Power 1 Charge Built-in MOTION EYE camera Media Access Optical disc drive Hard disk drive/Optical disc drive Num lock Caps lock Scroll lock WIRELESS ... media is placed into Sleep mode or turn off . See Charging the Battery Pack (page 25) for more wireless options are enabled in the VAIO Smart Network window. Letters appear in use . Illuminates while the battery pack is being read from or written to change how you scroll the display...

User Guide
Page 21
... an AC outlet (2). 3 Plug the cable connected to use either an AC adapter or a rechargeable battery pack as a power source for a long period of time, place the computer into Hibernate mode. This power saving mode saves the time of the DC In plug varies depending on the computer. ! n 21 N Getting Started Connecting... You can use your computer for your computer. Using the AC Adapter ✍ Use your computer completely from AC power, unplug the AC adapter. If you do not intend to the AC adapter (3) into the DC IN port (4) on the AC adapter. ✍ To disconnect ...
... an AC outlet (2). 3 Plug the cable connected to use either an AC adapter or a rechargeable battery pack as a power source for a long period of time, place the computer into Hibernate mode. This power saving mode saves the time of the DC In plug varies depending on the computer. ! n 21 N Getting Started Connecting... You can use your computer for your computer. Using the AC Adapter ✍ Use your computer completely from AC power, unplug the AC adapter. If you do not intend to the AC adapter (3) into the DC IN port (4) on the AC adapter. ✍ To disconnect ...

User Guide
Page 24
n 24 N Getting Started 4 Rotate the battery pack in the direction of the arrow, and push the battery pack down into the compartment until it clicks into place. 5 Slide the battery LOCK switch outward to secure the battery pack on the computer. ✍ When your computer is designed to AC power and has a battery pack installed, it uses power from the AC outlet. ! This computer is directly connected to operate only with genuine Sony batteries.
n 24 N Getting Started 4 Rotate the battery pack in the direction of the arrow, and push the battery pack down into the compartment until it clicks into place. 5 Slide the battery LOCK switch outward to secure the battery pack on the computer. ✍ When your computer is designed to AC power and has a battery pack installed, it uses power from the AC outlet. ! This computer is directly connected to operate only with genuine Sony batteries.

User Guide
Page 25
... mode) A battery error has occurred due to the computer. The battery pack is running out of power. (Normal mode) The battery pack is running out of delivery. To charge the battery pack 1 Install the battery pack. 2 Connect the AC adapter to a failed ... states: - Charge the battery pack as described in this manual from your computer is in any of power. - n 25 N Getting Started Fully charged. - Charging the Battery Pack The battery pack supplied with the orange power indicator light Blinks fast in orange Meaning The battery pack is charging. Charge indicator light status Lit...
... mode) A battery error has occurred due to the computer. The battery pack is running out of power. (Normal mode) The battery pack is running out of delivery. To charge the battery pack 1 Install the battery pack. 2 Connect the AC adapter to a failed ... states: - Charge the battery pack as described in this manual from your computer is in any of power. - n 25 N Getting Started Fully charged. - Charging the Battery Pack The battery pack supplied with the orange power indicator light Blinks fast in orange Meaning The battery pack is charging. Charge indicator light status Lit...

User Guide
Page 26
... Hibernate mode even when battery life is a lithium ion battery pack and can be recharged any time. When your computer is directly connected to AC power. To avoid loss of data, you should save your data frequently. If the battery level falls below 10%, you will lose all unsaved data. ...The battery pack supplied with your computer is low. n 26 N Getting Started ✍ Keep the battery pack in your computer while it uses power from the AC outlet. If the battery pack wears out when the computer enters Sleep mode, you should save your data frequently and manually activate...
... Hibernate mode even when battery life is a lithium ion battery pack and can be recharged any time. When your computer is directly connected to AC power. To avoid loss of data, you should save your data frequently. If the battery level falls below 10%, you will lose all unsaved data. ...The battery pack supplied with your computer is low. n 26 N Getting Started ✍ Keep the battery pack in your computer while it uses power from the AC outlet. If the battery pack wears out when the computer enters Sleep mode, you should save your data frequently and manually activate...

User Guide
Page 28
n 28 N Getting Started Shutting Down Your Computer Safely To avoid losing unsaved data, be sure to shut down your computer properly, as described below. To shut down your computer 1 Turn off any peripherals connected to the computer. 2 Click Start, the arrow next to the Lock button, and Shut Down. 3 Respond to any prompts warning you to save documents or to consider other users and wait for the computer to turn off . The power indicator light turns off automatically.
n 28 N Getting Started Shutting Down Your Computer Safely To avoid losing unsaved data, be sure to shut down your computer properly, as described below. To shut down your computer 1 Turn off any peripherals connected to the computer. 2 Click Start, the arrow next to the Lock button, and Shut Down. 3 Respond to any prompts warning you to save documents or to consider other users and wait for the computer to turn off . The power indicator light turns off automatically.

User Guide
Page 30
... only after the operating system finished launching. To increase lighting intensity, press Fn+F6 and then M or ,, or keep pressing Fn+F6. n 30 N Using Your VAIO Computer Using the Keyboard Your keyboard is very similar to a desktop computer keyboard, but has additional keys that perform model-specific tasks. To decrease lighting...
... only after the operating system finished launching. To increase lighting intensity, press Fn+F6 and then M or ,, or keep pressing Fn+F6. n 30 N Using Your VAIO Computer Using the Keyboard Your keyboard is very similar to a desktop computer keyboard, but has additional keys that perform model-specific tasks. To decrease lighting...

User Guide
Page 37
n 37 N Using Your VAIO Computer 4 Close the tray by pushing it in a power saving mode (Sleep or Hibernate). Doing so may cause the computer to malfunction. ✍ If you plan to use an external optical disc drive, connect the drive before you launch any preinstalled disc operation program. Do not remove the optical disc when your computer is in gently. !
n 37 N Using Your VAIO Computer 4 Close the tray by pushing it in a power saving mode (Sleep or Hibernate). Doing so may cause the computer to malfunction. ✍ If you plan to use an external optical disc drive, connect the drive before you launch any preinstalled disc operation program. Do not remove the optical disc when your computer is in gently. !

User Guide
Page 41
... your computer to malfunction. ❑ Before using the preinstalled software or any disc burning software. ❑ Connect and use the AC adapter to power your computer or make sure you exit and close the session before writing data to a disc. ❑ Do not use memory-resident utility software... ❑ To make data on a disc readable on your computer, to write data to a disc. n 41 N Using Your VAIO Computer Notes on writing data to a disc ❑ Use only Sony recommended software, which is at least 50% charged. ❑ Make sure you use the same disc burning software to add...
... your computer to malfunction. ❑ Before using the preinstalled software or any disc burning software. ❑ Connect and use the AC adapter to power your computer or make sure you exit and close the session before writing data to a disc. ❑ Do not use memory-resident utility software... ❑ To make data on a disc readable on your computer, to write data to a disc. n 41 N Using Your VAIO Computer Notes on writing data to a disc ❑ Use only Sony recommended software, which is at least 50% charged. ❑ Make sure you use the same disc burning software to add...

User Guide
Page 42
...on the packaging, you cannot play this means that you can play DVDs created with the DVD+R DL, DVD- n 42 N Using Your VAIO Computer Notes on playing discs To achieve optimum performance when playing discs, you should follow these recommendations. ❑ Some CD players and computers' optical... Some DVD players and computers' optical disc drives may cause your computer to malfunction. ❑ Do not place your computer into either of the power saving modes while your computer is playing a disc. ❑ Region code indicators are labeled on the DVDs to speed up disc access when playing...
...on the packaging, you cannot play this means that you can play DVDs created with the DVD+R DL, DVD- n 42 N Using Your VAIO Computer Notes on playing discs To achieve optimum performance when playing discs, you should follow these recommendations. ❑ Some CD players and computers' optical... Some DVD players and computers' optical disc drives may cause your computer to malfunction. ❑ Do not place your computer into either of the power saving modes while your computer is playing a disc. ❑ Region code indicators are labeled on the DVDs to speed up disc access when playing...

User Guide
Page 74
n 74 N Using Peripheral Devices Connecting an External Display You can use the computer with a computer display or a projector. ✍ Connect the power cord of your computer. For example, you can connect an external display (not supplied) to your external display after connecting all other cables.
n 74 N Using Peripheral Devices Connecting an External Display You can use the computer with a computer display or a projector. ✍ Connect the power cord of your computer. For example, you can connect an external display (not supplied) to your external display after connecting all other cables.

User Guide
Page 75
... a computer display (monitor) to your computer has a non-compliant monitor connected, you will not be able to play and view a wide variety of the display's power cord (1) into the monitor port (3) a on the computer. 3 If you want to connect an analog monitor, plug the display cable (2) (not supplied) into your computer...
... a computer display (monitor) to your computer has a non-compliant monitor connected, you will not be able to play and view a wide variety of the display's power cord (1) into the monitor port (3) a on the computer. 3 If you want to connect an analog monitor, plug the display cable (2) (not supplied) into your computer...

User Guide
Page 77
... Peripheral Devices Connecting a Multimedia Computer Display You can connect a multimedia computer display that includes built-in speakers and a microphone to the HDMI port. 1 Plug the power cord of your computer. To connect a multimedia computer display !
... Peripheral Devices Connecting a Multimedia Computer Display You can connect a multimedia computer display that includes built-in speakers and a microphone to the HDMI port. 1 Plug the power cord of your computer. To connect a multimedia computer display !

User Guide
Page 78
... an external display is connected to the monitor port. 1 Plug the power cord of your TV into an AC outlet. 2 Plug one provided by Sony for updates. ✍ See the manual that you use . Always use the device driver provided by Sony is equipped with an HDMI port and a DVI-D port, we recommend...
... an external display is connected to the monitor port. 1 Plug the power cord of your TV into an AC outlet. 2 Plug one provided by Sony for updates. ✍ See the manual that you use . Always use the device driver provided by Sony is equipped with an HDMI port and a DVI-D port, we recommend...

User Guide
Page 80
n 80 N Using Peripheral Devices Connecting a Projector You can connect a projector (for example, the Sony LCD projector) to the HDMI port. 1 Connect the power cord (1) of your projector into an AC outlet. 2 Plug a display cable (2) (not supplied) into the monitor port (3) a on the computer. 3 Plug an audio cable (4) (not ...
n 80 N Using Peripheral Devices Connecting a Projector You can connect a projector (for example, the Sony LCD projector) to the HDMI port. 1 Connect the power cord (1) of your projector into an AC outlet. 2 Plug a display cable (2) (not supplied) into the monitor port (3) a on the computer. 3 Plug an audio cable (4) (not ...


