User Guide
Page 2
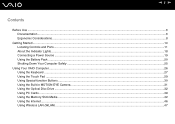
n2 N Contents Before Use ...6 Documentation ...6 Ergonomic Considerations ...8 Getting Started ...10 Locating Controls and Ports...11 About the Indicator Lights ...18 Connecting a Power Source ...19 Using the Battery Pack ...20 Shutting Down Your Computer Safely ...25 Using Your VAIO Computer ...26 Using the Keyboard ...27 Using the Touch Pad ...29 Using Special-function Buttons ...30 Using the Built-in MOTION EYE Camera...31 Using the Optical Disc Drive ...32 Using PC Cards ...39 Using the Memory Stick Media ...42 Using the Internet...46 Using Wireless LAN (WLAN) ...47
n2 N Contents Before Use ...6 Documentation ...6 Ergonomic Considerations ...8 Getting Started ...10 Locating Controls and Ports...11 About the Indicator Lights ...18 Connecting a Power Source ...19 Using the Battery Pack ...20 Shutting Down Your Computer Safely ...25 Using Your VAIO Computer ...26 Using the Keyboard ...27 Using the Touch Pad ...29 Using Special-function Buttons ...30 Using the Built-in MOTION EYE Camera...31 Using the Optical Disc Drive ...32 Using PC Cards ...39 Using the Memory Stick Media ...42 Using the Internet...46 Using Wireless LAN (WLAN) ...47

User Guide
Page 3
...) Device...72 Connecting a Printer ...75 Connecting an i.LINK Device ...77 Connecting to a Network (LAN) ...79 Customizing Your VAIO Computer ...81 Setting the Password ...82 Setting Up Your Computer with VAIO Central ...85 Using the Power Saving Modes ...86 Managing Power with VAIO Power Management ...91 Upgrading Your VAIO Computer...93 Adding and Removing Memory...94
...) Device...72 Connecting a Printer ...75 Connecting an i.LINK Device ...77 Connecting to a Network (LAN) ...79 Customizing Your VAIO Computer ...81 Setting the Password ...82 Setting Up Your Computer with VAIO Central ...85 Using the Power Saving Modes ...86 Managing Power with VAIO Power Management ...91 Upgrading Your VAIO Computer...93 Adding and Removing Memory...94
User Guide
Page 4
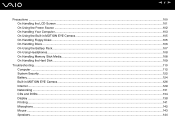
n4 N Precautions ...100 On Handling the LCD Screen ...101 On Using the Power Source ...102 On Handling Your Computer...103 On Using the Built-in MOTION EYE Camera...105 On Handling Floppy Disks ...105 On Handling Discs ...106 On Using the Battery Pack...107 On Using Headphones...108 On Handling Memory Stick Media...108 On Handling the Hard Disk ...109 Troubleshooting ...110 Computer ...112 System Security ...122 Battery...124 Built-in MOTION EYE Camera...126 Internet ...129 Networking ...131 CDs and DVDs...134 Display ...138 Printing ...141 Microphone ...142 Mouse ...143 Speakers ...144
n4 N Precautions ...100 On Handling the LCD Screen ...101 On Using the Power Source ...102 On Handling Your Computer...103 On Using the Built-in MOTION EYE Camera...105 On Handling Floppy Disks ...105 On Handling Discs ...106 On Using the Battery Pack...107 On Using Headphones...108 On Handling Memory Stick Media...108 On Handling the Hard Disk ...109 Troubleshooting ...110 Computer ...112 System Security ...122 Battery...124 Built-in MOTION EYE Camera...126 Internet ...129 Networking ...131 CDs and DVDs...134 Display ...138 Printing ...141 Microphone ...142 Mouse ...143 Speakers ...144

User Guide
Page 12
Front n 12 N Getting Started A Built-in MOTION EYE camera (page 31) B Built-in MOTION EYE camera indicator (page 18) C Internal microphone (monaural) D LCD screen (page 101) E Keyboard (page 27) F Touch pad (page 29) G WLAN (Wireless LAN) switch (page 47) H WLAN (Wireless LAN) indicator (page 18) I Power indicator (page 18) J Battery indicator (page 18) K Hard disk drive indicator (page 18) L Memory Stick media indicator (page 18) M Memory Stick media slot* (page 42) * Your computer supports Memory Stick Duo media and Memory Stick Pro high speed and high capacity capabilities.
Front n 12 N Getting Started A Built-in MOTION EYE camera (page 31) B Built-in MOTION EYE camera indicator (page 18) C Internal microphone (monaural) D LCD screen (page 101) E Keyboard (page 27) F Touch pad (page 29) G WLAN (Wireless LAN) switch (page 47) H WLAN (Wireless LAN) indicator (page 18) I Power indicator (page 18) J Battery indicator (page 18) K Hard disk drive indicator (page 18) L Memory Stick media indicator (page 18) M Memory Stick media slot* (page 42) * Your computer supports Memory Stick Duo media and Memory Stick Pro high speed and high capacity capabilities.

User Guide
Page 18
.... Press the key a second time to turn off the computer when this indicator is in Hibernate mode or off , the Memory Stick media is not being used . Indicator Power 1 Battery e Memory Stick Pro/Duo Optical disc drive Built-in MOTION EYE camera Hard disk Num lock Caps lock Scroll lock WIRELESS LAN... written to the computer is on .) When the indicator is off . When the indicator is off the indicator. Press the Caps Lock key to the Memory Stick media. (Do not enter Standby mode or turn off , the optical disc is not being used . Illuminates when data is read from or written...
.... Press the key a second time to turn off the computer when this indicator is in Hibernate mode or off , the Memory Stick media is not being used . Indicator Power 1 Battery e Memory Stick Pro/Duo Optical disc drive Built-in MOTION EYE camera Hard disk Num lock Caps lock Scroll lock WIRELESS LAN... written to the computer is on .) When the indicator is off . When the indicator is off the indicator. Press the Caps Lock key to the Memory Stick media. (Do not enter Standby mode or turn off , the optical disc is not being used . Illuminates when data is read from or written...
User Guide
Page 26
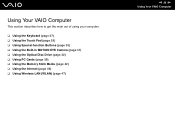
Using Your VAIO Computer This section describes how to get the most out of using your computer. ❑ Using the Keyboard (page 27) ❑ Using the Touch Pad (page 29) ❑ Using Special-function Buttons (page 30) ❑ Using the Built-in MOTION EYE Camera (page 31) ❑ Using the Optical Disc Drive (page 32) ❑ Using PC Cards (page 39) ❑ Using the Memory Stick Media (page 42) ❑ Using the Internet (page 46) ❑ Using Wireless LAN (WLAN) (page 47) n 26 N Using Your VAIO Computer
Using Your VAIO Computer This section describes how to get the most out of using your computer. ❑ Using the Keyboard (page 27) ❑ Using the Touch Pad (page 29) ❑ Using Special-function Buttons (page 30) ❑ Using the Built-in MOTION EYE Camera (page 31) ❑ Using the Optical Disc Drive (page 32) ❑ Using PC Cards (page 39) ❑ Using the Memory Stick Media (page 42) ❑ Using the Internet (page 46) ❑ Using Wireless LAN (WLAN) (page 47) n 26 N Using Your VAIO Computer
User Guide
Page 34
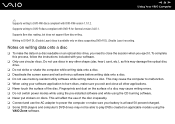
...close all other shape (star, heart, card, etc.), as this process, follow the instructions included with your software. ❑ Only use memory-resident utility software while writing data to a disc. To complete this may damage the optical disc drive. ❑ Do not strike or shake...and computer's DVD drives may cause writing errors. ❑ Do not switch power modes while using the pre-installed software and while using the VAIO Zone software. Fingerprints and dust on discs supporting DVD+R DL (Double Layer) recording. Supports writing to DVD-R discs compliant with DVD-RW version...
...close all other shape (star, heart, card, etc.), as this process, follow the instructions included with your software. ❑ Only use memory-resident utility software while writing data to a disc. To complete this may damage the optical disc drive. ❑ Do not strike or shake...and computer's DVD drives may cause writing errors. ❑ Do not switch power modes while using the pre-installed software and while using the VAIO Zone software. Fingerprints and dust on discs supporting DVD+R DL (Double Layer) recording. Supports writing to DVD-R discs compliant with DVD-RW version...

User Guide
Page 35
...This may cause the computer to malfunction. ❑ Deactivate the screen saver and exit anti-virus software before playing a DVD movie. ❑ Do not use memory-resident utility software to speed up disc access when playing a DVD. If the DVD is labeled "all open applications before playing a disc. ❑ Some discs... region code only a limited number of player you can play the disc. See the help file on what type of times. n 35 N Using Your VAIO Computer Notes on this number, the drive's DVD region code is permanently assigned and you will not be able to change it to make the...
...This may cause the computer to malfunction. ❑ Deactivate the screen saver and exit anti-virus software before playing a DVD movie. ❑ Do not use memory-resident utility software to speed up disc access when playing a DVD. If the DVD is labeled "all open applications before playing a disc. ❑ Some discs... region code only a limited number of player you can play the disc. See the help file on what type of times. n 35 N Using Your VAIO Computer Notes on this number, the drive's DVD region code is permanently assigned and you will not be able to change it to make the...

User Guide
Page 42
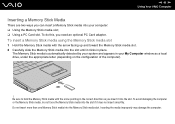
... read from accidental erasure or overwriting. Write-protecting a Memory Stick Media Some versions of Memory Stick media do not have an erasure prevention switch. n 42 N Using Your VAIO Computer Using the Memory Stick Media Your computer supports the Memory Stick media. Move the tab horizontally or vertically* to... as digital cameras, mobile phones and other devices. For the latest information on Memory Stick media, visit the Sony online support Web site at http://www.sony.com/pcsupport for customers in USA, at http://www.sony.ca/support for customers in Latin American countries or areas.
... read from accidental erasure or overwriting. Write-protecting a Memory Stick Media Some versions of Memory Stick media do not have an erasure prevention switch. n 42 N Using Your VAIO Computer Using the Memory Stick Media Your computer supports the Memory Stick media. Move the tab horizontally or vertically* to... as digital cameras, mobile phones and other devices. For the latest information on Memory Stick media, visit the Sony online support Web site at http://www.sony.com/pcsupport for customers in USA, at http://www.sony.ca/support for customers in Latin American countries or areas.
User Guide
Page 43
...the slot until it does not insert smoothly. Inserting the media improperly may damage the computer. To insert a Memory Stick media using the Memory Stick media slot 1 Hold the Memory Stick media with the arrow pointing in the correct direction as a local drive, under the appropriate letter (...depending on the configuration of the computer). ! n 43 N Using Your VAIO Computer Inserting a Memory Stick Media There are two ways you can insert a Memory Stick media into your My Computer window as you need an optional PC Card adapter. To do not force ...
...the slot until it does not insert smoothly. Inserting the media improperly may damage the computer. To insert a Memory Stick media using the Memory Stick media slot 1 Hold the Memory Stick media with the arrow pointing in the correct direction as a local drive, under the appropriate letter (...depending on the configuration of the computer). ! n 43 N Using Your VAIO Computer Inserting a Memory Stick Media There are two ways you can insert a Memory Stick media into your My Computer window as you need an optional PC Card adapter. To do not force ...

User Guide
Page 44
To format a Memory Stick media Use the Memory Stick Formatter software. n 44 N Using Your VAIO Computer ✍ The computer supports Memory Stick Duo media and is equipped with the Memory Stick combo slot that is compatible with both standard- To view the contents of the Memory Stick media 1 Click Start and then My Computer to open the...
To format a Memory Stick media Use the Memory Stick Formatter software. n 44 N Using Your VAIO Computer ✍ The computer supports Memory Stick Duo media and is equipped with the Memory Stick combo slot that is compatible with both standard- To view the contents of the Memory Stick media 1 Click Start and then My Computer to open the...

User Guide
Page 45
... of the slot. ! Do not remove the Memory Stick media while the Memory Stick media indicator is off . 2 Push the Memory Stick media in toward the computer. n 45 N Using Your VAIO Computer Removing a Memory Stick Media To remove a Memory Stick media using the Memory Stick media slot 1 Check that the Memory Stick media indicator is off before removing...
... of the slot. ! Do not remove the Memory Stick media while the Memory Stick media indicator is off . 2 Push the Memory Stick media in toward the computer. n 45 N Using Your VAIO Computer Removing a Memory Stick Media To remove a Memory Stick media using the Memory Stick media slot 1 Check that the Memory Stick media indicator is off before removing...

User Guide
Page 78
...the digital video camera recorder. 2 Launch the DVgate Plus software. ✍ On Sony digital video cameras, ports labeled DV Out, DV In/Out or i.LINK are i.LINK-compatible. The Sony digital video camera recorder shown here is an example; n 78 N Using Peripheral Devices... Connecting a Digital Video Camera Recorder To connect a digital video camera recorder 1 Plug one end of the i.LINK cable (1) into the i.LINK port (2) on the computer and the other end into the DV In/Out ports (3) on a Memory...
...the digital video camera recorder. 2 Launch the DVgate Plus software. ✍ On Sony digital video cameras, ports labeled DV Out, DV In/Out or i.LINK are i.LINK-compatible. The Sony digital video camera recorder shown here is an example; n 78 N Using Peripheral Devices... Connecting a Digital Video Camera Recorder To connect a digital video camera recorder 1 Plug one end of the i.LINK cable (1) into the i.LINK port (2) on the computer and the other end into the DV In/Out ports (3) on a Memory...

User Guide
Page 93
To find the nearest center or agent, visit the Sony online support Web site. For assistance, contact an authorized Sony Service Center. To avoid the invalidation of memory installed on your dealer to the online Specifications. n 93 N Upgrading Your VAIO Computer Upgrading Your VAIO Computer Your computer and memory modules use high precision components and electronic connectors...
To find the nearest center or agent, visit the Sony online support Web site. For assistance, contact an authorized Sony Service Center. To avoid the invalidation of memory installed on your dealer to the online Specifications. n 93 N Upgrading Your VAIO Computer Upgrading Your VAIO Computer Your computer and memory modules use high precision components and electronic connectors...

User Guide
Page 94
... with the general terminology associated with personal computers and with the safety practices and regulatory compliance required for example). Before touching a memory module, ensure the following: ❑ The procedures described in the following pages. The package protects the module from any telecommunication... (that are ready to change the module. n 94 N Upgrading Your VAIO Computer Adding and Removing Memory If you want to expand the functionality of your computer, you can increase the memory by maintaining contact with an unpainted metal portion of the chassis while performing ...
... with the general terminology associated with personal computers and with the safety practices and regulatory compliance required for example). Before touching a memory module, ensure the following: ❑ The procedures described in the following pages. The package protects the module from any telecommunication... (that are ready to change the module. n 94 N Upgrading Your VAIO Computer Adding and Removing Memory If you want to expand the functionality of your computer, you can increase the memory by maintaining contact with an unpainted metal portion of the chassis while performing ...

User Guide
Page 95
...magnetically shielded ❑ Ambient temperature of the components and circuit boards inside the computer. n 95 N Upgrading Your VAIO Computer ❑ Use the special bag delivered with the memory module or wrap the module in aluminium foil to protect it from electrostatic discharge. ❑ Introducing any liquids ...or any foreign substances or objects into the memory slots, or other internal components of the computer, will result in damage to the computer and any repair costs will not be...
...magnetically shielded ❑ Ambient temperature of the components and circuit boards inside the computer. n 95 N Upgrading Your VAIO Computer ❑ Use the special bag delivered with the memory module or wrap the module in aluminium foil to protect it from electrostatic discharge. ❑ Introducing any liquids ...or any foreign substances or objects into the memory slots, or other internal components of the computer, will result in damage to the computer and any repair costs will not be...

User Guide
Page 96
n 96 N Upgrading Your VAIO Computer 5 Touch a metal object (such as the connector panel on the back of the computer. Removing and Installing a Memory Module To change or add a memory module 1 Shut down the computer and disconnect all peripheral devices. 2 Unplug the computer and remove the battery. 3 Wait until the computer cools down. 4 Unscrew the screw at the bottom of the computer) to discharge static electricity.
n 96 N Upgrading Your VAIO Computer 5 Touch a metal object (such as the connector panel on the back of the computer. Removing and Installing a Memory Module To change or add a memory module 1 Shut down the computer and disconnect all peripheral devices. 2 Unplug the computer and remove the battery. 3 Wait until the computer cools down. 4 Unscrew the screw at the bottom of the computer) to discharge static electricity.

User Guide
Page 97
n 97 N Upgrading Your VAIO Computer ❑ Make sure that the memory module tilts up and then pull it out in the direction of the arrow (2). The memory module is released. 6 Remove the memory module: ❑ Pull the latches in the direction of the arrows (1).
n 97 N Upgrading Your VAIO Computer ❑ Make sure that the memory module tilts up and then pull it out in the direction of the arrow (2). The memory module is released. 6 Remove the memory module: ❑ Pull the latches in the direction of the arrows (1).

User Guide
Page 98
Make sure to insert the memory module edge with a notch into place. ! Do not touch any other components on the computer. n 98 N Upgrading Your VAIO Computer 7 Slide the memory module into the memory module slot and push it in until it clicks into the memory module slot. 8 Close the module cover and then tighten the screws on the bottom of the computer. 9 Reinsert the battery and turn on the motherboard.
Make sure to insert the memory module edge with a notch into place. ! Do not touch any other components on the computer. n 98 N Upgrading Your VAIO Computer 7 Slide the memory module into the memory module slot and push it in until it clicks into the memory module slot. 8 Close the module cover and then tighten the screws on the bottom of the computer. 9 Reinsert the battery and turn on the motherboard.

User Guide
Page 99
n 99 N Upgrading Your VAIO Computer Viewing the Amount of Memory To view the amount of system memory. If the additional memory does not appear, repeat the whole procedure and restart the computer. You can view the amount of memory 1 Turn on the computer. 2 Click Start, point to All Programs, and click VAIO Central. 3 Click the System Information tab in the VAIO Central window. 4 Double-click the System Information folder. 5 Double-click the System Information icon.
n 99 N Upgrading Your VAIO Computer Viewing the Amount of Memory To view the amount of system memory. If the additional memory does not appear, repeat the whole procedure and restart the computer. You can view the amount of memory 1 Turn on the computer. 2 Click Start, point to All Programs, and click VAIO Central. 3 Click the System Information tab in the VAIO Central window. 4 Double-click the System Information folder. 5 Double-click the System Information icon.


