User Guide
Page 3
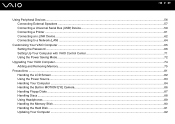
... ...62 Connecting to a Network (LAN) ...64 Customizing Your VAIO Computer ...65 Setting the Password ...66 Setting Up Your Computer with VAIO Control Center 71 Using the Power Saving Mode...72 Upgrading Your VAIO Computer...74 Adding and Removing Memory...75 Precautions ...81 Handling the LCD Screen ...82 Using the Power Source ...83 Handling Your...
... ...62 Connecting to a Network (LAN) ...64 Customizing Your VAIO Computer ...65 Setting the Password ...66 Setting Up Your Computer with VAIO Control Center 71 Using the Power Saving Mode...72 Upgrading Your VAIO Computer...74 Adding and Removing Memory...75 Precautions ...81 Handling the LCD Screen ...82 Using the Power Source ...83 Handling Your...
User Guide
Page 5
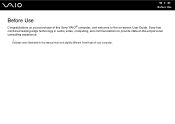
External views illustrated in audio, video, computing, and communications to the on-screen User Guide. Sony has combined leading-edge technology in this Sony VAIO® computer, and welcome to provide state-of your purchase of this manual may look slightly different from those of -the-art personal computing experience. ! n5 N Before Use Before Use Congratulations on your computer.
External views illustrated in audio, video, computing, and communications to the on-screen User Guide. Sony has combined leading-edge technology in this Sony VAIO® computer, and welcome to provide state-of your purchase of this manual may look slightly different from those of -the-art personal computing experience. ! n5 N Before Use Before Use Congratulations on your computer.
User Guide
Page 7
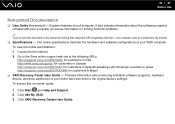
...of your entire hard disk drive to the Sony online support web site at the following URLs: http://esupport.sony.com/EN/VAIO/ for customers in USA http://www.sony.ca/support/ for customers in Canada http://esupport.sony.com/ES/VAIO/ for customers in Spanish-speaking Latin American countries... or areas http://esupport.sony.com/ES/VAIO/BR/ for customers in this manual) - n7 N Before Use Non-printed Documentation ❑ User Guide (this manual by clicking their respective URLs beginning with your computer, as well as information on -screen guide: 1 Click Start and Help...
...of your entire hard disk drive to the Sony online support web site at the following URLs: http://esupport.sony.com/EN/VAIO/ for customers in USA http://www.sony.ca/support/ for customers in Canada http://esupport.sony.com/ES/VAIO/ for customers in Spanish-speaking Latin American countries... or areas http://esupport.sony.com/ES/VAIO/BR/ for customers in this manual) - n7 N Before Use Non-printed Documentation ❑ User Guide (this manual by clicking their respective URLs beginning with your computer, as well as information on -screen guide: 1 Click Start and Help...
User Guide
Page 8
Provides information about setting up Bluetooth*, wireless LAN, and wireless WAN* functions. n8 N Before Use ❑ SmartWi™ Connection Utility Help - To access this on-screen guide: 1 Click Start, All Programs, and SmartWi Connection Utility. 2 Click SmartWi Connection Utility Help. * The Bluetooth and wireless WAN functions are available on selected models only. See the online specifications to find out whether your model supports the functions.
Provides information about setting up Bluetooth*, wireless LAN, and wireless WAN* functions. n8 N Before Use ❑ SmartWi™ Connection Utility Help - To access this on-screen guide: 1 Click Start, All Programs, and SmartWi Connection Utility. 2 Click SmartWi Connection Utility Help. * The Bluetooth and wireless WAN functions are available on selected models only. See the online specifications to find out whether your model supports the functions.
User Guide
Page 13
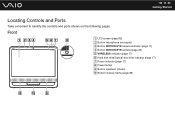
n 13 N Getting Started Locating Controls and Ports Take a moment to identify the controls and ports shown on the following pages. Front A LCD screen (page 82) B Built-in microphone (monaural) C Built-in MOTION EYE camera indicator (page 17) D Built-in MOTION EYE camera (page 26) E WIRELESS indicator (page 17) F Hard disk drive/Optical disc drive indicator (page 17) G Power indicator (page 17) H Power button I Built-in speakers (stereo) J Bottom chassis frame (page 85)
n 13 N Getting Started Locating Controls and Ports Take a moment to identify the controls and ports shown on the following pages. Front A LCD screen (page 82) B Built-in microphone (monaural) C Built-in MOTION EYE camera indicator (page 17) D Built-in MOTION EYE camera (page 26) E WIRELESS indicator (page 17) F Hard disk drive/Optical disc drive indicator (page 17) G Power indicator (page 17) H Power button I Built-in speakers (stereo) J Bottom chassis frame (page 85)
User Guide
Page 24
.... Fn+F6: Increases lighting intensity of your screen. See Setting Up Your Computer with the VAIO Control Center for the lower level of the LCD screen. Press to make the screen view look bigger and closer (zoom in its help file included with VAIO Control Center (page 71) and find out ...more information. For details on power management, see Using the Power Saving Mode (page 72). See the help file. B Sleep button Provides for more in ). D Zoom buttons Change the view size of the LCD screen. C S1 button...
.... Fn+F6: Increases lighting intensity of your screen. See Setting Up Your Computer with the VAIO Control Center for the lower level of the LCD screen. Press to make the screen view look bigger and closer (zoom in its help file included with VAIO Control Center (page 71) and find out ...more information. For details on power management, see Using the Power Saving Mode (page 72). See the help file. B Sleep button Provides for more in ). D Zoom buttons Change the view size of the LCD screen. C S1 button...

User Guide
Page 25
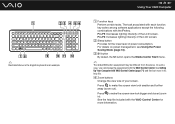
... Lk): Turns on while in the Num Lock state. (Caps Lock): Turns on while in the Caps Lock state. (Scr Lk): Turns on the computer screen. F Volume control buttons Increase (+) or decrease (-) the volume. J Directional arrow keys Move the pointer on while in the Scroll Lock state. G Windows key Displays the... Start menu. L Numeric keypad Use the numeric keypad to type numbers or to perform basic math calculations. n 25 N Using Your VAIO Computer E Muting button Turns the volume on and off.
... Lk): Turns on while in the Num Lock state. (Caps Lock): Turns on while in the Caps Lock state. (Scr Lk): Turns on the computer screen. F Volume control buttons Increase (+) or decrease (-) the volume. J Directional arrow keys Move the pointer on while in the Scroll Lock state. G Windows key Displays the... Start menu. L Numeric keypad Use the numeric keypad to type numbers or to perform basic math calculations. n 25 N Using Your VAIO Computer E Muting button Turns the volume on and off.
User Guide
Page 35
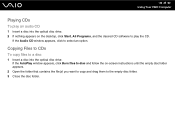
... files to select an option. If the Audio CD window appears, click to a disc 1 Insert a disc into the optical disc drive. 2 If nothing appears on -screen instructions until the empty disc folder appears. 2 Open the folder that contains the file(s) you want to copy and drag them to the empty disc... desktop, click Start, All Programs, and the desired CD software to play an audio CD 1 Insert a disc into the optical disc drive. n 35 N Using Your VAIO Computer Playing CDs To play the CD.
... files to select an option. If the Audio CD window appears, click to a disc 1 Insert a disc into the optical disc drive. 2 If nothing appears on -screen instructions until the empty disc folder appears. 2 Open the folder that contains the file(s) you want to copy and drag them to the empty disc... desktop, click Start, All Programs, and the desired CD software to play an audio CD 1 Insert a disc into the optical disc drive. n 35 N Using Your VAIO Computer Playing CDs To play the CD.

User Guide
Page 42
It may take time to format the Memory Stick depending on -screen instructions. ! n 42 N Using Your VAIO Computer 5 Click Start. 6 Follow the on the media type.
It may take time to format the Memory Stick depending on -screen instructions. ! n 42 N Using Your VAIO Computer 5 Click Start. 6 Follow the on the media type.
User Guide
Page 48
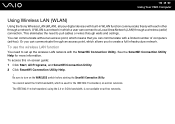
...ad-hoc networks. The IEEE 802.11n draft standard, using the 2.4 or 5 GHz bandwidth, is used for more information. Be sure to turn on -screen guide: 1 Click Start, All Programs, and SmartWi Connection Utility. 2 Click SmartWi Connection Utility Help. ! A WLAN is a network in WLAN function .... This eliminates the need to set up the wireless LAN network with the SmartWi Connection Utility. n 48 N Using Your VAIO Computer Using Wireless LAN (WLAN) Using the Sony Wireless LAN (WLAN), all your digital devices with built-in which a user can connect to a Local Area Network (LAN...
...ad-hoc networks. The IEEE 802.11n draft standard, using the 2.4 or 5 GHz bandwidth, is used for more information. Be sure to turn on -screen guide: 1 Click Start, All Programs, and SmartWi Connection Utility. 2 Click SmartWi Connection Utility Help. ! A WLAN is a network in WLAN function .... This eliminates the need to set up the wireless LAN network with the SmartWi Connection Utility. n 48 N Using Your VAIO Computer Using Wireless LAN (WLAN) Using the Sony Wireless LAN (WLAN), all your digital devices with built-in which a user can connect to a Local Area Network (LAN...
User Guide
Page 51
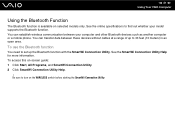
... the Bluetooth function You need to set up to 33 feet (10 meters) in an open area. n 51 N Using Your VAIO Computer Using the Bluetooth Function The Bluetooth function is available on -screen guide: 1 Click Start, All Programs, and SmartWi Connection Utility. 2 Click SmartWi Connection Utility Help. ! You can transfer data between...
... the Bluetooth function You need to set up to 33 feet (10 meters) in an open area. n 51 N Using Your VAIO Computer Using the Bluetooth Function The Bluetooth function is available on -screen guide: 1 Click Start, All Programs, and SmartWi Connection Utility. 2 Click SmartWi Connection Utility Help. ! You can transfer data between...
User Guide
Page 60
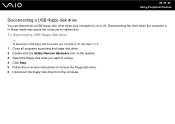
... mode may cause the computer to malfunction. To disconnect a USB floppy disk drive ✍ To disconnect a USB floppy disk drive when your computer is on -screen instructions to remove the floppy disk drive. 6 Disconnect the floppy disk drive from the computer. n 60 N Using Peripheral Devices Disconnecting a USB floppy disk drive You...
... mode may cause the computer to malfunction. To disconnect a USB floppy disk drive ✍ To disconnect a USB floppy disk drive when your computer is on -screen instructions to remove the floppy disk drive. 6 Disconnect the floppy disk drive from the computer. n 60 N Using Peripheral Devices Disconnecting a USB floppy disk drive You...
User Guide
Page 66
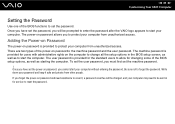
Adding the Power-on Password The power-on password and need to be sent in the BIOS setup screen, as well as starting the computer. Write down your computer from unauthorized access. The machine password is provided for users with administrative rights on ... password, you to protect your computer may need assistance to reset it safe and private from unauthorized access. n 66 N Customizing Your VAIO Computer Setting the Password Use one of the BIOS functions to set the machine password. ! Once you have set the password, you cannot start your computer without entering ...
Adding the Power-on Password The power-on password and need to be sent in the BIOS setup screen, as well as starting the computer. Write down your computer from unauthorized access. The machine password is provided for users with administrative rights on ... password, you to protect your computer may need assistance to reset it safe and private from unauthorized access. n 66 N Customizing Your VAIO Computer Setting the Password Use one of the BIOS functions to set the machine password. ! Once you have set the password, you cannot start your computer without entering ...

User Guide
Page 67
...to display the Security tab, select Set Machine Password, and then press the Enter key. 4 On the password entry screen, enter the password twice and press the Enter key. n 67 N Customizing Your VAIO Computer To add the power-on password (machine password) 1 Turn on the computer. 2 Press the F2 key when... the VAIO logo appears. The BIOS setup screen appears. If not, restart the computer and press the F2 key several times when the VAIO logo appears. 3 Press the < or , key to select Security to select Exit, select Exit...
...to display the Security tab, select Set Machine Password, and then press the Enter key. 4 On the password entry screen, enter the password twice and press the Enter key. n 67 N Customizing Your VAIO Computer To add the power-on password (machine password) 1 Turn on the computer. 2 Press the F2 key when... the VAIO logo appears. The BIOS setup screen appears. If not, restart the computer and press the F2 key several times when the VAIO logo appears. 3 Press the < or , key to select Security to select Exit, select Exit...

User Guide
Page 68
... and press the F2 key several times when the VAIO logo appears. 3 Enter the machine password and press the Enter key. 4 Press the < or , key to select Security to select Exit, select Exit Setup, and then press the Enter key. The BIOS setup screen appears. The password can be up to 32... spaces) long. 6 Press the < or , key to display the Security tab, select Set User Password, and then press the Enter key. 5 On the password entry screen, enter the password twice and press the Enter key. Make sure you set the machine password before setting the user password. 1 Turn on password (user...
... and press the F2 key several times when the VAIO logo appears. 3 Enter the machine password and press the Enter key. 4 Press the < or , key to select Security to select Exit, select Exit Setup, and then press the Enter key. The BIOS setup screen appears. The password can be up to 32... spaces) long. 6 Press the < or , key to display the Security tab, select Set User Password, and then press the Enter key. 5 On the password entry screen, enter the password twice and press the Enter key. Make sure you set the machine password before setting the user password. 1 Turn on password (user...
User Guide
Page 69
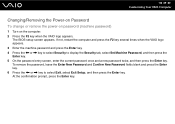
If not, restart the computer and press the F2 key several times when the VAIO logo appears. 3 Enter the machine password and press the Enter key. 4 Press the < or , key to select Security to select Exit, select Exit Setup, and ... Security tab, select Set Machine Password, and then press the Enter key. 5 On the password entry screen, enter the current password once and a new password twice, and then press the Enter key. n 69 N Customizing Your VAIO Computer Changing/Removing the Power-on Password To change or remove the power-on password (machine...
If not, restart the computer and press the F2 key several times when the VAIO logo appears. 3 Enter the machine password and press the Enter key. 4 Press the < or , key to select Security to select Exit, select Exit Setup, and ... Security tab, select Set Machine Password, and then press the Enter key. 5 On the password entry screen, enter the current password once and a new password twice, and then press the Enter key. n 69 N Customizing Your VAIO Computer Changing/Removing the Power-on Password To change or remove the power-on password (machine...
User Guide
Page 70
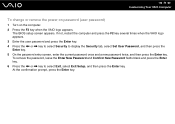
At the confirmation prompt, press the Enter key. The BIOS setup screen appears. If not, restart the computer and press the F2 key several times when the VAIO logo appears. 3 Enter the user password and press the Enter key. 4 Press the < or , key to select Security to select Exit, select Exit... tab, select Set User Password, and then press the Enter key. 5 On the password entry screen, enter the current password once and a new password twice, and then press the Enter key. n 70 N Customizing Your VAIO Computer To change or remove the power-on password (user password) 1 Turn on the computer. ...
At the confirmation prompt, press the Enter key. The BIOS setup screen appears. If not, restart the computer and press the F2 key several times when the VAIO logo appears. 3 Enter the user password and press the Enter key. 4 Press the < or , key to select Security to select Exit, select Exit... tab, select Set User Password, and then press the Enter key. 5 On the password entry screen, enter the current password once and a new password twice, and then press the Enter key. n 70 N Customizing Your VAIO Computer To change or remove the power-on password (user password) 1 Turn on the computer. ...
User Guide
Page 72
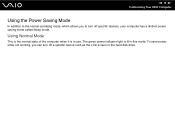
Using Normal Mode This is the normal state of the computer when it is lit in use. The green power indicator light is in this mode. n 72 N Customizing Your VAIO Computer Using the Power Saving Mode In addition to turn off specific devices, your computer has a distinct power saving mode called Sleep mode. To save power while not working, you to the normal operating mode, which allows you can turn off a specific device such as the LCD screen or the hard disk drive.
Using Normal Mode This is the normal state of the computer when it is lit in use. The green power indicator light is in this mode. n 72 N Customizing Your VAIO Computer Using the Power Saving Mode In addition to turn off specific devices, your computer has a distinct power saving mode called Sleep mode. To save power while not working, you to the normal operating mode, which allows you can turn off a specific device such as the LCD screen or the hard disk drive.
User Guide
Page 73
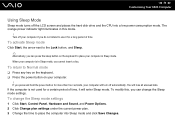
... button, and Sleep. ✍ Alternatively, you press and hold the power button for a long period of time. n 73 N Customizing Your VAIO Computer Using Sleep Mode Sleep mode turns off the LCD screen and places the hard disk drive and the CPU into Sleep mode and click Save Changes. To return to place...
... button, and Sleep. ✍ Alternatively, you press and hold the power button for a long period of time. n 73 N Customizing Your VAIO Computer Using Sleep Mode Sleep mode turns off the LCD screen and places the hard disk drive and the CPU into Sleep mode and click Save Changes. To return to place...
User Guide
Page 77
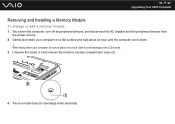
n 77 N Upgrading Your VAIO Computer Removing and Installing a Memory Module To change or add a memory module 1 Shut down the computer, turn off all peripheral devices, and disconnect the AC adapter and the peripheral devices from the power source. 2 Gently face down your computer on a flat surface and wait about an hour until the computer cools down your computer, be sure to place it on a soft cloth to avoid damage to the LCD screen. 3 Unscrew the screw (1) and remove the memory module compartment cover (2). 4 Touch a metal object to discharge static electricity. When facing down . !
n 77 N Upgrading Your VAIO Computer Removing and Installing a Memory Module To change or add a memory module 1 Shut down the computer, turn off all peripheral devices, and disconnect the AC adapter and the peripheral devices from the power source. 2 Gently face down your computer on a flat surface and wait about an hour until the computer cools down your computer, be sure to place it on a soft cloth to avoid damage to the LCD screen. 3 Unscrew the screw (1) and remove the memory module compartment cover (2). 4 Touch a metal object to discharge static electricity. When facing down . !


