
Limited Warranty (U.S. Only)
Page 1
... a service problem, or for a period of protection, to service the Product. PARTS: In addition, Sony will repair or replace the Product, at its original packaging or packaging affording an equal degree of two (2) year. LABOR: For a period of two (2) year from the date of the Product, including the antenna. 4-557-173-02 General Stereo/Hifi Components/Tape Decks ® CD Players/Mini Disc Players/Audio Systems Hifi Audio LIMITED WARRANTY Sony Electronics Inc. ("Sony...
... a service problem, or for a period of protection, to service the Product. PARTS: In addition, Sony will repair or replace the Product, at its original packaging or packaging affording an equal degree of two (2) year. LABOR: For a period of two (2) year from the date of the Product, including the antenna. 4-557-173-02 General Stereo/Hifi Components/Tape Decks ® CD Players/Mini Disc Players/Audio Systems Hifi Audio LIMITED WARRANTY Sony Electronics Inc. ("Sony...
Operating Instructions (primary manual)
Page 3
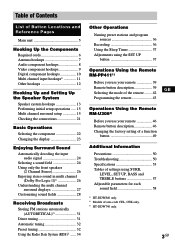
... hookups 7 Audio component hookups 8 Video component hookups 9 Digital component hookups 10 Multi channel input hookups1 11 Other hookups 12 Hooking Up and Setting Up the Speaker System Speaker system hookups 13 Performing initial setup operations ..... 15 Multi channel surround setup 15 Checking the connections 21 Basic Operations Selecting the component 22 Changing the display 23 Enjoying Surround Sound Automatically decoding the input audio signal 24 Selecting a sound field 24 Using only the front speakers (2 Channel Stereo 26 Enjoying stereo sound in multi channel (Dolby Pro...
... hookups 7 Audio component hookups 8 Video component hookups 9 Digital component hookups 10 Multi channel input hookups1 11 Other hookups 12 Hooking Up and Setting Up the Speaker System Speaker system hookups 13 Performing initial setup operations ..... 15 Multi channel surround setup 15 Checking the connections 21 Basic Operations Selecting the component 22 Changing the display 23 Enjoying Surround Sound Automatically decoding the input audio signal 24 Selecting a sound field 24 Using only the front speakers (2 Channel Stereo 26 Enjoying stereo sound in multi channel (Dolby Pro...
Operating Instructions (primary manual)
Page 4
...; Front/surround speakers • Center speaker • Sub woofer STR-K740P SS-MSP2 SS-CNP2 SA-WMSP2 About area codes The area code of the rear panel (see the illustration below). IMPEDANCE USE 8 - 16Ω ENTER FRONT R L R L 4-XXX-XXX-XX AA Area code Any differences in operation, according to turn on the power. Note for the supplied remote For RM-PP411 (HT-DDW840 only) The VIDEO 3, TV/SAT, PHONO, AUX, SOURCE, MPX/DUAL, ANALOG DIRECT...
...; Front/surround speakers • Center speaker • Sub woofer STR-K740P SS-MSP2 SS-CNP2 SA-WMSP2 About area codes The area code of the rear panel (see the illustration below). IMPEDANCE USE 8 - 16Ω ENTER FRONT R L R L 4-XXX-XXX-XX AA Area code Any differences in operation, according to turn on the power. Note for the supplied remote For RM-PP411 (HT-DDW840 only) The VIDEO 3, TV/SAT, PHONO, AUX, SOURCE, MPX/DUAL, ANALOG DIRECT...
Operating Instructions (primary manual)
Page 10
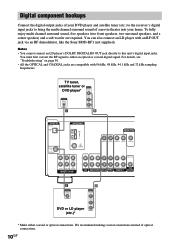
..., 44.1 kHz and 32 kHz sampling frequencies. Notes • You cannot connect an LD player's DOLBY DIGITAL RF OUT jack directly to this unit's digital input jacks. For details, see "Troubleshooting" on page 50. • All the OPTICAL and COAXIAL jacks are required. We recommend making coaxial connections instead of a movie theater into your DVD player and satellite tuner (etc.) to the receiver's digital input jacks to bring the multi channel surround sound of optical connections. 10GB Digital component hookups Connect the digital output jacks of your home.
..., 44.1 kHz and 32 kHz sampling frequencies. Notes • You cannot connect an LD player's DOLBY DIGITAL RF OUT jack directly to this unit's digital input jacks. For details, see "Troubleshooting" on page 50. • All the OPTICAL and COAXIAL jacks are required. We recommend making coaxial connections instead of a movie theater into your DVD player and satellite tuner (etc.) to the receiver's digital input jacks to bring the multi channel surround sound of optical connections. 10GB Digital component hookups Connect the digital output jacks of your home.
Operating Instructions (primary manual)
Page 11
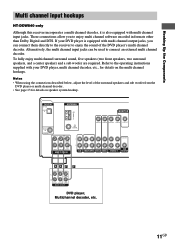
... on the multi channel hookups. Notes • When using the connections described below, adjust the level of the DVD player's multi channel decoder. Alternatively, the multi channel input jacks can connect them directly to the receiver to enjoy the sound of the surround speakers and sub woofer from the DVD player or multi channel decoder. • See page 13 for details on speaker system hookup. DIGITAL OPTICAL VIDEO 2 IN ANTENNA AM MONITOR DVD/LD IN COAXIAL FM 75Ω COAXIAL VIDEO IN VIDEO IN VIDEO OUT VIDEO IN VIDEO OUT L CENTER R SUB FRONT SURROUND WOOFER MULTI CH IN...
... on the multi channel hookups. Notes • When using the connections described below, adjust the level of the DVD player's multi channel decoder. Alternatively, the multi channel input jacks can connect them directly to the receiver to enjoy the sound of the surround speakers and sub woofer from the DVD player or multi channel decoder. • See page 13 for details on speaker system hookup. DIGITAL OPTICAL VIDEO 2 IN ANTENNA AM MONITOR DVD/LD IN COAXIAL FM 75Ω COAXIAL VIDEO IN VIDEO IN VIDEO OUT VIDEO IN VIDEO OUT L CENTER R SUB FRONT SURROUND WOOFER MULTI CH IN...

Operating Instructions (primary manual)
Page 14
... of the speaker cord Stripped speaker cord is currently displayed on the speakers. Notes • Connect the long speaker connecting cords to the surround speaker terminals and the short speaker connecting cords to avoid excessive output on the receiver, the speaker may damage the receiver. If the cords are reversed, the sound will lack bass. • If you turn down the volume before you use speakers with low maximum input rating, adjust the volume carefully to the front and center speaker terminals...
... of the speaker cord Stripped speaker cord is currently displayed on the speakers. Notes • Connect the long speaker connecting cords to the surround speaker terminals and the short speaker connecting cords to avoid excessive output on the receiver, the speaker may damage the receiver. If the cords are reversed, the sound will lack bass. • If you turn down the volume before you use speakers with low maximum input rating, adjust the volume carefully to the front and center speaker terminals...
Operating Instructions (primary manual)
Page 15
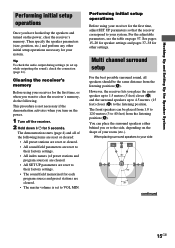
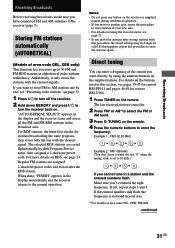
... set up the speakers and turned on the power, clear the receiver's memory. Performing initial setup operations Before using your receiver for the first time, adjust SET UP parameters so that the receiver correspond to clear the receiver's memory, do the following items are reset or cleared: • All preset stations are reset or cleared. • All sound field parameters are reset to their factory settings. • All index names (of preset stations and program sources...
... set up the speakers and turned on the power, clear the receiver's memory. Performing initial setup operations Before using your receiver for the first time, adjust SET UP parameters so that the receiver correspond to clear the receiver's memory, do the following items are reset or cleared: • All preset stations are reset or cleared. • All sound field parameters are reset to their factory settings. • All index names (of preset stations and program sources...
Operating Instructions (primary manual)
Page 20
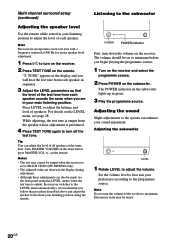
... balance and level of the woofer to maximum. Adjusting the subwoofer 1 Rotate LEVEL to turn the volume of speakers. Multi channel surround setup (continued) Adjusting the speaker level Use the remote while seated in your sound enjoyment. For details on the receiver. Listening to the programme source. Extraneous noise may be set to MULTI CH IN (HT-DDW840 only). • The adjusted value are in green. 3 Play the programme source. The POWER indicator on the remote. Adjusting the sound Slight adjustments...
... balance and level of the woofer to maximum. Adjusting the subwoofer 1 Rotate LEVEL to turn the volume of speakers. Multi channel surround setup (continued) Adjusting the speaker level Use the remote while seated in your sound enjoyment. For details on the receiver. Listening to the programme source. Extraneous noise may be set to MULTI CH IN (HT-DDW840 only). • The adjusted value are in green. 3 Play the programme source. The POWER indicator on the remote. Adjusting the sound Slight adjustments...
Operating Instructions (primary manual)
Page 22
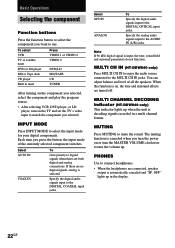
...or turn the MASTER VOLUME clockwise to select the input mode for your digital components. PHONES Use to the DIGITAL OPTICAL input jacks. OFF" lights up . When this function is decoding signals recorded in a multi channel format. INPUT MODE Press INPUT MODE to turn on the component you selected, select the component and play the program source. • After selecting VCR, DVD player, or LD player, turn the volume up in tuner Press VIDEO 1 or VIDEO 2 VIDEO 2 DVD/LD MD/TAPE CD TUNER After turning on the TV and set the TV's video input to the DIGITAL COAXIAL input jacks...
...or turn the MASTER VOLUME clockwise to select the input mode for your digital components. PHONES Use to the DIGITAL OPTICAL input jacks. OFF" lights up . When this function is decoding signals recorded in a multi channel format. INPUT MODE Press INPUT MODE to turn on the component you selected, select the component and play the program source. • After selecting VCR, DVD player, or LD player, turn the volume up in tuner Press VIDEO 1 or VIDEO 2 VIDEO 2 DVD/LD MD/TAPE CD TUNER After turning on the TV and set the TV's video input to the DIGITAL COAXIAL input jacks...
Operating Instructions (primary manual)
Page 24
... the measurement and Sony's own DSP (Digital Signal Processor) technology to the sub woofer. "AUTO DEC." Enjoying movies with Cinema Studio EX Cinema Studio EX is ideal for enjoying the movie software encoded with multi channel format, such as it will generate a low frequency signal for output to develop "Digital Cinema Sound". See "Multi channel surround setup" starting from page 15 to obtain the sound you speakers. When these sound fields are no low frequency signals (Dolby Digital LFE, etc.) it...
... the measurement and Sony's own DSP (Digital Signal Processor) technology to the sub woofer. "AUTO DEC." Enjoying movies with Cinema Studio EX Cinema Studio EX is ideal for enjoying the movie software encoded with multi channel format, such as it will generate a low frequency signal for output to develop "Digital Cinema Sound". See "Multi channel surround setup" starting from page 15 to obtain the sound you speakers. When these sound fields are no low frequency signals (Dolby Digital LFE, etc.) it...
Operating Instructions (primary manual)
Page 26
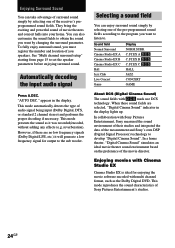
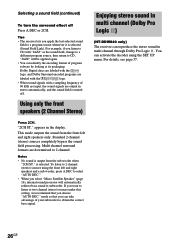
... in multi channel through Dolby Pro Logic . To listen to 2 channel (stereo) sources using the SET UP menu. Selecting a sound field (continued) To turn the surround effect off . Notes • No sound is turned off Press A.DEC or 2CH. mode so that you apply the last selected sound field to 2 channel. For details, see page 37. This mode outputs the sound from the sub woofer when "2CH ST." Tips • The receiver lets you choose "AUTO DEC." Dolby Digital discs...
... in multi channel through Dolby Pro Logic . To listen to 2 channel (stereo) sources using the SET UP menu. Selecting a sound field (continued) To turn the surround effect off . Notes • No sound is turned off Press A.DEC or 2CH. mode so that you apply the last selected sound field to 2 channel. For details, see page 37. This mode outputs the sound from the sub woofer when "2CH ST." Tips • The receiver lets you choose "AUTO DEC." Dolby Digital discs...

Operating Instructions (primary manual)
Page 27
... Pro Logic decoding does not function for tuner operations. Multi channel surround sound is NOT set to "ANALOG" (page 22). 4 MPEG: Lights up when using sound fields like "C.ST.EX", the receiver adds reverberation based on the speakers settings). OFF OPT COAX D.RANGE LCR L F E SL S SR 8 7 6 MEMORY 0 9 1 ; The boxes around the letters vary to adjust the dynamic range compression. 7 COAX: Lights up when the source signal is a digital signal being input through the OPTICAL terminal. 9 Playback channel...
... Pro Logic decoding does not function for tuner operations. Multi channel surround sound is NOT set to "ANALOG" (page 22). 4 MPEG: Lights up when using sound fields like "C.ST.EX", the receiver adds reverberation based on the speakers settings). OFF OPT COAX D.RANGE LCR L F E SL S SR 8 7 6 MEMORY 0 9 1 ; The boxes around the letters vary to adjust the dynamic range compression. 7 COAX: Lights up when the source signal is a digital signal being input through the OPTICAL terminal. 9 Playback channel...
Operating Instructions (primary manual)
Page 31
... on tuning the stored stations, see "Presetting radio stations" on page 33. 1 Press ?/1 to turn off the receiver. 2 Hold down MEMORY and press ?/1 to turn the receiver back on the receiver or supplied remote during autobetical operation. • If you move the antenna after the RDS station. If not, repeat steps 3 and 4. TUNING on the buttons used in the display momentarily and the receiver returns to enter the frequency. If...
... on tuning the stored stations, see "Presetting radio stations" on page 33. 1 Press ?/1 to turn off the receiver. 2 Hold down MEMORY and press ?/1 to turn the receiver back on the receiver or supplied remote during autobetical operation. • If you move the antenna after the RDS station. If not, repeat steps 3 and 4. TUNING on the buttons used in the display momentarily and the receiver returns to enter the frequency. If...
Operating Instructions (primary manual)
Page 40
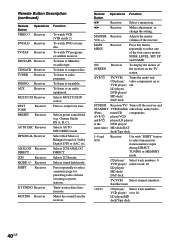
... DVD player/ same time) MD deck/DAT deck/Tape deck 1-9 and 0/10 Receiver Use with "SHIFT" button to an audio equipment. Cinema Studio EX A, B, C). Selects 2CH ANALOG DIRECT. B/b Receiver Makes adjustment or change the setting. MAIN MENU Receiver Press this button repeatedly to turntable. AV ?/1 TV/VCR/ Turns the audio and CD player/ video components on the TV screen. TV/VCR/ Select channel numbers. LD player/MD deck/Tape deck 40GB To listen to select tuner preset station numeric input during DIRECT TUNING or MEMORY mode. Adjusts the master volume of Dolby Digital...
... DVD player/ same time) MD deck/DAT deck/Tape deck 1-9 and 0/10 Receiver Use with "SHIFT" button to an audio equipment. Cinema Studio EX A, B, C). Selects 2CH ANALOG DIRECT. B/b Receiver Makes adjustment or change the setting. MAIN MENU Receiver Press this button repeatedly to turntable. AV ?/1 TV/VCR/ Turns the audio and CD player/ video components on the TV screen. TV/VCR/ Select channel numbers. LD player/MD deck/Tape deck 40GB To listen to select tuner preset station numeric input during DIRECT TUNING or MEMORY mode. Adjusts the master volume of Dolby Digital...
Operating Instructions (primary manual)
Page 42
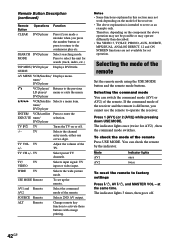
... work depending on or off . 42GB DVD player V/v/B/b VCR/Satellite Selects a menu item. at the same time. Remote Button Description (continued) Remote Operations Function Button CLEAR DVD player Press if you made a mistake when you cannot use the remote to factory settings Press =/1, AV =/1, and MASTER VOL - SEARCH DVD player MODE Select searching mode. Notes • Some functions explained in this section may operate differently than described. • The VIDEO 3, TV/SAT, PHONO, AUX, SOURCE, MPX/DUAL, ANALOG DIRECT, 12 and ON SCREEN functions...
... work depending on or off . 42GB DVD player V/v/B/b VCR/Satellite Selects a menu item. at the same time. Remote Button Description (continued) Remote Operations Function Button CLEAR DVD player Press if you made a mistake when you cannot use the remote to factory settings Press =/1, AV =/1, and MASTER VOL - SEARCH DVD player MODE Select searching mode. Notes • Some functions explained in this section may operate differently than described. • The VIDEO 3, TV/SAT, PHONO, AUX, SOURCE, MPX/DUAL, ANALOG DIRECT, 12 and ON SCREEN functions...
Operating Instructions (primary manual)
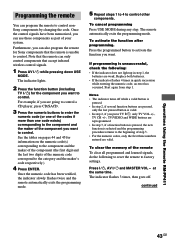
Page 43
... unable to control. continued Operations Using the Remote RM-PP411 43GB To activate the function after programming. The remote automatically exits the programming mode. Press ?/1, AV ?/1 and MASTER VOL - Press the programmed button to activate the function you want to control. Furthermore, you can also program the remote for information on pages 44 and 45 for Sony components that the remote is selected and the programming procedure returns to factory settings. See the...
... unable to control. continued Operations Using the Remote RM-PP411 43GB To activate the function after programming. The remote automatically exits the programming mode. Press ?/1, AV ?/1 and MASTER VOL - Press the programmed button to activate the function you want to control. Furthermore, you can also program the remote for information on pages 44 and 45 for Sony components that the remote is selected and the programming procedure returns to factory settings. See the...
Operating Instructions (primary manual)
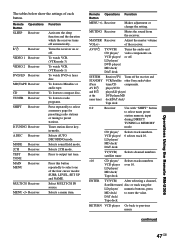
Page 47
... menu. Tuner station direct keyin-mode. Selects AUTO DECODING mode. Remote Operations Function Button MENU +/- MUTING Receiver Mutes the sound from the receiver. Turns the receiver on or off . Press to select tuner preset station numeric input during DIRECT TUNING or MEMORY mode. Adjust the master volume of each button. Selects sound field mode. SYSTEM STANDBY (Press AV ?/1 and ?/1 at the same time) Receiver/TV/ Turns off automatically. player/VCD player/LD player/ DVD player/MD deck/DAT deck/ Tape deck 0-9 Receiver Use with "SHIFT" button to output test...
... menu. Tuner station direct keyin-mode. Selects AUTO DECODING mode. Remote Operations Function Button MENU +/- MUTING Receiver Mutes the sound from the receiver. Turns the receiver on or off . Press to select tuner preset station numeric input during DIRECT TUNING or MEMORY mode. Adjust the master volume of each button. Selects sound field mode. SYSTEM STANDBY (Press AV ?/1 and ?/1 at the same time) Receiver/TV/ Turns off automatically. player/VCD player/LD player/ DVD player/MD deck/DAT deck/ Tape deck 0-9 Receiver Use with "SHIFT" button to output test...
Operating Instructions (primary manual)
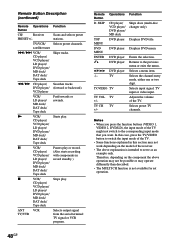
Page 48
... may not work depending on the model of the TV might not switch to the previous menu or exits the menu. Selects the channel entry mode, either one or two digit. Therefore, depending on the component the above explanation is not available for set operation. 48GB Scans and selects preset stations. Displays DVD menu. Selects a menu item. Remote Button Description (continued) Remote Operations Function Button CH/ Receiver PRESET+/- CD player/ VCD player/ LD player/ DVD player/ MD deck/ DAT deck/ Tape deck ANT VCR TV/VTR Selects output signal from...
... may not work depending on the model of the TV might not switch to the previous menu or exits the menu. Selects the channel entry mode, either one or two digit. Therefore, depending on the component the above explanation is not available for set operation. 48GB Scans and selects preset stations. Displays DVD menu. Selects a menu item. Remote Button Description (continued) Remote Operations Function Button CH/ Receiver PRESET+/- CD player/ VCD player/ LD player/ DVD player/ MD deck/ DAT deck/ Tape deck ANT VCR TV/VTR Selects output signal from...
Operating Instructions (primary manual)
Page 51
... DVD player, etc. There is no sound from a digital component connected to either "SMALL" or "LARGE" (page 16). Connect the LD player to the RF demodulator, then connect the RF demodulator's optical or coaxial digital output to "AUTO IN". Dolby Digital or DTS multi channel sound is set INPUT MODE manually (page 22). Recording cannot be obtained. There is set to set to the analog MD/TAPE terminal. There is no sound or only a very low-level sound is heard from the SUB WOOFER...
... DVD player, etc. There is no sound from a digital component connected to either "SMALL" or "LARGE" (page 16). Connect the LD player to the RF demodulator, then connect the RF demodulator's optical or coaxial digital output to "AUTO IN". Dolby Digital or DTS multi channel sound is set INPUT MODE manually (page 22). Recording cannot be obtained. There is set to set to the analog MD/TAPE terminal. There is no sound or only a very low-level sound is heard from the SUB WOOFER...
Operating Instructions (primary manual)
Page 52
... tuning in the display. Use direct tuning. • Make sure you connect the receiver to the appropriate input mode. • Move your TV to an outdoor antenna, ground it against lightning. The remote does not function. • The VIDEO3, TV/SAT, PHONO, AUX, SOURCE, MPX/DUAL, ANALOG DIRECT, 12 and ON SCREEN buttons on the remote are weak. • Make sure you select the correct function on the remote before operating the receiver or other component...
... tuning in the display. Use direct tuning. • Make sure you connect the receiver to the appropriate input mode. • Move your TV to an outdoor antenna, ground it against lightning. The remote does not function. • The VIDEO3, TV/SAT, PHONO, AUX, SOURCE, MPX/DUAL, ANALOG DIRECT, 12 and ON SCREEN buttons on the remote are weak. • Make sure you select the correct function on the remote before operating the receiver or other component...


