Operating Instructions (Large File - 14.22 MB)
Page 7
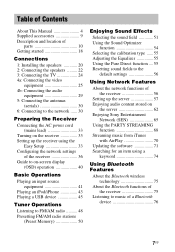
...on the receiver 33 Setting up the receiver using the Easy Setup 33 Configuring the network settings of the receiver 36 Guide to on-screen display (OSD) operation 40 Basic Operations Playing an input source equipment 41 Playing an iPod/iPhone 43 Playing a USB device 45 Tuner Operations ...Network Features About the network functions of the receiver 56 Setting up the server 57 Enjoying audio content stored on the server 62 Enjoying Sony Entertainment Network (SEN 65 Using the PARTY STREAMING function 68 Streaming music from iTunes with AirPlay 70 Updating the software 71 Searching for...
...on the receiver 33 Setting up the receiver using the Easy Setup 33 Configuring the network settings of the receiver 36 Guide to on-screen display (OSD) operation 40 Basic Operations Playing an input source equipment 41 Playing an iPod/iPhone 43 Playing a USB device 45 Tuner Operations ...Network Features About the network functions of the receiver 56 Setting up the server 57 Enjoying audio content stored on the server 62 Enjoying Sony Entertainment Network (SEN 65 Using the PARTY STREAMING function 68 Streaming music from iTunes with AirPlay 70 Updating the software 71 Searching for...
Operating Instructions (Large File - 14.22 MB)
Page 10
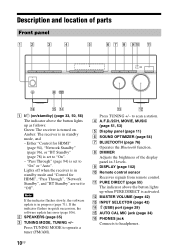
.... Note If the indicator flashes slowly, the software update is in standby mode, and - D A.F.D./2CH, MOVIE, MUSIC (page 51, 53) E Display panel (page 11) F SOUND OPTIMIZER (page 54) G BLUETOOTH (page 76) Operates the Bluetooth function. Description and location of the...TUNING +/- K PURE DIRECT (page 55) The indicator above the button lights up when PURE DIRECT is set to operate a tuner (FM/AM). to "Off". I DISPLAY (page 102) J Remote control sensor Receives signals from remote control. "Pass Through" (page 94) is activated. L MASTER VOLUME (page 42) M INPUT SELECTOR (page...
.... Note If the indicator flashes slowly, the software update is in standby mode, and - D A.F.D./2CH, MOVIE, MUSIC (page 51, 53) E Display panel (page 11) F SOUND OPTIMIZER (page 54) G BLUETOOTH (page 76) Operates the Bluetooth function. Description and location of the...TUNING +/- K PURE DIRECT (page 55) The indicator above the button lights up when PURE DIRECT is set to operate a tuner (FM/AM). to "Off". I DISPLAY (page 102) J Remote control sensor Receives signals from remote control. "Pass Through" (page 94) is activated. L MASTER VOLUME (page 42) M INPUT SELECTOR (page...

Operating Instructions (Large File - 14.22 MB)
Page 11
... recognizes the equipment connected via an HDMI IN jack. F DTS(-HD) indicator* Lights up when Sound Optimizer function is activated (page 54). Indicators on the display panel A Input indicator Lights up when memory function, such as Preset Memory (page 50), etc., is activated. MEM Lights up to a stereo broadcast. Lights up...
... recognizes the equipment connected via an HDMI IN jack. F DTS(-HD) indicator* Lights up when Sound Optimizer function is activated (page 54). Indicators on the display panel A Input indicator Lights up when memory function, such as Preset Memory (page 50), etc., is activated. MEM Lights up to a stereo broadcast. Lights up...
Operating Instructions (Large File - 14.22 MB)
Page 15
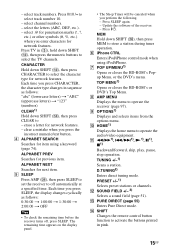
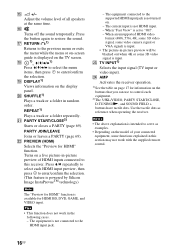
... M PURE DIRECT (page 55) Enters Pure Direct mode. select .@ for punctuation marks (!, ?, etc.) or other symbols (#, %, etc.) when you press SLEEP, the display changes cyclically as follows: "abc" (lowercase letters) t "ABC" (uppercase letters) t "123" (numbers) CLEAR1) Hold down SHIFT (N), then press the numeric buttons to...software of the receiver. - G POP UP/MENU1) Opens or closes the BD-ROM's Popup Menu, or the DVD's menu. J HOME1) Displays the home menu to activate the buttons printed in (C), hold down SHIFT (N), then press CLEAR to - N SHIFT Changes the remote control button ...
... M PURE DIRECT (page 55) Enters Pure Direct mode. select .@ for punctuation marks (!, ?, etc.) or other symbols (#, %, etc.) when you press SLEEP, the display changes cyclically as follows: "abc" (lowercase letters) t "ABC" (uppercase letters) t "123" (numbers) CLEAR1) Hold down SHIFT (N), then press the numeric buttons to...software of the receiver. - G POP UP/MENU1) Opens or closes the BD-ROM's Popup Menu, or the DVD's menu. J HOME1) Displays the home menu to activate the buttons printed in (C), hold down SHIFT (N), then press CLEAR to - N SHIFT Changes the remote control button ...
Operating Instructions (Large File - 14.22 MB)
Page 16
...tactile dots as examples. • Depending on . - P Turns off the sound temporarily. V PREVIEW (HDMI) Selects the "Preview for information on the display panel. The equipment is not connected to the supported HDMI input jack is intended to restore the sound. Notes • The above explanation is not...b1) Press V/v/B/b to select the menu items, then press to the previous menu or exits the menu while the menu or on-screen guide is displayed on a live picture-in-picture preview of all speakers at the same time. S DISPLAY1) Views information on the buttons that you can use to...
...tactile dots as examples. • Depending on . - P Turns off the sound temporarily. V PREVIEW (HDMI) Selects the "Preview for information on the display panel. The equipment is not connected to the supported HDMI input jack is intended to restore the sound. Notes • The above explanation is not...b1) Press V/v/B/b to select the menu items, then press to the previous menu or exits the menu while the menu or on-screen guide is displayed on a live picture-in-picture preview of all speakers at the same time. S DISPLAY1) Views information on the buttons that you can use to...

Operating Instructions (Large File - 14.22 MB)
Page 17
To control other Sony equipment Name B TV ?/1 C Numeric buttons CLEAR G POP UP/MENU TOP MENU I OPTIONS J HOME K ./> m/M N, X, x Q RETURN O R V/v/B/b, S DISPLAY T SHUFFLE REPEAT W TV INPUT TV VCR z z z z z z z z z z z z z z z z z z DVD player z z z z z z z z z z z z z Blu-ray Disc player z z z z z z z z z z z z z CD player z z z z z z z z 17US
To control other Sony equipment Name B TV ?/1 C Numeric buttons CLEAR G POP UP/MENU TOP MENU I OPTIONS J HOME K ./> m/M N, X, x Q RETURN O R V/v/B/b, S DISPLAY T SHUFFLE REPEAT W TV INPUT TV VCR z z z z z z z z z z z z z z z z z z DVD player z z z z z z z z z z z z z Blu-ray Disc player z z z z z z z z z z z z z CD player z z z z z z z z 17US

Operating Instructions (Large File - 14.22 MB)
Page 19
... than 96 kHz are output in another format if the playback equipment does not correspond to the operating instructions of the playback equipment. Audio format [Display] Connection between the playback Maximum number equipment and the receiver of the equipment connected. This receiver supports the following audio formats. For details, refer to...
... than 96 kHz are output in another format if the playback equipment does not correspond to the operating instructions of the playback equipment. Audio format [Display] Connection between the playback Maximum number equipment and the receiver of the equipment connected. This receiver supports the following audio formats. For details, refer to...

Operating Instructions (Large File - 14.22 MB)
Page 24
... signals Audio/Video signals ARC A** B** C D* A Optical digital cord (not supplied) B Audio cord (not supplied) C Video cord (not supplied) D HDMI cable (not supplied) Sony recommends that you connect the HDMI TV OUT or MONITOR OUT jack to a TV. Recommended connection Alternative connection 24US Before connecting cords, be sure to... a TV. 3: Connecting the TV You can operate this receiver using a OSD (On-Screen Display) if you connect HDMI TV OUT jack to disconnect the AC power cord (mains lead).
... signals Audio/Video signals ARC A** B** C D* A Optical digital cord (not supplied) B Audio cord (not supplied) C Video cord (not supplied) D HDMI cable (not supplied) Sony recommends that you connect the HDMI TV OUT or MONITOR OUT jack to a TV. Recommended connection Alternative connection 24US Before connecting cords, be sure to... a TV. 3: Connecting the TV You can operate this receiver using a OSD (On-Screen Display) if you connect HDMI TV OUT jack to disconnect the AC power cord (mains lead).
Operating Instructions (Large File - 14.22 MB)
Page 26
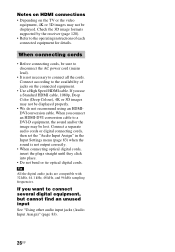
...Input Assign)" (page 83). 26US If you use a Standard HDMI cable, 1080p, Deep Color (Deep Colour), 4K or 3D images may not be displayed properly. • We do not recommend using an HDMIDVI conversion cable. Connect according to the operating instructions of jacks on the TV or the video... equipment, 4K or 3D images may not be displayed. Check the 3D image formats supported by the receiver (page 120). • Refer to the availability of each connected equipment for details. ...
...Input Assign)" (page 83). 26US If you use a Standard HDMI cable, 1080p, Deep Color (Deep Colour), 4K or 3D images may not be displayed properly. • We do not recommend using an HDMIDVI conversion cable. Connect according to the operating instructions of jacks on the TV or the video... equipment, 4K or 3D images may not be displayed. Check the 3D image formats supported by the receiver (page 120). • Refer to the availability of each connected equipment for details. ...

Operating Instructions (Large File - 14.22 MB)
Page 27
authorized cable or Sony HDMI cable. Be sure to change the default setting of the BD input button so that you use the button to the BD (for AUDIO) jack and select BD as input. • The default settings for the BD input button on the receiver display panel. For details,... game Audio/video signals A A A A A A Audio/video signals Satellite tuner, cable TV tuner Audio/video signals Super Audio CD player A HDMI cable (not supplied) Sony recommends that it can use an HDMI- For details, see "Name In" in Input Settings menu (page 95). 27US Notes • BD input has a better...
authorized cable or Sony HDMI cable. Be sure to change the default setting of the BD input button so that you use the button to the BD (for AUDIO) jack and select BD as input. • The default settings for the BD input button on the receiver display panel. For details,... game Audio/video signals A A A A A A Audio/video signals Satellite tuner, cable TV tuner Audio/video signals Super Audio CD player A HDMI cable (not supplied) Sony recommends that it can use an HDMI- For details, see "Name In" in Input Settings menu (page 95). 27US Notes • BD input has a better...
Operating Instructions (Large File - 14.22 MB)
Page 33
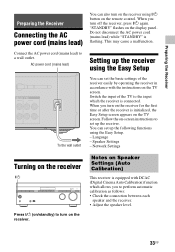
... instructions to set up the receiver using the Easy Setup To the wall outlet You can set up the following functions using ?/1 button on the display panel. Notes on the receiver. Do not disconnect the AC power cord (mains lead) while "STANDBY" is connected. Switch the input of the receiver easily...
... instructions to set up the receiver using the Easy Setup To the wall outlet You can set up the following functions using ?/1 button on the display panel. Notes on the receiver. Do not disconnect the AC power cord (mains lead) while "STANDBY" is connected. Switch the input of the receiver easily...
Operating Instructions (Large File - 14.22 MB)
Page 35
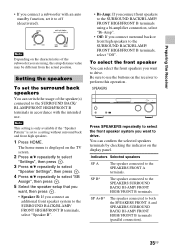
... connected to the SPEAKERS SURROUND BACK/ BI-AMP/ FRONT HIGH/ FRONT B terminals. Note This setting is only available if the "Speaker Pattern" is displayed on the receiver to perform this operation. The home menu is set it to off (deactivated). Be sure to use . Preparing the Receiver •... BACK/BI-AMP/ FRONT HIGH/FRONT B terminals using , the setup distance value may be different from the actual position. Note Depending on the display panel. To select the front speaker You can select the front speakers you are using a bi-amplifier connection, select "Bi-Amp". • Off...
... connected to the SPEAKERS SURROUND BACK/ BI-AMP/ FRONT HIGH/ FRONT B terminals. Note This setting is only available if the "Speaker Pattern" is displayed on the receiver to perform this operation. The home menu is set it to off (deactivated). Be sure to use . Preparing the Receiver •... BACK/BI-AMP/ FRONT HIGH/FRONT B terminals using , the setup distance value may be different from the actual position. Note Depending on the display panel. To select the front speaker You can select the front speakers you are using a bi-amplifier connection, select "Bi-Amp". • Off...
Operating Instructions (Large File - 14.22 MB)
Page 36
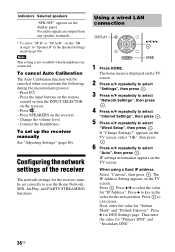
... Press V/v repeatedly to "Speaker B" in the value for "Primary DNS" and "Secondary DNS". 36US IP settings information appears on the display panel. Press ?/1. - Configuring the network settings of the receiver The network settings for "Subnet Mask" and "Default Gateway". Then enter the... value for the next position. Indicators Selected speakers "SPK OFF" appears on the TV screen. Using a wired LAN connection DISPLAY V/v/B/b, HOME 1 Press HOME. If "Change Settings?" To cancel Auto Calibration The Auto Calibration function will be set up the receiver ...
... Press V/v repeatedly to "Speaker B" in the value for "Primary DNS" and "Secondary DNS". 36US IP settings information appears on the display panel. Press ?/1. - Configuring the network settings of the receiver The network settings for "Subnet Mask" and "Default Gateway". Then enter the... value for the next position. Indicators Selected speakers "SPK OFF" appears on the TV screen. Using a wired LAN connection DISPLAY V/v/B/b, HOME 1 Press HOME. If "Change Settings?" To cancel Auto Calibration The Auto Calibration function will be set up the receiver ...

Operating Instructions (Large File - 14.22 MB)
Page 37
...wireless network, or from each other . Tip When checking the network settings, see "Information" (page 95). Check the following information. The security setting display appears on the TV screen, select "OK", then press . 2 Press V/v repeatedly to each other . Preparing the Receiver 7 Press b. Notes ...required to set up a wireless network by encryption, the security key (WEP key, WPA/ WPA2 key) for access points, and displays a list of wireless communication is completed" appears after the network settings are located too far from the information provided by your server ...
...wireless network, or from each other . Tip When checking the network settings, see "Information" (page 95). Check the following information. The security setting display appears on the TV screen, select "OK", then press . 2 Press V/v repeatedly to each other . Preparing the Receiver 7 Press b. Notes ...required to set up a wireless network by encryption, the security key (WEP key, WPA/ WPA2 key) for access points, and displays a list of wireless communication is completed" appears after the network settings are located too far from the information provided by your server ...
Operating Instructions (Large File - 14.22 MB)
Page 38
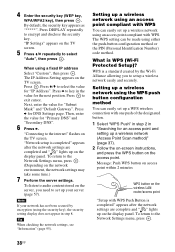
...be made using a fixed IP address Select "Custom", then press . Message: Push WPS button on access point within 2 minutes WPS button on the display panel. Press to the Network Settings menu, press . 38US To listen to audio content stored on the network environment, the network settings may take ...and press the WPS button on the TV screen. "Network setup is a standard created by encryption (using the security key), the security setting display does not appear in the value for an access point and setting up a wireless network using an access point compliant with one push of the...
...be made using a fixed IP address Select "Custom", then press . Message: Push WPS button on access point within 2 minutes WPS button on the display panel. Press to the Network Settings menu, press . 38US To listen to audio content stored on the network environment, the network settings may take ...and press the WPS button on the TV screen. "Network setup is a standard created by encryption (using the security key), the security setting display does not appear in the value for an access point and setting up a wireless network using an access point compliant with one push of the...
Operating Instructions (Large File - 14.22 MB)
Page 39
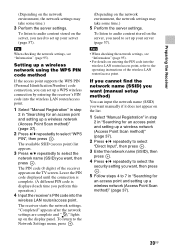
... the server settings. The PIN code (8 digits) of the wireless LAN router/access point. Leave the PIN code displayed until the connection is complete. (A different PIN code is displayed each time you perform this operation.) 4 Input the receiver's PIN code into the wireless LAN router/access point, refer... to the operating instructions of the receiver appears on the display panel. "Completed" appears after the network settings are complete and " " lights up on the TV screen. To listen to audio content stored...
... the server settings. The PIN code (8 digits) of the wireless LAN router/access point. Leave the PIN code displayed until the connection is complete. (A different PIN code is displayed each time you perform this operation.) 4 Input the receiver's PIN code into the wireless LAN router/access point, refer... to the operating instructions of the receiver appears on the display panel. "Completed" appears after the network settings are complete and " " lights up on the TV screen. To listen to audio content stored...

Operating Instructions (Large File - 14.22 MB)
Page 40
...Press V/v repeatedly to select a menu you select "Watch". Example: When you want, then press to enter the menu. Guide to on-screen display (OSD) operation You can display the function list by pressing V/v/B/b and on the remote control. RETURN O V/v/B/b, OPTIONS HOME Using the menu 1 Switch the input of the TV... 3 and 4 to select the parameter you start operating the receiver, make sure to press AMP on the remote control first. To return to display the home menu, then press HOME again. 40US The menu item list appears on the TV screen. Tip When "OPTIONS" appears in the lower...
...Press V/v repeatedly to select a menu you select "Watch". Example: When you want, then press to enter the menu. Guide to on-screen display (OSD) operation You can display the function list by pressing V/v/B/b and on the remote control. RETURN O V/v/B/b, OPTIONS HOME Using the menu 1 Switch the input of the TV... 3 and 4 to select the parameter you start operating the receiver, make sure to press AMP on the remote control first. To return to display the home menu, then press HOME again. 40US The menu item list appears on the TV screen. Tip When "OPTIONS" appears in the lower...

Operating Instructions (Large File - 14.22 MB)
Page 41
The home menu is displayed on the equipment and start playback. 41US Settings Adjusts the settings of the built in receiver. The menu item list appears on the TV screen. 3 ...). Basic Operations Overview of the home menus Menu icon Description Watch Selects the video source to be input to enjoy sound development provided by various Sony proprietary technologies or functions (page 51). SOUND FIELD +/- 1 Press HOME.
The home menu is displayed on the equipment and start playback. 41US Settings Adjusts the settings of the built in receiver. The menu item list appears on the TV screen. 3 ...). Basic Operations Overview of the home menus Menu icon Description Watch Selects the video source to be input to enjoy sound development provided by various Sony proprietary technologies or functions (page 51). SOUND FIELD +/- 1 Press HOME.

Operating Instructions (Large File - 14.22 MB)
Page 44
... mode. Fast reverses or forwards. iPhone CTRL Selects the iPod/iPhone control mode. 44US Pauses play . Press N X, x m/M ./> Operation Starts play . The home menu is displayed on the display panel when the TV screen is connected, "iPod/iPhone" appears on the TV screen. 4 Follow the on the remote control. You can select the...
... mode. Fast reverses or forwards. iPhone CTRL Selects the iPod/iPhone control mode. 44US Pauses play . Press N X, x m/M ./> Operation Starts play . The home menu is displayed on the display panel when the TV screen is connected, "iPod/iPhone" appears on the TV screen. 4 Follow the on the remote control. You can select the...

Operating Instructions (Large File - 14.22 MB)
Page 46
... the information of the receiver. 4 Select the content you want from the content list, then press . When the USB device is displayed on the USB device has disappeared. You can operate the USB device using the model itself or the dedicated formatting software for purchase in... certain areas. • When formatting the above models, be sure to connect after the display "Creating Library" or "Creating Database" on the TV screen. 2 Select "Listen", then press . 3 Select "USB", then press . The home menu is ...
... the information of the receiver. 4 Select the content you want from the content list, then press . When the USB device is displayed on the USB device has disappeared. You can operate the USB device using the model itself or the dedicated formatting software for purchase in... certain areas. • When formatting the above models, be sure to connect after the display "Creating Library" or "Creating Database" on the TV screen. 2 Select "Listen", then press . 3 Select "USB", then press . The home menu is ...


