Operating Instructions
Page 6
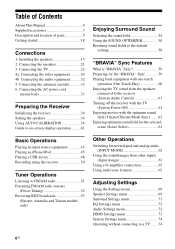
... 52 Receiving RDS broadcasts 53 (Europe, Australia and Taiwan models only) Other Operations Switching between digital and analog audio (INPUT MODE 62 Using the sound/images from other inputs (Input Assign 63 Using a bi-amplifier connection 65 Using multi-zone features 65 Adjusting Settings Using the Settings menu 68 Speaker Settings...
... 52 Receiving RDS broadcasts 53 (Europe, Australia and Taiwan models only) Other Operations Switching between digital and analog audio (INPUT MODE 62 Using the sound/images from other inputs (Input Assign 63 Using a bi-amplifier connection 65 Using multi-zone features 65 Adjusting Settings Using the Settings menu 68 Speaker Settings...

Operating Instructions
Page 13
... pre-programmed to watch the selected input image (page 23). G COMPONENT VIDEO INPUT/ OUTPUT section (page 23, 27, 28) Green (Y) Blue (PB) Red (PR) Y, PB, PR IN/OUT* jacks * You must connect the HDMI TV OUT or MONITOR OUT jack to your TV to operate Sony audio/video equipment. You can also... wf 1 wd 2 ws 3 4 wa w; 5 6 ql 7 qk qj 8 9 0 qh qg qf qa qd qs continued 13GB Remote control Use the supplied remote control to operate non-Sony equipment.
... pre-programmed to watch the selected input image (page 23). G COMPONENT VIDEO INPUT/ OUTPUT section (page 23, 27, 28) Green (Y) Blue (PB) Red (PR) Y, PB, PR IN/OUT* jacks * You must connect the HDMI TV OUT or MONITOR OUT jack to your TV to operate Sony audio/video equipment. You can also... wf 1 wd 2 ws 3 4 wa w; 5 6 ql 7 qk qj 8 9 0 qh qg qf qa qd qs continued 13GB Remote control Use the supplied remote control to operate non-Sony equipment.
Operating Instructions
Page 18
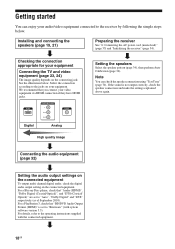
HDMI COMPONENT VIDEO Y PB/CB PR/CR VIDEO Digital Analog High quality image Setting the speakers Select the speaker pattern (page 34), then perform Auto Calibration (page 36). Connecting the audio equipment (page 32) Setting the audio output ... can enjoy your equipment. For a Blu-ray Disc player, check that you connect your equipment Connecting the TV and video equipment (page 23, 24) The image quality depends on the connecting jack. See the illustration below . We recommend that "Audio (HDMI)", "Dolby Digital (Coaxial/Optical)", and "DTS (Coaxial/ Optical)" are set...
HDMI COMPONENT VIDEO Y PB/CB PR/CR VIDEO Digital Analog High quality image Setting the speakers Select the speaker pattern (page 34), then perform Auto Calibration (page 36). Connecting the audio equipment (page 32) Setting the audio output ... can enjoy your equipment. For a Blu-ray Disc player, check that you connect your equipment Connecting the TV and video equipment (page 23, 24) The image quality depends on the connecting jack. See the illustration below . We recommend that "Audio (HDMI)", "Dolby Digital (Coaxial/Optical)", and "DTS (Coaxial/ Optical)" are set...

Operating Instructions
Page 23
.../video signals ARC A* B C D E* ** A Optical digital cord (not supplied) B Audio cord (not supplied) C Component video cord (not supplied) D Video cord (not supplied) E HDMI cable (not supplied) Sony recommends that you connect the HDMI TV OUT or MONITOR OUT jack to a TV. Connections 3: Connecting the TV You can operate this receiver using a GUI...
.../video signals ARC A* B C D E* ** A Optical digital cord (not supplied) B Audio cord (not supplied) C Component video cord (not supplied) D Video cord (not supplied) E HDMI cable (not supplied) Sony recommends that you connect the HDMI TV OUT or MONITOR OUT jack to a TV. Connections 3: Connecting the TV You can operate this receiver using a GUI...
Operating Instructions
Page 24
... by the receiver" (page 57). • The receiver can be distorted. Audio signals are not output from an HDMI TV OUT jack while the image is the case, place the antenna (aerial) farther away from the receiver. • When connecting optical digital cords, insert the plugs straight until they...to the Audio Return Channel (ARC) compatible TV, the TV sound will be output through the VIDEO OUT jacks or MONITOR OUT jacks. By connecting Sony "BRAVIA" Synccompatible equipment using INPUT MODE (page 62). Tips • All the digital audio jacks are being output to turn off the TV's ...
... by the receiver" (page 57). • The receiver can be distorted. Audio signals are not output from an HDMI TV OUT jack while the image is the case, place the antenna (aerial) farther away from the receiver. • When connecting optical digital cords, insert the plugs straight until they...to the Audio Return Channel (ARC) compatible TV, the TV sound will be output through the VIDEO OUT jacks or MONITOR OUT jacks. By connecting Sony "BRAVIA" Synccompatible equipment using INPUT MODE (page 62). Tips • All the digital audio jacks are being output to turn off the TV's ...

Operating Instructions
Page 25
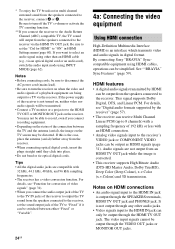
...to the operating instructions of each connected equipment for details. Refer to the operating instructions of the playback equipment. • To enjoy 3D images, connect 3D-compatible TV and video equipment (Blu-ray Disc player, Blu-ray Disc recorder, PlayStation 3, etc.) to the receiver using an... When connecting cords • Before connecting cords, be lost . If you use a Standard HDMI cable, 1080p, Deep Color (Deep Colour) or 3D images may not support Audio Return Channel (ARC). • Refer to the availability of jacks on the connected equipment. • Use a High Speed HDMI...
...to the operating instructions of each connected equipment for details. Refer to the operating instructions of the playback equipment. • To enjoy 3D images, connect 3D-compatible TV and video equipment (Blu-ray Disc player, Blu-ray Disc recorder, PlayStation 3, etc.) to the receiver using an... When connecting cords • Before connecting cords, be lost . If you use a Standard HDMI cable, 1080p, Deep Color (Deep Colour) or 3D images may not support Audio Return Channel (ARC). • Refer to the availability of jacks on the connected equipment. • Use a High Speed HDMI...

Operating Instructions
Page 26
Converting video signals This receiver is equipped with a function for conversion of video signals" (page 31). 26GB For details, see "Function for converting video signals. If you want to connect several digital equipment, but cannot find an unused input See "Using the sound/images from other inputs (Input Assign)" (page 63).
Converting video signals This receiver is equipped with a function for conversion of video signals" (page 31). 26GB For details, see "Function for converting video signals. If you want to connect several digital equipment, but cannot find an unused input See "Using the sound/images from other inputs (Input Assign)" (page 63).

Operating Instructions
Page 31
...viewed on your VCR, it may impact the video signal conversion. It is recommended to turn off this function on your VCR. • Converted HDMI image output does not support x.v.Color (x.v.Colour), Deep Color (Deep Colour) and 3D. • HDMI video signals cannot be converted to component video signals and...HDMI TV OUT jack are up to the VIDEO 1 VIDEO OUT jacks of video signals The receiver is output. : Video signals are using an image improvement circuitry with your TV, depending on the TV screen may not be output as shown in the table with a function for converting video ...
...viewed on your VCR, it may impact the video signal conversion. It is recommended to turn off this function on your VCR. • Converted HDMI image output does not support x.v.Color (x.v.Colour), Deep Color (Deep Colour) and 3D. • HDMI video signals cannot be converted to component video signals and...HDMI TV OUT jack are up to the VIDEO 1 VIDEO OUT jacks of video signals The receiver is output. : Video signals are using an image improvement circuitry with your TV, depending on the TV screen may not be output as shown in the table with a function for converting video ...
Operating Instructions
Page 41
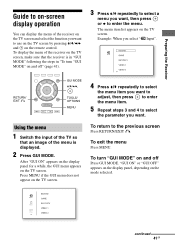
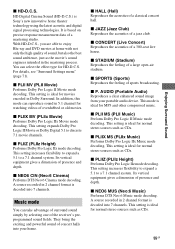
... a menu you want, then press or b to enter the menu. To display the menu of the receiver on the TV screen, make sure that an image of the menu is in "GUI MODE" following the steps in "To turn "GUI MODE" on the mode selected. RETURN/ EXIT O GUI MODE V/v/B/b, TOOLS/ OPTIONS...
... a menu you want, then press or b to enter the menu. To display the menu of the receiver on the TV screen, make sure that an image of the menu is in "GUI MODE" following the steps in "To turn "GUI MODE" on the mode selected. RETURN/ EXIT O GUI MODE V/v/B/b, TOOLS/ OPTIONS...
Operating Instructions
Page 55
... decoded into 7 channels. x CONCERT (Live Concert) Reproduces the acoustics of a mastering studio. AUDIO (Portable Audio) Reproduces a clear enhanced sound image from your home. A source recorded in 5.1 channel for MP3 and other compressed music. x JAZZ (Jazz Club) Reproduces the acoustics of a ...(page 71). In addition, this mode can reproduce sound in 2 channel format is decoded into 7 channels. This setting is Sony's new innovative home theater technology using the latest acoustic and digital signal processing technologies. With HD-D.C.S., you are able to discrete ...
... decoded into 7 channels. x CONCERT (Live Concert) Reproduces the acoustics of a mastering studio. AUDIO (Portable Audio) Reproduces a clear enhanced sound image from your home. A source recorded in 5.1 channel for MP3 and other compressed music. x JAZZ (Jazz Club) Reproduces the acoustics of a ...(page 71). In addition, this mode can reproduce sound in 2 channel format is decoded into 7 channels. This setting is Sony's new innovative home theater technology using the latest acoustic and digital signal processing technologies. With HD-D.C.S., you are able to discrete ...

Operating Instructions
Page 60
... for HDMIEasy Setting", check the Control for HDMI setting on setting the TV and connected equipment, refer to "AUTO" or "ON", sound and image can enjoy the sound/image using "HDMI Assign" in standby mode. The Settings menu list appears on the TV screen. 3 Select "HDMI", then press or b. 4 Select "Ctrl for...
... for HDMIEasy Setting", check the Control for HDMI setting on setting the TV and connected equipment, refer to "AUTO" or "ON", sound and image can enjoy the sound/image using "HDMI Assign" in standby mode. The Settings menu list appears on the TV screen. 3 Select "HDMI", then press or b. 4 Select "Ctrl for...
Operating Instructions
Page 63
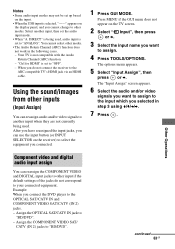
... the ARC compatible TV's HDMI jack via an HDMI cable. Notes • Some audio input modes may not be set to "ANALOG". Using the sound/images from other modes. • The Audio Return Channel (ARC) function does not work in step 3 using V/v/B/b. 7 Press . Other Operations Component video and digital audio input...
... the ARC compatible TV's HDMI jack via an HDMI cable. Notes • Some audio input modes may not be set to "ANALOG". Using the sound/images from other modes. • The Audio Return Channel (ARC) function does not work in step 3 using V/v/B/b. 7 Press . Other Operations Component video and digital audio input...
Operating Instructions
Page 65
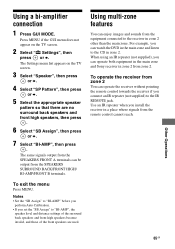
... zone 2 You can operate the receiver without pointing the remote control towards the receiver if you can operate both equipment in the main zone and Sony receiver in the main zone and listen to the IR REMOTE jack. Use an IR repeater when you can watch the DVD in zone 2 from... repeater (not supplied), you install the receiver in zone 2 other than the main zone. The same signals output from the SPEAKERS FRONT A terminals can enjoy images and sounds from the SPEAKERS SURROUND BACK/FRONT HIGH/ BI-AMP/FRONT B terminals. To exit the menu Press MENU.
... zone 2 You can operate the receiver without pointing the remote control towards the receiver if you can operate both equipment in the main zone and Sony receiver in the main zone and listen to the IR REMOTE jack. Use an IR repeater when you can watch the DVD in zone 2 from... repeater (not supplied), you install the receiver in zone 2 other than the main zone. The same signals output from the SPEAKERS FRONT A terminals can enjoy images and sounds from the SPEAKERS SURROUND BACK/FRONT HIGH/ BI-AMP/FRONT B terminals. To exit the menu Press MENU.

Operating Instructions
Page 68
Settings menu list Settings menu Auto Cal. Selects the sound field and adjusts the surround effect you want , then press . Makes settings for sound/ images from the menu, then press or b to enter the menu mode. Press MENU if the GUI menu does not appear on the TV screen. 2 Select " ...
Settings menu list Settings menu Auto Cal. Selects the sound field and adjusts the surround effect you want , then press . Makes settings for sound/ images from the menu, then press or b to enter the menu mode. Press MENU if the GUI menu does not appear on the TV screen. 2 Select " ...
Operating Instructions
Page 73
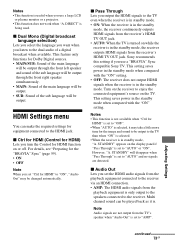
Notes • This function is useful when you use a "BRAVIA" Sync compatible Sony TV. HDMI Settings menu You can be output. • SUB: Sound of...8226; OFF Note When you set to "OFF". • When "AUTO" is not available when "Ctrl for the image and sound to be output to the receiver. Adjusting Settings continued 73GB This setting saves power in the standby mode when ...language will be played back as it may be output. This setting saves power in the standby mode. Sony recommends this setting if you turn the Control for Dolby Digital sources. • MAIN/SUB: Sound of...
Notes • This function is useful when you use a "BRAVIA" Sync compatible Sony TV. HDMI Settings menu You can be output. • SUB: Sound of...8226; OFF Note When you set to "OFF". • When "AUTO" is not available when "Ctrl for the image and sound to be output to the receiver. Adjusting Settings continued 73GB This setting saves power in the standby mode when ...language will be played back as it may be output. This setting saves power in the standby mode. Sony recommends this setting if you turn the Control for Dolby Digital sources. • MAIN/SUB: Sound of...

Operating Instructions
Page 74
... there is no signals input to the receiver. • ON: Switches to standby mode after approximately 30 minutes. • OFF: Does not switch to an image display equipment (projector, etc.), sound may not be output from the receiver is also in stereo as the number of the receiver. x Auto Standby Lets...
... there is no signals input to the receiver. • ON: Switches to standby mode after approximately 30 minutes. • OFF: Does not switch to an image display equipment (projector, etc.), sound may not be output from the receiver is also in stereo as the number of the receiver. x Auto Standby Lets...

Operating Instructions
Page 78
...details, see "Naming the input (Name Input)" (page 44). 78GB STBY ON, STBY OFF STBY ON For details, see "Using the sound/ images from other inputs (Input Assign)" (page 63). ASSIGN] HDMI settings [] System settings [] Control for HDMI [CTRL: HDMI] Pass Through [PASS THRU...] Audio out [AUDIO OUT] HDMI input assignment [H. OFFi) 0 ms MAIN/SUB, MAIN, SUB MAIN For details, see "Using the sound/ images from other inputs (Input Assign)" (page 63). AUTO1, D.L.L. Menu [Display] Parameters [Display] Surround speakers crossover frequencyg) [SUR CROSS] Front high speakers...
...details, see "Naming the input (Name Input)" (page 44). 78GB STBY ON, STBY OFF STBY ON For details, see "Using the sound/ images from other inputs (Input Assign)" (page 63). ASSIGN] HDMI settings [] System settings [] Control for HDMI [CTRL: HDMI] Pass Through [PASS THRU...] Audio out [AUDIO OUT] HDMI input assignment [H. OFFi) 0 ms MAIN/SUB, MAIN, SUB MAIN For details, see "Using the sound/ images from other inputs (Input Assign)" (page 63). AUTO1, D.L.L. Menu [Display] Parameters [Display] Surround speakers crossover frequencyg) [SUR CROSS] Front high speakers...

Operating Instructions
Page 87
... Color (Deep Colour) or 3D transmission. • Sound may not be output from the receiver while the GUI appears on the playback equipment, you view images or listen to other inputs (page 63). • Check that equipment. • You cannot listen to the Super Audio CD by connecting HDMI. • Depending...
... Color (Deep Colour) or 3D transmission. • Sound may not be output from the receiver while the GUI appears on the playback equipment, you view images or listen to other inputs (page 63). • Check that equipment. • You cannot listen to the Super Audio CD by connecting HDMI. • Depending...
Operating Instructions
Page 88
... select "GUI OFF". • Make sure the TV is compatible with each equipment. • Be sure to use a High Speed HDMI cable when you view images or listen to sound, especially for the 1080p, Deep Color (Deep Colour) or 3D transmission. • Sound may need to set to "ON" in the...
... select "GUI OFF". • Make sure the TV is compatible with each equipment. • Be sure to use a High Speed HDMI cable when you view images or listen to sound, especially for the 1080p, Deep Color (Deep Colour) or 3D transmission. • Sound may need to set to "ON" in the...

Operating Instructions
Page 89
... the last HDMI component selection before you turned off the receiver. The GUI menu does not appear on the TV or the video equipment, 3D images may not be displayed. In this case, select "AMP". • If you cannot listen to the sound of the TV on the TV screen, press... still does not appear on this receiver (page 31). • When you use a High Speed HDMI cable when you view images or listen to sound, especially for the connection, the image may not be output correctly. • Make sure that the equipment is set up -converting an input signal with this operation...
... the last HDMI component selection before you turned off the receiver. The GUI menu does not appear on the TV or the video equipment, 3D images may not be displayed. In this case, select "AMP". • If you cannot listen to the sound of the TV on the TV screen, press... still does not appear on this receiver (page 31). • When you use a High Speed HDMI cable when you view images or listen to sound, especially for the connection, the image may not be output correctly. • Make sure that the equipment is set up -converting an input signal with this operation...
