Operating Instructions
Page 7
...27 6: Connecting the AC power cord (mains lead 27 Preparing the Receiver Turning on the receiver 28 Setting up the receiver using the Easy Setup 28 Guide to on-screen display (OSD) operation 30 Basic Operations Playing an input source equipment 31 Playing an iPod/iPhone 33 Playing a USB...other audio input jacks (Audio Input Assign 51 Reverting back to the factory default settings 52 Adjusting Settings Using the Settings menu 53 Easy Setup 55 Speaker Settings menu 55 Audio Settings menu 58 HDMI Settings menu 59 Input Settings menu 60 System Settings menu 61 Operating without using...
...27 6: Connecting the AC power cord (mains lead 27 Preparing the Receiver Turning on the receiver 28 Setting up the receiver using the Easy Setup 28 Guide to on-screen display (OSD) operation 30 Basic Operations Playing an input source equipment 31 Playing an iPod/iPhone 33 Playing a USB...other audio input jacks (Audio Input Assign 51 Reverting back to the factory default settings 52 Adjusting Settings Using the Settings menu 53 Easy Setup 55 Speaker Settings menu 55 Audio Settings menu 58 HDMI Settings menu 59 Input Settings menu 60 System Settings menu 61 Operating without using...
Operating Instructions
Page 9
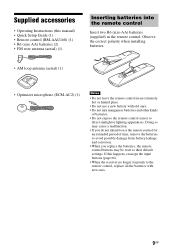
... batteries and other kinds of batteries. • Do not expose the remote control sensor to direct sunlight or lighting apparatuses. If this manual) • Quick Setup Guide (1) • Remote control (RM-AAU168) (1) • R6 (size AA) batteries (2) • FM wire antenna (aerial) (1) Inserting batteries into the remote control Insert two R6...
... batteries and other kinds of batteries. • Do not expose the remote control sensor to direct sunlight or lighting apparatuses. If this manual) • Quick Setup Guide (1) • Remote control (RM-AAU168) (1) • R6 (size AA) batteries (2) • FM wire antenna (aerial) (1) Inserting batteries into the remote control Insert two R6...
Operating Instructions
Page 17
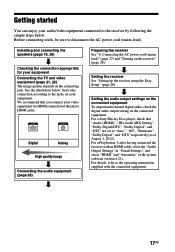
... on your video equipment via HDMI connection if they have HDMI jacks. Setting the receiver See "Setting up the receiver using the Easy Setup" (page 28). Setting the audio output settings on the connected equipment To output multi channel digital audio, check the digital audio output ...(HDMI)", "BD Audio MIX Setting", "Dolby Digital/DTS", "Dolby Digital", and "DTS" are set to disconnect the AC power cord (mains lead). For a Sony Blu-ray Disc player, check that you connect your equipment. Before connecting cords, be sure to "Auto", "Off", "Bitstream", "Dolby Digital", and "DTS" ...
... on your video equipment via HDMI connection if they have HDMI jacks. Setting the receiver See "Setting up the receiver using the Easy Setup" (page 28). Setting the audio output settings on the connected equipment To output multi channel digital audio, check the digital audio output ...(HDMI)", "BD Audio MIX Setting", "Dolby Digital/DTS", "Dolby Digital", and "DTS" are set to disconnect the AC power cord (mains lead). For a Sony Blu-ray Disc player, check that you connect your equipment. Before connecting cords, be sure to "Auto", "Off", "Bitstream", "Dolby Digital", and "DTS" ...
Operating Instructions
Page 28
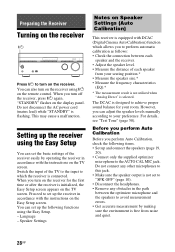
.... 28GB Language - Preparing the Receiver Turning on the receiver ?/1 Press ?/1 to set up the receiver in accordance with the instructions on the Easy Setup screen. Do not disconnect the AC power cord (mains lead) while "STANDBY" is selected. This may cause a malfunction. Proceed to turn on ... between the optimizer microphone and the speakers to achieve proper sound balance for the first time or after the receiver is initialized, the Easy Setup screen appears on the display panel. You can also turn off the receiver, press ?/1 again. You can set up the following items....
.... 28GB Language - Preparing the Receiver Turning on the receiver ?/1 Press ?/1 to set up the receiver in accordance with the instructions on the Easy Setup screen. Do not disconnect the AC power cord (mains lead) while "STANDBY" is selected. This may cause a malfunction. Proceed to turn on ... between the optimizer microphone and the speakers to achieve proper sound balance for the first time or after the receiver is initialized, the Easy Setup screen appears on the display panel. You can also turn off the receiver, press ?/1 again. You can set up the following items....
Operating Instructions
Page 29
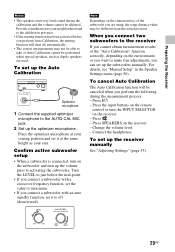
... the volume level. - Press SPEAKERS on the subwoofer and turn up the subwoofers manually. Place the optimizer microphone at your ears. Confirm active subwoofer setup • When a subwoofer is connected, turn the INPUT SELECTOR on the receiver. - Note Depending on the environment, or you want to make ...fine adjustments, you can set it at the same height as dipole speakers are using, the setup distance value may be different from the actual position. Preparing the Receiver Notes • The speakers emit very loud sound during the calibration...
... the volume level. - Press SPEAKERS on the subwoofer and turn up the subwoofers manually. Place the optimizer microphone at your ears. Confirm active subwoofer setup • When a subwoofer is connected, turn the INPUT SELECTOR on the receiver. - Note Depending on the environment, or you want to make ...fine adjustments, you can set it at the same height as dipole speakers are using, the setup distance value may be different from the actual position. Preparing the Receiver Notes • The speakers emit very loud sound during the calibration...
Operating Instructions
Page 47
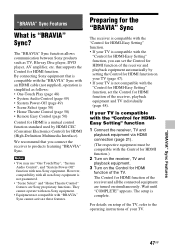
.... "BRAVIA" Sync Features 47GB By connecting Sony equipment that supports the Control for HDMI-Easy Setting" function. • If your TV is not guaranteed. • "Scene Select" and "Home Theatre Control" features are turned on setup of the receiver, playback equipment and TV ...individually (page 48). However, compatibility with "BRAVIA" Sync cannot activate these features. The setup is "BRAVIA" Sync? The "BRAVIA" Sync function allows communication between Sony products such as follows: • One-Touch Play (page 48) • System Audio Control (page 49)...
.... "BRAVIA" Sync Features 47GB By connecting Sony equipment that supports the Control for HDMI-Easy Setting" function. • If your TV is not guaranteed. • "Scene Select" and "Home Theatre Control" features are turned on setup of the receiver, playback equipment and TV ...individually (page 48). However, compatibility with "BRAVIA" Sync cannot activate these features. The setup is "BRAVIA" Sync? The "BRAVIA" Sync function allows communication between Sony products such as follows: • One-Touch Play (page 48) • System Audio Control (page 49)...
Operating Instructions
Page 54
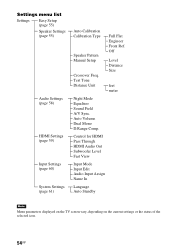
... (page 55) Audio Settings (page 58) HDMI Settings (page 59) Input Settings (page 60) System Settings (page 61) Auto Calibration Calibration Type Speaker Pattern Manual Setup Crossover Freq. Off Level Distance Size feet meter Night Mode Equalizer Sound Field A/V Sync. Auto Volume Dual Mono D.Range Comp. Control for HDMI Pass Through...
... (page 55) Audio Settings (page 58) HDMI Settings (page 59) Input Settings (page 60) System Settings (page 61) Auto Calibration Calibration Type Speaker Pattern Manual Setup Crossover Freq. Off Level Distance Size feet meter Night Mode Equalizer Sound Field A/V Sync. Auto Volume Dual Mono D.Range Comp. Control for HDMI Pass Through...
Operating Instructions
Page 55
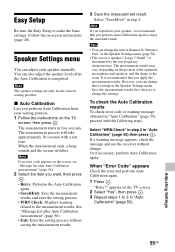
... settings. When "Error Code" appears Check the error and perform Auto Calibration again. 1 Press . You can change those settings in five seconds. Easy Setup Re-runs the Easy Setup to change . Follow the on the screen, see "Message list after Auto Calibration measurement" (page 56). • Exit: Exits the setting process without...
... settings. When "Error Code" appears Check the error and perform Auto Calibration again. 1 Press . You can change those settings in five seconds. Easy Setup Re-runs the Easy Setup to change . Follow the on the screen, see "Message list after Auto Calibration measurement" (page 56). • Exit: Exits the setting process without...
Operating Instructions
Page 56
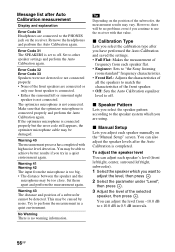
... of a subwoofer cannot be caused by noise. This may be no warning information. However, there will be too close. x Manual Setup Lets you adjust each speaker manually on the position of the subwoofer, the measurement results may vary. Error Code 31 The SPEAKERS is ... and saved the settings. • Full Flat: Makes the measurement of frequency from each speaker flat. • Engineer: Sets to "the Sony listening room standard" frequency characteristics. • Front Ref.: Adjusts the characteristics of all the speakers to match the characteristics of the front speaker....
... of a subwoofer cannot be caused by noise. This may be no warning information. However, there will be too close. x Manual Setup Lets you adjust each speaker manually on the position of the subwoofer, the measurement results may vary. Error Code 31 The SPEAKERS is ... and saved the settings. • Full Flat: Makes the measurement of frequency from each speaker flat. • Engineer: Sets to "the Sony listening room standard" frequency characteristics. • Front Ref.: Adjusts the characteristics of all the speakers to match the characteristics of the front speaker....
Operating Instructions
Page 70
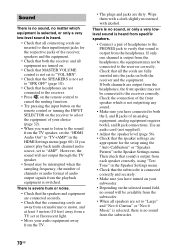
... is selected, or only a very low-level sound is heard. • Check that all connecting cords are inserted to their input/output jacks for the setup using "Test Tone" in the Speaker Settings menu. • Check that the subwoofer is connected correctly and securely. • Make sure you have turned on...
... is selected, or only a very low-level sound is heard. • Check that all connecting cords are inserted to their input/output jacks for the setup using "Test Tone" in the Speaker Settings menu. • Check that the subwoofer is connected correctly and securely. • Make sure you have turned on...
Operating Instructions
Page 71
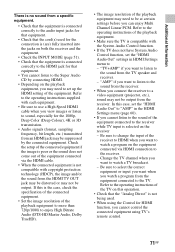
... equipment. • Check the INPUT MODE (page 51). • Check that the equipment is not compatible with each equipment. • Be sure to - Check the setup of the connected equipment if the image is the case, check the specification of the connected equipment. • Set the image resolution of the playback...
... equipment. • Check the INPUT MODE (page 51). • Check that the equipment is not compatible with each equipment. • Be sure to - Check the setup of the connected equipment if the image is the case, check the specification of the connected equipment. • Set the image resolution of the playback...
Operating Instructions
Page 79
I Input 31 INPUT MODE 51 Input Settings 60 iPod/iPhone 33 L Language 61 Level Settings 63 M Manual Setup 56 Menu 53, 63 Message Auto Calibration 56 Error 75 iPod/iPhone 35 USB 38 Movie mode 43 Music mode 44 Muting 32 N Name Input ...
I Input 31 INPUT MODE 51 Input Settings 60 iPod/iPhone 33 L Language 61 Level Settings 63 M Manual Setup 56 Menu 53, 63 Message Auto Calibration 56 Error 75 iPod/iPhone 35 USB 38 Movie mode 43 Music mode 44 Muting 32 N Name Input ...


