Operating Instructions
Page 4
... of area code U only". • The instructions in the text, for model STR-DH500. This receiver incorporates High-Definition Multimedia Interface (HDMITM) technology. HDMI, the HDMI logo and High-Definition Multimedia Interface are for example, "Models of HDMI Licensing LLC. 4US On Copyrights This receiver incorporates Dolby* Digital and Pro Logic Surround and the DTS** Digital Surround...
... of area code U only". • The instructions in the text, for model STR-DH500. This receiver incorporates High-Definition Multimedia Interface (HDMITM) technology. HDMI, the HDMI logo and High-Definition Multimedia Interface are for example, "Models of HDMI Licensing LLC. 4US On Copyrights This receiver incorporates Dolby* Digital and Pro Logic Surround and the DTS** Digital Surround...

Operating Instructions
Page 7
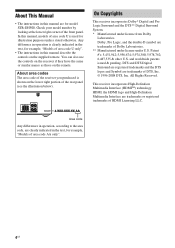
... the display if no digital signal is input through the OPTICAL jack. About the indicators on the display 12 3 4 SW LFE LCR SL S SR OPT HDMI DTS COAX 5 56 MEMORY PLI I D.RANGE MONO SLEEP ST D q; 9 8 7 Name A SW B LFE C Input indicators Function Lights up when subwoofer ...radio station is activated. Note The preset station number will change according to "AUTO" (page 49). OPT COAX HDMI Lights up when the receiver recognizes a component connected via an HDMI IN jack (page 18). For details on presetting radio stations, see page 47. continued 7US Lights up when ...
... the display if no digital signal is input through the OPTICAL jack. About the indicators on the display 12 3 4 SW LFE LCR SL S SR OPT HDMI DTS COAX 5 56 MEMORY PLI I D.RANGE MONO SLEEP ST D q; 9 8 7 Name A SW B LFE C Input indicators Function Lights up when subwoofer ...radio station is activated. Note The preset station number will change according to "AUTO" (page 49). OPT COAX HDMI Lights up when the receiver recognizes a component connected via an HDMI IN jack (page 18). For details on presetting radio stations, see page 47. continued 7US Lights up when ...
Operating Instructions
Page 9
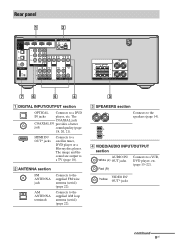
... to a TV (page 18). The image and the sound are output to a VCR, DVD player, etc. (page 15-22). HDMI IN/ OUT* jacks Connects to a DVD IN jacks player, etc. Rear panel 1 2 HDMI CONNECT TO SAT IN DVD IN BD IN OUT DIGITAL INPUT FOR AUDIO ANTENNA AM BD IN SAT IN...
... to a TV (page 18). The image and the sound are output to a VCR, DVD player, etc. (page 15-22). HDMI IN/ OUT* jacks Connects to a DVD IN jacks player, etc. Rear panel 1 2 HDMI CONNECT TO SAT IN DVD IN BD IN OUT DIGITAL INPUT FOR AUDIO ANTENNA AM BD IN SAT IN...
Operating Instructions
Page 10
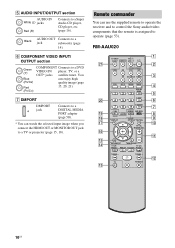
... IN White (L) jacks Red (R) Connects to a jack subwoofer (page 14). Remote commander You can watch the selected input image when you connect the HDMI OUT or MONITOR OUT jack to a TV or projector (page 15, 18). MEMORY AMP MENU 0/10 ENTER CLEAR DISPLAY TOOLS/ OPTIONS MUTING TV VOL...>10/ - G DMPORT DMPORT jack Connects to a DIGITAL MEDIA PORT adapter (page 50). * You can use the supplied remote to operate the receiver and to control the Sony audio/video components that the remote is assigned to a DVD VIDEO IN/ player, TV, or a OUT* jacks satellite tuner. ql qk qj qh...
... IN White (L) jacks Red (R) Connects to a jack subwoofer (page 14). Remote commander You can watch the selected input image when you connect the HDMI OUT or MONITOR OUT jack to a TV or projector (page 15, 18). MEMORY AMP MENU 0/10 ENTER CLEAR DISPLAY TOOLS/ OPTIONS MUTING TV VOL...>10/ - G DMPORT DMPORT jack Connects to a DIGITAL MEDIA PORT adapter (page 50). * You can use the supplied remote to operate the receiver and to control the Sony audio/video components that the remote is assigned to a DVD VIDEO IN/ player, TV, or a OUT* jacks satellite tuner. ql qk qj qh...
Operating Instructions
Page 15
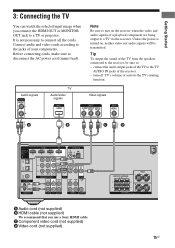
... via the receiver. Audio signals TV Audio/video signals Note Be sure to turn off TV's volume or activate the TV's muting function. connect the audio output jacks of the TV to a TV or projector. Getting Started 3: Connecting the TV You can watch the selected input image when you use a Sony HDMI cable...
... via the receiver. Audio signals TV Audio/video signals Note Be sure to turn off TV's volume or activate the TV's muting function. connect the audio output jacks of the TV to a TV or projector. Getting Started 3: Connecting the TV You can watch the selected input image when you use a Sony HDMI cable...
Operating Instructions
Page 16
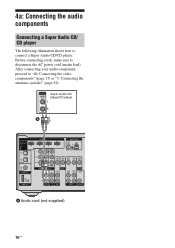
... your audio component, proceed to "4b: Connecting the video components" (page 17) or "5: Connecting the antennas (aerials)" (page 22). Super Audio CD player/CD player A HDMI CONNECT TO SAT IN DVD IN BD IN OUT DIGITAL INPUT FOR AUDIO ANTENNA AM BD IN SAT IN OPTICAL DVD IN COAXIAL DIGITAL DC5V...
... your audio component, proceed to "4b: Connecting the video components" (page 17) or "5: Connecting the antennas (aerials)" (page 22). Super Audio CD player/CD player A HDMI CONNECT TO SAT IN DVD IN BD IN OUT DIGITAL INPUT FOR AUDIO ANTENNA AM BD IN SAT IN OPTICAL DVD IN COAXIAL DIGITAL DC5V...
Operating Instructions
Page 17
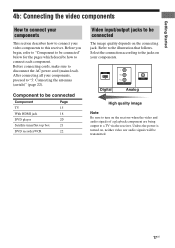
...the connecting jack. Component to be connected Component Page TV 15 With HDMI jack 18 DVD player 20 Satellite tuner/Set-top box 21 DVD recorder/VCR 22 Video input/output jacks to this receiver. Select the connection according to the illustration that follows. Refer to ...to connect each component. Unless the power is turned on the receiver when the video and audio signals of a playback component are being output to "5: Connecting the antennas (aerials)" (page 22). After connecting all your components. HDMI Digital Y PB/CB PR/CR COMPONENT VIDEO VIDEO Analog High...
...the connecting jack. Component to be connected Component Page TV 15 With HDMI jack 18 DVD player 20 Satellite tuner/Set-top box 21 DVD recorder/VCR 22 Video input/output jacks to this receiver. Select the connection according to the illustration that follows. Refer to ...to connect each component. Unless the power is turned on the receiver when the video and audio signals of a playback component are being output to "5: Connecting the antennas (aerials)" (page 22). After connecting all your components. HDMI Digital Y PB/CB PR/CR COMPONENT VIDEO VIDEO Analog High...
Operating Instructions
Page 18
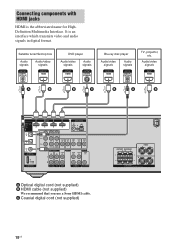
Connecting components with HDMI jacks HDMI is an interface which transmits video and audio signals in digital format. C Coaxial digital cord (not supplied) CENTER ... TV, projector, etc. It is the abbreviated name for HighDefinition Multimedia Interface. Audio/video signals A B B C B A B HDMI CONNECT TO SAT IN DVD IN BD IN OUT DIGITAL INPUT FOR AUDIO ANTENNA AM BD IN SAT IN OPTICAL DVD IN COAXIAL DIGITAL ...IN AUDIO OUT R SA-CD/CD TV SAT VIDEO SUBWOOFER A Optical digital cord (not supplied) B HDMI cable (not supplied) We recommend that you use a Sony HDMI cable.
Connecting components with HDMI jacks HDMI is an interface which transmits video and audio signals in digital format. C Coaxial digital cord (not supplied) CENTER ... TV, projector, etc. It is the abbreviated name for HighDefinition Multimedia Interface. Audio/video signals A B B C B A B HDMI CONNECT TO SAT IN DVD IN BD IN OUT DIGITAL INPUT FOR AUDIO ANTENNA AM BD IN SAT IN OPTICAL DVD IN COAXIAL DIGITAL ...IN AUDIO OUT R SA-CD/CD TV SAT VIDEO SUBWOOFER A Optical digital cord (not supplied) B HDMI cable (not supplied) We recommend that you use a Sony HDMI cable.
Operating Instructions
Page 19
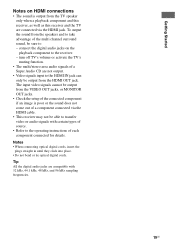
... place. • Do not bend or tie optical digital cords. Tip All the digital audio jacks are not output. • Video signals input to the HDMI IN jack can only be output from the speakers and to take advantage of the connected component if an image is output from the TV... speaker only when a playback component and this receiver, as well as this receiver and the TV are connected via the HDMI cable. • This receiver may not be sure to - connect the digital audio jacks on HDMI connections • The sound is poor or the sound does not come...
... place. • Do not bend or tie optical digital cords. Tip All the digital audio jacks are not output. • Video signals input to the HDMI IN jack can only be output from the speakers and to take advantage of the connected component if an image is output from the TV... speaker only when a playback component and this receiver, as well as this receiver and the TV are connected via the HDMI cable. • This receiver may not be sure to - connect the digital audio jacks on HDMI connections • The sound is poor or the sound does not come...
Operating Instructions
Page 20
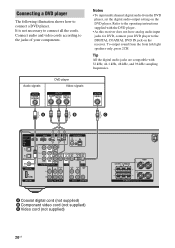
... DVD player. • As this receiver does not have analog audio input jacks for DVD, connect your components. Notes • To input multi channel digital audio from the front left/right speakers only, press 2CH. Audio signals DVD player Video signals A B C HDMI CONNECT TO SAT IN DVD IN BD...the DIGITAL COAXIAL DVD IN jack on the DVD player. To output sound from the DVD player, set the digital audio output setting on the receiver. It is not necessary to connect a DVD player. Connecting a DVD player The following illustration shows how to connect all the cords. Connect...
... DVD player. • As this receiver does not have analog audio input jacks for DVD, connect your components. Notes • To input multi channel digital audio from the front left/right speakers only, press 2CH. Audio signals DVD player Video signals A B C HDMI CONNECT TO SAT IN DVD IN BD...the DIGITAL COAXIAL DVD IN jack on the DVD player. To output sound from the DVD player, set the digital audio output setting on the receiver. It is not necessary to connect a DVD player. Connecting a DVD player The following illustration shows how to connect all the cords. Connect...
Operating Instructions
Page 21
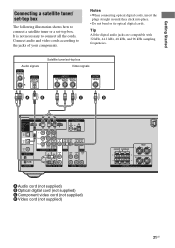
... connect all the cords. Connect audio and video cords according to the jacks of your components. Audio signals Satellite tuner/set-top box Video signals A B C D HDMI CONNECT TO SAT IN DVD IN BD IN OUT DIGITAL INPUT FOR AUDIO ANTENNA AM BD IN SAT IN OPTICAL DVD IN COAXIAL DIGITAL DC5V...
... connect all the cords. Connect audio and video cords according to the jacks of your components. Audio signals Satellite tuner/set-top box Video signals A B C D HDMI CONNECT TO SAT IN DVD IN BD IN OUT DIGITAL INPUT FOR AUDIO ANTENNA AM BD IN SAT IN OPTICAL DVD IN COAXIAL DIGITAL DC5V...
Operating Instructions
Page 22
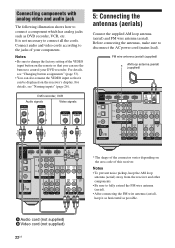
...be displayed on the area code of your DVD recorder. Connect audio and video cords according to the jacks of this receiver. DVD recorder, VCR Audio signals Video signals A B HDMI CONNECT TO SAT IN DVD IN BD IN OUT DIGITAL INPUT FOR AUDIO ANTENNA AM BD IN SAT IN OPTICAL DVD...connecting the antennas, make sure to connect all the cords. Notes • To prevent noise pickup, keep the AM loop antenna (aerial) away from the receiver and other components. • Be sure to fully extend the FM wire antenna (aerial). • After connecting the FM wire antenna (aerial), keep ...
...be displayed on the area code of your DVD recorder. Connect audio and video cords according to the jacks of this receiver. DVD recorder, VCR Audio signals Video signals A B HDMI CONNECT TO SAT IN DVD IN BD IN OUT DIGITAL INPUT FOR AUDIO ANTENNA AM BD IN SAT IN OPTICAL DVD...connecting the antennas, make sure to connect all the cords. Notes • To prevent noise pickup, keep the AM loop antenna (aerial) away from the receiver and other components. • Be sure to fully extend the FM wire antenna (aerial). • After connecting the FM wire antenna (aerial), keep ...
Operating Instructions
Page 50
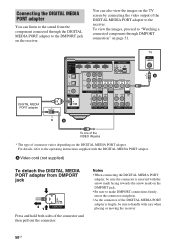
TV DIGITAL MEDIA PORT adapter HDMI CONNECT TO SAT IN DVD IN BD IN OUT DIGITAL INPUT FOR AUDIO ANTENNA AM... the images, proceed to "Watching a connected component through the DIGITAL MEDIA PORT adapter to the DMPORT jack on the receiver. You can listen to the sound from DMPORT jack 21 DC5V 0.7A MAX DMPORT Press and hold both sides of ... pull out the connector. For details, refer to the operating instructions supplied with care when placing or moving the receiver. 50US Connecting the DIGITAL MEDIA PORT adapter You can also view the images on the TV screen by connecting the...
TV DIGITAL MEDIA PORT adapter HDMI CONNECT TO SAT IN DVD IN BD IN OUT DIGITAL INPUT FOR AUDIO ANTENNA AM... the images, proceed to "Watching a connected component through the DIGITAL MEDIA PORT adapter to the DMPORT jack on the receiver. You can listen to the sound from DMPORT jack 21 DC5V 0.7A MAX DMPORT Press and hold both sides of ... pull out the connector. For details, refer to the operating instructions supplied with care when placing or moving the receiver. 50US Connecting the DIGITAL MEDIA PORT adapter You can also view the images on the TV screen by connecting the...
Operating Instructions
Page 55
...surround (left/right) and subwoofer channels. Since surround information is recorded and reproduced in stereo, more powerful. x HDMI (High-Definition Multimedia Interface) HDMI (High-Definition Multimedia Interface) is an interface that incorporates coding technology for digital video signals. This is decoded and... by filmmakers can be quantified. x Digital Cinema Sound (DCS) A unique sound reproduction technology for home theater developed by Sony, in cooperation with a frequency between 20 to 120 Hz, audio becomes more realistic sound with fuller presence is delivered than...
...surround (left/right) and subwoofer channels. Since surround information is recorded and reproduced in stereo, more powerful. x HDMI (High-Definition Multimedia Interface) HDMI (High-Definition Multimedia Interface) is an interface that incorporates coding technology for digital video signals. This is decoded and... by filmmakers can be quantified. x Digital Cinema Sound (DCS) A unique sound reproduction technology for home theater developed by Sony, in cooperation with a frequency between 20 to 120 Hz, audio becomes more realistic sound with fuller presence is delivered than...
Operating Instructions
Page 58
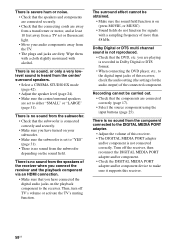
...DIGITAL MEDIA PORT adapter and/or component. • Check the DIGITAL MEDIA PORT adapter and/or component device to make sure it supports this receiver, check the audio setting (the settings for signals with alcohol. you have connected the digital audio jacks on your subwoofer. • Make... or motor, and at least 10 feet away from a TV set to the receiver. Wipe them with a cloth slightly moistened with a sampling frequency of the receiver when you connect the receiver and the playback component via an HDMI connection. • Make sure that the DVD, etc. There is no sound ...
...DIGITAL MEDIA PORT adapter and/or component. • Check the DIGITAL MEDIA PORT adapter and/or component device to make sure it supports this receiver, check the audio setting (the settings for signals with alcohol. you have connected the digital audio jacks on your subwoofer. • Make... or motor, and at least 10 feet away from a TV set to the receiver. Wipe them with a cloth slightly moistened with a sampling frequency of the receiver when you connect the receiver and the playback component via an HDMI connection. • Make sure that the DVD, etc. There is no sound ...
Operating Instructions
Page 59
...is not output from DMPORT, check that the frequency appears on the playback component, you connect the receiver to an outdoor antenna (aerial), ground it against lightning. Video There is no picture or an ...tuning in the VIDEO menu (page 31). Preset the stations (page 47). • Press DISPLAY repeatedly on the receiver so that - Adjust the antennas (aerials) and connect an external antenna (aerial), if necessary. • The ... are connected securely. The source image input to the HDMI jack on the receiver is poor. • Use a 75-ohm coaxial cable (not supplied) to connect the...
...is not output from DMPORT, check that the frequency appears on the playback component, you connect the receiver to an outdoor antenna (aerial), ground it against lightning. Video There is no picture or an ...tuning in the VIDEO menu (page 31). Preset the stations (page 47). • Press DISPLAY repeatedly on the receiver so that - Adjust the antennas (aerials) and connect an external antenna (aerial), if necessary. • The ... are connected securely. The source image input to the HDMI jack on the receiver is poor. • Use a 75-ohm coaxial cable (not supplied) to connect the...
Operating Instructions
Page 62
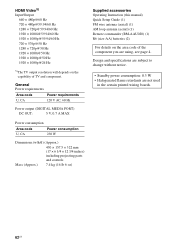
Design and specifications are subject to change without notice. • Standby power consumption: 0.3 W • Halogenated flame retardants are using, see page 4. HDMI Video5) Input/Output 640 × 480p@60 Hz 720 × [email protected]/60 Hz 1280 × [email protected]/60 Hz 1920 × 1080i@...
Design and specifications are subject to change without notice. • Standby power consumption: 0.3 W • Halogenated flame retardants are using, see page 4. HDMI Video5) Input/Output 640 × 480p@60 Hz 720 × [email protected]/60 Hz 1280 × [email protected]/60 Hz 1920 × 1080i@...
Operating Instructions
Page 63
... connecting 50 input 25 video assign 51 Dolby Digital 55 DTS 55 DVD player connecting 20 playback 28 DVD recorder connecting 22 E Error messages 60 H HDMI connecting 18 I Initial setup 23 INPUT MODE 49 M Menu AUDIO 34 LEVEL 32 SUR 33 SYSTEM 36 TONE 33 TUNER 34 VIDEO 35 Muting 26...
... connecting 50 input 25 video assign 51 Dolby Digital 55 DTS 55 DVD player connecting 20 playback 28 DVD recorder connecting 22 E Error messages 60 H HDMI connecting 18 I Initial setup 23 INPUT MODE 49 M Menu AUDIO 34 LEVEL 32 SUR 33 SYSTEM 36 TONE 33 TUNER 34 VIDEO 35 Muting 26...


