
Operating Instructions
Page 1
4-129-741-13(1) FM Stereo FM/AM Receiver Operating Instructions STR-DH100 ©2009 Sony Corporation
4-129-741-13(1) FM Stereo FM/AM Receiver Operating Instructions STR-DH100 ©2009 Sony Corporation

Operating Instructions
Page 3
... if not installed and used , use caution when moving the cart/apparatus combination to qualified service personnel. Reorient or relocate the receiving antenna. - Also disconnect the AC power cord from the MAINS before disconnecting the speaker cord from tip-over to provide reasonable protection... can be handed over . 13)Unplug this model manufactured for long periods of this equipment. Increase the separation between the equipment and receiver. - When a cart is encouraged to try to touch the core of electrical and electronic equipment. NOTE: This equipment has been ...
... if not installed and used , use caution when moving the cart/apparatus combination to qualified service personnel. Reorient or relocate the receiving antenna. - Also disconnect the AC power cord from the MAINS before disconnecting the speaker cord from tip-over to provide reasonable protection... can be handed over . 13)Unplug this model manufactured for long periods of this equipment. Increase the separation between the equipment and receiver. - When a cart is encouraged to try to touch the core of electrical and electronic equipment. NOTE: This equipment has been ...

Operating Instructions
Page 4
...help to the addresses given in combination with a chemical symbol. The recycling of the front panel. Any difference in operation is Sony Deutschland GmbH, Hedelfinger Strasse 61, 70327 Stuttgart, Germany. The chemical symbols for the environment and human health which could otherwise be...on the lower right portion of the receiver you purchased the product. Notice for customers: The following information is used in separate service or guarantee documents. Disposal of waste batteries (applicable in this manual are for model STR-DH100. In this manual, models of area...
...help to the addresses given in combination with a chemical symbol. The recycling of the front panel. Any difference in operation is Sony Deutschland GmbH, Hedelfinger Strasse 61, 70327 Stuttgart, Germany. The chemical symbols for the environment and human health which could otherwise be...on the lower right portion of the receiver you purchased the product. Notice for customers: The following information is used in separate service or guarantee documents. Disposal of waste batteries (applicable in this manual are for model STR-DH100. In this manual, models of area...

Operating Instructions
Page 5
...speakers 12 2: Connecting speakers 12 3: Connecting the audio/video components 13 4: Connecting the antennas (aerials 15 5: Preparing the receiver and the remote..... 16 6: Selecting the speaker system 17 Additional Information Precautions 29 Troubleshooting 30 Specifications 33 Index 35 Playback ...Enjoying sound from the component connected to the receiver 18 Enjoying sound from the components connected to the DIGITAL MEDIA PORT 19 Amplifier Operations Navigating through menus 20...
...speakers 12 2: Connecting speakers 12 3: Connecting the audio/video components 13 4: Connecting the antennas (aerials 15 5: Preparing the receiver and the remote..... 16 6: Selecting the speaker system 17 Additional Information Precautions 29 Troubleshooting 30 Specifications 33 Index 35 Playback ...Enjoying sound from the component connected to the receiver 18 Enjoying sound from the components connected to the DIGITAL MEDIA PORT 19 Amplifier Operations Navigating through menus 20...

Operating Instructions
Page 7
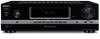
D Display The current status of the selected component or a list of the display. E Remote sensor Receives signals from remote commander. H DIMMER Press repeatedly to adjust the brightness of selectable items appears here (page 6). N FM MODE Press to restore the sound (page ... 23. 7GB G MUTING Press to tune in . Name P SP A/SP B Q SLEEP R Tuning indicators MEMORY RDS MONO ST Function Lights up when using the receiver to turn the receiver on (on the display (page 26, 27). A memory function, such as Preset Memory (page 23), etc., is tuned in radio stations (page 21), etc...
D Display The current status of the selected component or a list of the display. E Remote sensor Receives signals from remote commander. H DIMMER Press repeatedly to adjust the brightness of selectable items appears here (page 6). N FM MODE Press to restore the sound (page ... 23. 7GB G MUTING Press to tune in . Name P SP A/SP B Q SLEEP R Tuning indicators MEMORY RDS MONO ST Function Lights up when using the receiver to turn the receiver on (on the display (page 26, 27). A memory function, such as Preset Memory (page 23), etc., is tuned in radio stations (page 21), etc...

Operating Instructions
Page 8
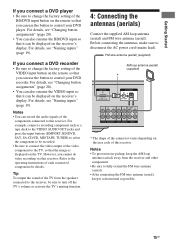
B ANTENNA section FM ANTENNA jack AM ANTENNA terminals Connects to the FM wire antenna (aerial) supplied with this receiver (page 15). Connects to speakers (page 12). D AUDIO INPUT/OUTPUT section AUDIO IN/ White (L) OUT jacks Red (R) Connects to a DIGITAL MEDIA PORT adapter (page 13). ... jack Connects to a Super Audio CD player, CD player, etc. (page 13). 8GB C SPEAKERS section Connects to the AM loop antenna (aerial) supplied with this receiver (page 15).
B ANTENNA section FM ANTENNA jack AM ANTENNA terminals Connects to the FM wire antenna (aerial) supplied with this receiver (page 15). Connects to speakers (page 12). D AUDIO INPUT/OUTPUT section AUDIO IN/ White (L) OUT jacks Red (R) Connects to a DIGITAL MEDIA PORT adapter (page 13). ... jack Connects to a Super Audio CD player, CD player, etc. (page 13). 8GB C SPEAKERS section Connects to the AM loop antenna (aerial) supplied with this receiver (page 15).

Operating Instructions
Page 9
... ?/1 switch changes automatically each time you press ?/1 (B) at the same time, it will turn off the receiver and other components (SYSTEM STANDBY). You can use the supplied remote to operate the receiver and to control the Sony audio/video components that the remote is assigned to display the menu of the speakers. Then...
... ?/1 switch changes automatically each time you press ?/1 (B) at the same time, it will turn off the receiver and other components (SYSTEM STANDBY). You can use the supplied remote to operate the receiver and to control the Sony audio/video components that the remote is assigned to display the menu of the speakers. Then...

Operating Instructions
Page 10
... or satellite tuner. Press MENU/HOME and TV (O) at the same time to select - Press to display the TV's menu. Press to the Sony TV. Press TOOLS/OPTIONS and TV (O) at the same time to operate audio/video components. Press MUTING and TV (O) at the same time to... display options applicable to enter the value after selecting a channel, disc or track using the numeric buttons of the receiver. M MENU/HOME Press to display the menu used to activate the TV's muting function. REPLAY < / ADVANCE < Press to enable TV operation. 10GB PRESET +/-...
... or satellite tuner. Press MENU/HOME and TV (O) at the same time to select - Press to display the TV's menu. Press to the Sony TV. Press TOOLS/OPTIONS and TV (O) at the same time to operate audio/video components. Press MUTING and TV (O) at the same time to... display options applicable to enter the value after selecting a channel, disc or track using the numeric buttons of the receiver. M MENU/HOME Press to display the menu used to activate the TV's muting function. REPLAY < / ADVANCE < Press to enable TV operation. 10GB PRESET +/-...

Operating Instructions
Page 11
... and TV (O) at the same time to serve as references when operating the receiver. Then, press to select the input signal (TV input or video input). Press to adjust the bass level of... the receiver, VCR, satellite tuner, CD player, DVD player, DVD recorder or Blu-ray disc player. ... only. return to preset stations. - Press also to activate the Sleep Timer function and the duration which the receiver turns off automatically. channel numbers of the CD player, DVD player, DVD recorder, MD deck or Blu-ray...
... and TV (O) at the same time to serve as references when operating the receiver. Then, press to select the input signal (TV input or video input). Press to adjust the bass level of... the receiver, VCR, satellite tuner, CD player, DVD player, DVD recorder or Blu-ray disc player. ... only. return to preset stations. - Press also to activate the Sleep Timer function and the duration which the receiver turns off automatically. channel numbers of the CD player, DVD player, DVD recorder, MD deck or Blu-ray...

Operating Instructions
Page 12
... in.) Right speaker A Speaker cords (not supplied) * If you want to use a 2.0 channel system. Getting Started 1: Installing speakers This receiver allows you to use with the SPEAKERS (OFF/A/B/A+B) button on the receiver (page 17). 12GB You can select the speakers you have an additional speaker system, connect them to disconnect the AC...
... in.) Right speaker A Speaker cords (not supplied) * If you want to use a 2.0 channel system. Getting Started 1: Installing speakers This receiver allows you to use with the SPEAKERS (OFF/A/B/A+B) button on the receiver (page 17). 12GB You can select the speakers you have an additional speaker system, connect them to disconnect the AC...

Operating Instructions
Page 13
... of connector varies depending on the DIGITAL MEDIA PORT adapter, video output may not be connected" below for the pages which describe how to this receiver. 3: Connecting the audio/ video components INPUT MD deck, Tape deck Getting Started How to connect your components This section describes how to connect your components...
... of connector varies depending on the DIGITAL MEDIA PORT adapter, video output may not be connected" below for the pages which describe how to this receiver. 3: Connecting the audio/ video components INPUT MD deck, Tape deck Getting Started How to connect your components This section describes how to connect your components...

Operating Instructions
Page 14
... connector, since the connector is locked in place. Connecting video components The following illustration shows how to handle with care when placing or moving the receiver. • To disconnect the DIGITAL MEDIA PORT adapter, squeeze the sides of the DIGITAL MEDIA PORT adapter is fragile, be sure to disconnect the AC...
... connector, since the connector is locked in place. Connecting video components The following illustration shows how to handle with care when placing or moving the receiver. • To disconnect the DIGITAL MEDIA PORT adapter, squeeze the sides of the DIGITAL MEDIA PORT adapter is fragile, be sure to disconnect the AC...
Operating Instructions
Page 15
... setting of the VIDEO input button on the remote so that you can be displayed on the area code of the components connected to this receiver. For details, see "Naming inputs" (page 19). For example, connect a recording component such as possible. 15GB Refer to the operating ...instructions of the TV from the receiver and other components. • Be sure to fully extend the FM wire antenna (aerial). • After connecting the FM wire antenna (aerial), keep...
... setting of the VIDEO input button on the remote so that you can be displayed on the area code of the components connected to this receiver. For details, see "Naming inputs" (page 19). For example, connect a recording component such as possible. 15GB Refer to the operating ...instructions of the TV from the receiver and other components. • Be sure to fully extend the FM wire antenna (aerial). • After connecting the FM wire antenna (aerial), keep...

Operating Instructions
Page 16
... on the display for a while, "CLEARED" appears. AC power cord (mains lead) Performing initial setup operations Before using the receiver for the first time, initialize the receiver by performing the following procedure. All the settings you have changed or adjusted are not touching each other between the SPEAKERS terminals.... • Connect the AC power cord (mains lead) firmly. 5: Preparing the receiver and the remote Connecting the AC power cord (mains lead) Connect the AC power cord (mains lead) to turn off the...
... on the display for a while, "CLEARED" appears. AC power cord (mains lead) Performing initial setup operations Before using the receiver for the first time, initialize the receiver by performing the following procedure. All the settings you have changed or adjusted are not touching each other between the SPEAKERS terminals.... • Connect the AC power cord (mains lead) firmly. 5: Preparing the receiver and the remote Connecting the AC power cord (mains lead) Connect the AC power cord (mains lead) to turn off the...

Operating Instructions
Page 17
...) Light up SP A SP B SP A SP B To turn off the speaker output Press SPEAKERS (OFF/A/B/A+B) repeatedly until the "SP A" and "SP B" indicators on the receiver for an extended period of batteries. • Do not expose the remote sensor to drive. Be sure to use the buttons on the display do...so may be reset to use the remote for this happens, reassign the buttons again (page 28). • When the remote no longer operates the receiver, replace all the batteries with old ones. • Do not mix manganese batteries and other kinds of time, remove the batteries to avoid possible ...
...) Light up SP A SP B SP A SP B To turn off the speaker output Press SPEAKERS (OFF/A/B/A+B) repeatedly until the "SP A" and "SP B" indicators on the receiver for an extended period of batteries. • Do not expose the remote sensor to drive. Be sure to use the buttons on the display do...so may be reset to use the remote for this happens, reassign the buttons again (page 28). • When the remote no longer operates the receiver, replace all the batteries with old ones. • Do not mix manganese batteries and other kinds of time, remove the batteries to avoid possible ...

Operating Instructions
Page 18
...level. 18GB Selected input Components that can [Display] be sure to DMPORT jack 2 Turn on the display. To turn the MASTER VOLUME on the receiver. The selected input appears on the component and start playback. 3 Press MASTER VOL +/- You can adjust the volume differently depending on the length ...use MASTER VOLUME on the remote. to select a component. You can adjust the volume differently depending on the speed with which you turn off the receiver, be played back VIDEO [VIDEO] VCR, etc., connected to the VIDEO jack BD/DVD [BD/DVD] Blu-ray disc player, etc., connected ...
...level. 18GB Selected input Components that can [Display] be sure to DMPORT jack 2 Turn on the display. To turn the MASTER VOLUME on the receiver. The selected input appears on the component and start playback. 3 Press MASTER VOL +/- You can adjust the volume differently depending on the length ...use MASTER VOLUME on the remote. to select a component. You can adjust the volume differently depending on the speed with which you turn off the receiver, be played back VIDEO [VIDEO] VCR, etc., connected to the VIDEO jack BD/DVD [BD/DVD] Blu-ray disc player, etc., connected ...

Operating Instructions
Page 19
...Press DMPORT. The name you do the following. • Press MUTING again. • Increase the volume. • Turn off the receiver. For details on the receiver's display. Notes • Do not connect an adapter other than the DIGITAL MEDIA PORT adapter. • Before connecting cords, make ... Press V/v to select a character, then press B/b to move the cursor to select "NAME IN", then press or b. "BALANCE" appears on the receiver to select "DMPORT". 2 Start playback of DIGITAL MEDIA PORT adapter, you to enjoy sound from the components connected to the DIGITAL MEDIA PORT The DIGITAL...
...Press DMPORT. The name you do the following. • Press MUTING again. • Increase the volume. • Turn off the receiver. For details on the receiver's display. Notes • Do not connect an adapter other than the DIGITAL MEDIA PORT adapter. • Before connecting cords, make ... Press V/v to select a character, then press B/b to move the cursor to select "NAME IN", then press or b. "BALANCE" appears on the receiver to select "DMPORT". 2 Start playback of DIGITAL MEDIA PORT adapter, you to enjoy sound from the components connected to the DIGITAL MEDIA PORT The DIGITAL...

Operating Instructions
Page 20
... exit the menu Press AMP MENU. This means that they are either unavailable or fixed and unchangeable. You can also press DIMMER repeatedly on the receiver to adjust the brightness of the display. 20GB R+10 in 3 steps: 0% dim, 40% dim, 70% dim The initial setting is 0% dim. x...BAL. Note Some parameters and settings may appear dimmed on the display. 2 Press or b to enter the parameter. 3 Press V/v repeatedly to customize the receiver. , V/v/B/b D.TUNING 789 >10/ MEMORY AMP MENU - 0/10 ENTER CLEAR DISPLAY TOOLS/ OPTIONS MUTING TV VOL MASTER VOL AMP MENU RETURN/EXIT MENU/...
... exit the menu Press AMP MENU. This means that they are either unavailable or fixed and unchangeable. You can also press DIMMER repeatedly on the receiver to adjust the brightness of the display. 20GB R+10 in 3 steps: 0% dim, 40% dim, 70% dim The initial setting is 0% dim. x...BAL. Note Some parameters and settings may appear dimmed on the display. 2 Press or b to enter the parameter. 3 Press V/v repeatedly to customize the receiver. , V/v/B/b D.TUNING 789 >10/ MEMORY AMP MENU - 0/10 ENTER CLEAR DISPLAY TOOLS/ OPTIONS MUTING TV VOL MASTER VOL AMP MENU RETURN/EXIT MENU/...

Operating Instructions
Page 21
... + or TREBLE - FM MODE 21GB BASS +/- REPLAY ADVANCE PRESET + .< > < TUNING - Amplifier Operations/Tuner Operations Adjusting the tone You can adjust from -10 dB to the receiver (page 15).
... + or TREBLE - FM MODE 21GB BASS +/- REPLAY ADVANCE PRESET + .< > < TUNING - Amplifier Operations/Tuner Operations Adjusting the tone You can adjust from -10 dB to the receiver (page 15).

Operating Instructions
Page 22
...MODE repeatedly until the "MONO" indicator lights up . To return to select the FM or AM band. 2 Press TUNING + or TUNING -. The receiver stops scanning whenever a station is not used in an AM station, adjust the direction of the AM loop antenna (aerial) for optimum reception. press ...TUNING - If you cannot tune in a station, the frequency is received. If you still cannot tune in a station Make sure you have entered the right frequency. In case of a station directly by using the numeric...
...MODE repeatedly until the "MONO" indicator lights up . To return to select the FM or AM band. 2 Press TUNING + or TUNING -. The receiver stops scanning whenever a station is not used in an AM station, adjust the direction of the AM loop antenna (aerial) for optimum reception. press ...TUNING - If you cannot tune in a station, the frequency is received. If you still cannot tune in a station Make sure you have entered the right frequency. In case of a station directly by using the numeric...


