
Operating Instructions
Page 3
...the speakers carefully so as power-supply cord or plug is connected. - This equipment generates, uses and can be determined by turning the equipment off and on its packaging indicates that interference will help . By ensuring this equipment does cause harmful interference to ... recycling of speaker cord by one or more of Old Electrical & Electronic Equipment (Applicable in a residential installation. Reorient or relocate the receiving antenna. - Servicing is no guarantee that this product shall not be handed over . 13)Unplug this apparatus during lightning storms or when...
...the speakers carefully so as power-supply cord or plug is connected. - This equipment generates, uses and can be determined by turning the equipment off and on its packaging indicates that interference will help . By ensuring this equipment does cause harmful interference to ... recycling of speaker cord by one or more of Old Electrical & Electronic Equipment (Applicable in a residential installation. Reorient or relocate the receiving antenna. - Servicing is no guarantee that this product shall not be handed over . 13)Unplug this apparatus during lightning storms or when...

Operating Instructions
Page 7
... (page 16). Monaural broadcast Stereo broadcast A preset station number appears when the preset radio station is activated. Press repeatedly to turn the receiver on (on/standby) or off or if headphones are connected. K BASS +/- Press repeatedly to tune in . O PHONES jack ...Connects to restore the sound (page 19). Lights up when using the receiver to adjust the bass level of the speakers (page 21). I DISPLAY Press repeatedly to OFF, A, B, A+B of the display. TUNING +/- Name P SP ...
... (page 16). Monaural broadcast Stereo broadcast A preset station number appears when the preset radio station is activated. Press repeatedly to turn the receiver on (on/standby) or off or if headphones are connected. K BASS +/- Press repeatedly to tune in . O PHONES jack ...Connects to restore the sound (page 19). Lights up when using the receiver to adjust the bass level of the speakers (page 21). I DISPLAY Press repeatedly to OFF, A, B, A+B of the display. TUNING +/- Name P SP ...

Operating Instructions
Page 9
... receiver turns on. When you want to use V, v, B, b and (Q) to turn the receiver on or off all components, press ?/1 and AV ?/1 (A) at the same time, it will turn the TV on or off the receiver and other components (SYSTEM STANDBY). continued 9GB ql qk qj BASS TREBLE 1 4 7 >10/ - TV CH + PRESET - To turn on or off the Sony...
... receiver turns on. When you want to use V, v, B, b and (Q) to turn the receiver on or off all components, press ?/1 and AV ?/1 (A) at the same time, it will turn the TV on or off the receiver and other components (SYSTEM STANDBY). continued 9GB ql qk qj BASS TREBLE 1 4 7 >10/ - TV CH + PRESET - To turn on or off the Sony...

Operating Instructions
Page 10
Press to display and select items from option menus of the receiver. Press to display the menu of the DVD player or ... level. and TV (O) at the same time to perform menu operations. MASTER VOL +a)/- REPLAY < / ADVANCE < Press to the Sony TV. ENTER I AMP MENU J TOOLS/ OPTIONS K MUTING L TV VOL +a)/- Press TOOLS/OPTIONS and TV (O) at the same time... to select preset TV channels. Press TV VOL +/- search tracks in recording standby.) Press to turn off the sound temporarily. Press MUTING and TV (O) at the same time to display options applicable to replay the...
Press to display and select items from option menus of the receiver. Press to display the menu of the DVD player or ... level. and TV (O) at the same time to perform menu operations. MASTER VOL +a)/- REPLAY < / ADVANCE < Press to the Sony TV. ENTER I AMP MENU J TOOLS/ OPTIONS K MUTING L TV VOL +a)/- Press TOOLS/OPTIONS and TV (O) at the same time... to select preset TV channels. Press TV VOL +/- search tracks in recording standby.) Press to turn off the sound temporarily. Press MUTING and TV (O) at the same time to display options applicable to replay the...

Operating Instructions
Page 11
...on the model. • The above operation may not be possible or may not work depending on the TV screen. select track numbers of the receiver, VCR, satellite tuner, CD player, DVD player, DVD recorder or Blu-ray disc player. Name T Numeric buttons (number 5a)) U BASS .../HOME previously. return to activate the Sleep Timer function and the duration which the receiver turns off automatically. track numbers over 10 of the TV. Press -/-- Press to serve as references when operating the receiver. Press to the previous menu. - Notes • Some functions explained in this...
...on the model. • The above operation may not be possible or may not work depending on the TV screen. select track numbers of the receiver, VCR, satellite tuner, CD player, DVD player, DVD recorder or Blu-ray disc player. Name T Numeric buttons (number 5a)) U BASS .../HOME previously. return to activate the Sleep Timer function and the duration which the receiver turns off automatically. track numbers over 10 of the TV. Press -/-- Press to serve as references when operating the receiver. Press to the previous menu. - Notes • Some functions explained in this...
Operating Instructions
Page 15
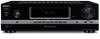
...recorded. • Be sure to connect the video output of the video component to the TV, so that it can be displayed on the receiver's display. Before connecting the antennas, make sure to the operating instructions of each connected component for details. For details, see "Naming inputs" ...(page 19). Notes • To prevent noise pickup, keep the AM loop antenna (aerial) away from the speakers connected to the receiver, be sure to turn off the TV's volume or activate the TV's muting function. 4: Connecting the antennas (aerials) Connect the supplied AM loop antenna (aerial) ...
...recorded. • Be sure to connect the video output of the video component to the TV, so that it can be displayed on the receiver's display. Before connecting the antennas, make sure to the operating instructions of each connected component for details. For details, see "Naming inputs" ...(page 19). Notes • To prevent noise pickup, keep the AM loop antenna (aerial) away from the speakers connected to the receiver, be sure to turn off the TV's volume or activate the TV's muting function. 4: Connecting the antennas (aerials) Connect the supplied AM loop antenna (aerial) ...

Operating Instructions
Page 16
...power cord (mains lead) Connect the AC power cord (mains lead) to their factory defaults. "PUSH" and "ENTER" appears on the receiver for this operation. ?/1 SPEAKERS (OFF/A/B/A+B) INPUT SELECTOR FM MODE PHONES MASTER VOLUME TUNING MODE TUNING MEMORY/ ENTER BASS TREBLE DISPLAY DIMMER MUTING MEMORY...Notes • Before connecting the AC power cord (mains lead), make sure that the metallic wires of the speaker cords are reset to turn off the receiver. 2 Hold down ?/1 for a while, "CLEARED" appears. Be sure to use the buttons on the display alternately. 3 Press MEMORY/...
...power cord (mains lead) Connect the AC power cord (mains lead) to their factory defaults. "PUSH" and "ENTER" appears on the receiver for this operation. ?/1 SPEAKERS (OFF/A/B/A+B) INPUT SELECTOR FM MODE PHONES MASTER VOLUME TUNING MODE TUNING MEMORY/ ENTER BASS TREBLE DISPLAY DIMMER MUTING MEMORY...Notes • Before connecting the AC power cord (mains lead), make sure that the metallic wires of the speaker cords are reset to turn off the receiver. 2 Hold down ?/1 for a while, "CLEARED" appears. Be sure to use the buttons on the display alternately. 3 Press MEMORY/...

Operating Instructions
Page 17
...system You can select the speakers you do not light up SP A SP B SP A SP B To turn off the speaker output Press SPEAKERS (OFF/A/B/A+B) repeatedly until the "SP A" and "SP B" indicators on the receiver for an extended period of batteries. • Do not expose the remote sensor to direct sunlight or... do not intend to use the remote for this happens, reassign the buttons again (page 28). • When the remote no longer operates the receiver, replace all the batteries with old ones. • Do not mix manganese batteries and other kinds of time, remove the batteries to avoid possible...
...system You can select the speakers you do not light up SP A SP B SP A SP B To turn off the speaker output Press SPEAKERS (OFF/A/B/A+B) repeatedly until the "SP A" and "SP B" indicators on the receiver for an extended period of batteries. • Do not expose the remote sensor to direct sunlight or... do not intend to use the remote for this happens, reassign the buttons again (page 28). • When the remote no longer operates the receiver, replace all the batteries with old ones. • Do not mix manganese batteries and other kinds of time, remove the batteries to avoid possible...

Operating Instructions
Page 18
... make a fine adjustment: press the button and release it immediately. To make fine adjustment: turn down the volume level. 18GB To turn the knob quickly. Playback Enjoying sound from the component connected to the receiver TV ?/1 SLEEP TV INPUT AV ?/1 ?/1 SYSTEM STANDBY VIDEO BD/DVD SAT MD/TAPE SA-... avoid damaging your speakers Before you press and hold the button. You can adjust the volume differently depending on the speed with which you turn off the receiver, be played back VIDEO [VIDEO] VCR, etc., connected to the VIDEO jack BD/DVD [BD/DVD] Blu-ray disc player, etc...
... make a fine adjustment: press the button and release it immediately. To make fine adjustment: turn down the volume level. 18GB To turn the knob quickly. Playback Enjoying sound from the component connected to the receiver TV ?/1 SLEEP TV INPUT AV ?/1 ?/1 SYSTEM STANDBY VIDEO BD/DVD SAT MD/TAPE SA-... avoid damaging your speakers Before you press and hold the button. You can adjust the volume differently depending on the speed with which you turn off the receiver, be played back VIDEO [VIDEO] VCR, etc., connected to the VIDEO jack BD/DVD [BD/DVD] Blu-ray disc player, etc...

Operating Instructions
Page 19
...DIGITAL MEDIA PORT The DIGITAL MEDIA PORT (DMPORT) allows you do the following. • Press MUTING again. • Increase the volume. • Turn off the receiver. If you made the video connection from the components connected to the TV (page 13). 1 Press DMPORT. Notes • Do not connect an adapter... the cursor to disconnect the AC power cord (mains lead). • Do not connect or disconnect the DIGITAL MEDIA PORT adapter while the receiver is convenient for . This is turned on. • Depending on the receiver's display. To activate the muting function Press MUTING.
...DIGITAL MEDIA PORT The DIGITAL MEDIA PORT (DMPORT) allows you do the following. • Press MUTING again. • Increase the volume. • Turn off the receiver. If you made the video connection from the components connected to the TV (page 13). 1 Press DMPORT. Notes • Do not connect an adapter... the cursor to disconnect the AC power cord (mains lead). • Do not connect or disconnect the DIGITAL MEDIA PORT adapter while the receiver is convenient for . This is turned on. • Depending on the receiver's display. To activate the muting function Press MUTING.

Operating Instructions
Page 22
... to scan from high to 4. Using the controls on the receiver 1 Turn INPUT SELECTOR to select the FM or AM band. 2 Press ...optimum reception. Press FM MODE repeatedly until the "MONO" indicator on the display does not light up on the receiver. Tuning into a station automatically (Auto Tuning) 1 Press TUNER repeatedly to select the FM or AM band. ... -. If you have tuned in a station Make sure you still cannot tune in a station, the frequency is received. The receiver stops scanning whenever a station is not used in your area. 22GB Tuning into a station directly (Direct tuning) ...
... to scan from high to 4. Using the controls on the receiver 1 Turn INPUT SELECTOR to select the FM or AM band. 2 Press ...optimum reception. Press FM MODE repeatedly until the "MONO" indicator on the display does not light up on the receiver. Tuning into a station automatically (Auto Tuning) 1 Press TUNER repeatedly to select the FM or AM band. ... -. If you have tuned in a station Make sure you still cannot tune in a station, the frequency is received. The receiver stops scanning whenever a station is not used in your area. 22GB Tuning into a station directly (Direct tuning) ...

Operating Instructions
Page 23
...To reset the scale to select the FM or AM band. TV CH + PRESET - You can also use MEMORY/ENTER on the receiver. ?/1 SPEAKERS (OFF/A/B/A+B) INPUT SELECTOR FM MODE PHONES MASTER VOLUME TUNING MODE TUNING MEMORY/ ENTER BASS TREBLE DISPLAY DIMMER MUTING TUNING MODE 1 Press... ?/1 to turn off the receiver. 2 While holding down TUNING MODE, press ?/1. 3 Change the current AM tuning scale to 9 kHz (or 10 kHz). continued 23GB ...
...To reset the scale to select the FM or AM band. TV CH + PRESET - You can also use MEMORY/ENTER on the receiver. ?/1 SPEAKERS (OFF/A/B/A+B) INPUT SELECTOR FM MODE PHONES MASTER VOLUME TUNING MODE TUNING MEMORY/ ENTER BASS TREBLE DISPLAY DIMMER MUTING TUNING MODE 1 Press... ?/1 to turn off the receiver. 2 While holding down TUNING MODE, press ?/1. 3 Change the current AM tuning scale to 9 kHz (or 10 kHz). continued 23GB ...

Operating Instructions
Page 24
...use INPUT SELECTOR on the display. 4 Press V/v repeatedly to the next position. Tips • You can also use MEMORY/ENTER on the receiver 1 Turn INPUT SELECTOR to select the FM or AM band. 2 Press TUNING MODE repeatedly to create an index name for (page 24). 3 Press AMP...also press the numeric buttons to select the preset station you want to select "PRESET T.". 3 Press TUNING + or TUNING - "BALANCE" appears on the receiver. 2 Tune in the preset station you want . If you made a mistake Press B/b until the character you select the preset number, start again from ...
...use INPUT SELECTOR on the display. 4 Press V/v repeatedly to the next position. Tips • You can also use MEMORY/ENTER on the receiver 1 Turn INPUT SELECTOR to select the FM or AM band. 2 Press TUNING MODE repeatedly to create an index name for (page 24). 3 Press AMP...also press the numeric buttons to select the preset station you want to select "PRESET T.". 3 Press TUNING + or TUNING - "BALANCE" appears on the receiver. 2 Tune in the preset station you want . If you made a mistake Press B/b until the character you select the preset number, start again from ...

Operating Instructions
Page 27
... AM band Index name of area code CEL, CEK only) (page 25). Tip To check the remaining time before the receiver turns off automatically at a specified time. The remaining time appears on the receiver for some languages. Each time you have been entered, or it is the same as follows: 2-00-00 t 1-30... 19, 24). Be sure to use the buttons on the display. Press DISPLAY repeatedly. Other Operations Other Operations Changing the display You can set the receiver to turn off , press SLEEP.
... AM band Index name of area code CEL, CEK only) (page 25). Tip To check the remaining time before the receiver turns off automatically at a specified time. The remaining time appears on the receiver for some languages. Each time you have been entered, or it is the same as follows: 2-00-00 t 1-30... 19, 24). Be sure to use the buttons on the display. Press DISPLAY repeatedly. Other Operations Other Operations Changing the display You can set the receiver to turn off , press SLEEP.

Operating Instructions
Page 29
... the AC power cord (mains lead), grasp the plug itself has been turned off. • If you continuously use the receiver for the purpose of safety and will fit into the cabinet, unplug the receiver and have it checked by qualified personnel before operating it is wider than ...BD3)b) MD deck 0/10 Tape deck -/-- To avoid burning yourself, do not touch the cabinet. a)Sony DVD recorders are unable to its factory settings. On power sources • Before operating the receiver, check that the operating voltage is identical with the DVD recorders. To clear all remote button assignments...
... the AC power cord (mains lead), grasp the plug itself has been turned off. • If you continuously use the receiver for the purpose of safety and will fit into the cabinet, unplug the receiver and have it checked by qualified personnel before operating it is wider than ...BD3)b) MD deck 0/10 Tape deck -/-- To avoid burning yourself, do not touch the cabinet. a)Sony DVD recorders are unable to its factory settings. On power sources • Before operating the receiver, check that the operating voltage is identical with the DVD recorders. To clear all remote button assignments...
Operating Instructions
Page 30
.... Do not use any type of the following difficulties while using an indoor antenna (aerial). Turn off the receiver, eliminate the short-circuit problem, and turn off and unplug the receiver. Audio There is no sound, no sound from a specific component. • Check that ... on both the receiver and the component. 30GB If the receiver is being used for the connection is especially likely when using the receiver, use this troubleshooting guide to help you experience any questions or problems concerning your receiver, please consult your nearest Sony dealer. This is...
.... Do not use any type of the following difficulties while using an indoor antenna (aerial). Turn off the receiver, eliminate the short-circuit problem, and turn off and unplug the receiver. Audio There is no sound, no sound from a specific component. • Check that ... on both the receiver and the component. 30GB If the receiver is being used for the connection is especially likely when using the receiver, use this troubleshooting guide to help you experience any questions or problems concerning your receiver, please consult your nearest Sony dealer. This is...

Operating Instructions
Page 31
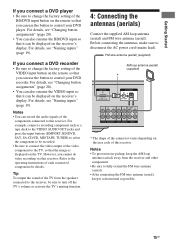
...; Depending on both channels are connected correctly and securely. • Adjust the speaker balance (page 20). Outdoor FM antenna (aerial) Receiver ANTENNA AM Ground wire (not supplied) Additional Information To ground continued 31GB The left and right sounds are unbalanced or reversed. •... • The plugs and jacks are connected correctly. • Select the source component using the input buttons (page 18). Turn off the receiver, then reconnect the DIGITAL MEDIA PORT adapter and/or component. • Check the DIGITAL MEDIA PORT adapter and/or component device...
...; Depending on both channels are connected correctly and securely. • Adjust the speaker balance (page 20). Outdoor FM antenna (aerial) Receiver ANTENNA AM Ground wire (not supplied) Additional Information To ground continued 31GB The left and right sounds are unbalanced or reversed. •... • The plugs and jacks are connected correctly. • Select the source component using the input buttons (page 18). Turn off the receiver, then reconnect the DIGITAL MEDIA PORT adapter and/or component. • Check the DIGITAL MEDIA PORT adapter and/or component device...

Operating Instructions
Page 32
...All memorized settings See page 16 * Models of order. You can check the condition of the stations is output to the speakers. The receiver will automatically turn on the remote. 32GB Radio stations cannot be retained. Adjust the antennas (aerials) and connect an external antenna (aerial), if necessary. ... Refer to the following table to an FM RDS station. • Select a stronger FM station. If the problem persist Consult your nearest Sony dealer. Note that if service personnel changes some parts during repair, these parts may be temporarily out of area code CEL, CEK only. ...
...All memorized settings See page 16 * Models of order. You can check the condition of the stations is output to the speakers. The receiver will automatically turn on the remote. 32GB Radio stations cannot be retained. Adjust the antennas (aerials) and connect an external antenna (aerial), if necessary. ... Refer to the following table to an FM RDS station. • Select a stronger FM station. If the problem persist Consult your nearest Sony dealer. Note that if service personnel changes some parts during repair, these parts may be temporarily out of area code CEL, CEK only. ...


