Easy Setup Guide
Page 1
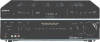
...Cordon audio monophonique Cable de audio monoaural AC OUTLET Speaker cord Cordon d'enceinte Cables de altavoces AUDIO INPUT Sony Corporation © 2005 Printed in Malaysia 4, 5 4, 6 D Sub woofer Caisson de grave Altavoz...(izquierdo) Surround speaker (left ) Enceinte avant (gauche) Altavoz delantero (izquierdo) A STR-DE898 Easy Setup Guide Guide de réglage rapide Guía de configuración f&#...étrico multicanal del reproductor de discos DVD. 2-580-792-01(1) FM Stereo FM-AM Receiver DVD player Lecteur DVD Reproductor de discos DVD COAXIAL DIGITAL OUT VIDEO OUTPUT...
...Cordon audio monophonique Cable de audio monoaural AC OUTLET Speaker cord Cordon d'enceinte Cables de altavoces AUDIO INPUT Sony Corporation © 2005 Printed in Malaysia 4, 5 4, 6 D Sub woofer Caisson de grave Altavoz...(izquierdo) Surround speaker (left ) Enceinte avant (gauche) Altavoz delantero (izquierdo) A STR-DE898 Easy Setup Guide Guide de réglage rapide Guía de configuración f&#...étrico multicanal del reproductor de discos DVD. 2-580-792-01(1) FM Stereo FM-AM Receiver DVD player Lecteur DVD Reproductor de discos DVD COAXIAL DIGITAL OUT VIDEO OUTPUT...
Operating Instructions
Page 1
2-580-791-11(3) FM Stereo FM/AM Receiver Operating Instructions Owner's Record The model and serial numbers are located on the rear of the unit. Serial No. Refer to them whenever you call upon your Sony dealer regarding this product. Model No. STR-DE898 ©2005 Sony Corporation Record the serial number in the space provided below.
2-580-791-11(3) FM Stereo FM/AM Receiver Operating Instructions Owner's Record The model and serial numbers are located on the rear of the unit. Serial No. Refer to them whenever you call upon your Sony dealer regarding this product. Model No. STR-DE898 ©2005 Sony Corporation Record the serial number in the space provided below.
Operating Instructions
Page 2
... that provides guidelines for energy efficiency. 2GB To prevent fire, do not expose the unit to rain or moisture. Reorient or relocate the receiving antenna. - CAUTION You are designed to provide reasonable protection against harmful interference in a particular installation. registered mark. However, there is no... to try to correct the interference by turning the equipment off and on the apparatus. As an ENERGY STAR® partner, Sony Corporation has determined that to which can radiate radio frequency energy and, if not installed and used in this manual could void your...
... that provides guidelines for energy efficiency. 2GB To prevent fire, do not expose the unit to rain or moisture. Reorient or relocate the receiving antenna. - CAUTION You are designed to provide reasonable protection against harmful interference in a particular installation. registered mark. However, there is no... to try to correct the interference by turning the equipment off and on the apparatus. As an ENERGY STAR® partner, Sony Corporation has determined that to which can radiate radio frequency energy and, if not installed and used in this manual could void your...

Operating Instructions
Page 3
... use the controls on the supplied remote if they have the same or similar names as those on the receiver. This receiver incorporates Dolby* Digital and Pro Logic Surround and the DTS** Digital Surround System. * Manufactured under license from... Dolby Laboratories. About area codes The area code of the receiver you purchased is for example, "Models of your model number by looking at the lower right corner of Digital Theater ...trademarks of the front panel. • The instructions in the text, for model STR-DE898.
... use the controls on the supplied remote if they have the same or similar names as those on the receiver. This receiver incorporates Dolby* Digital and Pro Logic Surround and the DTS** Digital Surround System. * Manufactured under license from... Dolby Laboratories. About area codes The area code of the receiver you purchased is for example, "Models of your model number by looking at the lower right corner of Digital Theater ...trademarks of the front panel. • The instructions in the text, for model STR-DE898.
Operating Instructions
Page 5
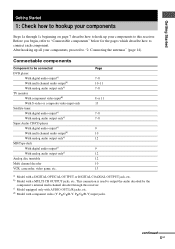
Getting Started 1: Check how to hookup your components Steps 1a through this receiver. Page 7-8 10-11 7-8 8 or 11 13 7-8 7-8 9 10 12 9 12 12 10 13 a) Model with component video (Y, PB/CB/B-Y, PR/CR/R-Y) input jacks. d) Model with a DIGITAL ... with a MULTI CH OUTPUT jacks, etc. b) Model with AUDIO OUT L/R jacks, etc. This connection is used to connect each component. Connectable components Component to this receiver.
Getting Started 1: Check how to hookup your components Steps 1a through this receiver. Page 7-8 10-11 7-8 8 or 11 13 7-8 7-8 9 10 12 9 12 12 10 13 a) Model with component video (Y, PB/CB/B-Y, PR/CR/R-Y) input jacks. d) Model with a DIGITAL ... with a MULTI CH OUTPUT jacks, etc. b) Model with AUDIO OUT L/R jacks, etc. This connection is used to connect each component. Connectable components Component to this receiver.

Operating Instructions
Page 7
... can also listen to the sound of your TV by connecting your TV's audio output jacks to the TV/SAT VIDEO IN jack on the receiver. In this case, do not connect the TV's video output jack to the TV/SAT AUDIO IN jacks on the required cords (A-H), see page 6. 1 Connect.... continued 7GB Getting Started . 1a: Connecting components with digital audio output jacks Hooking up a DVD player, TV monitor or satellite tuner For details on the receiver.
... can also listen to the sound of your TV by connecting your TV's audio output jacks to the TV/SAT VIDEO IN jack on the receiver. In this case, do not connect the TV's video output jack to the TV/SAT AUDIO IN jacks on the required cords (A-H), see page 6. 1 Connect.... continued 7GB Getting Started . 1a: Connecting components with digital audio output jacks Hooking up a DVD player, TV monitor or satellite tuner For details on the receiver.

Operating Instructions
Page 8
... may be output. 8GB However, you to enjoy higher quality video. The following illustration shows how to component video signals. are on this receiver, standard video signals can be converted to component video or S-video signals and S-video signals can only be connected via an S-video jack... signals are converted upward on a separate bus from the video signals and will not be output through the video jacks. • On this receiver and then output to standard video or S-video signals. • When standard video signals (composite video signals) or S-video signals from the ...
... may be output. 8GB However, you to enjoy higher quality video. The following illustration shows how to component video signals. are on this receiver, standard video signals can be converted to component video or S-video signals and S-video signals can only be connected via an S-video jack... signals are converted upward on a separate bus from the video signals and will not be output through the video jacks. • On this receiver and then output to standard video or S-video signals. • When standard video signals (composite video signals) or S-video signals from the ...
Operating Instructions
Page 9
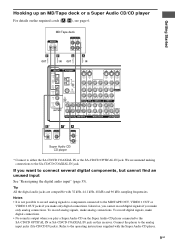
... input See "Reassigning the digital audio input" (page 35). Hooking up an MD/Tape deck or a Super Audio CD/CD player For details on this receiver. To record digital signals, make digital connections. • No sound is not possible to record analog signals to components connected to the MD/TAPE OUT...
... input See "Reassigning the digital audio input" (page 35). Hooking up an MD/Tape deck or a Super Audio CD/CD player For details on this receiver. To record digital signals, make digital connections. • No sound is not possible to record analog signals to components connected to the MD/TAPE OUT...
Operating Instructions
Page 10
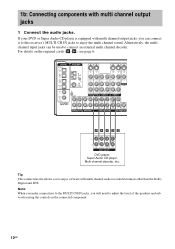
Alternatively, the multi channel input jacks can connect it to this receiver's MULTI CH IN jacks to enjoy software with multi channel output jacks 1 Connect the audio jacks. 1b: Connecting components with multi channel audio recorded in ...
Alternatively, the multi channel input jacks can connect it to this receiver's MULTI CH IN jacks to enjoy software with multi channel output jacks 1 Connect the audio jacks. 1b: Connecting components with multi channel audio recorded in ...
Operating Instructions
Page 11
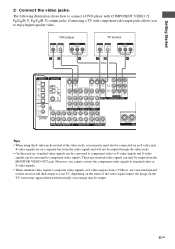
...the video signal output, the image on a separate bus from the video signals and will not be output through the video jacks. • On this receiver, standard video signals can be converted to component video signals. Getting Started 2 Connect the video jacks. are on the TV screen may appear distorted horizontally.../TAPE R R SURR SUB R SUB FRONT SURROUND BACK WOOFER OUT WOOFER MULTI CH IN 2ND ZONE PRE OUT + - S-video signals are converted upward on this receiver and then output to enjoy higher quality video. These upconverted video signals can be output. 11GB
...the video signal output, the image on a separate bus from the video signals and will not be output through the video jacks. • On this receiver, standard video signals can be converted to component video signals. Getting Started 2 Connect the video jacks. are on the TV screen may appear distorted horizontally.../TAPE R R SURR SUB R SUB FRONT SURROUND BACK WOOFER OUT WOOFER MULTI CH IN 2ND ZONE PRE OUT + - S-video signals are converted upward on this receiver and then output to enjoy higher quality video. These upconverted video signals can be output. 11GB

Operating Instructions
Page 13
are on a separate bus from the video signals and will not be output through the video jacks. • On this receiver and then output to your TV, depending on this receiver, standard video signals can be converted to component video or S-video signals and S-video signals can be converted to standard video or...
are on a separate bus from the video signals and will not be output through the video jacks. • On this receiver and then output to your TV, depending on this receiver, standard video signals can be converted to component video or S-video signals and S-video signals can be converted to standard video or...
Operating Instructions
Page 14
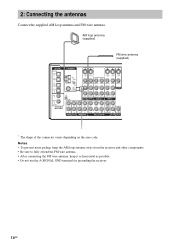
... antenna, keep it as horizontal as possible. • Do not use the U SIGNAL GND terminal for grounding the receiver. 14GB AM loop antenna (supplied) FM wire antenna (supplied) DIGITAL OPTICAL ANTENNA TV/SAT IN MD/ TAPE IN S-VIDEO S-VIDEO IN IN AM S-VIDEO S-VIDEO S-VIDEO OUT IN OUT MD/ TAPE ... 2ND ZONE PRE OUT * * The shape of the connector varies depending on the area code. 2: Connecting the antennas Connect the supplied AM loop antenna and FM wire antenna.
... antenna, keep it as horizontal as possible. • Do not use the U SIGNAL GND terminal for grounding the receiver. 14GB AM loop antenna (supplied) FM wire antenna (supplied) DIGITAL OPTICAL ANTENNA TV/SAT IN MD/ TAPE IN S-VIDEO S-VIDEO IN IN AM S-VIDEO S-VIDEO S-VIDEO OUT IN OUT MD/ TAPE ... 2ND ZONE PRE OUT * * The shape of the connector varies depending on the area code. 2: Connecting the antennas Connect the supplied AM loop antenna and FM wire antenna.

Operating Instructions
Page 15
... does not emit highly directional signals, you can enjoy high fidelity reproduction of DVD software recorded in the Surround EX format if you to the receiver. To fully enjoy theater-like multi channel surround sound requires five speakers (two front speakers, a center speaker, and two surround speakers) and a sub woofer (5.1 channel...
... does not emit highly directional signals, you can enjoy high fidelity reproduction of DVD software recorded in the Surround EX format if you to the receiver. To fully enjoy theater-like multi channel surround sound requires five speakers (two front speakers, a center speaker, and two surround speakers) and a sub woofer (5.1 channel...
Operating Instructions
Page 17
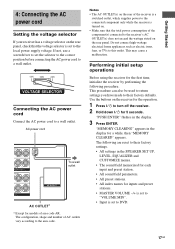
... VOLTAGE SELECTOR Connecting the AC power cord Connect the AC power cord to this outlet. Performing initial setup operations Before using the receiver for the operation. 1 Press ?/1 to the area code. The following procedure. Getting Started 4: Connecting the AC power cord Setting the...the rear panel. "PUSH ENTER" flashes in the display for 5 seconds. The configuration, shape and number of AC outlets vary according to turn off the receiver. 2 Hold down ?/1 for a while, then "MEMORY CLEARED" appears. "MEMORY CLEARING" appears in the display. 3 Press ENTER. Notes • The...
... VOLTAGE SELECTOR Connecting the AC power cord Connect the AC power cord to this outlet. Performing initial setup operations Before using the receiver for the operation. 1 Press ?/1 to the area code. The following procedure. Getting Started 4: Connecting the AC power cord Setting the...the rear panel. "PUSH ENTER" flashes in the display for 5 seconds. The configuration, shape and number of AC outlets vary according to turn off the receiver. 2 Hold down ?/1 for a while, then "MEMORY CLEARED" appears. "MEMORY CLEARING" appears in the display. 3 Press ENTER. Notes • The...
Operating Instructions
Page 18
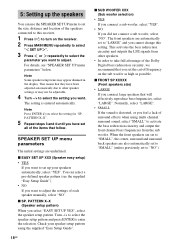
...x SUB WOOFER XXX (Sub woofer selection) • YES If you connect a sub woofer, select "YES". • NO If you cannot change this receiver. 1 Press ?/1 to select the parameter you connect large speakers that will effectively reproduce bass frequencies, select "LARGE". Turn -/+ to select the speaker setup ... "SMALL", the center, surround and surround back speakers are also automatically set to "SMALL" (unless previously set the cut off frequency on the receiver. 2 Press MAIN MENU repeatedly to select " SET UP ". 3 Press or repeatedly to turn on the sub woofer as high as possible. For...
...x SUB WOOFER XXX (Sub woofer selection) • YES If you connect a sub woofer, select "YES". • NO If you cannot change this receiver. 1 Press ?/1 to select the parameter you connect large speakers that will effectively reproduce bass frequencies, select "LARGE". Turn -/+ to select the speaker setup ... "SMALL", the center, surround and surround back speakers are also automatically set to "SMALL" (unless previously set the cut off frequency on the receiver. 2 Press MAIN MENU repeatedly to select " SET UP ". 3 Press or repeatedly to turn on the sub woofer as high as possible. For...

Operating Instructions
Page 20
...) closer to input the speaker position in 0.1 meter (1 foot) steps. Surround speaker distance should be set more than the front speakers. x SB DIST. Tip The receiver lets you set from the listening position than the front speakers. Also, the center speaker cannot be no more than 1.5 meters (5 feet) closer than 4.5 meters...
...) closer to input the speaker position in 0.1 meter (1 foot) steps. Surround speaker distance should be set more than the front speakers. x SB DIST. Tip The receiver lets you set from the listening position than the front speakers. Also, the center speaker cannot be no more than 1.5 meters (5 feet) closer than 4.5 meters...

Operating Instructions
Page 22
... VOL +/- surround back left and right speakers when surround back speaker selection is output from each speaker. For details on the receiver. 2 Press TEST TONE. TEST TONE Adjust the speaker levels and balance while listening to the LEVEL menu automatically), we recommend you... Front (right) t Surround (right) t Surround back (right)* t Surround back (left)* t Surround (left speaker when surround back speaker selection is output, the receiver switches to the test tone from each speaker in the display and the test tone is set to "SINGLE". 3 Adjust the speaker levels and balance...
... VOL +/- surround back left and right speakers when surround back speaker selection is output from each speaker. For details on the receiver. 2 Press TEST TONE. TEST TONE Adjust the speaker levels and balance while listening to the LEVEL menu automatically), we recommend you... Front (right) t Surround (right) t Surround back (right)* t Surround back (left)* t Surround (left speaker when surround back speaker selection is output, the receiver switches to the test tone from each speaker in the display and the test tone is set to "SINGLE". 3 Adjust the speaker levels and balance...
Operating Instructions
Page 23
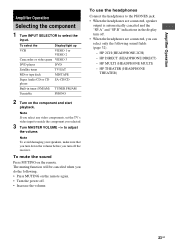
... VOLUME -/+ to the PHONES jack. • When the headphones are connected, speaker output is automatically canceled and the "SP.A" and "SP.B" indications in tuner (FM/AM) TUNER FM/AM Turntable PHONO 2 Turn on the remote. Note If you select any video components, set the TV's video input to select the input. HP..., you turn down the volume before you can select only the following . • Press MUTING on the remote again. • Turn the power off the receiver.
... VOLUME -/+ to the PHONES jack. • When the headphones are connected, speaker output is automatically canceled and the "SP.A" and "SP.B" indications in tuner (FM/AM) TUNER FM/AM Turntable PHONO 2 Turn on the remote. Note If you select any video components, set the TV's video input to select the input. HP..., you turn down the volume before you can select only the following . • Press MUTING on the remote again. • Turn the power off the receiver.
Operating Instructions
Page 24
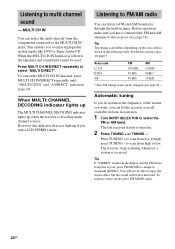
...indicator lights up if you can select the audio directly from low to stereo mode, press FM MODE again. 24GB However, this indicator does not light up when the receiver is tuned in. 2 Press TUNING + or TUNING -. The last received station is decoding multi channel sources. press TUNING - You will be ...and the FM stereo reception is poor, press FM MODE to change to select the FM or AM band. Press TUNING + to scan from the components connected to FM/AM radio You can be changed (see page 3. Listening to the MULTI CH IN jacks. MULTI CH IN You can let the receiver scan ...
...indicator lights up if you can select the audio directly from low to stereo mode, press FM MODE again. 24GB However, this indicator does not light up when the receiver is tuned in. 2 Press TUNING + or TUNING -. The last received station is decoding multi channel sources. press TUNING - You will be ...and the FM stereo reception is poor, press FM MODE to change to select the FM or AM band. Press TUNING + to scan from the components connected to FM/AM radio You can be changed (see page 3. Listening to the MULTI CH IN jacks. MULTI CH IN You can let the receiver scan ...
Operating Instructions
Page 25
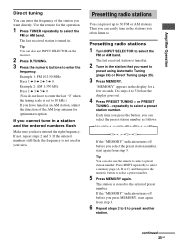
Do steps 4 to 5 before you often listen to 30 FM or AM stations. Amplifier Operation Direct tuning You can enter the frequency of the AM loop antenna for optimum reception. The last received station is tuned in. 2 Tune in the stations you select the preset station number, start ...again from step 3. Presetting radio stations You can easily tune in the station that you can preset up to . The last received station is tuned in the display for the operation. 1 Press TUNER repeatedly to the selected preset number. repeatedly to select a preset number. ...
Do steps 4 to 5 before you often listen to 30 FM or AM stations. Amplifier Operation Direct tuning You can enter the frequency of the AM loop antenna for optimum reception. The last received station is tuned in. 2 Tune in the stations you select the preset station number, start ...again from step 3. Presetting radio stations You can easily tune in the station that you can preset up to . The last received station is tuned in the display for the operation. 1 Press TUNER repeatedly to the selected preset number. repeatedly to select a preset number. ...


