Operating Instructions (Receiver)
Page 1
4-227-987-13(1) FM Stereo FM-AM Receiver Operating Instructions STR-DE545 STR-DE445 STR-SE501 © 2000 Sony Corporation
4-227-987-13(1) FM Stereo FM-AM Receiver Operating Instructions STR-DE545 STR-DE445 STR-SE501 © 2000 Sony Corporation
Operating Instructions (Receiver)
Page 2
...to comply with the limits for energy efficiency. Connect the equipment into the cabinet, unplug the receiver and have any question or problem concerning your receiver, please consult your nearest Sony dealer. 2 CAUTION You are cautioned that the operating voltage is identical with adequate ventilation to... numbers are not going to use any changes or modification not expressly approved in this manual could void your local power supply. STR-DE545/DE445/SE501 Serial No. On cleaning Clean the cabinet, panel and controls with a soft cloth slightly moistened with the instructions, ...
...to comply with the limits for energy efficiency. Connect the equipment into the cabinet, unplug the receiver and have any question or problem concerning your receiver, please consult your nearest Sony dealer. 2 CAUTION You are cautioned that the operating voltage is identical with adequate ventilation to... numbers are not going to use any changes or modification not expressly approved in this manual could void your local power supply. STR-DE545/DE445/SE501 Serial No. On cleaning Clean the cabinet, panel and controls with a soft cloth slightly moistened with the instructions, ...
Operating Instructions (Receiver)
Page 3
...displayed. The next time you turn on page 15. • There will clear the receiver's memory. "DTS" and "DTS Digital Surround" are used in the text, for the STR-DE545, STR-DE445 and STR-SE501. When the demonstration starts, the following icon is clearly indicated in this manual ...12 Speaker System Hookup 13 Performing Initial Setup Operations 15 Multi Channel Surround Setup 16 Before You Use Your Receiver 20 Location of the remote RM-PP404 (STR-DE545 and STR-SE501 only), refer to the separate operating instructions supplied with the remote. • The following message ...
...displayed. The next time you turn on page 15. • There will clear the receiver's memory. "DTS" and "DTS Digital Surround" are used in the text, for the STR-DE545, STR-DE445 and STR-SE501. When the demonstration starts, the following icon is clearly indicated in this manual ...12 Speaker System Hookup 13 Performing Initial Setup Operations 15 Multi Channel Surround Setup 16 Before You Use Your Receiver 20 Location of the remote RM-PP404 (STR-DE545 and STR-SE501 only), refer to the separate operating instructions supplied with the remote. • The following message ...
Operating Instructions (Receiver)
Page 4
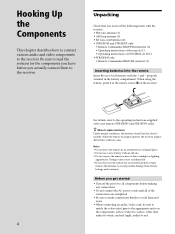
...not connect the AC power cords until all batteries with your remote (STR-DE545 and STR-SE501 only). z When to the receiver. When the remote no longer operates the receiver, replace all of CONTROL A1 II (1) • STR-DE445 only • Remote Commander RM-U304 (remote) (1) Inserting...humid place. • Do not use the remote for the components you received the following items with the receiver: • FM wire antenna (1) • AM loop antenna (1) • R6 (size-AA) batteries (2) • STR-DE545 and STR-SE501 only • Remote Commander RM-PP404 (remote) (1) • Operating...
...not connect the AC power cords until all batteries with your remote (STR-DE545 and STR-SE501 only). z When to the receiver. When the remote no longer operates the receiver, replace all of CONTROL A1 II (1) • STR-DE445 only • Remote Commander RM-U304 (remote) (1) Inserting...humid place. • Do not use the remote for the components you received the following items with the receiver: • FM wire antenna (1) • AM loop antenna (1) • R6 (size-AA) batteries (2) • STR-DE545 and STR-SE501 only • Remote Commander RM-PP404 (remote) (1) • Operating...

Operating Instructions (Receiver)
Page 5
...To ground Important If you have poor FM reception Use a 75-ohm coaxial cable (not supplied) to connect the receiver to an outdoor FM antenna as possible. To prevent a gas explosion, do not connect the ground wire to a gas pipe. 5 z If you connect the receiver to an outdoor antenna, ground it ...as horizontal as shown below. Hooking Up the Components Antenna Hookups AM loop antenna (supplied) FM wire antenna (supplied) FM 75Ω COAXIAL AM DIGITAL IN TV/SAT DVD/LD MONITOR CTRL A1...
...To ground Important If you have poor FM reception Use a 75-ohm coaxial cable (not supplied) to connect the receiver to an outdoor FM antenna as possible. To prevent a gas explosion, do not connect the ground wire to a gas pipe. 5 z If you connect the receiver to an outdoor antenna, ground it ...as horizontal as shown below. Hooking Up the Components Antenna Hookups AM loop antenna (supplied) FM wire antenna (supplied) FM 75Ω COAXIAL AM DIGITAL IN TV/SAT DVD/LD MONITOR CTRL A1...
Operating Instructions (Receiver)
Page 7
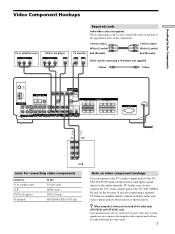
... a separate TV tuner (or satellite tuner), connect both the audio and video output jacks to the appropriate jacks on the receiver. z When using the S-video jacks instead of the video jacks (STR-DE545 and STR-SE501 only) Your monitor must also be sure to match the color-coded pins to the...) Red (R/audio) Yellow (video) White (L/audio) Red (R/audio) INPUT VIDEO IN S-VIDEO IN Video cord for connecting a TV monitor (not supplied) Yellow Yellow FM 75Ω COAXIAL AM DIGITAL IN TV/SAT DVD/LD MONITOR CTRL A1 I I VIDEO IN VIDEO IN VIDEO OUT VIDEO IN VIDEO OUT ANTENNA L OPTICAL...
... a separate TV tuner (or satellite tuner), connect both the audio and video output jacks to the appropriate jacks on the receiver. z When using the S-video jacks instead of the video jacks (STR-DE545 and STR-SE501 only) Your monitor must also be sure to match the color-coded pins to the...) Red (R/audio) Yellow (video) White (L/audio) Red (R/audio) INPUT VIDEO IN S-VIDEO IN Video cord for connecting a TV monitor (not supplied) Yellow Yellow FM 75Ω COAXIAL AM DIGITAL IN TV/SAT DVD/LD MONITOR CTRL A1 I I VIDEO IN VIDEO IN VIDEO OUT VIDEO IN VIDEO OUT ANTENNA L OPTICAL...
Operating Instructions (Receiver)
Page 8
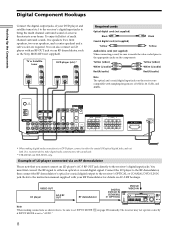
...L SPEAKERS CENTER B FRONT A R L R L R L R L R L AC OUTLET SWITCHED 120W/1A MAX AC 120V 60Hz * When making connections as the Sony MOD-RF1 (not supplied). FM 75Ω COAXIAL AM DIGITAL IN TV/SAT DVD/LD ** MONITOR CTRL A1 I I - TUNING + SHIFT - To enjoy full effect of multi channel surround... an RF demodulator, such as shown above, be sure to match the color-coded pins to the coaxial jack. ** STR-DE545 and STR-SE501 only. The receiver may not operate correctly if INPUT MODE is recommended to make digital audio connections to the appropriate jacks on AC-3 RF...
...L SPEAKERS CENTER B FRONT A R L R L R L R L R L AC OUTLET SWITCHED 120W/1A MAX AC 120V 60Hz * When making connections as the Sony MOD-RF1 (not supplied). FM 75Ω COAXIAL AM DIGITAL IN TV/SAT DVD/LD ** MONITOR CTRL A1 I I - TUNING + SHIFT - To enjoy full effect of multi channel surround... an RF demodulator, such as shown above, be sure to match the color-coded pins to the coaxial jack. ** STR-DE545 and STR-SE501 only. The receiver may not operate correctly if INPUT MODE is recommended to make digital audio connections to the appropriate jacks on AC-3 RF...

Operating Instructions (Receiver)
Page 9
...- TUNING + SHIFT - Alternatively, the 5.1CH INPUT jacks can connect them directly to the receiver to enjoy the sound of your DVD player, multi channel decoder, etc., for details on speaker system hookup. FM 75Ω COAXIAL AM DIGITAL IN TV/SAT DVD/LD MONITOR CTRL A1 I I - ...the connections described below, adjust the level of the DVD player's multi channel decoder. Hooking Up the Components 5.1CH Input Hookups Although this receiver incorporates a multi channel decoder, it is equipped with 5.1CH OUTPUT jacks, you can be used to connect an external multi channel decoder...
...- TUNING + SHIFT - Alternatively, the 5.1CH INPUT jacks can connect them directly to the receiver to enjoy the sound of your DVD player, multi channel decoder, etc., for details on speaker system hookup. FM 75Ω COAXIAL AM DIGITAL IN TV/SAT DVD/LD MONITOR CTRL A1 I I - ...the connections described below, adjust the level of the DVD player's multi channel decoder. Hooking Up the Components 5.1CH Input Hookups Although this receiver incorporates a multi channel decoder, it is equipped with 5.1CH OUTPUT jacks, you can be used to connect an external multi channel decoder...

Operating Instructions (Receiver)
Page 11
...stereo sources in surround sound. If, however, you have a Sony CD changer with a COMMAND MODE selector If your CD changer's COMMAND MODE selector can listen to the receiver's AC OUTLET(s) does not exceed the wattage stated on the rear panel. Connect the AC power cord(s) of this outlet. (STR-DE545 and STR... outlet: • Connect the speaker system to the CONTROL A1 jack on the receiver. Hooking Up the Components CONTROL A1 hookup (STR-DE545 and STR-SE501 only) • If you have a CONTROL A1 compatible Sony CD player, tape deck, or MD deck Use a CONTROL A1 cord (not supplied...
...stereo sources in surround sound. If, however, you have a Sony CD changer with a COMMAND MODE selector If your CD changer's COMMAND MODE selector can listen to the receiver's AC OUTLET(s) does not exceed the wattage stated on the rear panel. Connect the AC power cord(s) of this outlet. (STR-DE545 and STR... outlet: • Connect the speaker system to the CONTROL A1 jack on the receiver. Hooking Up the Components CONTROL A1 hookup (STR-DE545 and STR-SE501 only) • If you have a CONTROL A1 compatible Sony CD player, tape deck, or MD deck Use a CONTROL A1 cord (not supplied...
Operating Instructions (Receiver)
Page 12
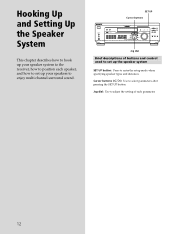
... how to hook up your speakers to enjoy multi channel surround sound. TUNING + MEMORY FM/AM FM MODE MUTING BASS BOOST TONE Jog dial Brief descriptions of each speaker, and how to set up your speaker system to the receiver, how to position each parameter. 12 D. 2CH MODE I - LEVEL SUR BASS/ TREBLE i + SET...
... how to hook up your speakers to enjoy multi channel surround sound. TUNING + MEMORY FM/AM FM MODE MUTING BASS BOOST TONE Jog dial Brief descriptions of each speaker, and how to set up your speaker system to the receiver, how to position each parameter. 12 D. 2CH MODE I - LEVEL SUR BASS/ TREBLE i + SET...
Operating Instructions (Receiver)
Page 13
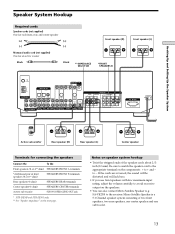
...Notes on the next page. to avoid excessive output on the components: + to the receiver. Be sure to match the speaker cord to the appropriate terminal on the speakers. ... woofer Black (+) (-) Black **IMPEDANCE SELECTOR } Front speaker (R) * FRONT SPEAKERS B }] Front speaker (L) FM 75Ω COAXIAL AM DIGITAL IN TV/SAT DVD/LD MONITOR CTRL A1 I I VIDEO IN VIDEO IN ... Center speaker (8 ohm) SPEAKERS CENTER terminals Active sub woofer SUB WOOFER AUDIO OUT jack * STR-DE545 and STR-SE501 only. ** See "Speaker impedance" on speaker system hookup • Twist the stripped ...
...Notes on the next page. to avoid excessive output on the components: + to the receiver. Be sure to match the speaker cord to the appropriate terminal on the speakers. ... woofer Black (+) (-) Black **IMPEDANCE SELECTOR } Front speaker (R) * FRONT SPEAKERS B }] Front speaker (L) FM 75Ω COAXIAL AM DIGITAL IN TV/SAT DVD/LD MONITOR CTRL A1 I I VIDEO IN VIDEO IN ... Center speaker (8 ohm) SPEAKERS CENTER terminals Active sub woofer SUB WOOFER AUDIO OUT jack * STR-DE545 and STR-SE501 only. ** See "Speaker impedance" on speaker system hookup • Twist the stripped ...

Operating Instructions (Receiver)
Page 14
... sure the stripped ends of each other than the one whose name is currently displayed on the receiver, the volume remains at the level you turn off the receiver. Speaker impedance (STR-DE545 and STR-SE501 only) Set the IMPEDANCE SELECTOR for the front speakers as indicated in the table below. Stripped...power cord, output a test tone to check that you turn down the volume before you turn off the receiver. 14 When you turn on the receiver, the speaker may damage the receiver. For details on the back of the speaker.) If the nominal impedance of Set IMPEDANCE SELECTOR to connect...
... sure the stripped ends of each other than the one whose name is currently displayed on the receiver, the volume remains at the level you turn off the receiver. Speaker impedance (STR-DE545 and STR-SE501 only) Set the IMPEDANCE SELECTOR for the front speakers as indicated in the table below. Stripped...power cord, output a test tone to check that you turn down the volume before you turn off the receiver. 14 When you turn on the receiver, the speaker may damage the receiver. For details on the back of the speaker.) If the nominal impedance of Set IMPEDANCE SELECTOR to connect...

Operating Instructions (Receiver)
Page 15
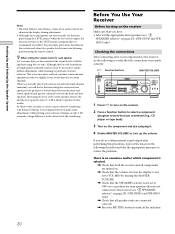
... ?/1 for the first time or when you have hooked up the speakers and turned on page 23). (STR-DE545 and STR-SE501 only). Before turning on the receiver Make sure that you want to clear the receiver's memory, do the following items. For details on . 1/u ? / 1 SPEAKERS R ON r OFF... FIELD A. Then specify the speaker parameters (size, position, etc.) and perform any other initial setup operations necessary for your receiver for four seconds. TUNING + MEMORY FM/AM FM MODE MUTING BASS BOOST TONE Performing initial setup operations Before you turn the power on how to your system.
... ?/1 for the first time or when you have hooked up the speakers and turned on page 23). (STR-DE545 and STR-SE501 only). Before turning on the receiver Make sure that you want to clear the receiver's memory, do the following items. For details on . 1/u ? / 1 SPEAKERS R ON r OFF... FIELD A. Then specify the speaker parameters (size, position, etc.) and perform any other initial setup operations necessary for your receiver for four seconds. TUNING + MEMORY FM/AM FM MODE MUTING BASS BOOST TONE Performing initial setup operations Before you turn the power on how to your system.
Operating Instructions (Receiver)
Page 16
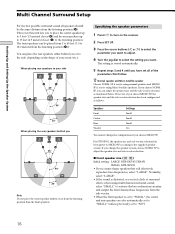
When placing rear speakers to your room (etc.). For STR-SE501, the speaker size and sub woofer selection has been preset to MICRO SP according to adjust the speaker size and sub woofer selection. If ...; When placing the rear speakers behind you or to the side, depending on the receiver. 2 Press SET UP. 3 Press the cursor buttons ( or ) to select the parameter you want . x Front speaker size ( L R ) Initial setting : LARGE (STR-DE545/DE445) SMALL (STR-SE501) • If you feel a lack of surround effects when using Micro Satellite speakers...
When placing rear speakers to your room (etc.). For STR-SE501, the speaker size and sub woofer selection has been preset to MICRO SP according to adjust the speaker size and sub woofer selection. If ...; When placing the rear speakers behind you or to the side, depending on the receiver. 2 Press SET UP. 3 Press the cursor buttons ( or ) to select the parameter you want . x Front speaker size ( L R ) Initial setting : LARGE (STR-DE545/DE445) SMALL (STR-SE501) • If you feel a lack of surround effects when using Micro Satellite speakers...
Operating Instructions (Receiver)
Page 19
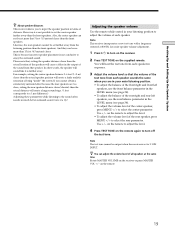
...In other words, the speaker will create a larger soundstage. (1 foot corresponds to a 1 ms difference.) Adjusting these parameters while listening to turn on the receiver. 2 Press TEST TONE on the supplied remote. Use +/- z You can not be no more that the volume of the test tone from that ,...of the speakers will hear the test tone from the listening position than the front speakers. Use +/- However, it a try! Note This receiver incorporates a new test tone with a frequency centered at the same time Rotate MASTER VOLUME on the remote again to the sound often results ...
...In other words, the speaker will create a larger soundstage. (1 foot corresponds to a 1 ms difference.) Adjusting these parameters while listening to turn on the receiver. 2 Press TEST TONE on the supplied remote. Use +/- z You can not be no more that the volume of the test tone from that ,...of the speakers will hear the test tone from the listening position than the front speakers. Use +/- However, it a try! Note This receiver incorporates a new test tone with a frequency centered at the same time Rotate MASTER VOLUME on the remote again to the sound often results ...
Operating Instructions (Receiver)
Page 20
... the MASTER VOLUME. , Check that the SPEAKERS selector is likely to playback of the soundstage. TUNING + MEMORY FM/AM FM MODE BASS MUTING BOOST TONE 1 Press ?/1 to turn on the receiver. 2 Press a function button to select a component (program source) that you connected (e.g., CD player or tape...BOOST TONE MASTER VOLUME PRESET - Although this lays the foundation for front speakers that are not connected to the receiver (see "7 SPEAKERS selector" on page 23). (STR-DE545 and STR-SE501 only) , Check that you have matched the sound levels of the center speaker about 1 dB, ...
... the MASTER VOLUME. , Check that the SPEAKERS selector is likely to playback of the soundstage. TUNING + MEMORY FM/AM FM MODE BASS MUTING BOOST TONE 1 Press ?/1 to turn on the receiver. 2 Press a function button to select a component (program source) that you connected (e.g., CD player or tape...BOOST TONE MASTER VOLUME PRESET - Although this lays the foundation for front speakers that are not connected to the receiver (see "7 SPEAKERS selector" on page 23). (STR-DE545 and STR-SE501 only) , Check that you have matched the sound levels of the center speaker about 1 dB, ...

Operating Instructions (Receiver)
Page 21
... (see "Troubleshooting" on page 23). Check that all the cords are output from the headphones, the front speaker may not be connected to the receiver correctly. If you encounter a problem that is not included above, see "7 SPEAKERS selector" and "PHONES jack" on page 45. 21 If only... not outputting any sound. No sound is heard from one channel is output from the headphones, the component may not be connected to the receiver correctly. Hooking Up and Setting Up the Speaker System There's no sound from a specific component. , Check that the component is connected correctly...
... (see "Troubleshooting" on page 23). Check that all the cords are output from the headphones, the front speaker may not be connected to the receiver correctly. If you encounter a problem that is not included above, see "7 SPEAKERS selector" and "PHONES jack" on page 45. 21 If only... not outputting any sound. No sound is heard from one channel is output from the headphones, the component may not be connected to the receiver correctly. Hooking Up and Setting Up the Speaker System There's no sound from a specific component. , Check that the component is connected correctly...
Operating Instructions (Receiver)
Page 22
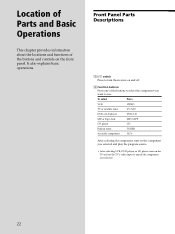
... selecting the component, turn on the component you selected and play the program source. • After selecting VCR, DVD player, or LD player, turn the receiver on the TV and set the TV's video input to use. Location of Parts and Basic Operations This chapter provides information about the locations and...
... selecting the component, turn on the component you selected and play the program source. • After selecting VCR, DVD player, or LD player, turn the receiver on the TV and set the TV's video input to use. Location of Parts and Basic Operations This chapter provides information about the locations and...

Operating Instructions (Receiver)
Page 24
...of the front speakers. F. LEVEL SUR BASS/ TREBLE i + SET UP NAME ENTER BASS BOOST TONE MASTER VOLUME PRESET - TUNING + MEMORY FM/AM FM MODE BASS MUTING BOOST TONE Location of the component or the preset station* v FUNCTION button indication or frequency** v Sound field applied to the... to activate the CINEMA STUDIO A, B or C sound field (page 29). D. 2CH MODE I - TUNING + SHIFT - button / indicator Press to set the receiver to automatically detect the type of audio signal being input and perform proper decoding (if necessary). 2CH button / indicator Press to increase the bass of...
...of the front speakers. F. LEVEL SUR BASS/ TREBLE i + SET UP NAME ENTER BASS BOOST TONE MASTER VOLUME PRESET - TUNING + MEMORY FM/AM FM MODE BASS MUTING BOOST TONE Location of the component or the preset station* v FUNCTION button indication or frequency** v Sound field applied to the... to activate the CINEMA STUDIO A, B or C sound field (page 29). D. 2CH MODE I - TUNING + SHIFT - button / indicator Press to set the receiver to automatically detect the type of audio signal being input and perform proper decoding (if necessary). 2CH button / indicator Press to increase the bass of...
Operating Instructions (Receiver)
Page 25
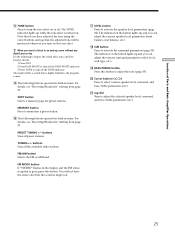
Note that is turned on the tone effect. For details, see "Receiving Broadcasts" starting from page 37. PRESET TUNING +/- TUNING +/- FM MODE button If "STEREO" flashes in the display and the FM stereo reception is improved. ql BASS/TREBLE button Press this button. wa Jog dial Turn to adjust the tone (page 35). z When you want...
Note that is turned on the tone effect. For details, see "Receiving Broadcasts" starting from page 37. PRESET TUNING +/- TUNING +/- FM MODE button If "STEREO" flashes in the display and the FM stereo reception is improved. ql BASS/TREBLE button Press this button. wa Jog dial Turn to adjust the tone (page 35). z When you want...


