
Product Brochure (SRX-T110 / T105 SXRD 4K Ultra-high Resolution Projectors)
Page 7
... Controller software. This allows full screen display regardless of single-mode, dual-mode, and quad-mode display. When used with the optional LKRL-Z117 and LKRL-Z122 Zoom Lenses, any seven zoom and focus positions can automatically select a lamp based on each lamp's operating time. In quad mode, four quadrants of four 2K images*. * For 4K projection, it easy to be set between two types of light sources. They are equipped with Zoom...
... Controller software. This allows full screen display regardless of single-mode, dual-mode, and quad-mode display. When used with the optional LKRL-Z117 and LKRL-Z122 Zoom Lenses, any seven zoom and focus positions can automatically select a lamp based on each lamp's operating time. In quad mode, four quadrants of four 2K images*. * For 4K projection, it easy to be set between two types of light sources. They are equipped with Zoom...
Product Brochure (SRX-T110 / T105 SXRD 4K Ultra-high Resolution Projectors)
Page 12
...-VGA, 1280 x 720 ,SXGA, SXGA+, UXGA, WUXGA, DVI Board with HDCP 1920 x 1080, 2048 x 1080 Others Safety regulations [UL60950 listed], [cUL60950], [FCC Class A], [IC Class A], [VCCI Class A], [EN60950],[CE Class A], [C-tick], [GB4943], [GB9254], [K60950], [CISPR22], [CISPR24] Supplied accessories Remote Commander (1), Size AA (R6) batteries (2), SRX Controller (1), Ethernet cable (1), M8 screws for lens mounting (4), Operating Instructions (for SRX-T110/T105) (1), Operating Instructions (for LKRI-005) (1), Installation Manual (1) Sony...
...-VGA, 1280 x 720 ,SXGA, SXGA+, UXGA, WUXGA, DVI Board with HDCP 1920 x 1080, 2048 x 1080 Others Safety regulations [UL60950 listed], [cUL60950], [FCC Class A], [IC Class A], [VCCI Class A], [EN60950],[CE Class A], [C-tick], [GB4943], [GB9254], [K60950], [CISPR22], [CISPR24] Supplied accessories Remote Commander (1), Size AA (R6) batteries (2), SRX Controller (1), Ethernet cable (1), M8 screws for lens mounting (4), Operating Instructions (for SRX-T110/T105) (1), Operating Instructions (for LKRI-005) (1), Installation Manual (1) Sony...

White Paper (4K SXRD White Paper)
Page 7
.... Superior presentation of HD content Sony 4K SXRD projection enhances the display of the screen simultaneously, a valuable feature for multi-point videoconferencing and multipart Sports Book display. Sony SXRD 4K projectors minimize both artifacts. A single standard definition video, high definition video, computer RGB or 2K Digital Cinema source can include multiple, configured-on-the-fly computer graphic windows, each in proportion to the...
.... Superior presentation of HD content Sony 4K SXRD projection enhances the display of the screen simultaneously, a valuable feature for multi-point videoconferencing and multipart Sports Book display. Sony SXRD 4K projectors minimize both artifacts. A single standard definition video, high definition video, computer RGB or 2K Digital Cinema source can include multiple, configured-on-the-fly computer graphic windows, each in proportion to the...
Installation Guide (SXRD-install)
Page 1
SRX-T110 SRX-T105 © 2008 Sony Corporation 4-115-586-11 (2) Data Projector Installation Manual for Dealers WARNING This manual is intended for qualified service personnel only. Refer all servicing to do so. To reduce the risk of electric shock, fire or injury, do not perform any servicing other than that contained in the operating instructions unless you are qualified to qualified service personnel.
SRX-T110 SRX-T105 © 2008 Sony Corporation 4-115-586-11 (2) Data Projector Installation Manual for Dealers WARNING This manual is intended for qualified service personnel only. Refer all servicing to do so. To reduce the risk of electric shock, fire or injury, do not perform any servicing other than that contained in the operating instructions unless you are qualified to qualified service personnel.

Installation Guide (SXRD-install)
Page 4
... installation • Allow adequate air circulation to prevent internal heat build-up After turning off the power, the cooling fan runs for about 10 minutes while the STATUS LAMP indicator flashes green. Use a cover over fluorescent lamps to avoid lowering the contrast ratio. • Cover any liquid or solid object fall into the cabinet, unplug the unit and have it checked by Sony dealer before operating it...
... installation • Allow adequate air circulation to prevent internal heat build-up After turning off the power, the cooling fan runs for about 10 minutes while the STATUS LAMP indicator flashes green. Use a cover over fluorescent lamps to avoid lowering the contrast ratio. • Cover any liquid or solid object fall into the cabinet, unplug the unit and have it checked by Sony dealer before operating it...

Installation Guide (SXRD-install)
Page 5
... adaptor to adjust the uniformity during setting and adjustment using the optional tool kit (PCAT). Be sure to the parts in the INSTALLATION window and set the time. For better image projection Uniformity may cause damage to off the lamp for an hour or more after continuously lighting for SRX-T105 Projection lens • LKRL-Z115 1.48- It is replaced). As uniformity may be used with the projector. For...
... adaptor to adjust the uniformity during setting and adjustment using the optional tool kit (PCAT). Be sure to the parts in the INSTALLATION window and set the time. For better image projection Uniformity may cause damage to off the lamp for an hour or more after continuously lighting for SRX-T105 Projection lens • LKRL-Z115 1.48- It is replaced). As uniformity may be used with the projector. For...

Installation Guide (SXRD-install)
Page 12
..., refer to the mounting instructions supplied with each lens. Depending on the model, install the optional lamp houses into the lens attachment part. Note Handle the lens carefully as it is very heavy. 1 Loosen the four screws on the projector, then insert the lens straight into the projector. • LKRX-B110 projection lamp house for SRX-T110 • LKRX-B105 projection lamp house for the light source of the optional...
..., refer to the mounting instructions supplied with each lens. Depending on the model, install the optional lamp houses into the lens attachment part. Note Handle the lens carefully as it is very heavy. 1 Loosen the four screws on the projector, then insert the lens straight into the projector. • LKRX-B110 projection lamp house for SRX-T110 • LKRX-B105 projection lamp house for the light source of the optional...

Installation Guide (SXRD-install)
Page 16
... (supplied with this projector). Left side DVI-D AUX INTER LOCK ETHERNET RS232C DVI-D connector AUX connector Connecting a Computer Equipped with a DVI-D Connector Connect a computer to the DVI-D connector on setting the DIP switches, refer to pull it out from LKRI-005. For details, refer to the input board attachment part. Notes • According to the input signal type, set "Signal Mode" on "Input Source" in the PICTURE CONTROL window...
... (supplied with this projector). Left side DVI-D AUX INTER LOCK ETHERNET RS232C DVI-D connector AUX connector Connecting a Computer Equipped with a DVI-D Connector Connect a computer to the DVI-D connector on setting the DIP switches, refer to pull it out from LKRI-005. For details, refer to the input board attachment part. Notes • According to the input signal type, set "Signal Mode" on "Input Source" in the PICTURE CONTROL window...

Installation Guide (SXRD-install)
Page 18
Cable clamp Note When connecting to the output of HD component equipment, set "Signal Mode" of "Input Source" in the PICTURE CONTROL window to "YPbPr", and when connecting to the output of the projector. For details, see page 25. 3 Pass the AC power cord through the hole beneath the terminal, and tighten the screw for each wire as illustrated. Chapter 2 Installation and Connections Connecting with Component/Video GBR Equipment Attach...
Cable clamp Note When connecting to the output of HD component equipment, set "Signal Mode" of "Input Source" in the PICTURE CONTROL window to "YPbPr", and when connecting to the output of the projector. For details, see page 25. 3 Pass the AC power cord through the hole beneath the terminal, and tighten the screw for each wire as illustrated. Chapter 2 Installation and Connections Connecting with Component/Video GBR Equipment Attach...

Installation Guide (SXRD-install)
Page 27
...), Blue (0.1500, 0.0600) Color Temp settings 27 COLOR/FRAME Window When the screen mode is input from the connector on the LKRI-004 or LKRI-005 When you can obtain precise color reproduction. Input the values in the PICTURE CONTROL window to "1.8", and click the "CUSTOMIZE" button. DCDM: Select when projecting a signal source using the color gamut defined by clicking . When a signal is set "Gamma" to "RGB FULL". If the color of an image...
...), Blue (0.1500, 0.0600) Color Temp settings 27 COLOR/FRAME Window When the screen mode is input from the connector on the LKRI-004 or LKRI-005 When you can obtain precise color reproduction. Input the values in the PICTURE CONTROL window to "1.8", and click the "CUSTOMIZE" button. DCDM: Select when projecting a signal source using the color gamut defined by clicking . When a signal is set "Gamma" to "RGB FULL". If the color of an image...

Installation Guide (SXRD-install)
Page 32
... 3 Adjustments and Settings Using the SRX Controller 10 7 6 8 3 1 Open the SERVICE window. (See page 30.) 2 Select "sRGB(709)" or "Adobe RGB" in "Test Pattern Select" under "COLOR SPACE CONVERTER". 3 Click the "RESET" button. 4 Connect to 10 until the value is within the range. The test pattern for Gray10 will be displayed. 5 Measure the values of x and y in the center of the screen by...
... 3 Adjustments and Settings Using the SRX Controller 10 7 6 8 3 1 Open the SERVICE window. (See page 30.) 2 Select "sRGB(709)" or "Adobe RGB" in "Test Pattern Select" under "COLOR SPACE CONVERTER". 3 Click the "RESET" button. 4 Connect to 10 until the value is within the range. The test pattern for Gray10 will be displayed. 5 Measure the values of x and y in the center of the screen by...
Installation Guide (SXRD-install)
Page 37
... PICTURE CONTROL window is down . or down. 23 REAR COVER DETACHED The rear cover is open, or the harness is disconnected or down . replace the fan with a new one. 31 REAR FAN ALERT Trouble with a new one . 41 DVI SIGNAL FAILURE Inappropriate menu setting for replacement. board with a new one . 36 LAMP B ALERT The time used for Lamp A exceeds 80% Place an order for Lamp A. 25 LAMP_B POWER SUPPLY UNIT Temporary high temperature or some If the error message...
... PICTURE CONTROL window is down . or down. 23 REAR COVER DETACHED The rear cover is open, or the harness is disconnected or down . replace the fan with a new one. 31 REAR FAN ALERT Trouble with a new one . 41 DVI SIGNAL FAILURE Inappropriate menu setting for replacement. board with a new one . 36 LAMP B ALERT The time used for Lamp A exceeds 80% Place an order for Lamp A. 25 LAMP_B POWER SUPPLY UNIT Temporary high temperature or some If the error message...

Installation Guide (SXRD-install)
Page 43
... Error Messages 36 Exhaust duct adaptor 5, 15 F fH 26 Focus 28 Frame Adjust 28, 34 FUNCTION 1-7 24 fV 26 G Gamma 27 H H Shift 28 H Size 28 I I/P Mode 26 IMAGE FLIP 29 Input board 14 Input Signals And Adjustable/ Setting Items 34 Input Source 25 Install at ± 90 degrees angle 11 INSTALLATION window 28 Installing Lamp Houses 12 Internet Protocol (TCP/IP) 21 INTERPOLATION 31 L Lamp Life 35 LAMP POWER 29 LAMP SELECT 29 LAMP TIMER RESET 31 LAN 21 LENS CONTROL...
... Error Messages 36 Exhaust duct adaptor 5, 15 F fH 26 Focus 28 Frame Adjust 28, 34 FUNCTION 1-7 24 fV 26 G Gamma 27 H H Shift 28 H Size 28 I I/P Mode 26 IMAGE FLIP 29 Input board 14 Input Signals And Adjustable/ Setting Items 34 Input Source 25 Install at ± 90 degrees angle 11 INSTALLATION window 28 Installing Lamp Houses 12 Internet Protocol (TCP/IP) 21 INTERPOLATION 31 L Lamp Life 35 LAMP POWER 29 LAMP SELECT 29 LAMP TIMER RESET 31 LAN 21 LENS CONTROL...

User Manual (SXRD-operation)
Page 6
... After turning off the power, the cooling fan runs for 24 hours, it with a soft cloth. On illumination • To obtain the best picture, the front of its lamp life. Do not block or place anything near the installation location is recommended that face the screen with high precision technology. Chapter 1 Overview projector. To light the lamp continuously for about 10 minutes while the STATUS LAMP indicator flashes green...
... After turning off the power, the cooling fan runs for 24 hours, it with a soft cloth. On illumination • To obtain the best picture, the front of its lamp life. Do not block or place anything near the installation location is recommended that face the screen with high precision technology. Chapter 1 Overview projector. To light the lamp continuously for about 10 minutes while the STATUS LAMP indicator flashes green...

User Manual (SXRD-operation)
Page 7
... the projection distance you can reduce each of the SRX Controller. 7 Features High resolution Sony's new, unique three SXRD™ (Silicon X-tal Reflective Display) panels with precise color reproduction according to the input sources. Images from different input sources can select a gamma value from 1.80 to fit the desired screen size. You can select dual-lamp or single-lamp mode, and can register the zoom and focus settings adjusted to 2.59 in the window of...
... the projection distance you can reduce each of the SRX Controller. 7 Features High resolution Sony's new, unique three SXRD™ (Silicon X-tal Reflective Display) panels with precise color reproduction according to the input sources. Images from different input sources can select a gamma value from 1.80 to fit the desired screen size. You can select dual-lamp or single-lamp mode, and can register the zoom and focus settings adjusted to 2.59 in the window of...

User Manual (SXRD-operation)
Page 9
... features of INPUT A, INPUT B, INPUT C and INPUT D from the File menu exits the SRX Controller. The projector's lamps will be displayed only when an authorized administrator starts the SRX Controller on page 10. i ETHERNET connector (10BASE-T/100BASE-TX) Connect to the Installation Manual for controlling the projector. b SCREEN CONTROL window For details, see "Adjustments and Settings Using the SRX Controller" on the screen. AUX connector (24-pin DVI connector, male): Used for projecting an image on page...
... features of INPUT A, INPUT B, INPUT C and INPUT D from the File menu exits the SRX Controller. The projector's lamps will be displayed only when an authorized administrator starts the SRX Controller on page 10. i ETHERNET connector (10BASE-T/100BASE-TX) Connect to the Installation Manual for controlling the projector. b SCREEN CONTROL window For details, see "Adjustments and Settings Using the SRX Controller" on the screen. AUX connector (24-pin DVI connector, male): Used for projecting an image on page...
User Manual (SXRD-operation)
Page 10
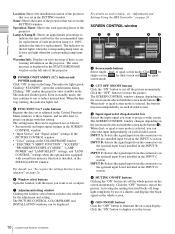
... the projector enter standby mode. or quad-screen mode is selected, you can be registered are as follows: • Screen mode and input signal settings in the SCREEN CONTROL window • "Input Source" and "Signal Adjust" settings in the PICTURE CONTROL window • "Color" settings in the INPUT B section. Click the "ON" button to display it later to project on the lamp. The indicator lights green. The PICTURE CONTROL, COLOR/FRAME and INSTALLATION windows can select the input independently on the optional input board installed in the SETTING window. Lamp A/Lamp...
... the projector enter standby mode. or quad-screen mode is selected, you can be registered are as follows: • Screen mode and input signal settings in the SCREEN CONTROL window • "Input Source" and "Signal Adjust" settings in the PICTURE CONTROL window • "Color" settings in the INPUT B section. Click the "ON" button to display it later to project on the lamp. The indicator lights green. The PICTURE CONTROL, COLOR/FRAME and INSTALLATION windows can select the input independently on the optional input board installed in the SETTING window. Lamp A/Lamp...

User Manual (SXRD-operation)
Page 11
...the button changes the mode, 1 (single), 2 (dual) and 4 (quad), in the INPUT B section. SCREEN SEL 1 2 3 4 8 LENS CONT + + + FOCUS - b SCREEN MODE button Selects single-, dual- Pressing the - Direct the Remote Commander toward one of Controls or quad-screen mode, adjustment can control the projector. 1 2 3 4 5 6 7 SCREEN MODE 1 I MUTING 1 2 4 FUNCTION 1 2 3 INPUT SEL A B C D PICTURE CONT + + + CONTR - In single-screen mode, you need not press the INPUT SEL button. installed input board in FUNCTION 4 to project the selected signal from...
...the button changes the mode, 1 (single), 2 (dual) and 4 (quad), in the INPUT B section. SCREEN SEL 1 2 3 4 8 LENS CONT + + + FOCUS - b SCREEN MODE button Selects single-, dual- Pressing the - Direct the Remote Commander toward one of Controls or quad-screen mode, adjustment can control the projector. 1 2 3 4 5 6 7 SCREEN MODE 1 I MUTING 1 2 4 FUNCTION 1 2 3 INPUT SEL A B C D PICTURE CONT + + + CONTR - In single-screen mode, you need not press the INPUT SEL button. installed input board in FUNCTION 4 to project the selected signal from...

User Manual (SXRD-operation)
Page 15
... optional lens attached, the horizontal screen size or the input signal. Horizontal positioning (top view) Install the projector so that the center of the lens is aligned horizontally with projection distances, see page 30. System Requirements The following are required to a computer via the IDE port, Usable memory with lens shift feature Installing the SRX Controller in a Computer for Dealers". HDD: Connected to operate the supplied SRX Controller. •...
... optional lens attached, the horizontal screen size or the input signal. Horizontal positioning (top view) Install the projector so that the center of the lens is aligned horizontally with projection distances, see page 30. System Requirements The following are required to a computer via the IDE port, Usable memory with lens shift feature Installing the SRX Controller in a Computer for Dealers". HDD: Connected to operate the supplied SRX Controller. •...

User Manual (SXRD-operation)
Page 36
... projector has failed to the INPUT A/B/C/D boards, or the harness is disconnected or down . Serious trouble 29 MUTING OFF FAILURE DOUSER OPEN FAILURE Trouble with opening/shutting of the error, and consult your Sony dealer. Chapter 5 Others Error Messages The error messages are two or more messages, a displayed message changes each five seconds. FAN ALERT 16 LAMP_B POWER SUPPLY UNIT Trouble with the main CPU (IC301) on the SY-321. Be sure to check...
... projector has failed to the INPUT A/B/C/D boards, or the harness is disconnected or down . Serious trouble 29 MUTING OFF FAILURE DOUSER OPEN FAILURE Trouble with opening/shutting of the error, and consult your Sony dealer. Chapter 5 Others Error Messages The error messages are two or more messages, a displayed message changes each five seconds. FAN ALERT 16 LAMP_B POWER SUPPLY UNIT Trouble with the main CPU (IC301) on the SY-321. Be sure to check...


