
Operating Instructions
Page 5
... contents 8 Step 2: Setting up the base phone 11 Step 3: Preparing the battery pack 13 Step 4: Entering your area code Basics 14 Making calls 16 Redialing 17 Receiving calls Telephone Features 19 One-touch dialing 19 Storing phone numbers 20 Making calls with one-touch dialing ...21 Speed dialing 21 Storing phone numbers 22 Making calls with speed dialing 23 Phone Directory 23 Storing phone numbers and names 24 Changing ...
... contents 8 Step 2: Setting up the base phone 11 Step 3: Preparing the battery pack 13 Step 4: Entering your area code Basics 14 Making calls 16 Redialing 17 Receiving calls Telephone Features 19 One-touch dialing 19 Storing phone numbers 20 Making calls with one-touch dialing ...21 Speed dialing 21 Storing phone numbers 22 Making calls with speed dialing 23 Phone Directory 23 Storing phone numbers and names 24 Changing ...

Operating Instructions
Page 6
... need to do three things to use the Caller ID service. Step 1 (page 7) First, unpack the phone and the supplied accessories. That's it up the base phone, including finding the best location for more than 12 hours. Here's a quick way to 12) Then, insert the battery pack into the handset and charge... it for the base phone. Base phone Handset Step 3 (pages 11 to set up your area code to set it ! 6US Getting Started Step 2 (pages 8 to 10) Next, you must first...
... need to do three things to use the Caller ID service. Step 1 (page 7) First, unpack the phone and the supplied accessories. That's it up the base phone, including finding the best location for more than 12 hours. Here's a quick way to 12) Then, insert the battery pack into the handset and charge... it for the base phone. Base phone Handset Step 3 (pages 11 to set up your area code to set it ! 6US Getting Started Step 2 (pages 8 to 10) Next, you must first...

Operating Instructions
Page 7
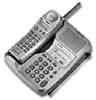
If anything is missing, contact your local Sony dealer. Getting Started AC power adaptor (AC-T46) Base phone Handset Telephone line cords (2) Wall bracket/stand for base phone Rechargeable battery pack (BP-T24) SPEED DIALING 1 6 2 7 3 8 4 9 5 0 SPEED DIALING 1 6 2 7 3 8 4 9 5 0 Directories Getting Started 7US Step 1 Checking the package contents Make sure you have received the following items in the package.
If anything is missing, contact your local Sony dealer. Getting Started AC power adaptor (AC-T46) Base phone Handset Telephone line cords (2) Wall bracket/stand for base phone Rechargeable battery pack (BP-T24) SPEED DIALING 1 6 2 7 3 8 4 9 5 0 SPEED DIALING 1 6 2 7 3 8 4 9 5 0 Directories Getting Started 7US Step 1 Checking the package contents Make sure you have received the following items in the package.
Operating Instructions
Page 8
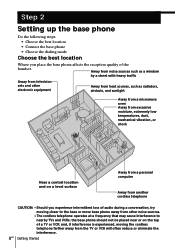
...steps: • Choose the best location • Connect the base phone • Choose the dialing mode Choose the best location Where you experience intermittent loss of audio during a conversation, try moving the cordless telephone farther away from other electronic equipment Away from heat sources, such ... street with heavy traffic Away from television sets and other noise sources. • The cordless telephone operates at a frequency that may cause interference to the base or move base phone away from the TV or VCR will often reduce or eliminate the interference. 8US Getting ...
...steps: • Choose the best location • Connect the base phone • Choose the dialing mode Choose the best location Where you experience intermittent loss of audio during a conversation, try moving the cordless telephone farther away from other electronic equipment Away from heat sources, such ... street with heavy traffic Away from television sets and other noise sources. • The cordless telephone operates at a frequency that may cause interference to the base or move base phone away from the TV or VCR will often reduce or eliminate the interference. 8US Getting ...

Operating Instructions
Page 9
... you want to hang the base phone on the wall, see page 40. 4 Getting Started Hook the cord. 3 To an AC outlet To DC IN 9V AC power adaptor (supplied) 2 1 Align the f marks. 2 To the telephone Telephone line cord (supplied) To LINE 1 outlet 1 Attach the wall bracket to ...the bottom of the base phone as a stand. 2 Connect the telephone line cord to the LINE jack and to a telephone outlet. 3 Connect the AC power adaptor to the DC IN 9V...
... you want to hang the base phone on the wall, see page 40. 4 Getting Started Hook the cord. 3 To an AC outlet To DC IN 9V AC power adaptor (supplied) 2 1 Align the f marks. 2 To the telephone Telephone line cord (supplied) To LINE 1 outlet 1 Attach the wall bracket to ...the bottom of the base phone as a stand. 2 Connect the telephone line cord to the LINE jack and to a telephone outlet. 3 Connect the AC power adaptor to the DC IN 9V...
Operating Instructions
Page 10
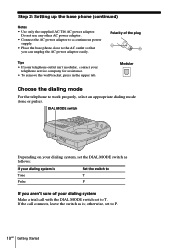
Step 2: Setting up the base phone (continued) Notes • Use only the supplied AC-T46 AC power adaptor. Polarity of your telephone service company for assistance. • To remove the wall bracket, press in the upper tab. Modular Choose the dialing mode For the telephone to P. 10US Getting Started otherwise,...dialing system is Tone Pulse Set the switch to the AC outlet so that you aren't sure of the plug Tips • If your telephone outlet isn't modular, contact your dialing system Make a trial call connects, leave the switch as is; DIAL MODE switch Depending on your ...
Step 2: Setting up the base phone (continued) Notes • Use only the supplied AC-T46 AC power adaptor. Polarity of your telephone service company for assistance. • To remove the wall bracket, press in the upper tab. Modular Choose the dialing mode For the telephone to P. 10US Getting Started otherwise,...dialing system is Tone Pulse Set the switch to the AC outlet so that you aren't sure of the plug Tips • If your telephone outlet isn't modular, contact your dialing system Make a trial call connects, leave the switch as is; DIAL MODE switch Depending on your ...

Operating Instructions
Page 11
.... Getting Started Red Black BP-T24 2 Connect the battery connector with either side facing up when the handset is properly seated on the base phone. Hook 4 Place the handset on the charge terminals of the handset. You can place it with correct polarity (black and red cords). 3... the battery pack. Then close the lid. Charge the battery pack for more than 12 hours before you start using your phone. 1 Slide open the battery compartment lid of the base phone. The CHARGE lamp remains lit even after charging is completed. CHARGE lamp continued Getting Started 11US
.... Getting Started Red Black BP-T24 2 Connect the battery connector with either side facing up when the handset is properly seated on the base phone. Hook 4 Place the handset on the charge terminals of the handset. You can place it with correct polarity (black and red cords). 3... the battery pack. Then close the lid. Charge the battery pack for more than 12 hours before you start using your phone. 1 Slide open the battery compartment lid of the base phone. The CHARGE lamp remains lit even after charging is completed. CHARGE lamp continued Getting Started 11US
Operating Instructions
Page 12
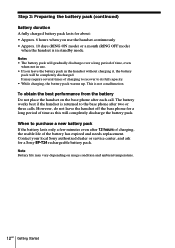
..., do not leave the handset off the base phone for a Sony BP-T24 rechargeable battery pack. Notes • The battery pack will gradually discharge over a long period of the battery has expired and needs replacement. It may vary depending on the base phone after 12 hours of charging, the usable life... may require several times of time as this will be completely discharged. Contact your local Sony authorized dealer or service center, and ask for a long period of charging to recover to the base phone after two or three calls. To obtain the best performance from the battery Do not...
..., do not leave the handset off the base phone for a Sony BP-T24 rechargeable battery pack. Notes • The battery pack will gradually discharge over a long period of the battery has expired and needs replacement. It may vary depending on the base phone after 12 hours of charging, the usable life... may require several times of time as this will be completely discharged. Contact your local Sony authorized dealer or service center, and ask for a long period of charging to recover to the base phone after two or three calls. To obtain the best performance from the battery Do not...

Operating Instructions
Page 13
...display in step 5. • To check the current area code, perform steps 1 to 3 above . Step 4 Entering your area code When you use this phone for 20 seconds. You'll hear a long confirmation beep. This is already entered, it appears on 4 the display. You'll hear a long confirmation beep.... Notes • If an area code is necessary because the phone must enter your three digits area code using the dialing keys. 4 Press (VOL/PGM). Enter your area code. Getting Started 13US DIRECTORY AREA Getting...
...display in step 5. • To check the current area code, perform steps 1 to 3 above . Step 4 Entering your area code When you use this phone for 20 seconds. You'll hear a long confirmation beep. This is already entered, it appears on 4 the display. You'll hear a long confirmation beep.... Notes • If an area code is necessary because the phone must enter your three digits area code using the dialing keys. 4 Press (VOL/PGM). Enter your area code. Getting Started 13US DIRECTORY AREA Getting...

Operating Instructions
Page 14
... (VOL/PGM) (*TONE) Additional tasks 1 Pick up . During a conversation, you 're connected. To Do this Adjust the handset volume During phone conversations, press (VOL/PGM). Press (HOLD) again to tone dialing temporarily Press (*TONE) after you can adjust the handset volume. Put a call... on the display, move closer to the base phone. 3 Dial the phone number. Switch to resume the conversation. Follow the procedure described in the following table. 4 When you hear five short error beeps...
... (VOL/PGM) (*TONE) Additional tasks 1 Pick up . During a conversation, you 're connected. To Do this Adjust the handset volume During phone conversations, press (VOL/PGM). Press (HOLD) again to tone dialing temporarily Press (*TONE) after you can adjust the handset volume. Put a call... on the display, move closer to the base phone. 3 Dial the phone number. Switch to resume the conversation. Follow the procedure described in the following table. 4 When you hear five short error beeps...
Operating Instructions
Page 15
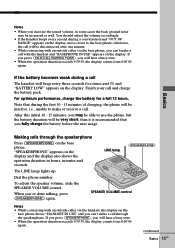
..." appears on the display. continued Basics 15US If the battery becomes weak during a conversation and "OUT OF RANGE" appears on the base phone shows "HANDSET IN USE" and you can 't make a call through the speakerphone Press (SPEAKERPHONE) on the display. Basics Making calls through... FLASH), you 're done talking, press (SPEAKERPHONE) again. thus it is recommended that during the first 10 - 15 minutes of charging, the phone will be increased as well. SPEAKER VOLUME control Notes • While conversing with the handset and "BASEPHONE IN USE" appears on the display and ...
..." appears on the display. continued Basics 15US If the battery becomes weak during a conversation and "OUT OF RANGE" appears on the base phone shows "HANDSET IN USE" and you can 't make a call through the speakerphone Press (SPEAKERPHONE) on the display. Basics Making calls through... FLASH), you 're done talking, press (SPEAKERPHONE) again. thus it is recommended that during the first 10 - 15 minutes of charging, the phone will be increased as well. SPEAKER VOLUME control Notes • While conversing with the handset and "BASEPHONE IN USE" appears on the display and ...

Operating Instructions
Page 16
... the best speakerphone performance • You may find that the number can't be erased from the memory, and you 're at the base phone, press (SPEAKERPHONE). In such cases, lower the speaker volume slightly. "SPEAKERPHONE" appears on the display. If you that the volume drops suddenly... with either the handset or base phone, press (REDIAL/PAUSE) twice within five seconds. The last number dialed is displayed. Therefore, use the speakerphone in a quiet room. • Do not bring your hand or other party's voice in the telephone designed to protect against feedback. This...
... the best speakerphone performance • You may find that the number can't be erased from the memory, and you 're at the base phone, press (SPEAKERPHONE). In such cases, lower the speaker volume slightly. "SPEAKERPHONE" appears on the display. If you that the volume drops suddenly... with either the handset or base phone, press (REDIAL/PAUSE) twice within five seconds. The last number dialed is displayed. Therefore, use the speakerphone in a quiet room. • Do not bring your hand or other party's voice in the telephone designed to protect against feedback. This...
Operating Instructions
Page 17
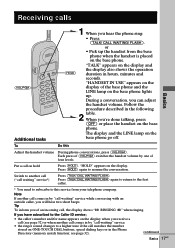
...USE" appears on the display of four levels. Follow the procedure described in by one of the base phone and the LINE lamp on the base phone lights up the handset from your telephone company. Note If another call ("call matches the number stored on ONE-TOUCH DIAL buttons, speed dialing ...keys or in the Phone Directory (memory match function; see page 32) or when another call comes in hours,...
...USE" appears on the display of four levels. Follow the procedure described in by one of the base phone and the LINE lamp on the base phone lights up the handset from your telephone company. Note If another call ("call matches the number stored on ONE-TOUCH DIAL buttons, speed dialing ...keys or in the Phone Directory (memory match function; see page 32) or when another call comes in hours,...

Operating Instructions
Page 18
... you set to OFF. • If there is set the RINGER switch on the base phone to OFF. Receiving calls (continued) To turn it off. * You need to subscribe to the service from your telephone company. 18US Note Even when you set to OFF, the handset will ring even when the... RINGER switch on hold Press (HOLD). RING switch Receiving calls through the speakerphone When you hear the phone ring, press (SPEAKERPHONE) on the bottom to inform...
... you set to OFF. • If there is set the RINGER switch on the base phone to OFF. Receiving calls (continued) To turn it off. * You need to subscribe to the service from your telephone company. 18US Note Even when you set to OFF, the handset will ring even when the... RINGER switch on hold Press (HOLD). RING switch Receiving calls through the speakerphone When you hear the phone ring, press (SPEAKERPHONE) on the bottom to inform...

Operating Instructions
Page 19
... a confirmation beep. Storing phone numbers 1 Press (VOL/PGM). A= ENTER NUMBER Telephone Features If a number is counted as one -touch dial button. You can dial with one touch of which is stored, it . 3 Enterthephonenumberyou want to store. The display goes off. continued Telephone Features 19US To store a...confirmation beep, and the number is stored. DIRECTORY AREA Jog Dial (REDIAL/PAUSE) 2 Pressoneofthethree ONE-TOUCH DIAL buttons ((A) to (C)). Telephone Features One-touch dialing You can enter up to 16 digits, including a tone and a pause, each of a key by storing...
... a confirmation beep. Storing phone numbers 1 Press (VOL/PGM). A= ENTER NUMBER Telephone Features If a number is counted as one -touch dial button. You can dial with one touch of which is stored, it . 3 Enterthephonenumberyou want to store. The display goes off. continued Telephone Features 19US To store a...confirmation beep, and the number is stored. DIRECTORY AREA Jog Dial (REDIAL/PAUSE) 2 Pressoneofthethree ONE-TOUCH DIAL buttons ((A) to (C)). Telephone Features One-touch dialing You can enter up to 16 digits, including a tone and a pause, each of a key by storing...

Operating Instructions
Page 20
... between each step of (VOL/PGM) in step 4. To dial the number, press (TALK/ CALL WAITING/ FLASH) while the number is displayed. 20US Telephone Features Tips • If you can replace the stored number with the handset, press one -touch dialing button will appear on the display and will... be dialed via Private Branch Exchange (PBX) Before entering a phone number in step 3 on the one of the ONE-TOUCH DIAL buttons ( (A) to (C)). The current number appears on the display for five seconds. ...
... between each step of (VOL/PGM) in step 4. To dial the number, press (TALK/ CALL WAITING/ FLASH) while the number is displayed. 20US Telephone Features Tips • If you can replace the stored number with the handset, press one -touch dialing button will appear on the display and will... be dialed via Private Branch Exchange (PBX) Before entering a phone number in step 3 on the one of the ONE-TOUCH DIAL buttons ( (A) to (C)). The current number appears on the display for five seconds. ...

Operating Instructions
Page 21
... on a dialing key. You can dial with a touch of the dialing keys ((0) to (9)) to store a phone number on the display. 2 Press (SPEED DIAL). continued Telephone Features 21US Storing phone numbers (REDIAL/PAUSE) (SPEAKERPHONE) 1 Press (PGM). "PROGRAM" appears on . 0= ENTER NUMBER You'll hear... a confirmation beep. 4 Enter the phone number you enter a wrong number in step 4, press ...
... on a dialing key. You can dial with a touch of the dialing keys ((0) to (9)) to store a phone number on the display. 2 Press (SPEED DIAL). continued Telephone Features 21US Storing phone numbers (REDIAL/PAUSE) (SPEAKERPHONE) 1 Press (PGM). "PROGRAM" appears on . 0= ENTER NUMBER You'll hear... a confirmation beep. 4 Enter the phone number you enter a wrong number in step 4, press ...

Operating Instructions
Page 22
... stored as the speed dialing number will be dialed via Private Branch Exchange (PBX) Before entering a phone number in step 4 on the display for five seconds. To check the phone number before speed dialing When not making a call with speed dialing 1 Press (SPEAKERPHONE). 2 Press (SPEED DIAL). 3...desired speed dialing number ( (0) to (9)). The number stored on the key appears on page 21, do as described previously. Making calls with the base phone, press (SPEED DIAL) and then one of the dialing keys ( (0) to (9)). Speed dialing (continued) To store a number to be dialed. To ...
... stored as the speed dialing number will be dialed via Private Branch Exchange (PBX) Before entering a phone number in step 4 on the display for five seconds. To check the phone number before speed dialing When not making a call with speed dialing 1 Press (SPEAKERPHONE). 2 Press (SPEED DIAL). 3...desired speed dialing number ( (0) to (9)). The number stored on the key appears on page 21, do as described previously. Making calls with the base phone, press (SPEED DIAL) and then one of the dialing keys ( (0) to (9)). Speed dialing (continued) To store a number to be dialed. To ...

Operating Instructions
Page 23
... appears. (See the character table for details.) Enter successive characters in which up to 50 phone numbers can enter up to move the cursor, press (6) twice (N), and press (9) three times (Y). SONY continued Telephone Features 23US Telephone Features Example: to enter "SONY", press (7) four times (S), press (6) three times (O), turn Jog Dial up to 15 characters. You...
... appears. (See the character table for details.) Enter successive characters in which up to 50 phone numbers can enter up to move the cursor, press (6) twice (N), and press (9) three times (Y). SONY continued Telephone Features 23US Telephone Features Example: to enter "SONY", press (7) four times (S), press (6) three times (O), turn Jog Dial up to 15 characters. You...

Operating Instructions
Page 24
... displayed. You'll hear a long confirmation beep, and the name and the number are stored. You cannot store the phone number. DIAL PGM ERASE 1234567 24US Telephone Features Tips • If you will hear five short error beeps and "MEMORY FULL" will be dialed via PBX, ...follow the steps on page 26. SONY 1234567 2 Press Jog Dial. SONY 1234567 6 Press (VOL/PGM). Changing a stored name and/or phone number 1 Displaythenameandphonenumberyouwant to ...
... displayed. You'll hear a long confirmation beep, and the name and the number are stored. You cannot store the phone number. DIAL PGM ERASE 1234567 24US Telephone Features Tips • If you will hear five short error beeps and "MEMORY FULL" will be dialed via PBX, ...follow the steps on page 26. SONY 1234567 2 Press Jog Dial. SONY 1234567 6 Press (VOL/PGM). Changing a stored name and/or phone number 1 Displaythenameandphonenumberyouwant to ...


