Operating Instructions
Page 6
... 28 Identifying the parts Basics 32 Making calls 32 Making calls with the cordless handset 35 Making call with the base phone 37 Redialing 39 Receiving calls 39 Receiving calls with the cordless handset 41 Receiving calls with the base phone Telephone Features 43 Phone Directory 43 Storing phone numbers and names 46 Making calls...
... 28 Identifying the parts Basics 32 Making calls 32 Making calls with the cordless handset 35 Making call with the base phone 37 Redialing 39 Receiving calls 39 Receiving calls with the cordless handset 41 Receiving calls with the base phone Telephone Features 43 Phone Directory 43 Storing phone numbers and names 46 Making calls...

Operating Instructions
Page 7
... the base phone 58 Transferring from the base phone to the cordless handset 59 Transferring between the cordless handsets Caller ID Features 60 Understanding the Caller ID service 60 When you receive a call 61 Looking at the Caller ID list 61 Viewing the ...call waiting" service 69 Using voice mail service 69 If you have messages Additional Information 71 Mounting the base phone on a wall 72 Carrying the cordless handset by the belt clip 73 Notes on power sources 74 Maintenance 75 Troubleshooting 79 Specifications 80 Index Back cover LIMITED WARRANTY Table of contents 7US
... the base phone 58 Transferring from the base phone to the cordless handset 59 Transferring between the cordless handsets Caller ID Features 60 Understanding the Caller ID service 60 When you receive a call 61 Looking at the Caller ID list 61 Viewing the ...call waiting" service 69 Using voice mail service 69 If you have messages Additional Information 71 Mounting the base phone on a wall 72 Carrying the cordless handset by the belt clip 73 Notes on power sources 74 Maintenance 75 Troubleshooting 79 Specifications 80 Index Back cover LIMITED WARRANTY Table of contents 7US
Operating Instructions
Page 8
...32 digits long by simple one-touch (page 23). 8US Getting Started talkie feature, it is necessary to purchase the SPP-H273 Sony cordless handset used for purchasing Sony QuadraStation 2.4! The distinctions are as follows: • Walkie-Talkie function - Other convenient features are explicitly explained in this...the system. The phone systems can be expanded to make an intercom conversation between the base phone and the cordless handset. use . (See "Registering additional cordless handsets" on page 25.) • Some procedures may vary according to the number of the same phone system far...
...32 digits long by simple one-touch (page 23). 8US Getting Started talkie feature, it is necessary to purchase the SPP-H273 Sony cordless handset used for purchasing Sony QuadraStation 2.4! The distinctions are as follows: • Walkie-Talkie function - Other convenient features are explicitly explained in this...the system. The phone systems can be expanded to make an intercom conversation between the base phone and the cordless handset. use . (See "Registering additional cordless handsets" on page 25.) • Some procedures may vary according to the number of the same phone system far...

Operating Instructions
Page 9
... (page 16) Choose an appropriate dialing mode. For changing the language of the display, follow the procedure in "Registering additional cordless handsets" on page 25. For using optional cordless handsets, follow the procedure in "Setting up the base phone, including finding the best location for the base phone. Step 5 (...Changing the language of the display" on page 23. Base phone Step 3 (pages 14 to 15) Insert the battery pack into the cordless handset and charge it ! Here's a quick way to set up your phone, you use the Caller ID service. Read this first Before you...
... (page 16) Choose an appropriate dialing mode. For changing the language of the display, follow the procedure in "Registering additional cordless handsets" on page 25. For using optional cordless handsets, follow the procedure in "Setting up the base phone, including finding the best location for the base phone. Step 5 (...Changing the language of the display" on page 23. Base phone Step 3 (pages 14 to 15) Insert the battery pack into the cordless handset and charge it ! Here's a quick way to set up your phone, you use the Caller ID service. Read this first Before you...
Operating Instructions
Page 10
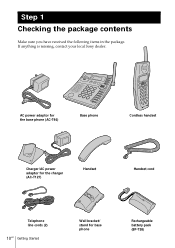
If anything is missing, contact your local Sony dealer. AC power adaptor for the base phone (AC-T46) Base phone Cordless handset Charger/AC power adaptor for the charger (AC-T127) Handset Handset cord Telephone line cords (2) 10US Getting Started Wall bracket/ stand for base phone Rechargeable battery pack (BP-T38) Step 1 Checking the package contents Make sure you have received the following items in the package.
If anything is missing, contact your local Sony dealer. AC power adaptor for the base phone (AC-T46) Base phone Cordless handset Charger/AC power adaptor for the charger (AC-T127) Handset Handset cord Telephone line cords (2) 10US Getting Started Wall bracket/ stand for base phone Rechargeable battery pack (BP-T38) Step 1 Checking the package contents Make sure you have received the following items in the package.
Operating Instructions
Page 11
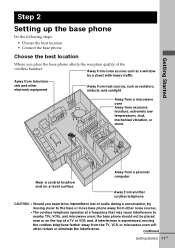
... base phone should not be placed near or on a level surface Away from a personal computer Away from another cordless telephone CAUTION: • Should you place the base phone affects the reception quality of the cordless handset. Getting Started Step 2 Setting up the base phone Do the following steps: • Choose the best location •...
... base phone should not be placed near or on a level surface Away from a personal computer Away from another cordless telephone CAUTION: • Should you place the base phone affects the reception quality of the cordless handset. Getting Started Step 2 Setting up the base phone Do the following steps: • Choose the best location •...

Operating Instructions
Page 12
...Hook the cord. 3 To an AC outlet To DC IN 9V AC power adaptor (supplied AC-T46) To LINE To HANDSET 2 To a telephone outlet Telephone line cord (supplied) To tilt the phone If you want to an AC outlet. 4 Raisetheantenna.Makesureit points towards the ceiling.... 12US Getting Started Align the f marks. 2 1 1 Connectthehandsetcordtothe HANDSET jack and to the handset. 2 Connectthetelephonelinecord to the LINE jack and to a telephone outlet. 3 ConnecttheACpoweradaptor to the DC IN 9V jack and to tilt the phone, attach the supplied ...
...Hook the cord. 3 To an AC outlet To DC IN 9V AC power adaptor (supplied AC-T46) To LINE To HANDSET 2 To a telephone outlet Telephone line cord (supplied) To tilt the phone If you want to an AC outlet. 4 Raisetheantenna.Makesureit points towards the ceiling.... 12US Getting Started Align the f marks. 2 1 1 Connectthehandsetcordtothe HANDSET jack and to the handset. 2 Connectthetelephonelinecord to the LINE jack and to a telephone outlet. 3 ConnecttheACpoweradaptor to the DC IN 9V jack and to tilt the phone, attach the supplied ...
Operating Instructions
Page 14
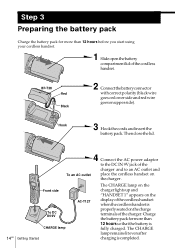
...Red Black 2 Connectthebatteryconnector with correct polarity (black wire goes on lower side and red wire goes on the charge terminals of the cordless handset when the cordless handset is properly seated on upper side). Front side To DC IN 9V CHARGE lamp 14US Getting Started AC-T127 The CHARGE lamp on ... close the lid. 4 Connect the AC power adaptor to the DC IN 9V jack of the cordless handset. Charge the battery pack for more than 12 hours before you start using your cordless handset. 1 Slideopenthebattery compartment lid of the charger and to an AC outlet and To an AC outlet ...
...Red Black 2 Connectthebatteryconnector with correct polarity (black wire goes on lower side and red wire goes on the charge terminals of the cordless handset when the cordless handset is properly seated on upper side). Front side To DC IN 9V CHARGE lamp 14US Getting Started AC-T127 The CHARGE lamp on ... close the lid. 4 Connect the AC power adaptor to the DC IN 9V jack of the cordless handset. Charge the battery pack for more than 12 hours before you start using your cordless handset. 1 Slideopenthebattery compartment lid of the charger and to an AC outlet and To an AC outlet ...

Operating Instructions
Page 15
... the battery lasts only a few minutes even after each cordless handset and base phone of registration. (See "Registering additional cordless handsets" on page 25.) HANDSET 1 NEW OLD MASSAGE RING OFF Battery duration A fully charged battery pack lasts for a Sony BP-T38 rechargeable battery pack. Contact your local Sony authorized dealer or service center, and ask for about...
... the battery lasts only a few minutes even after each cordless handset and base phone of registration. (See "Registering additional cordless handsets" on page 25.) HANDSET 1 NEW OLD MASSAGE RING OFF Battery duration A fully charged battery pack lasts for a Sony BP-T38 rechargeable battery pack. Contact your local Sony authorized dealer or service center, and ask for about...
Operating Instructions
Page 16
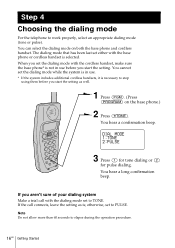
...of your dialing system Make a trial call connects, leave the setting as well. 1 Press (PGM). (Press (PROGRAM) on both the base phone and cordless handset. DIAL MODE 1:TONE 2:PULSE NEW OLD MASSAGE RING OFF 3 Press (1) for tone dialing or (2) for pulse dialing. Note Do not allow more than... a long confirmation beep. If the call with the dialing mode set the dialing mode with the base phone or cordless handset is ; Step 4 Choosing the dialing mode For the telephone to elapse during the operation procedure. 16US Getting Started You can select the dialing mode on the base phone.) 2...
...of your dialing system Make a trial call connects, leave the setting as well. 1 Press (PGM). (Press (PROGRAM) on both the base phone and cordless handset. DIAL MODE 1:TONE 2:PULSE NEW OLD MASSAGE RING OFF 3 Press (1) for tone dialing or (2) for pulse dialing. Note Do not allow more than... a long confirmation beep. If the call with the dialing mode set the dialing mode with the base phone or cordless handset is ; Step 4 Choosing the dialing mode For the telephone to elapse during the operation procedure. 16US Getting Started You can select the dialing mode on the base phone.) 2...
Operating Instructions
Page 17
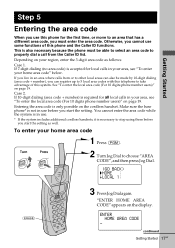
... also necessary because the phone must be made by 10-digit dialing (area code + number), you can register up to 5 local area codes with this telephone to an area that has a different area code, you must enter the area code. You cannot enter the area code while the system is required... (area code + number) is in your home area code 1 Press (PGM). Make sure the base phone* is not in use . * If the system includes additional cordless handsets, it is accepted for the first time, or move to take advantage of this phone and the Caller ID functions. If 7-digit dialing (no area...
... also necessary because the phone must be made by 10-digit dialing (area code + number), you can register up to 5 local area codes with this telephone to an area that has a different area code, you must enter the area code. You cannot enter the area code while the system is required... (area code + number) is in your home area code 1 Press (PGM). Make sure the base phone* is not in use . * If the system includes additional cordless handsets, it is accepted for the first time, or move to take advantage of this phone and the Caller ID functions. If 7-digit dialing (no area...

Operating Instructions
Page 18
... • If the home area code is pressed in use before you start the setting. * If the system includes additional cordless handsets, it appears on the display in step 2. Move the cordless handset closer to the previous set display by pressing Jog Dial. • To check the current home area code, perform steps 1 and...
... • If the home area code is pressed in use before you start the setting. * If the system includes additional cordless handsets, it appears on the display in step 2. Move the cordless handset closer to the previous set display by pressing Jog Dial. • To check the current home area code, perform steps 1 and...

Operating Instructions
Page 19
...Press (PGM). continued Getting Started 19US "ENTER LOCAL AREA CODE 1" appears on the display when you start the setting. * If the system includes additional cordless handsets, it appears on page 20. • Do not allow you can be heard after (PGM) is already entered, it is not in step 2. ...You hear a long confirmation beep. Move the cordless handset closer to the base phone, make sure the base phone* is necessary to the previous set display by turning Jog Dial. Notes • If ...
...Press (PGM). continued Getting Started 19US "ENTER LOCAL AREA CODE 1" appears on the display when you start the setting. * If the system includes additional cordless handsets, it appears on page 20. • Do not allow you can be heard after (PGM) is already entered, it is not in step 2. ...You hear a long confirmation beep. Move the cordless handset closer to the base phone, make sure the base phone* is necessary to the previous set display by turning Jog Dial. Notes • If ...
Operating Instructions
Page 21
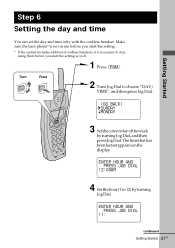
... the setting as well. 1 Press (PGM). Turn Press 2 Turn Jog Dial to stop using them before you start the setting. * If the system includes additional cordless handsets, it is necessary to choose "DAY/ TIME", and then press Jog Dial. (GO BACK) SUNDAY MONDAY NEW OLD MASSAGE RING OFF 3 Setthecorrectdayoftheweek by turning Jog... the day and time You can set appears on the display. The time that has been last set the day and time only with the cordless handset.
... the setting as well. 1 Press (PGM). Turn Press 2 Turn Jog Dial to stop using them before you start the setting. * If the system includes additional cordless handsets, it is necessary to choose "DAY/ TIME", and then press Jog Dial. (GO BACK) SUNDAY MONDAY NEW OLD MASSAGE RING OFF 3 Setthecorrectdayoftheweek by turning Jog... the day and time You can set appears on the display. The time that has been last set the day and time only with the cordless handset.
Operating Instructions
Page 22
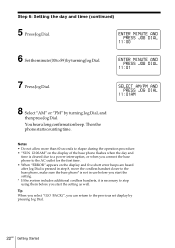
You hear a long confirmation beep. Tip When you select "(GO BACK)", you start the setting. * If the system includes additional cordless handsets, it is necessary to stop using them before you can return to the previous set display by turning Jog Dial, and then press Jog Dial. ... first time. • When "ERROR" appears on the display and five short error beeps are heard after Jog Dial is pressed in step 8, move the cordless handset closer to the base phone, make sure the base phone* is not in use before you start the setting as well. Step 6: Setting the day...
You hear a long confirmation beep. Tip When you select "(GO BACK)", you start the setting. * If the system includes additional cordless handsets, it is necessary to stop using them before you can return to the previous set display by turning Jog Dial, and then press Jog Dial. ... first time. • When "ERROR" appears on the display and five short error beeps are heard after Jog Dial is pressed in step 8, move the cordless handset closer to the base phone, make sure the base phone* is not in use before you start the setting as well. Step 6: Setting the day...

Operating Instructions
Page 23
... mail, long distance provider, or any set of numbers up to each unit (base phone and cordless handset). long distance provider. Getting Started (ERASE) (REDIAL/PAUSE) 1 Press (PGM). (Press (PROGRAM) on both the base phone and the cordless handset, further more than 60 seconds to elapse during the operation procedure. • You can register...
... mail, long distance provider, or any set of numbers up to each unit (base phone and cordless handset). long distance provider. Getting Started (ERASE) (REDIAL/PAUSE) 1 Press (PGM). (Press (PROGRAM) on both the base phone and the cordless handset, further more than 60 seconds to elapse during the operation procedure. • You can register...
Operating Instructions
Page 25
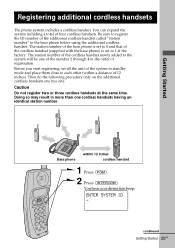
...to register the ID number of four cordless handsets. You hear a confirmation beep. Then do the following procedure only on the additional cordless handsets one bye one cordless handsets having an identical station number. Caution Do not register two or three cordless handsets at the factory. ENTER SYSTEM ID...in the order of 12 inches). Base phone within a distance of registration. The station number of the cordless handset newly added to each other (within 12 inches cordless handset 1 Press (PGM). 2 Press (INTERCOM). The station number of the base phone is set to 0...
...to register the ID number of four cordless handsets. You hear a confirmation beep. Then do the following procedure only on the additional cordless handsets one bye one cordless handsets having an identical station number. Caution Do not register two or three cordless handsets at the factory. ENTER SYSTEM ID...in the order of 12 inches). Base phone within a distance of registration. The station number of the cordless handset newly added to each other (within 12 inches cordless handset 1 Press (PGM). 2 Press (INTERCOM). The station number of the base phone is set to 0...

Operating Instructions
Page 26
...cordless handset you want to add to the system. • If you try to register a cordless handset... which you press any button other than 60 seconds to elapse during the operation procedure. • Once you add a cordless handset...added to the additional cordless handset The station number of the cordless handset appears on the display...station number is seated on the cordless handset. (For details, see Operating...) to use an unregistered cordless handset, the message "PLEASE REGISTER THIS HANDSET" will appear on the ... cordless handsets (continued) 3 Enter the 8 digits...
...cordless handset you want to add to the system. • If you try to register a cordless handset... which you press any button other than 60 seconds to elapse during the operation procedure. • Once you add a cordless handset...added to the additional cordless handset The station number of the cordless handset appears on the display...station number is seated on the cordless handset. (For details, see Operating...) to use an unregistered cordless handset, the message "PLEASE REGISTER THIS HANDSET" will appear on the ... cordless handsets (continued) 3 Enter the 8 digits...

Operating Instructions
Page 27
... RING OFF You will hear a long confirmation beep. Note Do not allow more , you can select the display language on each unit (base phone and cordless handset). Getting Started Changing the language of the display You can select the display language both the base phone and the... cordless handset, further more than 60 seconds to elapse during the operation procedure. To change the language from Spanish to English 1 Press (PGM). (Press (PROGRAM) on the ...
... RING OFF You will hear a long confirmation beep. Note Do not allow more , you can select the display language on each unit (base phone and cordless handset). Getting Started Changing the language of the display You can select the display language both the base phone and the... cordless handset, further more than 60 seconds to elapse during the operation procedure. To change the language from Spanish to English 1 Press (PGM). (Press (PROGRAM) on the ...

Operating Instructions
Page 28
... 36, 68) Switches to a second call if you have messages. 3 NEW CALL lamp (p. 61) Flashes when there is a "NEW" data in the Caller ID list. 4 Handset (p. 12, 35, 41) 5 Speaker 6 TONE button (p. 33) Allows you to switch temporarily to tone dialing. 7 Dialing keys (p. 35) 8 # button (p. 66) Used to... Refer to change the number of digits of the last five numbers called/inserts a pause in the dialing sequence. qs VOL + button (p. 35) Adjusts the handset or speaker volume. qd Jog Dial (p. 21, 61) qf EZ ACCESS button (p. 23, 35) Lets you make a call . 28US Getting Started Base phone 1 9 0...
... 36, 68) Switches to a second call if you have messages. 3 NEW CALL lamp (p. 61) Flashes when there is a "NEW" data in the Caller ID list. 4 Handset (p. 12, 35, 41) 5 Speaker 6 TONE button (p. 33) Allows you to switch temporarily to tone dialing. 7 Dialing keys (p. 35) 8 # button (p. 66) Used to... Refer to change the number of digits of the last five numbers called/inserts a pause in the dialing sequence. qs VOL + button (p. 35) Adjusts the handset or speaker volume. qd Jog Dial (p. 21, 61) qf EZ ACCESS button (p. 23, 35) Lets you make a call . 28US Getting Started Base phone 1 9 0...


