
Operating Instructions
Page 6
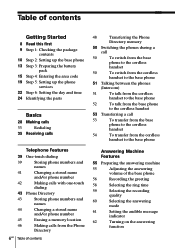
... Redialing 35 Receiving calls Telephone Features 39 One-touch dialing 39 Storing phone numbers and names 41 Changing a stored name and/or phone number 42 Making calls with one-touch dialing 43 Phone Directory 43 Storing phone numbers and names 44...cordless handset to the base phone 52 To talk from the base phone to the cordless handset 53 Transferring a call 53 To transfer from the base phone to the cordless handset 54 To transfer from the cordless handset to the base phone Answering Machine Features 55 Preparing the answering machine 55 Adjusting the answering...
... Redialing 35 Receiving calls Telephone Features 39 One-touch dialing 39 Storing phone numbers and names 41 Changing a stored name and/or phone number 42 Making calls with one-touch dialing 43 Phone Directory 43 Storing phone numbers and names 44...cordless handset to the base phone 52 To talk from the base phone to the cordless handset 53 Transferring a call 53 To transfer from the base phone to the cordless handset 54 To transfer from the cordless handset to the base phone Answering Machine Features 55 Preparing the answering machine 55 Adjusting the answering...

Operating Instructions
Page 7
...To screen incoming calls on the cordless handset 66 To answer the call 67 Recording a memo 68 Operating from an outside phone 68 Setting the remote ID code (security code) 69 Picking up new messages Additional Information 81 Mounting the base phone on a wall 82 Carrying the cordless handset by the belt clip 84... from the Caller ID list 76 Playing back a message from the Caller ID list 77 Storing a number of the Caller ID list into the Phone Directory 78 To change the number of digits of the phone number 80 Using "Caller ID with call waiting" service Table of contents 7US
...To screen incoming calls on the cordless handset 66 To answer the call 67 Recording a memo 68 Operating from an outside phone 68 Setting the remote ID code (security code) 69 Picking up new messages Additional Information 81 Mounting the base phone on a wall 82 Carrying the cordless handset by the belt clip 84... from the Caller ID list 76 Playing back a message from the Caller ID list 77 Storing a number of the Caller ID list into the Phone Directory 78 To change the number of digits of the phone number 80 Using "Caller ID with call waiting" service Table of contents 7US
Operating Instructions
Page 8
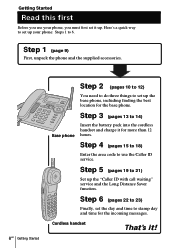
... way to set the day and time to 6. Step 3 (pages 13 to 21) Set up your phone, you use the Caller ID service. Step 5 (pages 19 to 14) Base phone Insert the battery pack into the cordless handset and charge it ! Step 4 (pages 15 to 18) Enter the area code to set it... up the base phone, including finding the best location for the base phone. Getting Started Read this first Before you must first...
... way to set the day and time to 6. Step 3 (pages 13 to 21) Set up your phone, you use the Caller ID service. Step 5 (pages 19 to 14) Base phone Insert the battery pack into the cordless handset and charge it ! Step 4 (pages 15 to 18) Enter the area code to set it... up the base phone, including finding the best location for the base phone. Getting Started Read this first Before you must first...
Operating Instructions
Page 9
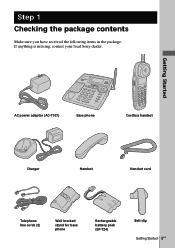
Step 1 Checking the package contents Make sure you have received the following items in the package. If anything is missing, contact your local Sony dealer. Getting Started AC power adaptor (AC-T107) Base phone Cordless handset Charger Handset Handset cord Telephone line cords (2) Wall bracket/ stand for base phone Rechargeable battery pack (BP-T24) Belt clip Getting Started 9US
Step 1 Checking the package contents Make sure you have received the following items in the package. If anything is missing, contact your local Sony dealer. Getting Started AC power adaptor (AC-T107) Base phone Cordless handset Charger Handset Handset cord Telephone line cords (2) Wall bracket/ stand for base phone Rechargeable battery pack (BP-T24) Belt clip Getting Started 9US
Operating Instructions
Page 10
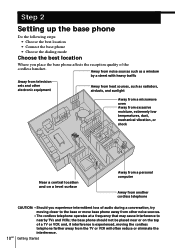
...a street with heavy traffic Away from television sets and other noise sources. • The cordless telephone operates at a frequency that may cause interference to nearby TVs and VCRs; the base phone should not be placed near or on a level surface Away from a personal computer Away ...from another cordless telephone 10US CAUTION: • Should you place the base phone affects the reception quality of the cordless handset. and, if interference is experienced, moving closer to the base or move base phone away from other electronic equipment Away from heat...
...a street with heavy traffic Away from television sets and other noise sources. • The cordless telephone operates at a frequency that may cause interference to nearby TVs and VCRs; the base phone should not be placed near or on a level surface Away from a personal computer Away ...from another cordless telephone 10US CAUTION: • Should you place the base phone affects the reception quality of the cordless handset. and, if interference is experienced, moving closer to the base or move base phone away from other electronic equipment Away from heat...
Operating Instructions
Page 11
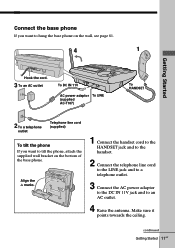
... the handset cord to the HANDSET jack and to the handset. 2 Connect the telephone line cord to the LINE jack and to a telephone outlet. 3 Connect the AC power adaptor to the DC IN 11V jack and to tilt the phone, attach the supplied wall bracket on the wall, see page 81. 4 1 ... adaptor To LINE (supplied AC-T107) To HANDSET 2 To a telephone outlet Telephone line cord (supplied) To tilt the phone If you want to hang the base phone on the bottom of the base phone. Make sure it points towards the ceiling. Connect the base phone If you want to an AC outlet. 4 Raise the antenna.
... the handset cord to the HANDSET jack and to the handset. 2 Connect the telephone line cord to the LINE jack and to a telephone outlet. 3 Connect the AC power adaptor to the DC IN 11V jack and to tilt the phone, attach the supplied wall bracket on the wall, see page 81. 4 1 ... adaptor To LINE (supplied AC-T107) To HANDSET 2 To a telephone outlet Telephone line cord (supplied) To tilt the phone If you want to hang the base phone on the bottom of the base phone. Make sure it points towards the ceiling. Connect the base phone If you want to an AC outlet. 4 Raise the antenna.

Operating Instructions
Page 12
...power adaptor. • Connect the AC power adaptor to a continuous power supply. • Place the base phone close to P. 12US Getting Started Modular Choose the dialing mode For the telephone to T. DIAL MODE switch Depending on your dialing system, set to the AC outlet so that you aren...'t sure of the plug Tip If your telephone service company for assistance. Step 2: Setting up the base phone (continued) Notes • Use ...
...power adaptor. • Connect the AC power adaptor to a continuous power supply. • Place the base phone close to P. 12US Getting Started Modular Choose the dialing mode For the telephone to T. DIAL MODE switch Depending on your dialing system, set to the AC outlet so that you aren...'t sure of the plug Tip If your telephone service company for assistance. Step 2: Setting up the base phone (continued) Notes • Use ...

Operating Instructions
Page 15
...local calls in your area, see "To enter the local area code (For 10 digits phone number users)" on page 17. If you must be made by 10-digit dialing (area code + number), you cannot use this telephone to choose "BASE SETTINGS", and then press Jog Button (ENTER). BASE SETTINGS GO BACK... AREA CODE PHONE SERVICES CLOCK 3 Press Jog Button (ENTER). See "To enter the local area code (For 10 digits...
...local calls in your area, see "To enter the local area code (For 10 digits phone number users)" on page 17. If you must be made by 10-digit dialing (area code + number), you cannot use this telephone to choose "BASE SETTINGS", and then press Jog Button (ENTER). BASE SETTINGS GO BACK... AREA CODE PHONE SERVICES CLOCK 3 Press Jog Button (ENTER). See "To enter the local area code (For 10 digits...
Operating Instructions
Page 16
... has not been entered, calling back from the Caller ID list and storing the Caller ID data into the Phone Directory cannot be heard after (PROGRAM) is not correctly entered, "SEND TO CORDLESS HANDSET FAILED." The home area code will be performed. • If the home area code is pressed in step... you can erase the home area code. The home area code appears on the display. appears on the display for about 20 seconds. Move the cordless handset closer to the base phone, and then start over the procedure. You hear a long confirmation beep.
... has not been entered, calling back from the Caller ID list and storing the Caller ID data into the Phone Directory cannot be heard after (PROGRAM) is not correctly entered, "SEND TO CORDLESS HANDSET FAILED." The home area code will be performed. • If the home area code is pressed in step... you can erase the home area code. The home area code appears on the display. appears on the display for about 20 seconds. Move the cordless handset closer to the base phone, and then start over the procedure. You hear a long confirmation beep.
Operating Instructions
Page 17
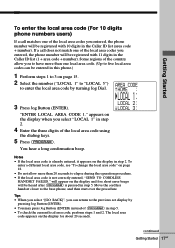
... allow you can be heard after (PROGRAM) is already entered, it appears on page 15. 2 Select the number ("LOCAL 1" to "LOCAL 5") to the base phone, and then start over the procedure. AREA CODE HOME : LOCAL 1: LOCAL 2: LOCAL 3: Notes • If the local area code is pressed in step 5....local area codes can return to elapse during the operation procedure. • If the local area code is not correctly entered, "SEND TO CORDLESS HANDSET FAILED." appears on the display for about 20 seconds. continued Getting Started 17US Some regions of the country allow more than 20 seconds to...
... allow you can be heard after (PROGRAM) is already entered, it appears on page 15. 2 Select the number ("LOCAL 1" to "LOCAL 5") to the base phone, and then start over the procedure. AREA CODE HOME : LOCAL 1: LOCAL 2: LOCAL 3: Notes • If the local area code is pressed in step 5....local area codes can return to elapse during the operation procedure. • If the local area code is not correctly entered, "SEND TO CORDLESS HANDSET FAILED." appears on the display for about 20 seconds. continued Getting Started 17US Some regions of the country allow more than 20 seconds to...

Operating Instructions
Page 19
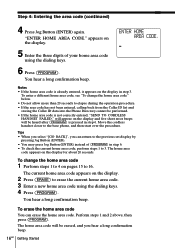
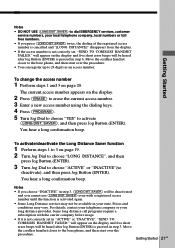
...CALL WAITING ID GO BACK ACTIVE INACTIVE 5 Turn Jog Dial to choose "PHONE SERVICES", and then press Jog Button (ENTER). continued Getting Started 19US Step 5 Setting up the phone services Getting Started Set up the phone services is preset to "Caller ID with call waiting" service and the Long... Distance Saver function before use this service, you must first subscribe to "ACTIVE". (ERASE) (LONG DIST. PHONE SERVICES GO BACK CALL WAITING ID LONG DISTANCE 4 Press Jog Button (ENTER). To set up the "Caller ID with call waiting" service In ...
...CALL WAITING ID GO BACK ACTIVE INACTIVE 5 Turn Jog Dial to choose "PHONE SERVICES", and then press Jog Button (ENTER). continued Getting Started 19US Step 5 Setting up the phone services Getting Started Set up the phone services is preset to "Caller ID with call waiting" service and the Long... Distance Saver function before use this service, you must first subscribe to "ACTIVE". (ERASE) (LONG DIST. PHONE SERVICES GO BACK CALL WAITING ID LONG DISTANCE 4 Press Jog Button (ENTER). To set up the "Caller ID with call waiting" service In ...
Operating Instructions
Page 20
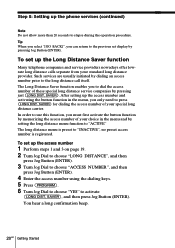
...setting the long distance menu function to "ACTIVE" The long distance menu is preset to the long distance call itself. To set up the phone services (continued) Note Do not allow more than 20 seconds to dial the access number of your special long distance carrier. Step 5: ...Setting up the Long Distance Saver function Many telephone companies and service providers nowadays offer lowrate long distance calls separate from your standard long distance provider. SAVER). In order to use this function...
...setting the long distance menu function to "ACTIVE" The long distance menu is preset to the long distance call itself. To set up the phone services (continued) Note Do not allow more than 20 seconds to dial the access number of your special long distance carrier. Step 5: ...Setting up the Long Distance Saver function Many telephone companies and service providers nowadays offer lowrate long distance calls separate from your standard long distance provider. SAVER). In order to use this function...
Operating Instructions
Page 21
... telephone company, local numbers or toll free numbers. • If you choose "INACTIVE" in step 6. Getting Started 21US will appear on the display and five short error beeps will be heard after Jog Button (ENTER) is activated again. • Some Long Distance services may vary. Move the cordless ... will be heard after Jog Button (ENTER) is not correctly set in step 3. You hear a long confirmation beep. SAVER) to the base phone, and then start over the procedure. The current access number appears on page 20. SAVER) twice, the dialing of the registered access number is...
... telephone company, local numbers or toll free numbers. • If you choose "INACTIVE" in step 6. Getting Started 21US will appear on the display and five short error beeps will be heard after Jog Button (ENTER) is activated again. • Some Long Distance services may vary. Move the cordless ... will be heard after Jog Button (ENTER) is not correctly set in step 3. You hear a long confirmation beep. SAVER) to the base phone, and then start over the procedure. The current access number appears on page 20. SAVER) twice, the dialing of the registered access number is...

Operating Instructions
Page 23
...). Notes • Do not allow more than 60 seconds to elapse during the operation procedure. • "SUN 12:00AM" on the display of the base phone flashes when the day and time is announced. You hear a long confirmation beep and the day and time you just entered is cleared due to... the current day and time are not set, you will not hear a time stamp when you connect the base phone to the previous set display by pressing Jog Button (ENTER). Then the phone starts counting time. ENTER MINUTE AND PRESS JOG BUTTON 12:00AM 6 Set the minute (00 to 12) by turning...
...). Notes • Do not allow more than 60 seconds to elapse during the operation procedure. • "SUN 12:00AM" on the display of the base phone flashes when the day and time is announced. You hear a long confirmation beep and the day and time you just entered is cleared due to... the current day and time are not set, you will not hear a time stamp when you connect the base phone to the previous set display by pressing Jog Button (ENTER). Then the phone starts counting time. ENTER MINUTE AND PRESS JOG BUTTON 12:00AM 6 Set the minute (00 to 12) by turning...
Operating Instructions
Page 24
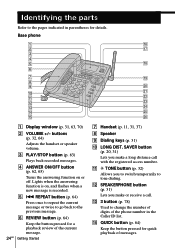
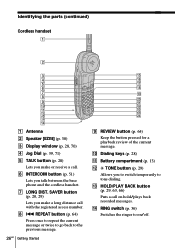
...the parts Refer to tone dialing. Lights when the answering function is on or off. qd # button (p. 78) Used to the previous message. 6 REVIEW button (p. 64) Keep the button pressed for a playback review of the phone number in parentheses for quick playback of messages. wa ...details. buttons (p. 32, 64) Adjusts the handset or speaker volume. 3 PLAY/STOP button (p. 63) Plays back recorded messages. 4 ANSWER ON/OFF button (p. 62, 63) Turns the answering function on , and flashes when a new message is recorded. 5 . qs SPEAKERPHONE button (p. 31) Lets you make a long distance ...
...the parts Refer to tone dialing. Lights when the answering function is on or off. qd # button (p. 78) Used to the previous message. 6 REVIEW button (p. 64) Keep the button pressed for a playback review of the phone number in parentheses for quick playback of messages. wa ...details. buttons (p. 32, 64) Adjusts the handset or speaker volume. 3 PLAY/STOP button (p. 63) Plays back recorded messages. 4 ANSWER ON/OFF button (p. 62, 63) Turns the answering function on , and flashes when a new message is recorded. 5 . qs SPEAKERPHONE button (p. 31) Lets you make a long distance ...
Operating Instructions
Page 25
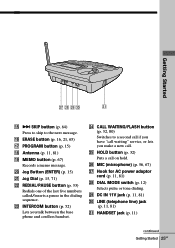
... or tone dialing. qh ERASE button (p. 16, 21, 65) qj PROGRAM button (p. 15) qk Antenna (p. 11, 81) ql MEMO button (p. 67) Records a memo message. LINE (telephone line) jack (p. 11, 81) ea HANDSET jack (p. 11) continued Getting Started 25US wd INTERCOM button (p. 52) Lets you make a new call on hold. wl DC... sequence. ea qg > SKIP button (p. 64) Press to skip to a second call if you have "call waiting" service, or lets you talk between the base phone and cordless handset.
... or tone dialing. qh ERASE button (p. 16, 21, 65) qj PROGRAM button (p. 15) qk Antenna (p. 11, 81) ql MEMO button (p. 67) Records a memo message. LINE (telephone line) jack (p. 11, 81) ea HANDSET jack (p. 11) continued Getting Started 25US wd INTERCOM button (p. 52) Lets you make a new call on hold. wl DC... sequence. ea qg > SKIP button (p. 64) Press to skip to a second call if you have "call waiting" service, or lets you talk between the base phone and cordless handset.
Operating Instructions
Page 26
... or receive a call. 6 INTERCOM button (p. 51) Lets you make a long distance call on /off. SAVER button (p. 20, 29) Lets you talk between the base phone and the cordless handset. 7 LONG DIST. qf RING switch (p. 36) Switches the ringer to the previous message. 26US Getting Started qg qh qj qk ql w; REPEAT button...
... or receive a call. 6 INTERCOM button (p. 51) Lets you make a long distance call on /off. SAVER button (p. 20, 29) Lets you talk between the base phone and the cordless handset. 7 LONG DIST. qf RING switch (p. 36) Switches the ringer to the previous message. 26US Getting Started qg qh qj qk ql w; REPEAT button...
Operating Instructions
Page 27
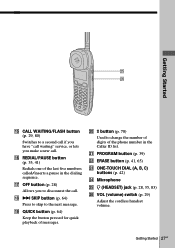
... five numbers called/inserts a pause in the Caller ID list. qk > SKIP button (p. 64) Press to skip to change the number of digits of the phone number in the dialing sequence. wa PROGRAM button (p. 39) ws ERASE button (p. 41, 65) wd ONE-TOUCH DIAL (A, B, C) buttons (p. 42) wf Microphone wg I... (HEADSET) jack (p. 28, 35, 83) wh VOL (volume) switch (p. 29) Adjust the cordless handset volume. Getting Started 27US qj OFF button (p. 28) Allows you to a second call if you have "call waiting" service, or lets you make a new...
... five numbers called/inserts a pause in the Caller ID list. qk > SKIP button (p. 64) Press to skip to change the number of digits of the phone number in the dialing sequence. wa PROGRAM button (p. 39) ws ERASE button (p. 41, 65) wd ONE-TOUCH DIAL (A, B, C) buttons (p. 42) wf Microphone wg I... (HEADSET) jack (p. 28, 35, 83) wh VOL (volume) switch (p. 29) Adjust the cordless handset volume. Getting Started 27US qj OFF button (p. 28) Allows you to a second call if you have "call waiting" service, or lets you make a new...
Operating Instructions
Page 28
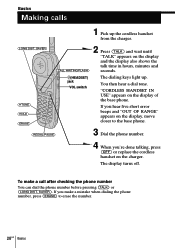
... display turns off. SAVER). If you make a call after checking the phone number You can dial the phone number before pressing (TALK) or (LONG DIST. If you 're done talking, press (OFF) or replace the cordless handset on the display and the display also shows the talk time in ... (HOLD) (ERASE) I(HEADSET) jack VOL switch The dialing keys light up the cordless handset from the charger. (LONG DIST. To make a mistake when dialing the phone number, press (ERASE) to the base phone. (REDIAL/PAUSE) 3 Dial the phone number. 4 When you hear five short error beeps and "OUT OF RANGE" appears...
... display turns off. SAVER). If you make a call after checking the phone number You can dial the phone number before pressing (TALK) or (LONG DIST. If you 're done talking, press (OFF) or replace the cordless handset on the display and the display also shows the talk time in ... (HOLD) (ERASE) I(HEADSET) jack VOL switch The dialing keys light up the cordless handset from the charger. (LONG DIST. To make a mistake when dialing the phone number, press (ERASE) to the base phone. (REDIAL/PAUSE) 3 Dial the phone number. 4 When you hear five short error beeps and "OUT OF RANGE" appears...
Operating Instructions
Page 29
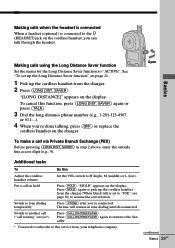
... through the headset. SAVER) again or press (TALK). 3 Dial the long distance phone number (e.g., 1-201-123-4567, or 011-...). 4 When you're done talking, press (OFF) or replace the cordless handset on hold Press (HOLD). Basics Making calls using the Long Distance Saver function ...Set the menu for the Long Distance Saver function to another call ("call waiting" service*) Press (CALL WAITING/FLASH). continued Basics 29US To cancel this service from your telephone company....
... through the headset. SAVER) again or press (TALK). 3 Dial the long distance phone number (e.g., 1-201-123-4567, or 011-...). 4 When you're done talking, press (OFF) or replace the cordless handset on hold Press (HOLD). Basics Making calls using the Long Distance Saver function ...Set the menu for the Long Distance Saver function to another call ("call waiting" service*) Press (CALL WAITING/FLASH). continued Basics 29US To cancel this service from your telephone company....


