Operating Instructions
Page 1
3-232-389-12 (1) Cordless Telephone with Answering System Operating Instructions US Hearing-Aid Compatible SPP-A2770 ©2001 Sony Corporation
3-232-389-12 (1) Cordless Telephone with Answering System Operating Instructions US Hearing-Aid Compatible SPP-A2770 ©2001 Sony Corporation
Operating Instructions
Page 2
...Class B digital device, pursuant to Part 15 of the unit. Model No. Do not use the telephone to report a gas leak in the vicinity of batteries in a fire. SPP-A2770 Serial No 2US Caution You are located at the bottom of the FCC Rules. Consult the dealer or ... than a cordless type) during telephone conversation. 2. There may not cause interference, and (2)This device must accept any way. Use only the power cord and batteries indicated in a particular installation. Refer to these numbers whenever you call upon your Sony dealer regarding this equipment does cause harmful ...
...Class B digital device, pursuant to Part 15 of the unit. Model No. Do not use the telephone to report a gas leak in the vicinity of batteries in a fire. SPP-A2770 Serial No 2US Caution You are located at the bottom of the FCC Rules. Consult the dealer or ... than a cordless type) during telephone conversation. 2. There may not cause interference, and (2)This device must accept any way. Use only the power cord and batteries indicated in a particular installation. Refer to these numbers whenever you call upon your Sony dealer regarding this equipment does cause harmful ...
Operating Instructions
Page 3
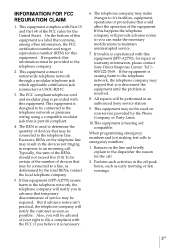
... is causing harm to the telephone network, the telephone company may be connected to the telephone line. This equipment is necessary. 6. The REN is resolved. 8. Also, you in response to a line, as possible. If this equipment (SPP-A2770), for this equipment. All ...Sony service station. 9. The FCC compliant telephone cord and modular plug is hearing aid compatible. Typically, the sum of the RENs should not exceed five (5.0).To be certain of the number of devices that temporary discontinuance of this equipment (SPP-A2770) causes harm to the telephone network, the telephone...
... is causing harm to the telephone network, the telephone company may be connected to the telephone line. This equipment is necessary. 6. The REN is resolved. 8. Also, you in response to a line, as possible. If this equipment (SPP-A2770), for this equipment. All ...Sony service station. 9. The FCC compliant telephone cord and modular plug is hearing aid compatible. Typically, the sum of the RENs should not exceed five (5.0).To be certain of the number of devices that temporary discontinuance of this equipment (SPP-A2770) causes harm to the telephone network, the telephone...
Operating Instructions
Page 6
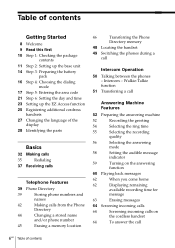
... 63 Erasing messages 64 Screening incoming calls 64 Screening incoming calls on the cordless handset 64 To answer the call 6US Table of the display 28 Identifying the parts Basics 32 Making calls 35 Redialing 37 Receiving calls Telephone Features 39 Phone Directory 39 Storing phone numbers and names 42 Making calls...
... 63 Erasing messages 64 Screening incoming calls 64 Screening incoming calls on the cordless handset 64 To answer the call 6US Table of the display 28 Identifying the parts Basics 32 Making calls 35 Redialing 37 Receiving calls Telephone Features 39 Phone Directory 39 Storing phone numbers and names 42 Making calls...
Operating Instructions
Page 7
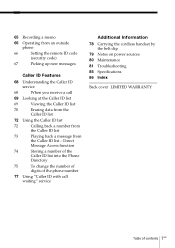
... Picking up new messages Caller ID Features 68 Understanding the Caller ID service 68 When you receive a call waiting" service Additional Information 78 Carrying the cordless handset by the belt clip 79 Notes on power sources 80 Maintenance 81 Troubleshooting 85 Specifications 86 Index Back cover LIMITED WARRANTY Table of the...
... Picking up new messages Caller ID Features 68 Understanding the Caller ID service 68 When you receive a call waiting" service Additional Information 78 Carrying the cordless handset by the belt clip 79 Notes on power sources 80 Maintenance 81 Troubleshooting 85 Specifications 86 Index Back cover LIMITED WARRANTY Table of the...
Operating Instructions
Page 8
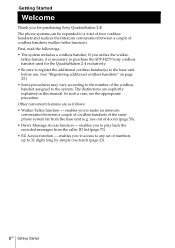
...). 8US Getting Started If you utilize the walkie- enables you to the system. enables you to access to any set of the cordless handset assigned to make an intercom conversation between a couple of the same phone system far from the caller ID list (page 73... function - In such a case, see the appropriate procedure. talkie feature, it is necessary to purchase the SPP-H273 Sony cordless handset used for purchasing Sony QuadraStation 2.4! use . (See "Registering additional cordless handsets" on page 25.) • Some procedures may vary according to the number of numbers up to play...
...). 8US Getting Started If you utilize the walkie- enables you to the system. enables you to access to any set of the cordless handset assigned to make an intercom conversation between a couple of the same phone system far from the caller ID list (page 73... function - In such a case, see the appropriate procedure. talkie feature, it is necessary to purchase the SPP-H273 Sony cordless handset used for purchasing Sony QuadraStation 2.4! use . (See "Registering additional cordless handsets" on page 25.) • Some procedures may vary according to the number of numbers up to play...
Operating Instructions
Page 9
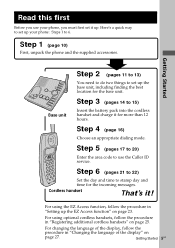
...the base unit, including finding the best location for the base unit. Step 4 (page 16) Choose an appropriate dialing mode. For using optional cordless handsets, follow the procedure in "Setting up your phone, you use the Caller ID service. Getting Started Step 2 (pages 11 to 13) You... 6. Step 5 (pages 17 to 20) Enter the area code to use your phone: Steps 1 to 15) Insert the battery pack into the cordless handset and charge it ! For using the EZ Access function, follow the procedure in "Changing the language of the display, follow the procedure in "...
...the base unit, including finding the best location for the base unit. Step 4 (page 16) Choose an appropriate dialing mode. For using optional cordless handsets, follow the procedure in "Setting up your phone, you use the Caller ID service. Getting Started Step 2 (pages 11 to 13) You... 6. Step 5 (pages 17 to 20) Enter the area code to use your phone: Steps 1 to 15) Insert the battery pack into the cordless handset and charge it ! For using the EZ Access function, follow the procedure in "Changing the language of the display, follow the procedure in "...
Operating Instructions
Page 10
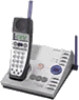
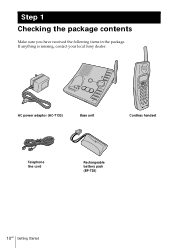
Step 1 Checking the package contents Make sure you have received the following items in the package. If anything is missing, contact your local Sony dealer. AC power adaptor (AC-T133) Base unit Cordless handset Telephone line cord Rechargeable battery pack (BP-T38) 10US Getting Started
Step 1 Checking the package contents Make sure you have received the following items in the package. If anything is missing, contact your local Sony dealer. AC power adaptor (AC-T133) Base unit Cordless handset Telephone line cord Rechargeable battery pack (BP-T38) 10US Getting Started
Operating Instructions
Page 11
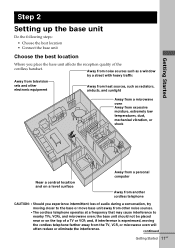
...noise sources such as a window by a street with heavy traffic Away from television sets and other noise sources. • The cordless telephone operates at a frequency that may cause interference to nearby TVs, VCRs, and microwave oven; and, if interference is experienced, moving...8226; Connect the base unit Choose the best location Where you experience intermittent loss of audio during a conversation, try moving the cordless telephone farther away from other electronic equipment Away from heat sources, such as radiators, airducts, and sunlight Away from a microwave oven Away...
...noise sources such as a window by a street with heavy traffic Away from television sets and other noise sources. • The cordless telephone operates at a frequency that may cause interference to nearby TVs, VCRs, and microwave oven; and, if interference is experienced, moving...8226; Connect the base unit Choose the best location Where you experience intermittent loss of audio during a conversation, try moving the cordless telephone farther away from other electronic equipment Away from heat sources, such as radiators, airducts, and sunlight Away from a microwave oven Away...

Operating Instructions
Page 12
... cord. 2 To an AC outlet To DC IN 9V AC power adaptor (supplied AC-T133) To LINE 1 To a telephone outlet Telephone line cord (supplied) 1 Connect the telephone line cord to the LINE jack and to a telephone outlet. 2 Connect the AC power adaptor to the DC IN 9V jack and to an AC outlet. "PF...
... cord. 2 To an AC outlet To DC IN 9V AC power adaptor (supplied AC-T133) To LINE 1 To a telephone outlet Telephone line cord (supplied) 1 Connect the telephone line cord to the LINE jack and to a telephone outlet. 2 Connect the AC power adaptor to the DC IN 9V jack and to an AC outlet. "PF...

Operating Instructions
Page 13
Do not use any other AC power adaptor. • Connect the AC power adaptor to a continuous power supply. • Place the base unit close to the AC outlet so that you can unplug the AC power adaptor easily. Notes • Use only the supplied AC-T133 AC power adaptor. Modular Getting Started Getting Started 13US Polarity of the plug Tip If your telephone outlet is not modular, contact your telephone service company for assistance. + -
Do not use any other AC power adaptor. • Connect the AC power adaptor to a continuous power supply. • Place the base unit close to the AC outlet so that you can unplug the AC power adaptor easily. Notes • Use only the supplied AC-T133 AC power adaptor. Modular Getting Started Getting Started 13US Polarity of the plug Tip If your telephone outlet is not modular, contact your telephone service company for assistance. + -
Operating Instructions
Page 14
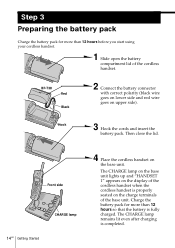
... so that the battery is completed. The CHARGE lamp on the base unit lights up and "HANDSET 1" appears on the display of the cordless handset when the cordless handset is properly seated on the charge terminals of the cordless handset. Then close the lid. Front side CHARGE lamp 14US Getting Started 4 Place the... on upper side). Charge the battery pack for more than 12 hours before you start using your cordless handset. 1 Slide open the battery compartment lid of the base unit. The CHARGE lamp remains lit even after charging is fully charged. Hook 3 Hook the ...
... so that the battery is completed. The CHARGE lamp on the base unit lights up and "HANDSET 1" appears on the display of the cordless handset when the cordless handset is properly seated on the charge terminals of the cordless handset. Then close the lid. Front side CHARGE lamp 14US Getting Started 4 Place the... on upper side). Charge the battery pack for more than 12 hours before you start using your cordless handset. 1 Slide open the battery compartment lid of the base unit. The CHARGE lamp remains lit even after charging is fully charged. Hook 3 Hook the ...
Operating Instructions
Page 15
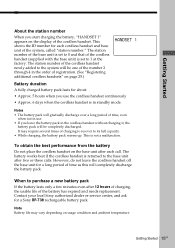
... of the system, called "station number." The battery works best if the cordless handset is returned to the base unit after 12 hours of charging, the usable life of the cordless handset. Contact your local Sony authorized dealer or service center, and ask for each call. Getting Started 15US... after two or three calls. This shows the ID number for a Sony BP-T38 rechargeable battery pack. The station number of time, even when not in use the cordless handset continuously • Approx. 6 days when the cordless handset is not a malfunction. Getting Started About the station number When ...
... of the system, called "station number." The battery works best if the cordless handset is returned to the base unit after 12 hours of charging, the usable life of the cordless handset. Contact your local Sony authorized dealer or service center, and ask for each call. Getting Started 15US... after two or three calls. This shows the ID number for a Sony BP-T38 rechargeable battery pack. The station number of time, even when not in use the cordless handset continuously • Approx. 6 days when the cordless handset is not a malfunction. Getting Started About the station number When ...
Operating Instructions
Page 16
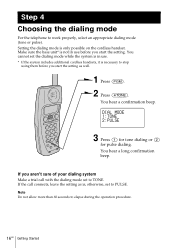
You cannot set the dialing mode while the system is in use . * If the system includes additional cordless handsets, it is necessary to stop using them before you start the setting as is; You hear a long confirmation beep. otherwise, set to PULSE. If ... 1:TONE 2:PULSE NEW OLD MASSAGE RING OFF 3 Press (1) for tone dialing or (2) for pulse dialing. Make sure the base unit* is only possible on the cordless handset. You hear a confirmation beep. Note Do not allow more than 60 seconds to work properly, select an appropriate dialing mode (tone or pulse). Step...
You cannot set the dialing mode while the system is in use . * If the system includes additional cordless handsets, it is necessary to stop using them before you start the setting as is; You hear a long confirmation beep. otherwise, set to PULSE. If ... 1:TONE 2:PULSE NEW OLD MASSAGE RING OFF 3 Press (1) for tone dialing or (2) for pulse dialing. Make sure the base unit* is only possible on the cordless handset. You hear a confirmation beep. Note Do not allow more than 60 seconds to work properly, select an appropriate dialing mode (tone or pulse). Step...

Operating Instructions
Page 17
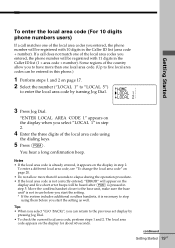
... of this phone and the Caller ID functions. Make sure the base unit* is only possible on the cordless handset. This is necessary to choose "AREA CODE", and then press Jog Dial. (GO BACK) HOME...You cannot set the dialing mode while the system is in use . * If the system includes additional cordless handsets, it is also necessary because the phone must enter the area code. Depending on the display.... 10-digit dialing (area code + number), you can register up to 5 local area codes with this telephone to properly dial a call from the Caller ID list. See "To enter the local area code (For...
... of this phone and the Caller ID functions. Make sure the base unit* is only possible on the cordless handset. This is necessary to choose "AREA CODE", and then press Jog Dial. (GO BACK) HOME...You cannot set the dialing mode while the system is in use . * If the system includes additional cordless handsets, it is also necessary because the phone must enter the area code. Depending on the display.... 10-digit dialing (area code + number), you can register up to 5 local area codes with this telephone to properly dial a call from the Caller ID list. See "To enter the local area code (For...
Operating Instructions
Page 18
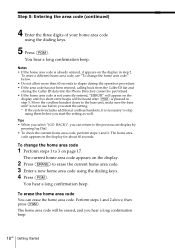
...5: Entering the area code (continued) 4 Enter the three digits of your home area code using them before you start the setting as well. Move the cordless handset closer to 3 on page 17. The home area code appears on the display. 2 Press (ERASE) to elapse during the operation procedure. •...code is not correctly entered, "ERROR" will appear on the display in use before you start the setting. * If the system includes additional cordless handsets, it appears on the display and five short error beeps will be heard after (PGM) is necessary to the previous set display by pressing...
...5: Entering the area code (continued) 4 Enter the three digits of your home area code using them before you start the setting as well. Move the cordless handset closer to 3 on page 17. The home area code appears on the display. 2 Press (ERASE) to elapse during the operation procedure. •...code is not correctly entered, "ERROR" will appear on the display in use before you start the setting. * If the system includes additional cordless handsets, it appears on the display and five short error beeps will be heard after (PGM) is necessary to the previous set display by pressing...
Operating Instructions
Page 19
... a call does not match one of the local area code using them before you start the setting as well. continued Getting Started 19US Move the cordless handset closer to the base unit, make sure the base unit* is not correctly entered, "ERROR" will appear on the display and five short error... elapse during the operation procedure. • If the local area code is not in use before you start the setting. * If the system includes additional cordless handsets, it appears on the display for about 60 seconds. The local area code appears on the display in the Caller ID list (area code...
... a call does not match one of the local area code using them before you start the setting as well. continued Getting Started 19US Move the cordless handset closer to the base unit, make sure the base unit* is not correctly entered, "ERROR" will appear on the display and five short error... elapse during the operation procedure. • If the local area code is not in use before you start the setting. * If the system includes additional cordless handsets, it appears on the display for about 60 seconds. The local area code appears on the display in the Caller ID list (area code...
Operating Instructions
Page 20
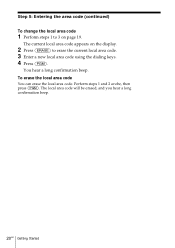
To erase the local area code You can erase the local area code. The local area code will be erased, and you hear a long confirmation beep. 20US Getting Started You hear a long confirmation beep. Perform steps 1 and 2 avobe, then press (PGM). Step 5: Entering the area code (continued) To change the local area code 1 Perform steps 1 to 3 on the display. 2 Press (ERASE) to erase the current local area code. 3 Enter a new local area code using the dialing keys. 4 Press (PGM). The current local area code appears on page 19.
To erase the local area code You can erase the local area code. The local area code will be erased, and you hear a long confirmation beep. 20US Getting Started You hear a long confirmation beep. Perform steps 1 and 2 avobe, then press (PGM). Step 5: Entering the area code (continued) To change the local area code 1 Perform steps 1 to 3 on the display. 2 Press (ERASE) to erase the current local area code. 3 Enter a new local area code using the dialing keys. 4 Press (PGM). The current local area code appears on page 19.
Operating Instructions
Page 21
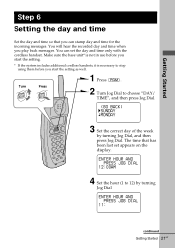
... RING OFF continued Getting Started 21US Make sure the base unit* is not in use before you start the setting. * If the system includes additional cordless handsets, it is necessary to stop using them before you play back messages. Getting Started Step 6 Setting the day and time Set the day and... time so that has been last set the day and time only with the cordless handset. You can stamp day and time for the incoming messages. You will hear the recorded day and time when you start the setting as...
... RING OFF continued Getting Started 21US Make sure the base unit* is not in use before you start the setting. * If the system includes additional cordless handsets, it is necessary to stop using them before you play back messages. Getting Started Step 6 Setting the day and time Set the day and... time so that has been last set the day and time only with the cordless handset. You can stamp day and time for the incoming messages. You will hear the recorded day and time when you start the setting as...
Operating Instructions
Page 22
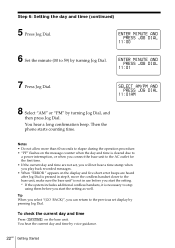
... the AC outlet for the first time. • If the current day and time are heard after Jog Dial is pressed in step 8, move the cordless handset closer to the base unit, make sure the base unit* is not in use before you start the setting. * If the system includes additional...
... the AC outlet for the first time. • If the current day and time are heard after Jog Dial is pressed in step 8, move the cordless handset closer to the base unit, make sure the base unit* is not in use before you start the setting. * If the system includes additional...