
α Handbook
Page 1
4-287-948-11(1) Interchangeable Lens Digital Camera α Handbook A-mount Preparing the camera Shooting and viewing images Shooting images to suit your subject Using the shooting functions Using the playback functions Functions list Viewing images on a computer Others Advanced operations Index SLT-A65/SLT-A65V ©2011 Sony Corporation
4-287-948-11(1) Interchangeable Lens Digital Camera α Handbook A-mount Preparing the camera Shooting and viewing images Shooting images to suit your subject Using the shooting functions Using the playback functions Functions list Viewing images on a computer Others Advanced operations Index SLT-A65/SLT-A65V ©2011 Sony Corporation

α Handbook
Page 2
... the camera Checking the supplied items 13 Identifying parts 14 Charging the battery pack 20 Inserting the battery pack/memory card (sold separately) 22 Attaching a lens 25 Turning the camera on operating the camera.
... the camera Checking the supplied items 13 Identifying parts 14 Charging the battery pack 20 Inserting the battery pack/memory card (sold separately) 22 Attaching a lens 25 Turning the camera on operating the camera.

α Handbook
Page 4
Shooting 4 Histogram 82 The digital level gauge 83 Monitoring the subject through the lens without effects displayed 83 List of icons for viewfinder mode 84 Shooting a clear image without camera shake 86 Camera shake warning indicator 86 Using the ...
Shooting 4 Histogram 82 The digital level gauge 83 Monitoring the subject through the lens without effects displayed 83 List of icons for viewfinder mode 84 Shooting a clear image without camera shake 86 Camera shake warning indicator 86 Using the ...
α Handbook
Page 6
of the camera 159 Long Exposure NR 159 High ISO NR 159 Color Space 160 Release w/o Lens 160 Grid Line 161 Auto Review 161 Func. View Mode 146 Slide Show 147 Playback Display 147 Scrolling panoramic images 148 Protecting images (Protect 149 ... movies in the same view mode 151 About playback on TV 152 3D Viewing 152 Using "BRAVIA" Sync 152 Setup of the camera GPS setting (SLT-A65V only 154 GPS Assist Data 155 GPS Auto Time Cor 155 Setting the aspect ratio and image quality 157 Aspect Ratio 157 Quality 157 Setting...
of the camera 159 Long Exposure NR 159 High ISO NR 159 Color Space 160 Release w/o Lens 160 Grid Line 161 Auto Review 161 Func. View Mode 146 Slide Show 147 Playback Display 147 Scrolling panoramic images 148 Protecting images (Protect 149 ... movies in the same view mode 151 About playback on TV 152 3D Viewing 152 Using "BRAVIA" Sync 152 Setup of the camera GPS setting (SLT-A65V only 154 GPS Assist Data 155 GPS Auto Time Cor 155 Setting the aspect ratio and image quality 157 Aspect Ratio 157 Quality 157 Setting...
α Handbook
Page 7
Power sources 201 AVCHD format 202 GPS (SLT-A65V only 203 3D-shootings 205 Memory card 206 7 Setting the method for recording on a memory card ..... 166 Format 166 File Number 166 Folder Name 166 ... definition image quality (STD) disc 180 Discs you can use with "PMB 181 Print Specifying DPOF 182 Date Imprint 182 Cleaning Cleaning the camera and a lens 183 Cleaning the image sensor 184 Trouble shooting/Others Troubleshooting 187 Warning messages 196 Precautions 198 To use your camera abroad -
Power sources 201 AVCHD format 202 GPS (SLT-A65V only 203 3D-shootings 205 Memory card 206 7 Setting the method for recording on a memory card ..... 166 Format 166 File Number 166 Folder Name 166 ... definition image quality (STD) disc 180 Discs you can use with "PMB 181 Print Specifying DPOF 182 Date Imprint 182 Cleaning Cleaning the camera and a lens 183 Cleaning the image sensor 184 Trouble shooting/Others Troubleshooting 187 Warning messages 196 Precautions 198 To use your camera abroad -

α Handbook
Page 10
... time intervals. Also, refer to the operating instructions of the connected device or the software used with the camera on the LCD monitor, electronic viewfinder, lens, and image sensor • The LCD monitor and electronic viewfinder are manufactured using a progressive method. Before allowing them to a malfunction of your own standards. Since...
... time intervals. Also, refer to the operating instructions of the connected device or the software used with the camera on the LCD monitor, electronic viewfinder, lens, and image sensor • The LCD monitor and electronic viewfinder are manufactured using a progressive method. Before allowing them to a malfunction of your own standards. Since...

α Handbook
Page 12
Model name Lens SLT-A65/A65V - SLT-A65K/ A65VK DT18-55mm SLT-A65Y/ A65VY DT18-55mm and DT55-200mm Notes on the countries/regions. Model name This manual covers several models supplied with different lenses. The available model varies depending on using your camera 12 The model name varies depending on the supplied lens.
Model name Lens SLT-A65/A65V - SLT-A65K/ A65VK DT18-55mm SLT-A65Y/ A65VY DT18-55mm and DT55-200mm Notes on the countries/regions. Model name This manual covers several models supplied with different lenses. The available model varies depending on using your camera 12 The model name varies depending on the supplied lens.

α Handbook
Page 13
Application Software for α camera - α Handbook (This manual) • Instruction Manual (1) SLT-A65K/A65VK • DT18-55mm zoom lens (1)/Front lens cap (1)/Packaging lid (1) SLT-A65Y/A65VY • DT18-55mm zoom lens (1)/Front lens cap (1)/Packaging lid (1) • DT55-200mm zoom lens (1)/ Front lens cap (1)/Rear lens cap (1)/Lens hood (1) 13 Preparing the camera Preparing the camera Checking the supplied...
Application Software for α camera - α Handbook (This manual) • Instruction Manual (1) SLT-A65K/A65VK • DT18-55mm zoom lens (1)/Front lens cap (1)/Packaging lid (1) SLT-A65Y/A65VY • DT18-55mm zoom lens (1)/Front lens cap (1)/Packaging lid (1) • DT55-200mm zoom lens (1)/ Front lens cap (1)/Rear lens cap (1)/Lens hood (1) 13 Preparing the camera Preparing the camera Checking the supplied...

α Handbook
Page 14
Doing so may cause noise or lower the volume. Front side A Shutter button (31) B Power switch (28) C Control dial (94) D Remote sensor (142) E Self-timer lamp (140) F Lens contacts* G Mirror* H Preview button (97) I Mount J Built-in parentheses for details of operation. Identifying parts See the pages in flash* (42, 124) K Microphone** (107) L Mode dial (37) 14 M (Flash pop-up) button (42, 124) N Mounting index (25) O Lens release button (26) P Focus mode switch (108, 114) * Do not directly touch these parts. ** Do not cover this part during movie recording.
Doing so may cause noise or lower the volume. Front side A Shutter button (31) B Power switch (28) C Control dial (94) D Remote sensor (142) E Self-timer lamp (140) F Lens contacts* G Mirror* H Preview button (97) I Mount J Built-in parentheses for details of operation. Identifying parts See the pages in flash* (42, 124) K Microphone** (107) L Mode dial (37) 14 M (Flash pop-up) button (42, 124) N Mounting index (25) O Lens release button (26) P Focus mode switch (108, 114) * Do not directly touch these parts. ** Do not cover this part during movie recording.
α Handbook
Page 19
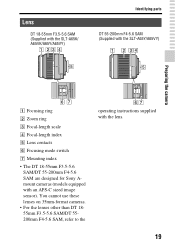
..., refer to the operating instructions supplied with an APS-C sized image sensor). Lens DT 18-55mm F3.5-5.6 SAM (Supplied with the SLT-A65K/ A65VK/A65Y/A65VY) Identifying parts DT 55-200mm F4-5.6 SAM (Supplied with the SLT-A65Y/A65VY) Preparing the camera A Focusing ring B Zoom ring C Focal-...length scale D Focal-length index E Lens contacts F Focusing mode switch G Mounting index • The DT 18-55mm F3.5-5.6 SAM/DT 55-200mm F4-5.6 SAM are designed for Sony Amount cameras (models equipped ...
..., refer to the operating instructions supplied with an APS-C sized image sensor). Lens DT 18-55mm F3.5-5.6 SAM (Supplied with the SLT-A65K/ A65VK/A65Y/A65VY) Identifying parts DT 55-200mm F4-5.6 SAM (Supplied with the SLT-A65Y/A65VY) Preparing the camera A Focusing ring B Zoom ring C Focal-...length scale D Focal-length index E Lens contacts F Focusing mode switch G Mounting index • The DT 18-55mm F3.5-5.6 SAM/DT 55-200mm F4-5.6 SAM are designed for Sony Amount cameras (models equipped ...

α Handbook
Page 25
... this camera. • When you use force when attaching a lens. • E-mount lenses are not compatible with a lens attached, hold both the camera and the lens firmly. 25 Front lens cap Body cap Packaging lid 2 Mount the lens by aligning the orange index marks (mounting indexes) on straight. ... • When attaching a lens, do not press the lens release button. • Do not use a lens for which a tripod socket is provided, attach the lens onto the tripod using the tripod socket provided to put the lens on the lens and camera. 3 Turn the lens clockwise until it clicks into the...
... this camera. • When you use force when attaching a lens. • E-mount lenses are not compatible with a lens attached, hold both the camera and the lens firmly. 25 Front lens cap Body cap Packaging lid 2 Mount the lens by aligning the orange index marks (mounting indexes) on straight. ... • When attaching a lens, do not press the lens release button. • Do not use a lens for which a tripod socket is provided, attach the lens onto the tripod using the tripod socket provided to put the lens on the lens and camera. 3 Turn the lens clockwise until it clicks into the...
α Handbook
Page 26
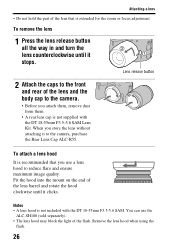
Fit the hood into the mount on the end of the lens barrel and rotate the hood clockwise until it stops. Remove the lens hood when using the flash. 26 Lens release button 2 Attach the caps to the front and rear of the lens and the body cap to the camera. • Before you attach... not included with the DT 18-55mm F3.5-5.6 SAM Lens Kit. Notes • A lens hood is recommended that is not supplied with the DT 18-55mm F3.5-5.6 SAM. To remove the lens 1 Press the lens release button all the way in and turn the lens counterclockwise until it to reduce flare and ensure maximum image...
Fit the hood into the mount on the end of the lens barrel and rotate the hood clockwise until it stops. Remove the lens hood when using the flash. 26 Lens release button 2 Attach the caps to the front and rear of the lens and the body cap to the camera. • Before you attach... not included with the DT 18-55mm F3.5-5.6 SAM Lens Kit. Notes • A lens hood is recommended that is not supplied with the DT 18-55mm F3.5-5.6 SAM. To remove the lens 1 Press the lens release button all the way in and turn the lens counterclockwise until it to reduce flare and ensure maximum image...

α Handbook
Page 27
The camera is equipped with an anti-dust function to the surface of the image sensor (the part that acts as dark spots on the image, depending on the image sensor. Preparing the camera Attaching a lens • When storing, turn over the lens hood and place it may appear as the film), it onto the lens backwards. Note on changing the lens When changing the lens, if dust or debris gets inside the camera and adheres to prevent dust from dusty locations when attaching/removing a lens. 27 However, quickly change the lens away from landing on the shooting environment.
The camera is equipped with an anti-dust function to the surface of the image sensor (the part that acts as dark spots on the image, depending on the image sensor. Preparing the camera Attaching a lens • When storing, turn over the lens hood and place it may appear as the film), it onto the lens backwards. Note on changing the lens When changing the lens, if dust or debris gets inside the camera and adheres to prevent dust from dusty locations when attaching/removing a lens. 27 However, quickly change the lens away from landing on the shooting environment.

α Handbook
Page 30
... monitor mode In viewfinder mode In viewfinder mode (vertical position) Point 1 One hand holds the grip of the camera, and the other hand supports the lens. Holding the camera properly Stabilize your knee. 30 Note • The dioptic adjustment attachment (sold separately) cannot be used with your eyesight until the display...
... monitor mode In viewfinder mode In viewfinder mode (vertical position) Point 1 One hand holds the grip of the camera, and the other hand supports the lens. Holding the camera properly Stabilize your knee. 30 Note • The dioptic adjustment attachment (sold separately) cannot be used with your eyesight until the display...

α Handbook
Page 31
..., monitoring your shot with the LCD monitor or viewfinder. 3 Overlay the AF area on your shot. AF area (Camera shake warning) indicator 4 When using a zoom lens, turn the zoom ring, then decide on the desired subject. • If the (Camera shake warning) indicator flashes, carefully shoot the subject, holding the camera...
..., monitoring your shot with the LCD monitor or viewfinder. 3 Overlay the AF area on your shot. AF area (Camera shake warning) indicator 4 When using a zoom lens, turn the zoom ring, then decide on the desired subject. • If the (Camera shake warning) indicator flashes, carefully shoot the subject, holding the camera...

α Handbook
Page 33
... may be started from any exposure mode. • The shutter speed and aperture are adjusted automatically. Notes • The sound of the camera and the lens in autofocus mode. Turn the camera off and wait until the temperature of the camera is too high. Shooting and viewing images Recording movies 1 Press...
... may be started from any exposure mode. • The shutter speed and aperture are adjusted automatically. Notes • The sound of the camera and the lens in autofocus mode. Turn the camera off and wait until the temperature of the camera is too high. Shooting and viewing images Recording movies 1 Press...

α Handbook
Page 59
Shooting Sets whether or not to shoot continuously in -focus ranges with the MENU button Release w/o Lens (160) Sets whether shutter can open when lens is not attached. (Enable/Disable) Auto+ Cont. Info./Level/ Histogram) Peaking Level (115) Enhances the outline of in AUTO+ mode. (88) (Auto/Off) Auto+ Image ...
Shooting Sets whether or not to shoot continuously in -focus ranges with the MENU button Release w/o Lens (160) Sets whether shutter can open when lens is not attached. (Enable/Disable) Auto+ Cont. Info./Level/ Histogram) Peaking Level (115) Enhances the outline of in AUTO+ mode. (88) (Auto/Off) Auto+ Image ...

α Handbook
Page 60
... Tracking/AF lock/Aperture Preview/Shot. The functions selected with the MENU button Func. of the screen caused by the lens attached. (Auto/Off) 60 Lens Comp.: Shading Compensates for the shaded corners of AEL button (161) Assigns the desired function to be used for the...(Shot. Result Preview/Aperture Preview) Focus Hold Button Sets the function of the focus hold button of the screen caused by the lens attached. (Auto/Off) Lens Comp.: Distortion (165) Compensates for the (Smart Telecon./Focus Magnifier) button. Button (115, 138) Selects the operation method for ...
... Tracking/AF lock/Aperture Preview/Shot. The functions selected with the MENU button Func. of the screen caused by the lens attached. (Auto/Off) 60 Lens Comp.: Shading Compensates for the shaded corners of AEL button (161) Assigns the desired function to be used for the...(Shot. Result Preview/Aperture Preview) Focus Hold Button Sets the function of the focus hold button of the screen caused by the lens attached. (Auto/Off) Lens Comp.: Distortion (165) Compensates for the (Smart Telecon./Focus Magnifier) button. Button (115, 138) Selects the operation method for ...

α Handbook
Page 83
... The digital level gauge indicates whether the camera is always displayed with the appropriate brightness. Monitoring the subject through the lens without effects displayed You can monitor the subject through the lens without effects, such as the exposure compensation, white balance, Creative Style, Picture Effect etc., displayed. Note • [Setting Effect OFF...
... The digital level gauge indicates whether the camera is always displayed with the appropriate brightness. Monitoring the subject through the lens without effects displayed You can monitor the subject through the lens without effects, such as the exposure compensation, white balance, Creative Style, Picture Effect etc., displayed. Note • [Setting Effect OFF...

α Handbook
Page 87
Preparation (Advanced operations) Shooting a clear image without camera shake Using a tripod In the following cases, we recommend that you mount the camera on a tripod. • Shooting without a flash under dark conditions. • Shooting with slow shutter speeds, which are typically used in night-time shooting. • Shooting a close subject, such as in macro shooting. • Shooting with a telescopic lens. Note • When using a tripod, deactivate the SteadyShot function because there is a potential for malfunction of the SteadyShot function. 87
Preparation (Advanced operations) Shooting a clear image without camera shake Using a tripod In the following cases, we recommend that you mount the camera on a tripod. • Shooting without a flash under dark conditions. • Shooting with slow shutter speeds, which are typically used in night-time shooting. • Shooting a close subject, such as in macro shooting. • Shooting with a telescopic lens. Note • When using a tripod, deactivate the SteadyShot function because there is a potential for malfunction of the SteadyShot function. 87


