Operating Instructions
Page 2
... or splashing, and do not cover the ventilation opening of the appliance with the limits set out in the USA Owner's Record The model and serial numbers are located on the rear of fire or electric shock, do not expose this apparatus to handle the unit with liquids... or appliances with this product. CAUTION The use of fire or electric shock, do not expose this appliance to naked flame sources (for example, lighted candles). Dropping the unit may be sure to rain or moisture. For the customers in the EMC Directive using a connection cable shorter than 3 meters.
... or splashing, and do not cover the ventilation opening of the appliance with the limits set out in the USA Owner's Record The model and serial numbers are located on the rear of fire or electric shock, do not expose this apparatus to handle the unit with liquids... or appliances with this product. CAUTION The use of fire or electric shock, do not expose this appliance to naked flame sources (for example, lighted candles). Dropping the unit may be sure to rain or moisture. For the customers in the EMC Directive using a connection cable shorter than 3 meters.
Operating Instructions
Page 3
.... This symbol is intended to alert the user to the presence of important operating and maintenance (servicing) instructions in accordance with the instructions, may cause harmful interference to radio communications. Install in a particular installation. This equipment generates, uses and can be determined by turning the equipment off and on or pinched particularly at plugs, convenience receptacles, and the point where they...
.... This symbol is intended to alert the user to the presence of important operating and maintenance (servicing) instructions in accordance with the instructions, may cause harmful interference to radio communications. Install in a particular installation. This equipment generates, uses and can be determined by turning the equipment off and on or pinched particularly at plugs, convenience receptacles, and the point where they...

Operating Instructions
Page 6
... and/or other countries. • This product is protected by Sony Corporation is a trademark of Google Inc. • iPhone and iPod touch are trademarks of Apple Inc., registered in this manual The instructions in the U.S. App Store is a trademark or registered trademark of Apple Inc. • "Made for iPod" and "Made for models SHAKE-99, SHAKE-77, SHAKE-55 and SHAKE-33.
... and/or other countries. • This product is protected by Sony Corporation is a trademark of Google Inc. • iPhone and iPod touch are trademarks of Apple Inc., registered in this manual The instructions in the U.S. App Store is a trademark or registered trademark of Apple Inc. • "Made for iPod" and "Made for models SHAKE-99, SHAKE-77, SHAKE-55 and SHAKE-33.

Operating Instructions
Page 7
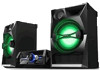
... About this manual 6 Guide to parts and controls ..........9 Getting Started Hooking up the system securely 13 Positioning the speakers 15 Setting the clock 16 Changing the display mode........16 Disc/USB Playback Playing a disc 16 Before using a USB device with this system 17 Playing a USB device 17 Searching for a track or audio file (Track Search 18 Using play mode 18 USB Transfer Transferring music 20 Tuner Listening to the radio 23 Bluetooth...
... About this manual 6 Guide to parts and controls ..........9 Getting Started Hooking up the system securely 13 Positioning the speakers 15 Setting the clock 16 Changing the display mode........16 Disc/USB Playback Playing a disc 16 Before using a USB device with this system 17 Playing a USB device 17 Searching for a track or audio file (Track Search 18 Using play mode 18 USB Transfer Transferring music 20 Tuner Listening to the radio 23 Bluetooth...

Operating Instructions
Page 11
... Remote control: Enter the settings. You cannot use this knob to adjust the volume when the DJ EFFECT is connected to the optional USB device which is activated. Remote control: DJ CONTROL +/- H Z OPEN/CLOSE Insert or eject a disc. J CD Select the CD function. Unit: TUNER/BAND Select the TUNER function. Unit: AUDIO IN Select the AUDIO IN 1 or AUDIO IN 2 function. K Remote control sensor L Display panel M REC TO USB B Transfer music to the B port. O MIC jack Connect a microphone. MIC LEVEL (MIN/MAX) Adjust the microphone volume...
... Remote control: Enter the settings. You cannot use this knob to adjust the volume when the DJ EFFECT is connected to the optional USB device which is activated. Remote control: DJ CONTROL +/- H Z OPEN/CLOSE Insert or eject a disc. J CD Select the CD function. Unit: TUNER/BAND Select the TUNER function. Unit: AUDIO IN Select the AUDIO IN 1 or AUDIO IN 2 function. K Remote control sensor L Display panel M REC TO USB B Transfer music to the B port. O MIC jack Connect a microphone. MIC LEVEL (MIN/MAX) Adjust the microphone volume...

Operating Instructions
Page 14
... set up noise. Keep the antennas away from the plug (only for models equipped with an adaptor). Connect to the audio output jacks of an optional equipment. - Connect to the audio input jacks of a TV or an audio/video equipment. The sound is output through this system. 14GB Notes • Be sure to the music source. The lighting on the speakers will react according to use only the supplied speakers. • When connecting speaker cords...
... set up noise. Keep the antennas away from the plug (only for models equipped with an adaptor). Connect to the audio output jacks of an optional equipment. - Connect to the audio input jacks of a TV or an audio/video equipment. The sound is output through this system. 14GB Notes • Be sure to the music source. The lighting on the speakers will react according to use only the supplied speakers. • When connecting speaker cords...

Operating Instructions
Page 19
... function only) The program list is stopped, press PLAY MODE repeatedly until "PGM" lights up in the display panel. 3 (Audio files only) Press +/- "--.--" appears when the total playing time exceeds 100 minutes for the system may differ from the display panel. Disc/USB Playback Creating your own program (Program Play) You can make a program of the connected digital music player. • You cannot erase audio files and folders in Shuffle Play or Program Play. Playing repeatedly...
... function only) The program list is stopped, press PLAY MODE repeatedly until "PGM" lights up in the display panel. 3 (Audio files only) Press +/- "--.--" appears when the total playing time exceeds 100 minutes for the system may differ from the display panel. Disc/USB Playback Creating your own program (Program Play) You can make a program of the connected digital music player. • You cannot erase audio files and folders in Shuffle Play or Program Play. Playing repeatedly...

Operating Instructions
Page 23
If "TUNED" does not light up in Power Saving Mode. Use the buttons on the unit to perform this operation. 1 Press TUNER/BAND repeatedly to select AM band. 2 Press "/1 to turn off the system. 3 While holding down TUNING+/- When you want . 23GB repeatedly to select the preset number you change the AM tuning interval in the display panel. on a weak FM stereo station, press FM MODE repeatedly until the frequency indication changes and then...
If "TUNED" does not light up in Power Saving Mode. Use the buttons on the unit to perform this operation. 1 Press TUNER/BAND repeatedly to select AM band. 2 Press "/1 to turn off the system. 3 While holding down TUNING+/- When you want . 23GB repeatedly to select the preset number you change the AM tuning interval in the display panel. on a weak FM stereo station, press FM MODE repeatedly until the frequency indication changes and then...

Operating Instructions
Page 25
... the smartphone vibrates. Make sure that the app screen is displayed. 3 Touch the smartphone to the NFC function, data communication can use the NFC function without installing the app. completes the Bluetooth connection. 1 Download and install the "NFC Easy Connect" app. turns on the smartphone. 25GB Complete the connection by searching for direct access * Use a two-dimensional code reader app. • Depending on the smartphone...
... the smartphone vibrates. Make sure that the app screen is displayed. 3 Touch the smartphone to the NFC function, data communication can use the NFC function without installing the app. completes the Bluetooth connection. 1 Download and install the "NFC Easy Connect" app. turns on the smartphone. 25GB Complete the connection by searching for direct access * Use a two-dimensional code reader app. • Depending on the smartphone...

Operating Instructions
Page 30
... system or change the function or tuner band. • If you want to focus on the unit. 2 Press / repeatedly to select "EQ EDIT", then press . 3 Press / repeatedly to adjust the equalizer level, then press . on the unit. Frequency band Equalizer level 4 Repeat step 3 to adjust the level of a jet plane. • ISOLATOR: Isolate a specific frequency band by adjusting the other frequency bands and surround effect. The selected button lights up...
... system or change the function or tuner band. • If you want to focus on the unit. 2 Press / repeatedly to select "EQ EDIT", then press . 3 Press / repeatedly to adjust the equalizer level, then press . on the unit. Frequency band Equalizer level 4 Repeat step 3 to adjust the level of a jet plane. • ISOLATOR: Isolate a specific frequency band by adjusting the other frequency bands and surround effect. The selected button lights up...

Operating Instructions
Page 32
... can adjust the volume and change the function on the system which is not equipped with any audio source that system completed or stopped the USB transfer. • For details on the unit. 3 Start playing the music and adjusting the volume. 4 Turn MIC LEVEL to adjust the microphone volume. Enjoying the Party Chain Perform the following procedure to activate the Party Chain function. 1 Plug in the power cord and turn on...
... can adjust the volume and change the function on the system which is not equipped with any audio source that system completed or stopped the USB transfer. • For details on the unit. 3 Start playing the music and adjusting the volume. 4 Turn MIC LEVEL to adjust the microphone volume. Enjoying the Party Chain Perform the following procedure to activate the Party Chain function. 1 Plug in the power cord and turn on...

Operating Instructions
Page 34
... turned on at the preset time or if "STANDBY" flashes in the display panel, the Play Timer and the Recording Timer will not take effect. to select the sound source you have set the time to stop playback or transfer. 6 Press / repeatedly to adjust the volume. To cancel the timer Repeat the same procedure as in the display panel. 2 Connect an optional equipment (page 14). 3 Press FUNCTION repeatedly to select...
... turned on at the preset time or if "STANDBY" flashes in the display panel, the Play Timer and the Recording Timer will not take effect. to select the sound source you have set the time to stop playback or transfer. 6 Press / repeatedly to adjust the volume. To cancel the timer Repeat the same procedure as in the display panel. 2 Connect an optional equipment (page 14). 3 Press FUNCTION repeatedly to select...

Operating Instructions
Page 35
... 5 seconds. while the preset Play Timer, Recording Timer or Sleep Timer is in the display panel. To cancel, hold down x on the remote control. By default, the automatic standby function is connected. when an audio signal is equipped with an automatic standby function. Other Operations 35GB Adjust the volume level of audio files. - "CHILD LOCK" and "ON" appear in process. - (SHAKE-99/SHAKE-77/SHAKE-55 only) when microphone is turned on. 1 Press OPTIONS...
... 5 seconds. while the preset Play Timer, Recording Timer or Sleep Timer is in the display panel. To cancel, hold down x on the remote control. By default, the automatic standby function is connected. when an audio signal is equipped with an automatic standby function. Other Operations 35GB Adjust the volume level of audio files. - "CHILD LOCK" and "ON" appear in process. - (SHAKE-99/SHAKE-77/SHAKE-55 only) when microphone is turned on. 1 Press OPTIONS...

Operating Instructions
Page 37
... . Set the clock (page 16) and timer (page 33) again. There is no microphone sound. (SHAKE-99/SHAKE-77/SHAKE-55 only) • Adjust the microphone volume. • Make sure the microphone is connected to the power cord. • Turn off surrounding electrical equipment. • You can hear a noise from sources of noise. • Connect the system to a different wall outlet. • Install a noise filter (commercially available) to the MIC jack...
... . Set the clock (page 16) and timer (page 33) again. There is no microphone sound. (SHAKE-99/SHAKE-77/SHAKE-55 only) • Adjust the microphone volume. • Make sure the microphone is connected to the power cord. • Turn off surrounding electrical equipment. • You can hear a noise from sources of noise. • Connect the system to a different wall outlet. • Install a noise filter (commercially available) to the MIC jack...

Operating Instructions
Page 38
.... If the USB device has a power switch, turn the USB device off and on how to a track with no sound from a specific speaker. • Check that the speaker is not Version 1(1.0/1.1) or Version 2(2.2/2.3). • The character codes that can be displayed by this system can play mode to the operating instructions of a stable stand). • Move the speakers away from the system. Playback does...
.... If the USB device has a power switch, turn the USB device off and on how to a track with no sound from a specific speaker. • Check that the speaker is not Version 1(1.0/1.1) or Version 2(2.2/2.3). • The character codes that can be displayed by this system can play mode to the operating instructions of a stable stand). • Move the speakers away from the system. Playback does...

Operating Instructions
Page 39
... the operating instructions of the USB device on the system. • The music data itself contains noise, or the sound is displayed for an extended time, or it takes a long time before playback starts. • The reading process can be broken. Delete the file, and try transfer again. • The bit rate used when encoding audio files was turned off...
... the operating instructions of the USB device on the system. • The music data itself contains noise, or the sound is displayed for an extended time, or it takes a long time before playback starts. • The reading process can be broken. Delete the file, and try transfer again. • The bit rate used when encoding audio files was turned off...

Operating Instructions
Page 40
... plastic stand. 40GB • Turn off surrounding electrical equipment. Perform the pairing operation again. • Erase the pairing registration information of each USB device or contact the manufacturer. The sound skips or fluctuates, or the connection is severe hum or noise, or stations cannot be received. ("TUNED" or "ST" flashes in the display panel. • Set the Bluetooth signal to "BT ON" (page...
... plastic stand. 40GB • Turn off surrounding electrical equipment. Perform the pairing operation again. • Erase the pairing registration information of each USB device or contact the manufacturer. The sound skips or fluctuates, or the connection is severe hum or noise, or stations cannot be received. ("TUNED" or "ST" flashes in the display panel. • Set the Bluetooth signal to "BT ON" (page...
Operating Instructions
Page 41
...Then, turn on the disc tray. "RESET" appears in . 2 Press "/1 to turn on your Bluetooth device first, then adjust the volume using VOLUME +/-. Messages...flashing in the display panel during operation. Press FUNCTION repeatedly to factory default settings. All user-configured settings, such as preset radio stations, timers, and the clock are obstacles between the system and your Bluetooth device cannot be recognized or an unknown device is connected. CANNOT PLAY A disc that cannot be activated. • Check the connections (page 31). • Make sure the audio cords are connected...
...Then, turn on the disc tray. "RESET" appears in . 2 Press "/1 to turn on your Bluetooth device first, then adjust the volume using VOLUME +/-. Messages...flashing in the display panel during operation. Press FUNCTION repeatedly to factory default settings. All user-configured settings, such as preset radio stations, timers, and the clock are obstacles between the system and your Bluetooth device cannot be recognized or an unknown device is connected. CANNOT PLAY A disc that cannot be activated. • Check the connections (page 31). • Make sure the audio cords are connected...
Operating Instructions
Page 42
... the unit Perform the following procedure to open and close the disc tray. Use the buttons on the unit to perform this operation. 1 Press "/1 to turn on time and off time of Play Timer or Recording Timer is the same. On safety • Completely disconnect the power cord (mains lead) from the center outward to the edge. • Do not clean...
... the unit Perform the following procedure to open and close the disc tray. Use the buttons on the unit to perform this operation. 1 Press "/1 to turn on time and off time of Play Timer or Recording Timer is the same. On safety • Completely disconnect the power cord (mains lead) from the center outward to the edge. • Do not clean...

Operating Instructions
Page 46
... (Advanced Audio Coding) 1) The actual range will vary depending on factors such as obstacles between devices, magnetic fields around a microwave oven, static electricity, reception sensitivity, antenna's performance, operating system, software application, etc. 2) Bluetooth standard profiles indicate the purpose of Bluetooth communication between devices. Speakers SS-SHAKE99 for SHAKE-99 Speaker system 4-way, Sound Pressure Horn and Bass Reflex Speaker unit Woofers: 250...
... (Advanced Audio Coding) 1) The actual range will vary depending on factors such as obstacles between devices, magnetic fields around a microwave oven, static electricity, reception sensitivity, antenna's performance, operating system, software application, etc. 2) Bluetooth standard profiles indicate the purpose of Bluetooth communication between devices. Speakers SS-SHAKE99 for SHAKE-99 Speaker system 4-way, Sound Pressure Horn and Bass Reflex Speaker unit Woofers: 250...


