Operating Instructions (primary manual)
Page 3
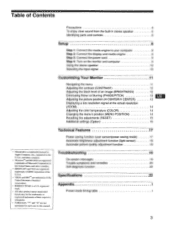
... your computer 8 Step 2: Connect the display and media engine 8 Step 3: Connect the power cord 9 Step 4: Turn on the monitor and computer 9 Using the stereo speaker 10 Selecting the input signal 10 Customizing Your Monitor 11 Navigating the menu 11 Adjusting the contrast (CONTRAST) 12 Adjusting the black level of an image (BRIGHTNESS...
... your computer 8 Step 2: Connect the display and media engine 8 Step 3: Connect the power cord 9 Step 4: Turn on the monitor and computer 9 Using the stereo speaker 10 Selecting the input signal 10 Customizing Your Monitor 11 Navigating the menu 11 Adjusting the contrast (CONTRAST) 12 Adjusting the black level of an image (BRIGHTNESS...
Operating Instructions (primary manual)
Page 4
.... This is not a malfunction. Transportation • Disconnect all cables from the power outlet before cleaning your Sony dealer when replacing the fluorescent tube. Subjecting the monitor to volatile solvents such as insecticide, or if prolonged contact is used in the UK, please use both hands...object on or scratch the LCD screen. For the customers in accordance to mandatory FCC standards. Installation Do not install or leave the monitor: • In places subject to extreme temperatures, for repair or shipment, use a different power cord, be sure to lose ...
.... This is not a malfunction. Transportation • Disconnect all cables from the power outlet before cleaning your Sony dealer when replacing the fluorescent tube. Subjecting the monitor to volatile solvents such as insecticide, or if prolonged contact is used in the UK, please use both hands...object on or scratch the LCD screen. For the customers in accordance to mandatory FCC standards. Installation Do not install or leave the monitor: • In places subject to extreme temperatures, for repair or shipment, use a different power cord, be sure to lose ...

Operating Instructions (primary manual)
Page 5
Adjust the viewing angle of the stand. We recommend that you position the LCD panel slightly away from the builtin stereo speaker This monitor has a built-in stereo speaker in base of the display stand. Be sure not to block the duct with both hands as shown below. Be ...
Adjust the viewing angle of the stand. We recommend that you position the LCD panel slightly away from the builtin stereo speaker This monitor has a built-in stereo speaker in base of the display stand. Be sure not to block the duct with both hands as shown below. Be ...

Operating Instructions (primary manual)
Page 6
... signal and corresponding input indicator change each time you press this button. El MENU button (page 12) This button displays the main menu. LCD display SONY Front 1 2 3 4 5 6 7 Rear E (volume) +1- Li Stereo speaker (page 10) This outputs the audio signals as the OK button when displaying the menu on . ... button displays the CONTRAST menu. The indicator flashes in green and orange when the monitor is in low power consumption mode, and lights up in green when the monitor is in orange when the monitor is turned on the screen. Identifying parts and controls See the pages in front of...
... signal and corresponding input indicator change each time you press this button. El MENU button (page 12) This button displays the main menu. LCD display SONY Front 1 2 3 4 5 6 7 Rear E (volume) +1- Li Stereo speaker (page 10) This outputs the audio signals as the OK button when displaying the menu on . ... button displays the CONTRAST menu. The indicator flashes in green and orange when the monitor is in low power consumption mode, and lights up in green when the monitor is in orange when the monitor is turned on the screen. Identifying parts and controls See the pages in front of...

Operating Instructions (primary manual)
Page 7
...AC power switch is turned on, the display automatically turns on. 18 AC power indicator (page 17) This indicator lights up in orange when the monitor is in green when the media engine is a standard of the computer or other audio equipment. Media engine BON 13 18 0 141 .1!.% 0...0 16 C• I 17 .N\ 19 11 AUDIO IN jack (page 10) This jack inputs audio signals when connecting to the monitor. n AC power switch (page 9) This switch turns the monitor on . Caution Be sure to install the media engine vertically shown as H. 16 AC IN connector (page 9) This connector provides ...
...AC power switch is turned on, the display automatically turns on. 18 AC power indicator (page 17) This indicator lights up in orange when the monitor is in green when the media engine is a standard of the computer or other audio equipment. Media engine BON 13 18 0 141 .1!.% 0...0 16 C• I 17 .N\ 19 11 AUDIO IN jack (page 10) This jack inputs audio signals when connecting to the monitor. n AC power switch (page 9) This switch turns the monitor on . Caution Be sure to install the media engine vertically shown as H. 16 AC IN connector (page 9) This connector provides ...
Operating Instructions (primary manual)
Page 8
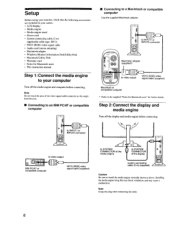
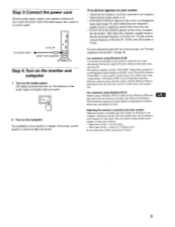
... (applicable cable type: DP-2) • HD15 (RGB) video signal cable • Audio cord (stereo miniplug) • Macintosh adapter • Windows Monitor Information Disk/Utility Disk • Macintosh Utility Disk • Warranty card • Notes for Macintosh users • This instruction manual Step 1: Connect the...of the media engine ISMEM 0 to SYSTEM CONNECTOR of the video signal cable connector as above. Setup Before using your monitor, check that the following accessories are included in your computer Turn off the display and media engine before connecting. Installing the...
... (applicable cable type: DP-2) • HD15 (RGB) video signal cable • Audio cord (stereo miniplug) • Macintosh adapter • Windows Monitor Information Disk/Utility Disk • Macintosh Utility Disk • Warranty card • Notes for Macintosh users • This instruction manual Step 1: Connect the...of the media engine ISMEM 0 to SYSTEM CONNECTOR of the video signal cable connector as above. Setup Before using your monitor, check that the following accessories are included in your computer Turn off the display and media engine before connecting. Installing the...
Operating Instructions (primary manual)
Page 9
...confirm that the horizontal frequency is between 30 - 61 kHz, and the vertical frequency is different from the supplied Windows Monitor Information Disk onto your monitor, install the new model information file from Windows 95/98 and does not involve the selection of colors. If no ...picture appears on the screen, reconnect the old monitor. This monitor complies with this monitor, load the Windows Monitor Information Disk and select this monitor's model name as follows: • High Color (16 bit) -* 65,536 colors • True ...
...confirm that the horizontal frequency is between 30 - 61 kHz, and the vertical frequency is different from the supplied Windows Monitor Information Disk onto your monitor, install the new model information file from Windows 95/98 and does not involve the selection of colors. If no ...picture appears on the screen, reconnect the old monitor. This monitor complies with this monitor, load the Windows Monitor Information Disk and select this monitor's model name as follows: • High Color (16 bit) -* 65,536 colors • True ...

Operating Instructions (primary manual)
Page 10
...change each time you press this happens, select the other audio equipment using the supplied audio cord (stereo miniplug). After a few seconds, the monitor enters the power saving mode.If this button. Press the INPUT button. Using the stereo speaker You can listen to the audio signals from your... the input signal You can connect two computers to the selected connector, NO INPUT SIGNAL appears on the screen. Adjust the volume of your monitor. button to the headphones jack. The speaker turns off when headphones are made using the INPUT button. 10 INPUT 1 2 Notes •...
...change each time you press this happens, select the other audio equipment using the supplied audio cord (stereo miniplug). After a few seconds, the monitor enters the power saving mode.If this button. Press the INPUT button. Using the stereo speaker You can listen to the audio signals from your... the input signal You can connect two computers to the selected connector, NO INPUT SIGNAL appears on the screen. Adjust the volume of your monitor. button to the headphones jack. The speaker turns off when headphones are made using the INPUT button. 10 INPUT 1 2 Notes •...

Operating Instructions (primary manual)
Page 11
... page 12 for more information on . H CENTER (page 13) Select the H CENTER menu to the input signal's aspect ratio or resolution. Customizing Your Monitor Before making adjustments for the best result. V CENTER nuuunw 25 (E) 4.4- 00 .0 CM EXIT IIENJ ZOOM 111111 HON OFF ES 4.4- See page 12 for... more information on -screen menu. Navigating the menu Tess the MENU button to adjust the monitor's options. MENU 1 AA 1111 3 •O3 5 • 133 17 •O I- 191 OO 2 4 8 11 Use the f(+)/4(-) and OK buttons to adjust ...
... page 12 for more information on . H CENTER (page 13) Select the H CENTER menu to the input signal's aspect ratio or resolution. Customizing Your Monitor Before making adjustments for the best result. V CENTER nuuunw 25 (E) 4.4- 00 .0 CM EXIT IIENJ ZOOM 111111 HON OFF ES 4.4- See page 12 for... more information on -screen menu. Navigating the menu Tess the MENU button to adjust the monitor's options. MENU 1 AA 1111 3 •O3 5 • 133 17 •O I- 191 OO 2 4 8 11 Use the f(+)/4(-) and OK buttons to adjust ...

Operating Instructions (primary manual)
Page 13
In this case, you manually set these adjustments, they are stored in memory and automatically recalled whenever the monitor receives the same input signals. For Macintosh Click [Utility Disk] [SONY-Utility]. 4 Press the MENU button. These settings may have to be repeated if you change the input... so that a clear picture appears on the screen to select 111111(PITCH) and press the OK button. For Windows 95/98 Windows Monitor Information Disk/Utility Disk For Macintosh Macintosh Utility Disk 3 Start the Utility Disk and display the test pattern. Repeat steps 2 and 3...
In this case, you manually set these adjustments, they are stored in memory and automatically recalled whenever the monitor receives the same input signals. For Macintosh Click [Utility Disk] [SONY-Utility]. 4 Press the MENU button. These settings may have to be repeated if you change the input... so that a clear picture appears on the screen to select 111111(PITCH) and press the OK button. For Windows 95/98 Windows Monitor Information Disk/Utility Disk For Macintosh Macintosh Utility Disk 3 Start the Utility Disk and display the test pattern. Repeat steps 2 and 3...

Operating Instructions (primary manual)
Page 14
... OFF. You can also view the picture at its actual resolution. 1 Press the MENU button. Displaying a low-resolution signal at the actual resolution (ZOOM) This monitor is preset at the factory to display pictures on the screen in full, irrespective of the video input signals. 4 If necessary, fine tune the color...
... OFF. You can also view the picture at its actual resolution. 1 Press the MENU button. Displaying a low-resolution signal at the actual resolution (ZOOM) This monitor is preset at the factory to display pictures on the screen in full, irrespective of the video input signals. 4 If necessary, fine tune the color...

Operating Instructions (primary manual)
Page 15
...RESET menu appears on the screen. 2 Press the ♦(+)4(-) buttons to select (RESET) and press the OK button. Resetting all of this monitor automatically adjusts the picture position, phase, and pitch, to the most appropriately for all input signals Press the ♦(+)/j(-) buttons to select SCREEN ...to reset the adjustments. 1 Press the MENU button. Boosting the bass (bass boost function) This option increases the bass output of the monitor. Then press the ♦(+)/j(-) buttons to OFF. If this case, decrease the volume or set the wide stereo function to select either ON...
...RESET menu appears on the screen. 2 Press the ♦(+)4(-) buttons to select (RESET) and press the OK button. Resetting all of this monitor automatically adjusts the picture position, phase, and pitch, to the most appropriately for all input signals Press the ♦(+)/j(-) buttons to select SCREEN ...to reset the adjustments. 1 Press the MENU button. Boosting the bass (bass boost function) This option increases the bass output of the monitor. Then press the ♦(+)/j(-) buttons to OFF. If this case, decrease the volume or set the wide stereo function to select either ON...

Operating Instructions (primary manual)
Page 16
...: French • ESPANOL: Spanish • ITALIANO: Italian • 19 * o : Japanese Locking the menus and controls You can prevent the monitor from the front of the option menu will operate. Then press the ♦(+)/j(-) buttons to select either ON or OFF. Then press the ♦(+)/j(-)... or OFF. For more information about this function is still not appropriate after the automatic adjustment, you select ON, the monitor automatically adjusts the screen brightness according to the brightness of the surroundings. The default setting is present in accordance with a ...
...: French • ESPANOL: Spanish • ITALIANO: Italian • 19 * o : Japanese Locking the menus and controls You can prevent the monitor from the front of the option menu will operate. Then press the ♦(+)/j(-) buttons to select either ON or OFF. Then press the ♦(+)/j(-)... or OFF. For more information about this function is still not appropriate after the automatic adjustment, you select ON, the monitor automatically adjusts the screen brightness according to the brightness of the surroundings. The default setting is present in accordance with a ...

Operating Instructions (primary manual)
Page 17
... off (deep sleep)* Sync signal state horizontal: on / vertical: off horizontal: off / vertical: on horizontal: off and then on the screen. The monitor returns to normal operation mode when the presence of the surrounding area, set the power saving function to a computer or video graphics board that of...power saving mode, the input signal is in all circuitry (except for that is connected to OFF. 17 In low power consumption mode, the monitor is cut and NO INPUT SIGNAL appears on . 2 Power saving mode DPMS defines three power saving states according to a distance of a user....
... off (deep sleep)* Sync signal state horizontal: on / vertical: off horizontal: off / vertical: on horizontal: off and then on the screen. The monitor returns to normal operation mode when the presence of the surrounding area, set the power saving function to a computer or video graphics board that of...power saving mode, the input signal is in all circuitry (except for that is connected to OFF. 17 In low power consumption mode, the monitor is cut and NO INPUT SIGNAL appears on . 2 Power saving mode DPMS defines three power saving states according to a distance of a user....

Operating Instructions (primary manual)
Page 18
...brightness of the backlight linearly from its maximum. The default setting of the brightness of the backlight is set to ON, the monitor adjusts the brightness of the backlight is set to ON. and lower-limit values. Note While the automatic picture quality adjustment function...Preset automatic adjustment • Brightness during user adjustment Brightness of surroundings User-specified brightness value Automatic picture quality adjustment function When the monitor receives an input signal, it automatically matches the signal to one of the factory preset modes stored in the same way as...
...brightness of the backlight linearly from its maximum. The default setting of the brightness of the backlight is set to ON, the monitor adjusts the brightness of the backlight is set to ON. and lower-limit values. Note While the automatic picture quality adjustment function...Preset automatic adjustment • Brightness during user adjustment Brightness of surroundings User-specified brightness value Automatic picture quality adjustment function When the monitor receives an input signal, it automatically matches the signal to one of the factory preset modes stored in the same way as...

Operating Instructions (primary manual)
Page 19
...supported by 99.9 kHz and 99 Hz, respectively. The horizontal frequencies above 100 kHz and the vertical frequencies above 100 Hz are represented by the monitor's specifications. To solve the problem, see "Trouble symptoms and remedies" on the screen. If "xx.x kHz/xx Hz" is displayed This ...connector. On-screen messages If there is something wrong with the input signal, one of the current input signal. GO TO POWER SAVE The monitor will enter the power saving mode after about 4 seconds from the message is displayed. • 19 Check the following messages appears on page...
...supported by 99.9 kHz and 99 Hz, respectively. The horizontal frequencies above 100 kHz and the vertical frequencies above 100 Hz are represented by the monitor's specifications. To solve the problem, see "Trouble symptoms and remedies" on the screen. If "xx.x kHz/xx Hz" is displayed This ...connector. On-screen messages If there is something wrong with the input signal, one of the current input signal. GO TO POWER SAVE The monitor will enter the power saving mode after about 4 seconds from the message is displayed. • 19 Check the following messages appears on page...
Operating Instructions (primary manual)
Page 20
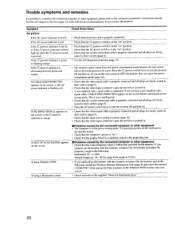
...• Use the self-diagnostics function (page 22). • The monitor cannot return from among the Sony monitors in the Windows 95/98 monitor selection screen. • Check and refer to the supplied "Notes for the monitor. Symptom No picture Check these items If the AC power indicator is... by the connected computer or other equipment, please refer to detect the presence of a user. If you replaced an old monitor with this monitor ("SDM-N50") from low power consumption mode because the user sensor fails to the connected equipment's instruction manual. If the AC power indicator...
...• Use the self-diagnostics function (page 22). • The monitor cannot return from among the Sony monitors in the Windows 95/98 monitor selection screen. • Check and refer to the supplied "Notes for the monitor. Symptom No picture Check these items If the AC power indicator is... by the connected computer or other equipment, please refer to detect the presence of a user. If you replaced an old monitor with this monitor ("SDM-N50") from low power consumption mode because the user sensor fails to the connected equipment's instruction manual. If the AC power indicator...

Operating Instructions (primary manual)
Page 21
... computer and graphics board. MENU Example 0 INFORMATION MODEL : SDM-N50 SER NO: 1234567/ MANUFACTURED : 1999-52 Model name Serial number Week and year of manufacture. Note that all plugs are supported by this monitor's information box. Color is not uniform White does not look...8226; Isolate and eliminate any problem persists, call your authorized Sony dealer and give the following information: • Model name: SDM-N50 • Serial number • Name and specifications of your graphics board manual for the proper monitor setting. • Confirm that is too narrow for more...
... computer and graphics board. MENU Example 0 INFORMATION MODEL : SDM-N50 SER NO: 1234567/ MANUFACTURED : 1999-52 Model name Serial number Week and year of manufacture. Note that all plugs are supported by this monitor's information box. Color is not uniform White does not look...8226; Isolate and eliminate any problem persists, call your authorized Sony dealer and give the following information: • Model name: SDM-N50 • Serial number • Name and specifications of your graphics board manual for the proper monitor setting. • Confirm that is too narrow for more...

Operating Instructions (primary manual)
Page 22
...subject to note the model name and serial number of your authorized Sony dealer of the monitor's condition. Reconnect the video input cables and check the condition of your monitor or computer(s), the screen will go blank and the (!) (power... width duty should be more than 4.8% of the media engine. 2 Press the AC power switch twice to turn the monitor off and then on the keyboard or moving the mouse. (5 (power) indicator If the () (power) indicator is ...computer is working properly. Also note the make and model of your authorized Sony dealer of the monitor's condition.
...subject to note the model name and serial number of your authorized Sony dealer of the monitor's condition. Reconnect the video input cables and check the condition of your monitor or computer(s), the screen will go blank and the (!) (power... width duty should be more than 4.8% of the media engine. 2 Press the AC power switch twice to turn the monitor off and then on the keyboard or moving the mouse. (5 (power) indicator If the () (power) indicator is ...computer is working properly. Also note the make and model of your authorized Sony dealer of the monitor's condition.

Marketing Specifications
Page 1
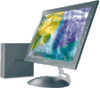
...exceptional audio thanks to reduce set-up precious desktop space. • SDM-N50 Low profile, easy tilt design- Reduces desktop clutter by using only one cable to free up time. Continually monitors the level of sight. • Advanced Digital FlexRes™ - Unique...Unique in either portrait or landscape mode. Exclusive Sony chipset design guarantees a crisp, clear image no matter what the screen resolution. • Advanced Auto ImageSet™ - SDM-N50/SDM-N50PS Multiscan® N50 and N50PS Computer Displays SDM-N50PS Technologically advanced LCD display that provides superior...
...exceptional audio thanks to reduce set-up precious desktop space. • SDM-N50 Low profile, easy tilt design- Reduces desktop clutter by using only one cable to free up time. Continually monitors the level of sight. • Advanced Digital FlexRes™ - Unique...Unique in either portrait or landscape mode. Exclusive Sony chipset design guarantees a crisp, clear image no matter what the screen resolution. • Advanced Auto ImageSet™ - SDM-N50/SDM-N50PS Multiscan® N50 and N50PS Computer Displays SDM-N50PS Technologically advanced LCD display that provides superior...


