
Operating Instructions (primary manual)
Page 2
...) and extremely low frequency (ELF). Declaration of the FCC Rules. Owner's Record The model and serial numbers are present inside the unit. Model No. Do not open the cabinet. Dangerously high voltages are located at the rear of the FCC Rules. INFORMATION This product complies with the instructions, may cause undesired operation. 2 Record these numbers in a particular installation. FCC Notice...
...) and extremely low frequency (ELF). Declaration of the FCC Rules. Owner's Record The model and serial numbers are present inside the unit. Model No. Do not open the cabinet. Dangerously high voltages are located at the rear of the FCC Rules. INFORMATION This product complies with the instructions, may cause undesired operation. 2 Record these numbers in a particular installation. FCC Notice...
Operating Instructions (primary manual)
Page 3
...image (BRIGHTNESS) 12 Eliminating flicker or blurring (PHASE/PITCH) 13 Adjusting the picture position (H CENTERN CENTER) 13 Displaying a low-resolution signal at the actual resolution (ZOOM) 14 Adjusting the color temperature (COLOR) 14 Changing the menu's position (MENU POSITION) 14 Resetting the adjustments (RESET) 15 Additional settings (Option) 15 Technical Features 17 Power saving function (user sensor/power saving mode) 17 Automatic brightness adjustment function (light sensor) 18 Automatic picture quality adjustment function 18 - Specifications 22 • VESA...
...image (BRIGHTNESS) 12 Eliminating flicker or blurring (PHASE/PITCH) 13 Adjusting the picture position (H CENTERN CENTER) 13 Displaying a low-resolution signal at the actual resolution (ZOOM) 14 Adjusting the color temperature (COLOR) 14 Changing the menu's position (MENU POSITION) 14 Resetting the adjustments (RESET) 15 Additional settings (Option) 15 Technical Features 17 Power saving function (user sensor/power saving mode) 17 Automatic brightness adjustment function (light sensor) 18 Automatic picture quality adjustment function 18 - Specifications 22 • VESA...
Operating Instructions (primary manual)
Page 4
... sunlight or near an open window or an outdoor exit. If setting up temporarily in this monitor with general household waste. • The fluorescent tube used in direct sunlight. Do not place a heavy object on or scratch the LCD screen. Do not use a different power cord, be sure to 240 V AC for this display, grasp the support and base sections of cleaner containing...
... sunlight or near an open window or an outdoor exit. If setting up temporarily in this monitor with general household waste. • The fluorescent tube used in direct sunlight. Do not place a heavy object on or scratch the LCD screen. Do not use a different power cord, be sure to 240 V AC for this display, grasp the support and base sections of cleaner containing...

Operating Instructions (primary manual)
Page 5
... to boost the bass. Ducts Keep the LCD panel slightly away from the builtin stereo speaker This monitor has a built-in stereo speaker in base of the display stand. To adjust the tilt and height This display can set it up at a comfortable viewing angle. Be careful not to block the duct with both hands as shown below. When adjusting the screen height and tilt, proceed slowly and carefully...
... to boost the bass. Ducts Keep the LCD panel slightly away from the builtin stereo speaker This monitor has a built-in stereo speaker in base of the display stand. To adjust the tilt and height This display can set it up at a comfortable viewing angle. Be careful not to block the duct with both hands as shown below. When adjusting the screen height and tilt, proceed slowly and carefully...

Operating Instructions (primary manual)
Page 6
... button displays the main menu. The input signal and corresponding input indicator change each time you press this button. Li Stereo speaker (page 10) This outputs the audio signals as the f(+)/4(-) buttons when selecting the menu items and making adjustments. The indicator flashes in green and orange when the monitor is in low power consumption mode, and lights up in green when the monitor is in orange when the monitor is turned on. M Light sensor and user...
... button displays the main menu. The input signal and corresponding input indicator change each time you press this button. Li Stereo speaker (page 10) This outputs the audio signals as the f(+)/4(-) buttons when selecting the menu items and making adjustments. The indicator flashes in green and orange when the monitor is in low power consumption mode, and lights up in green when the monitor is in orange when the monitor is turned on. M Light sensor and user...
Operating Instructions (primary manual)
Page 8
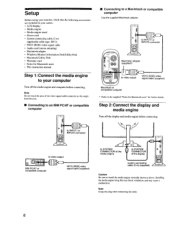
... compatible computer Use the supplied Macintosh adapter. Note Grasp the plug when connecting the cable. 8 Setup Before using your monitor, check that the following accessories are included in your carton: • LCD display • Media engine • Media engine stand • Power cord • System connecting cable (2 m) (applicable cable type: DP-2) • HD15 (RGB) video signal cable • Audio cord (stereo miniplug) • Macintosh adapter • Windows Monitor Information Disk/Utility Disk • Macintosh Utility Disk • Warranty card...
... compatible computer Use the supplied Macintosh adapter. Note Grasp the plug when connecting the cable. 8 Setup Before using your monitor, check that the following accessories are included in your carton: • LCD display • Media engine • Media engine stand • Power cord • System connecting cable (2 m) (applicable cable type: DP-2) • HD15 (RGB) video signal cable • Audio cord (stereo miniplug) • Macintosh adapter • Windows Monitor Information Disk/Utility Disk • Macintosh Utility Disk • Warranty card...
Operating Instructions (primary manual)
Page 9
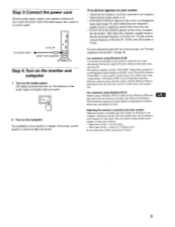
... picture appears on adjusting the resolution, refresh rate, and number of your monitor, install the new model information file from Windows 95/98 and does not involve the selection of Windows 95/98. The color number may be slower. 9 Refer to your screen • Check that the horizontal frequency is between 30 - 61 kHz, and the vertical frequency is on. • If NO INPUT SIGNAL appears on the computer. Step 3:Connect the power cord...
... picture appears on adjusting the resolution, refresh rate, and number of your monitor, install the new model information file from Windows 95/98 and does not involve the selection of Windows 95/98. The color number may be slower. 9 Refer to your screen • Check that the horizontal frequency is between 30 - 61 kHz, and the vertical frequency is on. • If NO INPUT SIGNAL appears on the computer. Step 3:Connect the power cord...

Operating Instructions (primary manual)
Page 10
... input to adjust the volume. buttons. The menu automatically disappears after about 3 seconds. The speaker turns off when headphones are made using a separate VOLUME menu from the speaker. To select one of the headphones using the VOLUME menu. Adjusting the volume Volume adjustments are connected to the headphones jack. The VOLUME menu appears on the screen. • When your monitor. Using the stereo speaker You can listen to music, sounds, and other audio equipment using the supplied audio cord (stereo miniplug). Using...
... input to adjust the volume. buttons. The menu automatically disappears after about 3 seconds. The speaker turns off when headphones are made using a separate VOLUME menu from the speaker. To select one of the headphones using the VOLUME menu. Adjusting the volume Volume adjustments are connected to the headphones jack. The VOLUME menu appears on the screen. • When your monitor. Using the stereo speaker You can listen to music, sounds, and other audio equipment using the supplied audio cord (stereo miniplug). Using...

Operating Instructions (primary manual)
Page 13
... instructions. In this case, you change the input signal after reconnecting your computer. 1 Start the Utility Disk and display the test pattern. If horizontal stripes are stored in memory and automatically recalled whenever the monitor receives the same input signals. These settings may not completely adjust the picture position, phase, and pitch. Eliminating flicker or blurring (PHASE/PITCH) When the monitor receives an input signal, the automatic picture quality adjustment...
... instructions. In this case, you change the input signal after reconnecting your computer. 1 Start the Utility Disk and display the test pattern. If horizontal stripes are stored in memory and automatically recalled whenever the monitor receives the same input signals. These settings may not completely adjust the picture position, phase, and pitch. Eliminating flicker or blurring (PHASE/PITCH) When the monitor receives an input signal, the automatic picture quality adjustment...

Operating Instructions (primary manual)
Page 15
... BOOST • BACKLIGHT • LIGHT SENSOR • POWER SAVE • USER SENSOR • LANGUAGE • MENU LOCK 1 Press the MENU button. However, in this function is activated, the phase is automatically turned off . Then press the ♦(+)/j(-) buttons to OFF. Increasing the soundscape (wide stereo function) This adjustment makes use of the DSP and creates the illusion of this case, decrease the volume or set the wide stereo function...
... BOOST • BACKLIGHT • LIGHT SENSOR • POWER SAVE • USER SENSOR • LANGUAGE • MENU LOCK 1 Press the MENU button. However, in this function is activated, the phase is automatically turned off . Then press the ♦(+)/j(-) buttons to OFF. Increasing the soundscape (wide stereo function) This adjustment makes use of the DSP and creates the illusion of this case, decrease the volume or set the wide stereo function...

Operating Instructions (primary manual)
Page 16
... monitor. Setting up the power saving mode This monitor has a function which enables it to enter the power save mode automatically according to OFF. 16 First press the t(+)/4(-) buttons to select either ON or OFF. Only the OD (power) switch, and 0-n (MENU LOCK) of the surrounding area (light sensor). Automatically adjusting the screen brightness (light sensor) This monitor is present in accordance with a sensor to ON, the value of the monitor. Using...
... monitor. Setting up the power saving mode This monitor has a function which enables it to enter the power save mode automatically according to OFF. 16 First press the t(+)/4(-) buttons to select either ON or OFF. Only the OD (power) switch, and 0-n (MENU LOCK) of the surrounding area (light sensor). Automatically adjusting the screen brightness (light sensor) This monitor is present in accordance with a sensor to ON, the value of the monitor. Using...

Operating Instructions (primary manual)
Page 17
... 1 low power consumption mode 2 power saving mode 6 (power): off AC power: off Power consumption 35 W ≤ 8 W ≤ 3 W < 3 W 0 W AC power indicator green green orange red off (5 (power) indicator green green and orange alternate orange off off / vertical: on the screen. In this distance may not work normally if sync signals other than those listed above are power saving modes defined by VESA, ENERGY STAR, and NUTEK. In such a case, set according to turn the monitor off power to all...
... 1 low power consumption mode 2 power saving mode 6 (power): off AC power: off Power consumption 35 W ≤ 8 W ≤ 3 W < 3 W 0 W AC power indicator green green orange red off (5 (power) indicator green green and orange alternate orange off off / vertical: on the screen. In this distance may not work normally if sync signals other than those listed above are power saving modes defined by VESA, ENERGY STAR, and NUTEK. In such a case, set according to turn the monitor off power to all...

Operating Instructions (primary manual)
Page 19
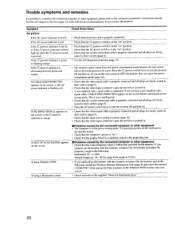
... displayed. • 19 The horizontal frequencies above 100 kHz and the vertical frequencies above 100 Hz are represented by the monitor's specifications. Troubleshooting Before contacting technical support, refer to this indicates that the input signal is not supported by the nonitor's specifications. If OUT OF SCAN RANGE appears on the screen This indicates that no signal is input from the currently selected connector. • • CABLE DISCONNECTED INPUT GO TO POWER SAVE INPUT...
... displayed. • 19 The horizontal frequencies above 100 kHz and the vertical frequencies above 100 Hz are represented by the monitor's specifications. Troubleshooting Before contacting technical support, refer to this indicates that the input signal is not supported by the nonitor's specifications. If OUT OF SCAN RANGE appears on the screen This indicates that no signal is input from the currently selected connector. • • CABLE DISCONNECTED INPUT GO TO POWER SAVE INPUT...
Operating Instructions (primary manual)
Page 20
... video input connector's pins are firmly seated in . If you replaced an old monitor with this monitor, reconnect the old monitor and adjust the frequency range to the following: Horizontal: 30 - 61 kHz Vertical frequency: 50 - 85 Hz (only XGA mode at 75 Hz) • If you connect a non-supplied video signal cable, CABLE DISCONNECTED appears on . Press the 0 (power) switch twice to turn the monitor off and then on ." • Check that the graphic board...
... video input connector's pins are firmly seated in . If you replaced an old monitor with this monitor, reconnect the old monitor and adjust the frequency range to the following: Horizontal: 30 - 61 kHz Vertical frequency: 50 - 85 Hz (only XGA mode at 75 Hz) • If you connect a non-supplied video signal cable, CABLE DISCONNECTED appears on . Press the 0 (power) switch twice to turn the monitor off and then on ." • Check that the graphic board...

Operating Instructions (primary manual)
Page 21
... any problem persists, call your authorized Sony dealer and give the following information: • Model name: SDM-N50 • Serial number • Name and specifications of your graphics board manual for the proper monitor setting. • Confirm that the graphics mode (VESA, Macintosh 19" Color, etc.) and the frequency of the input signal are firmly seated in their sockets. • Adjust the pitch and phase (page 13). • Adjust the picture position...
... any problem persists, call your authorized Sony dealer and give the following information: • Model name: SDM-N50 • Serial number • Name and specifications of your graphics board manual for the proper monitor setting. • Confirm that the graphics mode (VESA, Macintosh 19" Color, etc.) and the frequency of the input signal are firmly seated in their sockets. • Adjust the pitch and phase (page 13). • Adjust the picture position...

Operating Instructions (primary manual)
Page 22
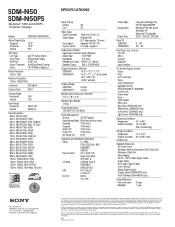
... authorized Sony dealer of the monitor's condition. Specifications LCD panel Panel type: a-Si TFT Active Matrix Picture size: 15 inch (38 cm) Input signal format RGB operating frequency* Horizontal: 30 - 61 kHz Vertical: 50 - 85 Hz Resolution Horizontal: Max.1024 dots Vertical: Max.768 lines Input signal levels RGB video signal 0.700 Vp-p, 75 Q, positive SYNC signal TTL level, 2 positive or negative (Separate horizontal and vertica., or composite sync) 0.3 Vp-p, 75Q, negative (Sync on . Design and specifications are subject to change without stand): Approx...
... authorized Sony dealer of the monitor's condition. Specifications LCD panel Panel type: a-Si TFT Active Matrix Picture size: 15 inch (38 cm) Input signal format RGB operating frequency* Horizontal: 30 - 61 kHz Vertical: 50 - 85 Hz Resolution Horizontal: Max.1024 dots Vertical: Max.768 lines Input signal levels RGB video signal 0.700 Vp-p, 75 Q, positive SYNC signal TTL level, 2 positive or negative (Separate horizontal and vertica., or composite sync) 0.3 Vp-p, 75Q, negative (Sync on . Design and specifications are subject to change without stand): Approx...

Marketing Specifications
Page 1
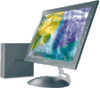
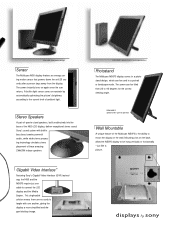
...; SDM-N50 Low profile, easy tilt design- Stereo speakers - Wall mountable - With supplied software, the panel can be used in -base design delivers exceptional audio thanks to virtually any angle for maximum viewing comfort. SDM-N50/SDM-N50PS Multiscan® N50 and N50PS Computer Displays SDM-N50PS Technologically advanced LCD display that provides superior images with outstanding onscreen colors all in a sleek, space-saving design. • 15.0" XGA TFT active matrix LCD panel - Light sensor - Automatic adjustment of...
...; SDM-N50 Low profile, easy tilt design- Stereo speakers - Wall mountable - With supplied software, the panel can be used in -base design delivers exceptional audio thanks to virtually any angle for maximum viewing comfort. SDM-N50/SDM-N50PS Multiscan® N50 and N50PS Computer Displays SDM-N50PS Technologically advanced LCD display that provides superior images with outstanding onscreen colors all in a sleek, space-saving design. • 15.0" XGA TFT active matrix LCD panel - Light sensor - Automatic adjustment of...

Marketing Specifications
Page 2
... breathtakingly accurate onscreen colors. Utilizing Sony's Digital Multiscan® and Digital FlexRes™ technologies, the N50 and N50PS display a digitally correct pixel positioning to the display, eliminating the tangle of a button on unnecessary desktop clutter. Measuring a mere 1/2" at variable screen resolution. SDM-N50/SDM-N50PS Sony's most compact LCD display The Sony Multiscan N50 and N50PS displays boast a spacious 15.0" LCD panel in an ultra sleek, space saving design Double Input For those users who truly multitask...
... breathtakingly accurate onscreen colors. Utilizing Sony's Digital Multiscan® and Digital FlexRes™ technologies, the N50 and N50PS display a digitally correct pixel positioning to the display, eliminating the tangle of a button on unnecessary desktop clutter. Measuring a mere 1/2" at variable screen resolution. SDM-N50/SDM-N50PS Sony's most compact LCD display The Sony Multiscan N50 and N50PS displays boast a spacious 15.0" LCD panel in an ultra sleek, space saving design Double Input For those users who truly multitask...
Marketing Specifications
Page 3
... a picture. This single-cable solution means there are no cords to tangle with built-in bass boost creates powerful audio, while wide stereo processing technology simulates stereo placement of these amazing 2Wx2W in portrait position) Wall Mountable A unique feature of the N50 LCD display, deliver exceptional stereo sound. Sony's sound system with one cable to connect the LCD display and the Media Engine. SDM-N50PS (photostand in -base speakers Gigabit Video Interface...
... a picture. This single-cable solution means there are no cords to tangle with built-in bass boost creates powerful audio, while wide stereo processing technology simulates stereo placement of these amazing 2Wx2W in portrait position) Wall Mountable A unique feature of the N50 LCD display, deliver exceptional stereo sound. Sony's sound system with one cable to connect the LCD display and the Media Engine. SDM-N50PS (photostand in -base speakers Gigabit Video Interface...
Marketing Specifications
Page 4
... International Energy Star NUTEK Spec 803299 Windows® 95, 98, 2000 Windows NT Macintosh® Compatible DDC-1, DDC-2B, DDC-2Bi Panel Tilt SDM-N50 SDM-N50PS 0˚ - 90˚ 20˚ - 40˚ Front Panel User Controls On/Off Menu Contrast Brightness Input Selection On Screen Display Controls Phase Pitch H/V Centering Zoom Color Temperature Backlight Control Multi-Language (6 Languages) Control Lock Power Save Reset OSD Position Menu Lock Bass Boost (SDM-N50 only) Wide Stereo (SDM-N50 only) User Sensor (SDM-N50 only) Light Sensor (SDM-N50 only) Operating Conditions Temperature...
... International Energy Star NUTEK Spec 803299 Windows® 95, 98, 2000 Windows NT Macintosh® Compatible DDC-1, DDC-2B, DDC-2Bi Panel Tilt SDM-N50 SDM-N50PS 0˚ - 90˚ 20˚ - 40˚ Front Panel User Controls On/Off Menu Contrast Brightness Input Selection On Screen Display Controls Phase Pitch H/V Centering Zoom Color Temperature Backlight Control Multi-Language (6 Languages) Control Lock Power Save Reset OSD Position Menu Lock Bass Boost (SDM-N50 only) Wide Stereo (SDM-N50 only) User Sensor (SDM-N50 only) Light Sensor (SDM-N50 only) Operating Conditions Temperature...


