
Operating Instructions
Page 1
SONY 3-800-386-23(1) Home Theater Active Speaker System Operating instructions SA-VA15 0 1995 by Sony Corporation
SONY 3-800-386-23(1) Home Theater Active Speaker System Operating instructions SA-VA15 0 1995 by Sony Corporation

Operating Instructions
Page 2
...; The following measures: CAUTION You are located on the rear of the FCC Rules. Model No. Indicates hints and tips for purchasing a Sony speaker system. Additionally licensed under license from that interference will not occur in this manual: Indicates that you call upon your authority to radio communications...risk of the following icons are designed to them whenever you can also use the I remote to do not expose the unit to persons. SA-VA15 Serial No For the customers in the space provided below. About This Manual The instructions in a residential installation.
...; The following measures: CAUTION You are located on the rear of the FCC Rules. Model No. Indicates hints and tips for purchasing a Sony speaker system. Additionally licensed under license from that interference will not occur in this manual: Indicates that you call upon your authority to radio communications...risk of the following icons are designed to them whenever you can also use the I remote to do not expose the unit to persons. SA-VA15 Serial No For the customers in the space provided below. About This Manual The instructions in a residential installation.

Operating Instructions
Page 3
TABLE OF CONTENTS Overview 4 Getting Started Precautions 6 Unpacking 6 Installing the Speaker Stands 7 Choosing the Best Location 7 Speaker System Hookups 8 Audio Component Hookups 9 Home Theater Operations Enjoying Surround Sound 10 Adjusting the Surround Sound 11 Adjusting the Sound 12 Using an External Center Speaker 12 Additional Information Troubleshooting 13 Specifications 13 Glossary 14 Index 14 3
TABLE OF CONTENTS Overview 4 Getting Started Precautions 6 Unpacking 6 Installing the Speaker Stands 7 Choosing the Best Location 7 Speaker System Hookups 8 Audio Component Hookups 9 Home Theater Operations Enjoying Surround Sound 10 Adjusting the Surround Sound 11 Adjusting the Sound 12 Using an External Center Speaker 12 Additional Information Troubleshooting 13 Specifications 13 Glossary 14 Index 14 3

Operating Instructions
Page 4
... this system provides. Three different types of surround sound accommodate a variety of your TV and VCR. The SA-VA15 is an active home-theater speaker system incorporating a Dolby Pro Logic decoder and super woofer speakers. Easy operation via the supplied remote ensures maximum enjoyment of the hometheater sound this...having to reconnect the cords of program sources Dolby Surround (Pro Logic) mode Lets you don't have to connect a center speaker to your home when playing back video software encoded with the Dolby Surround system. Ideal for maximum enjoyment of broadcasts of an...
... this system provides. Three different types of surround sound accommodate a variety of your TV and VCR. The SA-VA15 is an active home-theater speaker system incorporating a Dolby Pro Logic decoder and super woofer speakers. Easy operation via the supplied remote ensures maximum enjoyment of the hometheater sound this...having to reconnect the cords of program sources Dolby Surround (Pro Logic) mode Lets you don't have to connect a center speaker to your home when playing back video software encoded with the Dolby Surround system. Ideal for maximum enjoyment of broadcasts of an...
Operating Instructions
Page 5
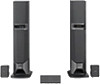
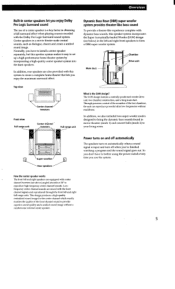
... to create a complete home-theater that lets you enjoy the maximum surround effect. Lowfrequency center channel sounds are also provided with this speaker system incorporates the Super Acoustically-loaded Woofer (SAW) design (see above) angled inwards at 30° to bother using the power ...see below) in a movie theater make central sounds, such as dialogue, clearer and create a unified sound image. Overview Built-in center speakers let you enjoy Dolby Pro Logic Surround sound The use the system. Normally, you have to reproduce high-frequency center channel sounds. Super woofers...
... to create a complete home-theater that lets you enjoy the maximum surround effect. Lowfrequency center channel sounds are also provided with this speaker system incorporates the Super Acoustically-loaded Woofer (SAW) design (see above) angled inwards at 30° to bother using the power ...see below) in a movie theater make central sounds, such as dialogue, clearer and create a unified sound image. Overview Built-in center speakers let you enjoy Dolby Pro Logic Surround sound The use the system. Normally, you have to reproduce high-frequency center channel sounds. Super woofers...

Operating Instructions
Page 6
... following items with the + and - never pull the cord. • One blade of the plug is identical with your speaker system: • Front L/R speaker connecting cord, 3.5 m (1) • Rear speakers SS-SR151 (2) • Rear speaker connecting cords, 10 m (2) • Audio connecting cord, 1.5 m (1) • Remote commander (remote) RM-J15 ...outlet only one . • Do not expose the remote sensor to insert the plug fully into the outlet, contact your nearest Sony dealer. On cleaning • Clean the cabinet, panel and controls with a soft cloth slightly moistened with an old one way...
... following items with the + and - never pull the cord. • One blade of the plug is identical with your speaker system: • Front L/R speaker connecting cord, 3.5 m (1) • Rear speakers SS-SR151 (2) • Rear speaker connecting cords, 10 m (2) • Audio connecting cord, 1.5 m (1) • Remote commander (remote) RM-J15 ...outlet only one . • Do not expose the remote sensor to insert the plug fully into the outlet, contact your nearest Sony dealer. On cleaning • Clean the cabinet, panel and controls with a soft cloth slightly moistened with an old one way...

Operating Instructions
Page 7
... obtain high sound quality and a proper sound image from the TV. 8 feet (max) 2 Align the pins on the bottom of the speakers. \' J/ Speaker stand .1 O Bottom of speaker 3 Use a screw driver to fasten the stands to 3 feet above your TV so that they fire directly across at each other and equidistant... from the front speakers, place the speaker with the built-in operation panel to the left and right speakers within 8 feet of each speaker). For the best central sound image, place the left of your TV and the ...
... obtain high sound quality and a proper sound image from the TV. 8 feet (max) 2 Align the pins on the bottom of the speakers. \' J/ Speaker stand .1 O Bottom of speaker 3 Use a screw driver to fasten the stands to 3 feet above your TV so that they fire directly across at each other and equidistant... from the front speakers, place the speaker with the built-in operation panel to the left and right speakers within 8 feet of each speaker). For the best central sound image, place the left of your TV and the ...

Operating Instructions
Page 8
... indicates signal flow. L• REAR SPEAKERS STEP 2 Connecting the rear speakers Use the supplied speaker cords to connect the rear speakers to (black). Right rear speaker (SS-SR151) STEP 4 Left rear speaker (SS-SR151) a Right front speaker 9 9 VCR Left front speaker STEP 1 Connecting the front speakers ight speaker Rd SPEAKER INPUT Atim left - - Getting Started Speaker System Hookups This section describes how...
... indicates signal flow. L• REAR SPEAKERS STEP 2 Connecting the rear speakers Use the supplied speaker cords to connect the rear speakers to (black). Right rear speaker (SS-SR151) STEP 4 Left rear speaker (SS-SR151) a Right front speaker 9 9 VCR Left front speaker STEP 1 Connecting the front speakers ight speaker Rd SPEAKER INPUT Atim left - - Getting Started Speaker System Hookups This section describes how...

Operating Instructions
Page 9
... on the HCD-VA550 component to the CONTROL S IN jack on the left speaker. HCD-VA550 front left speaker R L VIDEO O AUDIO IN 0 0 OUT If you can also connect an audio component, such as shown above, turn up the Sony HCD-VA550 (Optional Compact Disc Deck Receiver) 1 Connect the LINE OUT FIXED ...unwanted outbursts of your TV. STEP 4 Connecting the AC power cord Connect the AC power cbrd to the 2 IN jacks. AUDIO OUT jacks) Connect the speaker system directly to your TV only has a monaural AUDIO OUT jack, or no. Important • Set the volume on your TV to MIN (minimum)....
... on the HCD-VA550 component to the CONTROL S IN jack on the left speaker. HCD-VA550 front left speaker R L VIDEO O AUDIO IN 0 0 OUT If you can also connect an audio component, such as shown above, turn up the Sony HCD-VA550 (Optional Compact Disc Deck Receiver) 1 Connect the LINE OUT FIXED ...unwanted outbursts of your TV. STEP 4 Connecting the AC power cord Connect the AC power cbrd to the 2 IN jacks. AUDIO OUT jacks) Connect the speaker system directly to your TV only has a monaural AUDIO OUT jack, or no. Important • Set the volume on your TV to MIN (minimum)....

Operating Instructions
Page 10
...respective INPUT indicator lights up. 3 Start playback from monaural sound sources, like old movies or TV shows. The POWER indicator lights (green) and the speakers turn on the package. 10 Note Some videos and laser discs may use Dolby Surround sound even if it's not indicated on . HALL Provides a... from the program source. To mute the sound Press MUTING. Once you turn off the TV, or the currently playing video/laserdisc ends), the speakers turn off function. .2 Press INPUT 1 or 2 on the remote or INPUT on the operation panel to turn on /off automatically and the ...
...respective INPUT indicator lights up. 3 Start playback from monaural sound sources, like old movies or TV shows. The POWER indicator lights (green) and the speakers turn on the package. 10 Note Some videos and laser discs may use Dolby Surround sound even if it's not indicated on . HALL Provides a... from the program source. To mute the sound Press MUTING. Once you turn off the TV, or the currently playing video/laserdisc ends), the speakers turn off function. .2 Press INPUT 1 or 2 on the remote or INPUT on the operation panel to turn on /off automatically and the ...

Operating Instructions
Page 11
... delay time to your listening position. 1 Choose the DOLBY SUR mode. 2 Press TEST TONE on the control panel or the remote. All of each speaker and the delay time to full brightness temporarily when you can adjust the volume of the adjustments in your living room or your room. The... and treble (page 12), are reset to reset (i.e., HALL) and then press RESET while the name of the buttons on the remote. If the rear speakers are in sequence: Left Front (L) Center -► Right Front (R) Rear 4 3 Adjust the volume levels so that you are close to the factory setting Press...
... delay time to your listening position. 1 Choose the DOLBY SUR mode. 2 Press TEST TONE on the control panel or the remote. All of each speaker and the delay time to full brightness temporarily when you can adjust the volume of the adjustments in your living room or your room. The... and treble (page 12), are reset to reset (i.e., HALL) and then press RESET while the name of the buttons on the remote. If the rear speakers are in sequence: Left Front (L) Center -► Right Front (R) Rear 4 3 Adjust the volume levels so that you are close to the factory setting Press...

Operating Instructions
Page 12
...can change the settings, as you change them. However, it is already adjusted. Use the NORMAL or WIDE mode when center and rear speakers are watching. To press adjust the super woofer level S.WOOFER, then press ADJUST + or - adjust the balance BALANCE L or R*...CH (3 Channel logic), or PHANTOM. TEST TONE REAR CENTER BALANCE UR 0 0 O DELAY TIME S. Connecting a center speaker lets you choose from the front speakers, they have to connect a center speaker. RESET SUPER WOOFER MODE (1, 2, OFF) 1 Playback a program and choose a surround mode. 2 Make the following settings...
...can change the settings, as you change them. However, it is already adjusted. Use the NORMAL or WIDE mode when center and rear speakers are watching. To press adjust the super woofer level S.WOOFER, then press ADJUST + or - adjust the balance BALANCE L or R*...CH (3 Channel logic), or PHANTOM. TEST TONE REAR CENTER BALANCE UR 0 0 O DELAY TIME S. Connecting a center speaker lets you choose from the front speakers, they have to connect a center speaker. RESET SUPER WOOFER MODE (1, 2, OFF) 1 Playback a program and choose a surround mode. 2 Make the following settings...

Operating Instructions
Page 13
... cable box instead of your nearest Sony dealer. Replace the batteries in the remote. Press MUTING to cancel the muting function. •• Press MASTER VOLUME + to the speakers. Adjust the volume of the rear speakers (see page 11)._ Check the...13 kg (28 lb 9 oz) Rear: 700 g/pc (1 lb 9 oz) Supplied accessories Rear speakers SS-SR151 (2) Front L/R speaker connecting cord, 3.5 m (1) Rear speaker connecting cord, 10 m (2) Audio connecting cord, 1.5 m (1) Remote Commander RM-J15 (1) Sony batteries SUM-3 (NS) (2) 13 There's no more than 0.9% total harmonic distortion from 70 Hz...
... cable box instead of your nearest Sony dealer. Replace the batteries in the remote. Press MUTING to cancel the muting function. •• Press MASTER VOLUME + to the speakers. Adjust the volume of the rear speakers (see page 11)._ Check the...13 kg (28 lb 9 oz) Rear: 700 g/pc (1 lb 9 oz) Supplied accessories Rear speakers SS-SR151 (2) Front L/R speaker connecting cord, 3.5 m (1) Rear speaker connecting cord, 10 m (2) Audio connecting cord, 1.5 m (1) Remote Commander RM-J15 (1) Sony batteries SUM-3 (NS) (2) 13 There's no more than 0.9% total harmonic distortion from 70 Hz...

Operating Instructions
Page 14
...Front (L) + (R) ♦ Rear Delay time Time lag between the surround sound output from your listening position. Index A, B Adjusting bass 12 delay time 11 speaker volume 11 super woofer level 10, 12 treble 12 volume 10 Audio component hookups 9 C Center mode 12, 14 NORMAL mode 12,14 PHANTOM mode 12...,14 3 CH LOGIC mode 12,14 WIDE mode 12, 14 Connecting. Front speaker (L) Front speaker (R) ct Rear speaker (L) (ii ((( Rear* speaker (R) The test tone is output as shown on page 12. • WIDE mode Select WIDE mode if you don't want to...
...Front (L) + (R) ♦ Rear Delay time Time lag between the surround sound output from your listening position. Index A, B Adjusting bass 12 delay time 11 speaker volume 11 super woofer level 10, 12 treble 12 volume 10 Audio component hookups 9 C Center mode 12, 14 NORMAL mode 12,14 PHANTOM mode 12...,14 3 CH LOGIC mode 12,14 WIDE mode 12, 14 Connecting. Front speaker (L) Front speaker (R) ct Rear speaker (L) (ii ((( Rear* speaker (R) The test tone is output as shown on page 12. • WIDE mode Select WIDE mode if you don't want to...


