Operating Instructions
Page 3
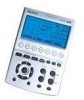
... key operations for entering a channel number on /off and other remote control signals you can be available) (page 49). Components are selectable with this one remote commander This Commander is preset for Sony components are preset at the factory to operate Sony brand components, so you need This Commander has a learning function, to learn remote control signals (infrared signals only) of non Audio Visual components such as a control center for the components frequently used and 12 keys on the LCD, such as recording, stopping...
... key operations for entering a channel number on /off and other remote control signals you can be available) (page 49). Components are selectable with this one remote commander This Commander is preset for Sony components are preset at the factory to operate Sony brand components, so you need This Commander has a learning function, to learn remote control signals (infrared signals only) of non Audio Visual components such as a control center for the components frequently used and 12 keys on the LCD, such as recording, stopping...
Operating Instructions
Page 4
... 12 Setting a component code 12 Checking if the code number works 15 Finding a component code with the Search function 16 Operating Your Components with the Remote Commander 18 To control the volume ...19 Using Non-Preset Remote Control Operations - Learning Function 19 For accurate learning ...25 Changing or erasing the function of a taught key or button 25 Advanced Features Controlling the Volume of Visual Components Connected to an Audio System 29 Executing a Series of Commands - Table of Contents Getting Started Location and Function of Controls 6 Installing the Batteries...
... 12 Setting a component code 12 Checking if the code number works 15 Finding a component code with the Search function 16 Operating Your Components with the Remote Commander 18 To control the volume ...19 Using Non-Preset Remote Control Operations - Learning Function 19 For accurate learning ...25 Changing or erasing the function of a taught key or button 25 Advanced Features Controlling the Volume of Visual Components Connected to an Audio System 29 Executing a Series of Commands - Table of Contents Getting Started Location and Function of Controls 6 Installing the Batteries...
Operating Instructions
Page 5
... Specifications ...83 Troubleshooting ...84 Appendix Table of Preset Functions ...88 TV ...88 STB (Digital satellite) ...89 STB2 (Digital cable box) ...90 VCR, VCR2, VCR3 ...91 DVD, DVD2 ...92 CD ...93 AMP ...94 MD ...95 TAPE A, TAPE B ...96 CABLE (Cable box) ...97 LD (Laser disc player) ...97 DVR (Digital video recorder 98 DAT ...99 LIGHTING ...100 Quick Reference of Operations 101 Full display ...103 Index ...Back cover 5 Hold Function 71 Protecting your settings - Selecting a Channel with...
... Specifications ...83 Troubleshooting ...84 Appendix Table of Preset Functions ...88 TV ...88 STB (Digital satellite) ...89 STB2 (Digital cable box) ...90 VCR, VCR2, VCR3 ...91 DVD, DVD2 ...92 CD ...93 AMP ...94 MD ...95 TAPE A, TAPE B ...96 CABLE (Cable box) ...97 LD (Laser disc player) ...97 DVR (Digital video recorder 98 DAT ...99 LIGHTING ...100 Quick Reference of Operations 101 Full display ...103 Index ...Back cover 5 Hold Function 71 Protecting your settings - Selecting a Channel with...
Operating Instructions
Page 6
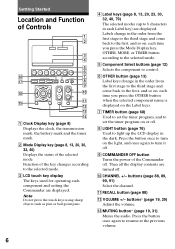
... button once to turn it off. 9 COMMANDER OFF button Turns the power of the selected mode. buttons* (page 19, 29) Adjust the volume. Getting Started Location and Function of Controls 1 2 3 4 qk qj qh TV STB VCR DVD CD AMP OTHER SYSTEM CONTROL COMMANDER TIMER LIGHT OFF 1 2 3 MORE VOLUME CHANNEL OK 5 6 7 8 9 0 qg MENU EXIT MUTING RECALL qa qs qd qf 1 Clock Display key (page 8) Displays the clock, the transmission mark, the battery mark and the timer mark. 2 Mode Display key...
... button once to turn it off. 9 COMMANDER OFF button Turns the power of the selected mode. buttons* (page 19, 29) Adjust the volume. Getting Started Location and Function of Controls 1 2 3 4 qk qj qh TV STB VCR DVD CD AMP OTHER SYSTEM CONTROL COMMANDER TIMER LIGHT OFF 1 2 3 MORE VOLUME CHANNEL OK 5 6 7 8 9 0 qg MENU EXIT MUTING RECALL qa qs qd qf 1 Clock Display key (page 8) Displays the clock, the transmission mark, the battery mark and the timer mark. 2 Mode Display key...
Operating Instructions
Page 12
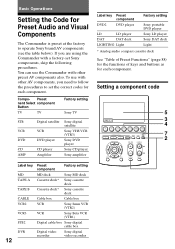
... VCR Sony Beta VCR (VTR1) STB2 Digital cable box Sony digital cable box DVR 12 Digital video recorder Sony digital video recorder Label key DVD2 Preset component DVD player LD LD player DAT DAT deck LIGHTING Light Factory setting Sony portable DVD player Sony LD player Sony DAT deck Light * Analog audio compact cassette deck See "Table of Preset Functions" (page 88) for the functions of keys and buttons as for each component. You can use with other AV components, you are using the Commander with other preset AV components also. Basic Operations Setting the Code...
... VCR Sony Beta VCR (VTR1) STB2 Digital cable box Sony digital cable box DVR 12 Digital video recorder Sony digital video recorder Label key DVD2 Preset component DVD player LD LD player DAT DAT deck LIGHTING Light Factory setting Sony portable DVD player Sony LD player Sony DAT deck Light * Analog audio compact cassette deck See "Table of Preset Functions" (page 88) for the functions of keys and buttons as for each component. You can use with other AV components, you are using the Commander with other preset AV components also. Basic Operations Setting the Code...
Operating Instructions
Page 13
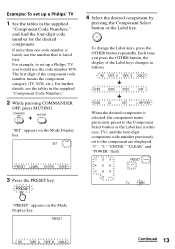
... Mode Display key. "PRESET" appears on the Mode Display key. 4 Select the desired component by pressing the Component Select button or the Label key. Continued 13 Each time you would use the number that is listed first. When the desired component is selected, the component name previously preset to the Component Select button or the Label key (in the supplied "Component Code Numbers," and find the four-digit code number for the desired component. For example, to set up a Philips' TV...
... Mode Display key. "PRESET" appears on the Mode Display key. 4 Select the desired component by pressing the Component Select button or the Label key. Continued 13 Each time you would use the number that is listed first. When the desired component is selected, the component name previously preset to the Component Select button or the Label key (in the supplied "Component Code Numbers," and find the four-digit code number for the desired component. For example, to set up a Philips' TV...
Operating Instructions
Page 15
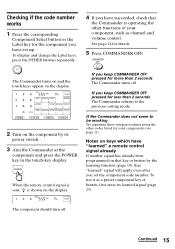
... to be working Try repeating these setup procedures using the other functions of your components (see page 12). If you keep COMMANDER OFF pressed for less than 2 seconds The Commander turns off . If the Commander does not seem to the previous setting mode. When the remote control signal is sent, is operating the other codes listed for details. 5 Press COMMANDER OFF. Notes on keys which have "learned" a remote control signal already...
... to be working Try repeating these setup procedures using the other functions of your components (see page 12). If you keep COMMANDER OFF pressed for less than 2 seconds The Commander turns off . If the Commander does not seem to the previous setting mode. When the remote control signal is sent, is operating the other codes listed for details. 5 Press COMMANDER OFF. Notes on keys which have "learned" a remote control signal already...
Operating Instructions
Page 17
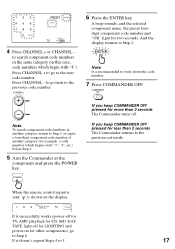
... the component and press the POWER key. If it doesn't, repeat Steps 4 to the previous set mode. Note It is shown on for two seconds. A beep sounds, and the selected component name, the preset fourdigit component code number and "OK" light for other components), go to the previous code number. Press CHANNEL + to go back to Step 6. COMMANDER OFF Note To search component code numbers in this case, code numbers which begins with "8"). CHANNEL 6 Press the ENTER key.
... the component and press the POWER key. If it doesn't, repeat Steps 4 to the previous set mode. Note It is shown on for two seconds. A beep sounds, and the selected component name, the preset fourdigit component code number and "OK" light for other components), go to the previous code number. Press CHANNEL + to go back to Step 6. COMMANDER OFF Note To search component code numbers in this case, code numbers which begins with "8"). CHANNEL 6 Press the ENTER key.
Operating Instructions
Page 18
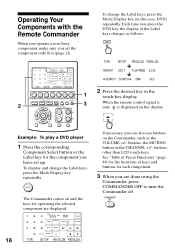
... LCD touch-keys. Each time you press the DVD key, the display of keys and buttons for the component you set up. DVD The Commander comes on and the keys for operating the selected component are done using the Commander, press COMMANDER OFF to turn the Commander off. See "Table of Preset Functions" (page 88) for the functions of the Label keys changes as the VOLUME +/- COMMANDER OFF 18 DVD 2 TV STB VCR DVD CD AMP OTHER SYSTEM CONTROL COMMANDER TIMER LIGHT OFF 1 2 3 MORE VOLUME CHANNEL OK MENU...
... LCD touch-keys. Each time you press the DVD key, the display of keys and buttons for the component you set up. DVD The Commander comes on and the keys for operating the selected component are done using the Commander, press COMMANDER OFF to turn the Commander off. See "Table of Preset Functions" (page 88) for the functions of the Label keys changes as the VOLUME +/- COMMANDER OFF 18 DVD 2 TV STB VCR DVD CD AMP OTHER SYSTEM CONTROL COMMANDER TIMER LIGHT OFF 1 2 3 MORE VOLUME CHANNEL OK MENU...
Operating Instructions
Page 19
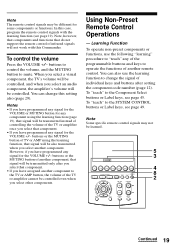
... the VOLUME +/- You can change the signal of individual keys and buttons after you select that do not support the remote control of TV or AMP using the learning function (page 19), that signal will be controlled even when you have assigned another component, that signal will be transmitted only after setting the component code number (page 12). TV STB VCR DVD CD AMP OTHER SYSTEM CONTROL COMMANDER TIMER LIGHT OFF 1 2 3 MORE VOLUME CHANNEL OK MENU EXIT...
... the VOLUME +/- You can change the signal of individual keys and buttons after you select that do not support the remote control of TV or AMP using the learning function (page 19), that signal will be controlled even when you have assigned another component, that signal will be transmitted only after setting the component code number (page 12). TV STB VCR DVD CD AMP OTHER SYSTEM CONTROL COMMANDER TIMER LIGHT OFF 1 2 3 MORE VOLUME CHANNEL OK MENU EXIT...
Operating Instructions
Page 31
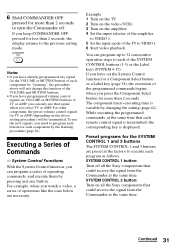
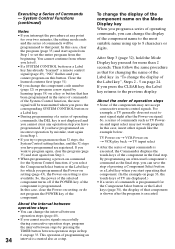
... one button. SYSTEM CONTROL 2 button: Turn on all the Sony components that could receive the signal from the Commander at the same time. Example: 1 Turn on the TV. 2 Turn on the video (VCR). 3 Turn on the above setting procedure) will be transmitted. The component macro executing time is displayed. SYSTEM CONTROL 1 button: Turn off . System Control Functions With the System Control function, you need to program each button for each remote control signal is transmitted, the corresponding key is variable by "learning", the...
... one button. SYSTEM CONTROL 2 button: Turn on all the Sony components that could receive the signal from the Commander at the same time. Example: 1 Turn on the TV. 2 Turn on the video (VCR). 3 Turn on the above setting procedure) will be transmitted. The component macro executing time is displayed. SYSTEM CONTROL 1 button: Turn off . System Control Functions With the System Control function, you need to program each button for each remote control signal is transmitted, the corresponding key is variable by "learning", the...
Operating Instructions
Page 34
...-keys of the component in the series of commands of the System Control function, the new signal will be transmitted when you can change the display of TV are registered. In this button. Then follow the same procedure as the final step, you can save the step of pressing a Component Select button or a Label key when you programmed the Power-on setting (page 43), the Power-on t VCR play back t TV input...
...-keys of the component in the series of commands of the System Control function, the new signal will be transmitted when you can change the display of TV are registered. In this button. Then follow the same procedure as the final step, you can save the step of pressing a Component Select button or a Label key when you programmed the Power-on setting (page 43), the Power-on t VCR play back t TV input...
Operating Instructions
Page 45
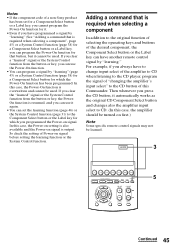
... can set for a Component Select button or a Label key, you cannot program the Power-On function for it automatically works as the original CD Component Select button and changes also the amplifier input select to CD. (In this case, the Power-on setting is overwritten and cannot be turned on signal. Adding a command that button, but it cannot be learned. 3 TV STB VCR DVD CD AMP OTHER SYSTEM CONTROL COMMANDER TIMER LIGHT OFF 1 2 3 MORE VOLUME CHANNEL OK MENU...
... can set for a Component Select button or a Label key, you cannot program the Power-On function for it automatically works as the original CD Component Select button and changes also the amplifier input select to CD. (In this case, the Power-on setting is overwritten and cannot be turned on signal. Adding a command that button, but it cannot be learned. 3 TV STB VCR DVD CD AMP OTHER SYSTEM CONTROL COMMANDER TIMER LIGHT OFF 1 2 3 MORE VOLUME CHANNEL OK MENU...
Operating Instructions
Page 52
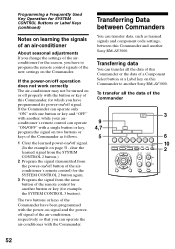
... can transfer all the data of the Commander 9 4,7 5 3 TV STB VCR DVD CD AMP OTHER SYSTEM CONTROL COMMANDER TIMER LIGHT OFF 1 2 3 MORE VOLUME CHANNEL OK MENU EXIT MUTING RECALL 6 10 2 52 The two buttons or keys of the Commander have programmed its power-on/off properly with the button or key of the new settings on the Commander. If the power-on/off operation does not work correctly The air-conditioner may not be...
... can transfer all the data of the Commander 9 4,7 5 3 TV STB VCR DVD CD AMP OTHER SYSTEM CONTROL COMMANDER TIMER LIGHT OFF 1 2 3 MORE VOLUME CHANNEL OK MENU EXIT MUTING RECALL 6 10 2 52 The two buttons or keys of the Commander have programmed its power-on/off properly with the button or key of the new settings on the Commander. If the power-on/off operation does not work correctly The air-conditioner may not be...
Operating Instructions
Page 61
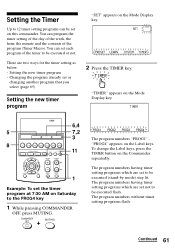
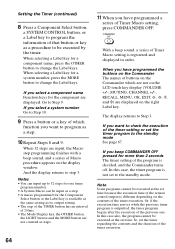
...the program (Timer Macro). Setting the new timer program - COMMANDER OFF MUTING The program numbers "PROG1" "PROG4" appears on the Commander repeatedly. The program numbers without timer setting programs flash. There are set not to be set the timer program at 7:30 AM on the Mode Display key. 2 Press the TIMER key. To change the Label keys, press the TIMER button on the Label keys. TIMER "TIMER" appears on the Mode Display key. 6,4 5 7,2 3 8 TV STB VCR DVD CD AMP OTHER SYSTEM CONTROL COMMANDER TIMER LIGHT OFF 1 2 3 MORE VOLUME CHANNEL 11 OK MENU EXIT...
...the program (Timer Macro). Setting the new timer program - COMMANDER OFF MUTING The program numbers "PROG1" "PROG4" appears on the Commander repeatedly. The program numbers without timer setting programs flash. There are set not to be set the timer program at 7:30 AM on the Mode Display key. 2 Press the TIMER key. To change the Label keys, press the TIMER button on the Label keys. TIMER "TIMER" appears on the Mode Display key. 6,4 5 7,2 3 8 TV STB VCR DVD CD AMP OTHER SYSTEM CONTROL COMMANDER TIMER LIGHT OFF 1 2 3 MORE VOLUME CHANNEL 11 OK MENU EXIT...
Operating Instructions
Page 64
... mode. When selecting a Label key for a system number, press the MORE button to Step 10. 9 Press a button or a key of which are not on the LCD touch key display (VOLUME +/-, MUTING, CHANNEL +/-, RECALL, MENU, OK, EXIT, , , , and ) are displayed on the Commander which function you select a component name Function keys for the component are input, the Macro step programming finishes with a beep sound, and a series of the timer setting or set time. If you select a system number Go to change...
... mode. When selecting a Label key for a system number, press the MORE button to Step 10. 9 Press a button or a key of which are not on the LCD touch key display (VOLUME +/-, MUTING, CHANNEL +/-, RECALL, MENU, OK, EXIT, , , , and ) are displayed on the Commander which function you select a component name Function keys for the component are input, the Macro step programming finishes with a beep sound, and a series of the timer setting or set time. If you select a system number Go to change...
Operating Instructions
Page 65
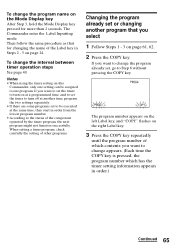
... the component operated by the timer program, the next program might not function successfully. The Commander enter the Label Inputting mode. If you want to set the timer to turn on at a programmed time, and to set the timer to turn off at the same time, they start in order from the lowest program number. • According to change appears. (Each time the COPY key is pressed, the program number which contents you select 1 Follow Steps 1 - 3 on...
... the component operated by the timer program, the next program might not function successfully. The Commander enter the Label Inputting mode. If you want to set the timer to turn on at a programmed time, and to set the timer to turn off at the same time, they start in order from the lowest program number. • According to change appears. (Each time the COPY key is pressed, the program number which contents you select 1 Follow Steps 1 - 3 on...

Operating Instructions
Page 68
... timer standby mode. • The timer program contents you have set the timer standby mode to OFF (weekly timer). To reset the standby mode to off using the TIMER button 1 Press the TIMER button. With a beep sound, "c" mark lights and the standby mode of the timer program. The program numbers of AV components. The display returns to operate an air-conditioner or electrical appliances. Setting the Timer (continued) To switch quickly the timer standby mode to on the Label keys. If you set...
... timer standby mode. • The timer program contents you have set the timer standby mode to OFF (weekly timer). To reset the standby mode to off using the TIMER button 1 Press the TIMER button. With a beep sound, "c" mark lights and the standby mode of the timer program. The program numbers of AV components. The display returns to operate an air-conditioner or electrical appliances. Setting the Timer (continued) To switch quickly the timer standby mode to on the Label keys. If you set...
Operating Instructions
Page 84
... cannot operate a component even after setting the component code numbers. If the code that the component has infrared remote capability. You cannot control the volume. Troubleshooting If you have problems setting up the Commander as described in the supplied "Component Code Numbers". • Some features may not be preset. Symptom You cannot operate the components. If not, see "For accurate learning" (page 25) and try all of the Component Select button or the Label key.
... cannot operate a component even after setting the component code numbers. If the code that the component has infrared remote capability. You cannot control the volume. Troubleshooting If you have problems setting up the Commander as described in the supplied "Component Code Numbers". • Some features may not be preset. Symptom You cannot operate the components. If not, see "For accurate learning" (page 25) and try all of the Component Select button or the Label key.

Operating Instructions
Page 98
... of Preset Functions (continued) DVR (Digital video recorder) KEY DISPLAY FUNCTION POWER To turn the power on/off 1 - 9, 0, ENTER To change the channel For example, to change to channel 5, press 0 and 5 (or, press 5 and ENTER) INPUT To switch the output of the SAT receiver to the TV (When connecting a TV cable or antenna to the receiver, the output switches between a TV and SAT program) DISPLAY To turn on the display CLEAR To clear the setting GUIDE To bring up Master Guide INFO To display program information...
... of Preset Functions (continued) DVR (Digital video recorder) KEY DISPLAY FUNCTION POWER To turn the power on/off 1 - 9, 0, ENTER To change the channel For example, to change to channel 5, press 0 and 5 (or, press 5 and ENTER) INPUT To switch the output of the SAT receiver to the TV (When connecting a TV cable or antenna to the receiver, the output switches between a TV and SAT program) DISPLAY To turn on the display CLEAR To clear the setting GUIDE To bring up Master Guide INFO To display program information...


