
Operating Instructions
Page 9
... the ONE TOUCH DUBBING button to dub a DV/D8 format tape over to view all titles on a DVD-RW (VR mode) or DVD-R (VR mode), then erase, move or add scenes as you like without changing the original contents. Original Playlist Operation restrictions Current Operation Playing a VHS tape*1 Recording on a VHS tape Playing a DVD*2 Recording on a DVD and a VHS tape...
... the ONE TOUCH DUBBING button to dub a DV/D8 format tape over to view all titles on a DVD-RW (VR mode) or DVD-R (VR mode), then erase, move or add scenes as you like without changing the original contents. Original Playlist Operation restrictions Current Operation Playing a VHS tape*1 Recording on a VHS tape Playing a DVD*2 Recording on a DVD and a VHS tape...
Operating Instructions
Page 20
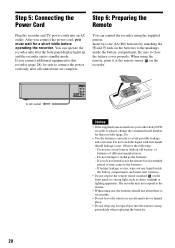
... PB PR SET TOP BOX OPTICAL COAXIAL CONTROL DIGITAL AUDIO OUT Notes • If the supplied remote interferes your other Sony DVD recorder or player, change the command mode number for this recorder (page 28), be sure to the markings inside the battery compartment, and insert new batteries. • Do not expose...sensor on the batteries to connect the power cord only after the front panel display lights up and the recorder enters standby mode. Observe the following: - Do not touch the liquid with an old battery, or batteries of time, remove the batteries. - If you do not...
... PB PR SET TOP BOX OPTICAL COAXIAL CONTROL DIGITAL AUDIO OUT Notes • If the supplied remote interferes your other Sony DVD recorder or player, change the command mode number for this recorder (page 28), be sure to the markings inside the battery compartment, and insert new batteries. • Do not expose...sensor on the batteries to connect the power cord only after the front panel display lights up and the recorder enters standby mode. Observe the following: - Do not touch the liquid with an old battery, or batteries of time, remove the batteries. - If you do not...

Operating Instructions
Page 50
... Timer (One-touch Timer Recording) You can turn off . * 12 hours 30 minutes for the recorder to leave it on other equipment, finalize the disc (page 91). • You can check the recording information such as...DVD-R DL (Dual Layer) discs. To pause recording Press X PAUSE. Recording using a cable box or a satellite receiver, make sure to stop recording Press x STOP. Each press increases the time by 30 minutes, up , and the remaining recording time appears in the front panel display. The recorder returns to select the recording mode. To watch a VHS tape while recording...
... Timer (One-touch Timer Recording) You can turn off . * 12 hours 30 minutes for the recorder to leave it on other equipment, finalize the disc (page 91). • You can check the recording information such as...DVD-R DL (Dual Layer) discs. To pause recording Press X PAUSE. Recording using a cable box or a satellite receiver, make sure to stop recording Press x STOP. Each press increases the time by 30 minutes, up , and the remaining recording time appears in the front panel display. The recorder returns to select the recording mode. To watch a VHS tape while recording...
Operating Instructions
Page 51
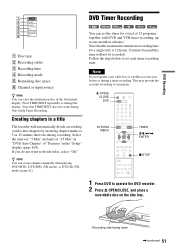
...a single title is 12 hours. Z OPEN/ CLOSE DVD SYSTEM MENU TIMER M/m/ Note that TIME/TEXT does not work during a timer recording. Note Do not operate your cable box or satellite receiver just before or during One-touch Timer Recording. Creating chapters in the "Setup" display (page 104...). Select the interval, "5 Min" (default) or "15 Min" in "DVD Auto Chapter" of a program. If you do not want to change the display. Follow the steps below to one month in the front panel display. DVD Recording Record ...
...a single title is 12 hours. Z OPEN/ CLOSE DVD SYSTEM MENU TIMER M/m/ Note that TIME/TEXT does not work during a timer recording. Note Do not operate your cable box or satellite receiver just before or during One-touch Timer Recording. Creating chapters in the "Setup" display (page 104...). Select the interval, "5 Min" (default) or "15 Min" in "DVD Auto Chapter" of a program. If you do not want to change the display. Follow the steps below to one month in the front panel display. DVD Recording Record ...
Operating Instructions
Page 79
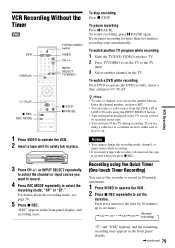
...; To select a channel, you pause recording for more than five minutes, recording stops automatically. To watch a DVD while recording Press DVD to select the channel or input source you are using the Quick Timer (One-touch Timer Recording) You can turn off the TV during recording. or INPUT SELECT repeatedly to operate the DVD recorder, insert a disc, and press H PLAY...
...; To select a channel, you pause recording for more than five minutes, recording stops automatically. To watch a DVD while recording Press DVD to select the channel or input source you are using the Quick Timer (One-touch Timer Recording) You can turn off the TV during recording. or INPUT SELECT repeatedly to operate the DVD recorder, insert a disc, and press H PLAY...

Operating Instructions
Page 80
...TIME/TEXT does not work during One-touch Timer Recording. 80 The information display appears. Press the button repeatedly to normal recording mode. Notes • The remaining tape length may take one minute for short tapes such as remaining tape length or recording mode, etc. "Tape Length" of... "Features" in the front panel display. Record 0:30:00 SP Rem 01:30 Ch 110 A Recording status B Time counter C Recording mode D Remaining tape length E Current channel To check the ...
...TIME/TEXT does not work during One-touch Timer Recording. 80 The information display appears. Press the button repeatedly to normal recording mode. Notes • The remaining tape length may take one minute for short tapes such as remaining tape length or recording mode, etc. "Tape Length" of... "Features" in the front panel display. Record 0:30:00 SP Rem 01:30 Ch 110 A Recording status B Time counter C Recording mode D Remaining tape length E Current channel To check the ...

Operating Instructions
Page 94
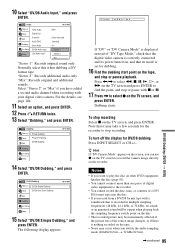
...of a DV/D8 format tape (One Touch Dubbing), see page 96. ◆How titles and chapters are created The dubbed contents on the disc become one title, and the title is then divided into chapters at either 5 or 15-minute intervals, according to the "DVD Auto Chapter" setting of "Features" ...motion, and stop the tape to a DVD +RW -RWVR -RWVideo +R -RVR -RVideo You can fast forward, rewind, play in the "Setup" display. Dubbing From a DV/D8 Format Tape to select the scenes using the onscreen menu. The recorder controls the digital video camera. You can record a DV/D8 format tape onto a disc...
...of a DV/D8 format tape (One Touch Dubbing), see page 96. ◆How titles and chapters are created The dubbed contents on the disc become one title, and the title is then divided into chapters at either 5 or 15-minute intervals, according to the "DVD Auto Chapter" setting of "Features" ...motion, and stop the tape to a DVD +RW -RWVR -RWVideo +R -RVR -RVideo You can fast forward, rewind, play in the "Setup" display. Dubbing From a DV/D8 Format Tape to select the scenes using the onscreen menu. The recorder controls the digital video camera. You can record a DV/D8 format tape onto a disc...
Operating Instructions
Page 95
..., and press ENTER. 12 Press O RETURN twice. 13 Select "Dubbing," and press ENTER. "Mix": Records original and additional sounds. DV/D8 Dubbing Title List Timer DV/D8 Simple Dubbing DV/D8 One Touch Dubbing Edit Dubbing Disc Setting Setup 10:10 AM 15 Select "DV/D8 Simple Dubbing," and press... ENTER. Select "Stereo 2" or "Mix" if you have added a second audio channel when recording with your digital video camera. DV Tape Mode If...
..., and press ENTER. 12 Press O RETURN twice. 13 Select "Dubbing," and press ENTER. "Mix": Records original and additional sounds. DV/D8 Dubbing Title List Timer DV/D8 Simple Dubbing DV/D8 One Touch Dubbing Edit Dubbing Disc Setting Setup 10:10 AM 15 Select "DV/D8 Simple Dubbing," and press... ENTER. Select "Stereo 2" or "Mix" if you have added a second audio channel when recording with your digital video camera. DV Tape Mode If...

Operating Instructions
Page 96
... the digital video camera for the recorder to stop recording Press x STOP. The recorder rewinds the tape in step 15 of "Dubbing From a DV/D8 Format Tape to a DVD" (page 94), and press SYSTEM MENU to turn off the display. 2 Press ONE TOUCH DUBBING. When playback of the ONE TOUCH DUBBING button. Dubbing an entire DV...
... the digital video camera for the recorder to stop recording Press x STOP. The recorder rewinds the tape in step 15 of "Dubbing From a DV/D8 Format Tape to a DVD" (page 94), and press SYSTEM MENU to turn off the display. 2 Press ONE TOUCH DUBBING. When playback of the ONE TOUCH DUBBING button. Dubbing an entire DV...

Operating Instructions
Page 114
... played. A disc that has a non-standard shape (e.g., card, heart). - Notes About This Recorder On adjusting volume Do not turn up the volume while listening to a section with a cleaning cloth. If you do, the speakers may be damaged when a ... may not support AV mouse. On cleaning Clean the cabinet, panel, and controls with a soft cloth slightly moistened with a label or sticker on the recorder. Do not touch the surface. The Set Top Box Control function does not work. , Turn on it in a car parked in its edge. On cleaning discs, disc...
... played. A disc that has a non-standard shape (e.g., card, heart). - Notes About This Recorder On adjusting volume Do not turn up the volume while listening to a section with a cleaning cloth. If you do, the speakers may be damaged when a ... may not support AV mouse. On cleaning Clean the cabinet, panel, and controls with a soft cloth slightly moistened with a label or sticker on the recorder. Do not touch the surface. The Set Top Box Control function does not work. , Turn on it in a car parked in its edge. On cleaning discs, disc...
Operating Instructions
Page 118
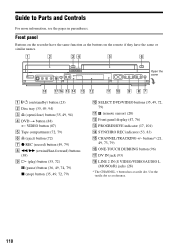
...buttons on /standby) button (23) B Disc tray (35, 49, 94) C A (open/close) button (35, 49, 94) D DVD t button (88) T VIDEO button (87) E Tape compartment (72, 79) F A (eject) button (72) G z REC (record) button (49, 79) H m/M (rewind/fast-forward) buttons (38) I H (play) button (35, 72) X (pause) button (...DVD/VIDEO buttons (35, 49, 72, 79) K (remote sensor) (20) L Front panel display (47, 76) M PROGRESSIVE indicator (17, 101) N SYNCHRO REC indicator (53, 83) O CHANNEL/TRACKING +/- Open the cover A "/1 (on the remote if they have the same or similar names. buttons* (21, 49, 73, 79) P ONE-TOUCH...
...buttons on /standby) button (23) B Disc tray (35, 49, 94) C A (open/close) button (35, 49, 94) D DVD t button (88) T VIDEO button (87) E Tape compartment (72, 79) F A (eject) button (72) G z REC (record) button (49, 79) H m/M (rewind/fast-forward) buttons (38) I H (play) button (35, 72) X (pause) button (...DVD/VIDEO buttons (35, 49, 72, 79) K (remote sensor) (20) L Front panel display (47, 76) M PROGRESSIVE indicator (17, 101) N SYNCHRO REC indicator (53, 83) O CHANNEL/TRACKING +/- Open the cover A "/1 (on the remote if they have the same or similar names. buttons* (21, 49, 73, 79) P ONE-TOUCH...

Operating Instructions
Page 120
... button (35, 49) ef X PAUSE button (49) eg CHAPTER MARK/CHAPTER MARK ERASE buttons (62) eh WIDE MODE button (21) ej ONE TOUCH DUBBING button (96) ek COMMAND MODE switch (DVD 1, 2, 3) (26) * CH + and H PLAY buttons have a tactile dot. buttons* (21, 49) X VOL (volume) +/- buttons (21) Y TV/VIDEO button (21) Z INPUT SELECT...
... button (35, 49) ef X PAUSE button (49) eg CHAPTER MARK/CHAPTER MARK ERASE buttons (62) eh WIDE MODE button (21) ej ONE TOUCH DUBBING button (96) ek COMMAND MODE switch (DVD 1, 2, 3) (26) * CH + and H PLAY buttons have a tactile dot. buttons* (21, 49) X VOL (volume) +/- buttons (21) Y TV/VIDEO button (21) Z INPUT SELECT...

Operating Instructions
Page 130
.../D8 Audio Input" 95, 104 "DV/D8 Dubbing" 95 "DV/D8 One Touch Dubbing" 96 "DV/D8 Simple Dubbing" 95 "DVD Auto Chapter" 104 DVD Editing 58 DVD VIDEO 33, 123 DVD+R 30, 123 DVD+R DL 30 DVD+RW 30, 123 DVD-R 30, 123 DVD-RAM 33 DVD-RW 30, 123 E Easy Setup 108 "Edit" 55, 85 "Edit Playlist" 66... mode 79 "Erase" 60 "Erase All Titles" 70 F "Factory Setting" 108 Fast forward 37, 74 Fast reverse 37, 74 Feature settings 104 Finalizing 91 "Format DVD-RW" 105 Formatting 49, 70 "Front Display" 107 Front panel 118 Front panel display 122 H Handling discs 114 I i.LINK 93, 117 INPUT SELECT 49, 79...
.../D8 Audio Input" 95, 104 "DV/D8 Dubbing" 95 "DV/D8 One Touch Dubbing" 96 "DV/D8 Simple Dubbing" 95 "DVD Auto Chapter" 104 DVD Editing 58 DVD VIDEO 33, 123 DVD+R 30, 123 DVD+R DL 30 DVD+RW 30, 123 DVD-R 30, 123 DVD-RAM 33 DVD-RW 30, 123 E Easy Setup 108 "Edit" 55, 85 "Edit Playlist" 66... mode 79 "Erase" 60 "Erase All Titles" 70 F "Factory Setting" 108 Fast forward 37, 74 Fast reverse 37, 74 Feature settings 104 Finalizing 91 "Format DVD-RW" 105 Formatting 49, 70 "Front Display" 107 Front panel 118 Front panel display 122 H Handling discs 114 I i.LINK 93, 117 INPUT SELECT 49, 79...
Operating Instructions
Page 131
...67 "Move" 68 MP3 audio tracks 43 N NEXT 37, 74 Number buttons 21, 41 O One Touch Dubbing 96 On-screen display Setup Display 97 Sub-menu 11 System Menu 10 TOOLS menu 11 Options settings... REC 50, 79 REC MODE 50, 79 Recording 48, 78 recordable discs 30 recording format 30 recording mode 48 tape speed 78 while watching another program 50, 79 Recording mode 48, 78 Recording time 48, 51 Region code 34 Remaining time... 72, 79 Sub-menu 11 SUBTITLE 36 "Subtitle" 106 SUR (surround) 37 SYNCHRO REC 54, 83 "Synchro Recording" 54, 83, 105 System Menu 10 T "Tape Length" 105 Tape speed 78 "Time Zone" 100 TIME/...
...67 "Move" 68 MP3 audio tracks 43 N NEXT 37, 74 Number buttons 21, 41 O One Touch Dubbing 96 On-screen display Setup Display 97 Sub-menu 11 System Menu 10 TOOLS menu 11 Options settings... REC 50, 79 REC MODE 50, 79 Recording 48, 78 recordable discs 30 recording format 30 recording mode 48 tape speed 78 while watching another program 50, 79 Recording mode 48, 78 Recording time 48, 51 Region code 34 Remaining time... 72, 79 Sub-menu 11 SUBTITLE 36 "Subtitle" 106 SUR (surround) 37 SYNCHRO REC 54, 83 "Synchro Recording" 54, 83, 105 System Menu 10 T "Tape Length" 105 Tape speed 78 "Time Zone" 100 TIME/...