Primary User Manual
Page 1
3-048-920-11 (1) Personal Component System Operating Instructions PHC-Z10 ©2000 Sony Corporation
3-048-920-11 (1) Personal Component System Operating Instructions PHC-Z10 ©2000 Sony Corporation
Primary User Manual
Page 2
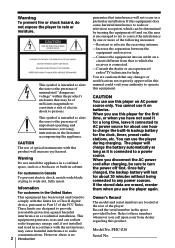
... erased, reenter them when you use of important operating and maintenance (servicing) instructions in a particular installation. Once fully charged, the backup battery will not occur in the literature accompanying the appliance. PHC-Z10 Serial No Warning To prevent fire or shock hazard, do not expose the ... instruments with this product will charge the battery automatically as long as a bookcase or built-in this manual could void your Sony dealer regarding this player for the first time, or when you use the player during charging. CAUTION You can radiate radio frequency...
... erased, reenter them when you use of important operating and maintenance (servicing) instructions in a particular installation. Once fully charged, the backup battery will not occur in the literature accompanying the appliance. PHC-Z10 Serial No Warning To prevent fire or shock hazard, do not expose the ... instruments with this product will charge the battery automatically as long as a bookcase or built-in this manual could void your Sony dealer regarding this player for the first time, or when you use the player during charging. CAUTION You can radiate radio frequency...

Primary User Manual
Page 4
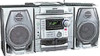
Basic Operations Playing a CD 4 2 1,3 1 Z CD OPEN/CLOSE 2 DISC CHANGE For hookup instructions, see pages 31 - 34. Note Place one CD over another and close the CD tray. 4 Basic Operations If you place one CD each only on the CD tray. 3 Z CD OPEN/CLOSE Press Z CD OPEN/CLOSE to close the CD tray, you will not be able to pull out the...
Basic Operations Playing a CD 4 2 1,3 1 Z CD OPEN/CLOSE 2 DISC CHANGE For hookup instructions, see pages 31 - 34. Note Place one CD over another and close the CD tray. 4 Basic Operations If you place one CD each only on the CD tray. 3 Z CD OPEN/CLOSE Press Z CD OPEN/CLOSE to close the CD tray, you will not be able to pull out the...

Primary User Manual
Page 6
... by step. M CD + TUNE until the band you can't tune in the display. CD + PRESET Hold down + TUNE or TUNE - Press RADIO BAND•AUTO PRESET until the frequency digits begin to change in a station, press the button repeatedly to the radio 12 1 AUTO PRESET RADIO BAND For hookup instructions, see pages 31...
... by step. M CD + TUNE until the band you can't tune in the display. CD + PRESET Hold down + TUNE or TUNE - Press RADIO BAND•AUTO PRESET until the frequency digits begin to change in a station, press the button repeatedly to the radio 12 1 AUTO PRESET RADIO BAND For hookup instructions, see pages 31...

Primary User Manual
Page 8
Use TYPE I (normal) tape only. B 2 TAPE With the side you Press TAPE N. The player turns on (direct power-on) and starts playing. Display 8 Basic Operations Playing a tape 12 1 For hookup instructions, see pages 31 - 34. 1 Z PUSH OPEN/CLOSE Press Z PUSH OPEN/CLOSE to play facing you want to open the tape compartment and insert a recorded tape.
Use TYPE I (normal) tape only. B 2 TAPE With the side you Press TAPE N. The player turns on (direct power-on) and starts playing. Display 8 Basic Operations Playing a tape 12 1 For hookup instructions, see pages 31 - 34. 1 Z PUSH OPEN/CLOSE Press Z PUSH OPEN/CLOSE to play facing you want to open the tape compartment and insert a recorded tape.
Primary User Manual
Page 10
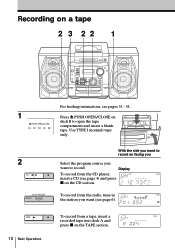
... you want to record. Recording on a tape 2 3 22 1 For hookup instructions, see page 6). B 2 CD AUTO PRESET RADIO BAND With the side you want (see pages 31 - 34. 1 Press Z PUSH OPEN/CLOSE on the TAPE section. To record from the CD player, insert a CD (see page 4) and press x on facing you Select the program source... tape. TAPE 10 Basic Operations To record from a tape, insert a recorded tape into deck A and press x on Z PUSH OPEN/CLOSE deck B to record on the CD section. Use TYPE I (normal) tape only.
... you want to record. Recording on a tape 2 3 22 1 For hookup instructions, see page 6). B 2 CD AUTO PRESET RADIO BAND With the side you want (see pages 31 - 34. 1 Press Z PUSH OPEN/CLOSE on the TAPE section. To record from the CD player, insert a CD (see page 4) and press x on facing you Select the program source... tape. TAPE 10 Basic Operations To record from a tape, insert a recorded tape into deck A and press x on Z PUSH OPEN/CLOSE deck B to record on the CD section. Use TYPE I (normal) tape only.

Primary User Manual
Page 27
... the position that most decreases the noise. When recording from the component connected to the LINE IN jacks of the player, refer to the operating instructions of the component. STANDBY TIMER ENTER MEM Notes • You cannot preset recording timer and waking up timer (page 25) at a certain time. If it...
... the position that most decreases the noise. When recording from the component connected to the LINE IN jacks of the player, refer to the operating instructions of the component. STANDBY TIMER ENTER MEM Notes • You cannot preset recording timer and waking up timer (page 25) at a certain time. If it...

Primary User Manual
Page 36
For details, refer to the instruction manual of the component to avoid any malfunction. to LINE IN jacks Audio connecting cable For MiniDisc recorder: RK-G129 (1.5 m) (not supplied) For TV, VCR ...
For details, refer to the instruction manual of the component to avoid any malfunction. to LINE IN jacks Audio connecting cable For MiniDisc recorder: RK-G129 (1.5 m) (not supplied) For TV, VCR ...


