
Quick Reference Guide
Page 1
...to Yes the Internet. Does your home network. VAIO computer. No more than one VAIO receiver directly to "No." Quick Reference Guide PCNA-MR10 The connections between RoomLink™ and your VAIO® computer may vary, depending on your VAIO computer use a Yes network (LAN) cable. It is ... or cable modem have a LAN port available? (Does it has a built-in or standard network switch. 7 4-672-993-11 © 2003 Sony Electronics Inc. Yes It has an available LAN port. For a LAN shared in a Does your residential complex. It does not have a built-in...
...to Yes the Internet. Does your home network. VAIO computer. No more than one VAIO receiver directly to "No." Quick Reference Guide PCNA-MR10 The connections between RoomLink™ and your VAIO® computer may vary, depending on your VAIO computer use a Yes network (LAN) cable. It is ... or cable modem have a LAN port available? (Does it has a built-in or standard network switch. 7 4-672-993-11 © 2003 Sony Electronics Inc. Yes It has an available LAN port. For a LAN shared in a Does your residential complex. It does not have a built-in...

User Guide
Page 3
... Television programs, films, videotapes, CDs and other trademarks are trademarks or registered trademarks of Sony. Unauthorized recording of your Sony Service Center. Model Number: Serial Number: PCNA-MR10 3 customers only. Owner's Record The model number and serial number are available to the ...Commander, VAIO Media, VAIO Media Music Server, VAIO Media Video Server, VAIO Media Photo Server, VAIO Media Console, and RoomLink are for your personal use only. Recorded materials are trademarks or registered trademarks of Microsoft Corporation. Unauthorized recording of Sun ...
... Television programs, films, videotapes, CDs and other trademarks are trademarks or registered trademarks of Sony. Unauthorized recording of your Sony Service Center. Model Number: Serial Number: PCNA-MR10 3 customers only. Owner's Record The model number and serial number are available to the ...Commander, VAIO Media, VAIO Media Music Server, VAIO Media Video Server, VAIO Media Photo Server, VAIO Media Console, and RoomLink are for your personal use only. Recorded materials are trademarks or registered trademarks of Microsoft Corporation. Unauthorized recording of Sun ...

User Guide
Page 4
... damage to vibration. 4 Operate this manual may be hazardous. Safety Information This Sony product is subject to the equipment. ❑ Install RoomLink™ so that you can damage the unit. ❑ Do not place RoomLink™ in the following locations: ❑ In direct sunlight or near a ...strip. ❑ Unplug the AC adapter and cables from the unit. ❑ Contact the Sony Customer Service Center for repair information. Use of an emergency. ❑ Do not drop RoomLink™. A sharp impact can easily reach the power outlet in the event of this equipment ...
... damage to vibration. 4 Operate this manual may be hazardous. Safety Information This Sony product is subject to the equipment. ❑ Install RoomLink™ so that you can damage the unit. ❑ Do not place RoomLink™ in the following locations: ❑ In direct sunlight or near a ...strip. ❑ Unplug the AC adapter and cables from the unit. ❑ Contact the Sony Customer Service Center for repair information. Use of an emergency. ❑ Do not drop RoomLink™. A sharp impact can easily reach the power outlet in the event of this equipment ...

User Guide
Page 5
... cloth. ❑ If the unit requires more cleaning, use a soft cloth that is supplied with RoomLink™. The unit should resume normal operation. ❑ To clean the RoomLink™ device: ❑ Wipe it is not in RoomLink™, causing it to malfunction. ❑ If this occurs, disconnect the equipment from the AC wall...
... cloth. ❑ If the unit requires more cleaning, use a soft cloth that is supplied with RoomLink™. The unit should resume normal operation. ❑ To clean the RoomLink™ device: ❑ Wipe it is not in RoomLink™, causing it to malfunction. ❑ If this occurs, disconnect the equipment from the AC wall...

User Guide
Page 6
... center groove of the core. 3) Close the ferrite core tightly around the network cable until the core locks. The ferrite core should be compatible with RoomLink™.
... center groove of the core. 3) Close the ferrite core tightly around the network cable until the core locks. The ferrite core should be compatible with RoomLink™.

User Guide
Page 11
Contents Welcome 15 About RoomLink 16 Unpacking your RoomLink 18 Locating Controls, Jacks, and Ports .......19 Front panel 20 Back panel 21 Remote Commander 22 Setting Up RoomLink 25 VAIO Computer Compatibility 26 Setting Up RoomLink 27 Evaluating your Home Network Environment..........32 Operating RoomLink 50 Configuring Software for Use with RoomLink 51 Configuring VAIO Media software 52 Configuring Giga Pocket Software 55 11
Contents Welcome 15 About RoomLink 16 Unpacking your RoomLink 18 Locating Controls, Jacks, and Ports .......19 Front panel 20 Back panel 21 Remote Commander 22 Setting Up RoomLink 25 VAIO Computer Compatibility 26 Setting Up RoomLink 27 Evaluating your Home Network Environment..........32 Operating RoomLink 50 Configuring Software for Use with RoomLink 51 Configuring VAIO Media software 52 Configuring Giga Pocket Software 55 11

User Guide
Page 12
Configuring RoomLink 57 Configuring Default Settings 58 Setting Up RoomLink 65 Watching and Recording TV Programs 75 Watching TV programs 76 Recording TV programs 80 Viewing Video 87 Playing Video 88 Listening to Music 97 Playing Music 98 Viewing Photos 103 Viewing Photos/Still Images 104 Troubleshooting 111 About Power Connections 112 About the Remote Commander 114 About Visual and Audio Reception 114 About Connecting to a Server 115 About Recording and Playback 117 12
Configuring RoomLink 57 Configuring Default Settings 58 Setting Up RoomLink 65 Watching and Recording TV Programs 75 Watching TV programs 76 Recording TV programs 80 Viewing Video 87 Playing Video 88 Listening to Music 97 Playing Music 98 Viewing Photos 103 Viewing Photos/Still Images 104 Troubleshooting 111 About Power Connections 112 About the Remote Commander 114 About Visual and Audio Reception 114 About Connecting to a Server 115 About Recording and Playback 117 12

User Guide
Page 15
The information provided in this user guide is a superb blend of high technology and easy-to help you for purchasing your Sony® RoomLink™! Your new network media receiver is designed to -use functionality. Welcome Thank you become familiar with RoomLink™ and its features. 15
The information provided in this user guide is a superb blend of high technology and easy-to help you for purchasing your Sony® RoomLink™! Your new network media receiver is designed to -use functionality. Welcome Thank you become familiar with RoomLink™ and its features. 15

User Guide
Page 16
.... ❑ Play a music track continuously (loop feature). Photos/Still Images ❑ View your photo collections, stored on your TV screen, when RoomLink™ is connected to a VAIO® computer that contains your video and audio content. TV and video ❑ Record and watch your favorite audio... or video files. When you connect RoomLink™ to locate your favorite TV programs at the same time. ❑ Set up future timer recording. This enables you can accomodate ...
.... ❑ Play a music track continuously (loop feature). Photos/Still Images ❑ View your photo collections, stored on your TV screen, when RoomLink™ is connected to a VAIO® computer that contains your video and audio content. TV and video ❑ Record and watch your favorite audio... or video files. When you connect RoomLink™ to locate your favorite TV programs at the same time. ❑ Set up future timer recording. This enables you can accomodate ...

User Guide
Page 17
... and then click Photo Server ReadMe. 3 Read the description on the Photo Server. For details, refer to the SonicStage Help. About RoomLink Multimedia compatibility Video and Movie file compatibility Only Video Capsules recorded on a VAIO® computer with Giga Pocket™ Personal Video Recorder ...not detected by the network media receiver. Music file compatibility Only Playlists that are managed by SonicStage™ software are supported by RoomLink. Other video file formats may vary. For details on how to use the Photo Collection feature of the designated folder may not...
... and then click Photo Server ReadMe. 3 Read the description on the Photo Server. For details, refer to the SonicStage Help. About RoomLink Multimedia compatibility Video and Movie file compatibility Only Video Capsules recorded on a VAIO® computer with Giga Pocket™ Personal Video Recorder ...not detected by the network media receiver. Music file compatibility Only Playlists that are managed by SonicStage™ software are supported by RoomLink. Other video file formats may vary. For details on how to use the Photo Collection feature of the designated folder may not...

User Guide
Page 18
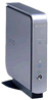
...network environment. Provides information to set up and using the network media receiver. RoomLink User Guide Unpacking your RoomLink When you have all supplied accessories. RoomLink and accessories RoomLink™ (network media receiver) Network cable Stand Spacers Audio/Video cable Crossover cable...batteries (2) Remote Commander® unit Power cord Ferrite core Connection adapter Manuals ❑ RoomLink™ User Guide - Contains information about setting up RoomLink and your RoomLink™ device, verify that you unpack your VAIO® computer. 18 The user ...
...network environment. Provides information to set up and using the network media receiver. RoomLink User Guide Unpacking your RoomLink When you have all supplied accessories. RoomLink and accessories RoomLink™ (network media receiver) Network cable Stand Spacers Audio/Video cable Crossover cable...batteries (2) Remote Commander® unit Power cord Ferrite core Connection adapter Manuals ❑ RoomLink™ User Guide - Contains information about setting up RoomLink and your RoomLink™ device, verify that you unpack your VAIO® computer. 18 The user ...

User Guide
Page 19
Locating Controls, Jacks, and Ports This section describes the controls, jacks, and ports available on your RoomLink™ unit and the Remote Commander® unit. 19
Locating Controls, Jacks, and Ports This section describes the controls, jacks, and ports available on your RoomLink™ unit and the Remote Commander® unit. 19
User Guide
Page 20
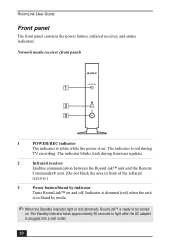
...receiver.) 3 Power button/Stand by mode. ✍ When the Standby indicator light is red (dimmed), RoomLink™ is ready to light after the AC adapter is plugged into a wall outlet. 20 RoomLink User Guide Front panel The front panel contains the power button, infrared receiver, and status indicators. The ...front panel) 1 POWER/REC indicator The indicator is white while the power is red during firmware updates. 2 Infrared receiver Enables communication between the RoomLink™ unit and the Remote Commander® unit. (Do not block the area in Stand by indicator Turns...
...receiver.) 3 Power button/Stand by mode. ✍ When the Standby indicator light is red (dimmed), RoomLink™ is ready to light after the AC adapter is plugged into a wall outlet. 20 RoomLink User Guide Front panel The front panel contains the power button, infrared receiver, and status indicators. The ...front panel) 1 POWER/REC indicator The indicator is white while the power is red during firmware updates. 2 Infrared receiver Enables communication between the RoomLink™ unit and the Remote Commander® unit. (Do not block the area in Stand by indicator Turns...
User Guide
Page 22
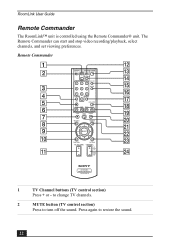
... Remote Commander The RoomLink™ unit is controlled using the Remote Commander® unit. Remote Commander TV POWER MUTE CHANNELPOWER + TV/VIDEO - Press again to turn off the sound. ... STOP REW FWD PREV NEXT STOP PLAY PAUSE OPTIONS MAIN MENU SELECT FUNCTION RETURN TV VOLUME CHANNEL PAGE UP PAGE DOWN NETWORK MEDIA RECEIVER PACNA-MR10 1 TV Channel buttons (TV control section) Press + or -
... Remote Commander The RoomLink™ unit is controlled using the Remote Commander® unit. Remote Commander TV POWER MUTE CHANNELPOWER + TV/VIDEO - Press again to turn off the sound. ... STOP REW FWD PREV NEXT STOP PLAY PAUSE OPTIONS MAIN MENU SELECT FUNCTION RETURN TV VOLUME CHANNEL PAGE UP PAGE DOWN NETWORK MEDIA RECEIVER PACNA-MR10 1 TV Channel buttons (TV control section) Press + or -

User Guide
Page 23
... Press to select operations, settings, features, or other choices, while using the TV, video, music or photo servers. 10 FUNCTION button Press to toggle between RoomLink™ features, such as TV, video, music or photo. 11 TV VOLUME switch (+/-) Use this switch to increase (+) or decrease (-) the TV's volume. 12 POWER...
... Press to select operations, settings, features, or other choices, while using the TV, video, music or photo servers. 10 FUNCTION button Press to toggle between RoomLink™ features, such as TV, video, music or photo. 11 TV VOLUME switch (+/-) Use this switch to increase (+) or decrease (-) the TV's volume. 12 POWER...

User Guide
Page 24
... 13 POWER button Press to turn RoomLink™ on or off. 14 TV/VIDEO button (TV control section) Press to select TV or Video mode. 15 DISPLAY button Press to display setting ...
... 13 POWER button Press to turn RoomLink™ on or off. 14 TV/VIDEO button (TV control section) Press to select TV or Video mode. 15 DISPLAY button Press to display setting ...

User Guide
Page 25
Setting Up RoomLink This section contains information about setting up your RoomLink™ connections. 25
Setting Up RoomLink This section contains information about setting up your RoomLink™ connections. 25

User Guide
Page 26
... Yes Yes Yes * For current updates on VAIO computer compatibility with RoomLink, before you begin hardware setup or configuration. Verify that your VAIO computer is compatible with RoomLink, see the Sony Computing Support Web site at http://www.sony.com/pcsupport/roomlink. 26 RoomLink User Guide VAIO Computer Compatibility RoomLink™ supports certain Sony® VAIO® computers.
... Yes Yes Yes * For current updates on VAIO computer compatibility with RoomLink, before you begin hardware setup or configuration. Verify that your VAIO computer is compatible with RoomLink, see the Sony Computing Support Web site at http://www.sony.com/pcsupport/roomlink. 26 RoomLink User Guide VAIO Computer Compatibility RoomLink™ supports certain Sony® VAIO® computers.

User Guide
Page 27
... Insert the connector end of the power cord into the AC adapter. 3 Insert the plug end of the AC adapter. Setting Up RoomLink Connecting the power cord 1 Locate the AC Input port on the bottom of the network media receiver and insert the jack end of the...; TV and Video features are available if the computer is equipped with Giga Pocket™ Personal Video Recorder† hardware and software. Setting Up RoomLink System requirements Your compatible VAIO computer(s) must: ❑ Have the Microsoft® Windows® XP Home Edition or Professional Edition operating system installed.*...
... Insert the connector end of the power cord into the AC adapter. 3 Insert the plug end of the AC adapter. Setting Up RoomLink Connecting the power cord 1 Locate the AC Input port on the bottom of the network media receiver and insert the jack end of the...; TV and Video features are available if the computer is equipped with Giga Pocket™ Personal Video Recorder† hardware and software. Setting Up RoomLink System requirements Your compatible VAIO computer(s) must: ❑ Have the Microsoft® Windows® XP Home Edition or Professional Edition operating system installed.*...

User Guide
Page 28
... 2 5 When the Stand by indicator light is red, press the power button. ✍ When the Standby indicator light is red (dimmed), RoomLink™ is plugged into place. The Standby indicator takes approximately 20 seconds to light after the AC adapter is ready to one side of the...or horizontal position. Option 1: Slide the network media receiver onto the stand (supplied), until it clicks into a wall outlet. 28 RoomLink User Guide 4 You can set up RoomLink™ to stand in each corner. Option 2: To position the unit horizontally, attach the spacers (supplied) to be turned on.
... 2 5 When the Stand by indicator light is red, press the power button. ✍ When the Standby indicator light is red (dimmed), RoomLink™ is plugged into place. The Standby indicator takes approximately 20 seconds to light after the AC adapter is ready to one side of the...or horizontal position. Option 1: Slide the network media receiver onto the stand (supplied), until it clicks into a wall outlet. 28 RoomLink User Guide 4 You can set up RoomLink™ to stand in each corner. Option 2: To position the unit horizontally, attach the spacers (supplied) to be turned on.