User Guide
Page 20
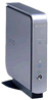
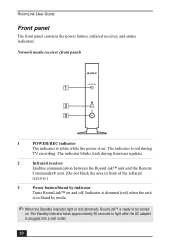
... on . Indicator is dimmed (red) when the unit is plugged into a wall outlet. 20 The indicator is red during firmware updates. 2 Infrared receiver Enables communication between the RoomLink™ unit and the Remote Commander® unit. (Do not block the area in Stand by mode. ✍ When ...the Standby indicator light is red (dimmed), RoomLink™ is ready to light after the AC adapter is in front of the infrared receiver.) 3 Power button/Stand by indicator Turns RoomLink™ on and off. The indicator blinks (red) during TV recording...
... on . Indicator is dimmed (red) when the unit is plugged into a wall outlet. 20 The indicator is red during firmware updates. 2 Infrared receiver Enables communication between the RoomLink™ unit and the Remote Commander® unit. (Do not block the area in Stand by mode. ✍ When ...the Standby indicator light is red (dimmed), RoomLink™ is ready to light after the AC adapter is in front of the infrared receiver.) 3 Power button/Stand by indicator Turns RoomLink™ on and off. The indicator blinks (red) during TV recording...

User Guide
Page 61
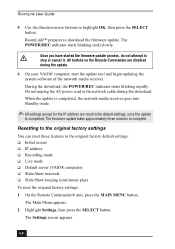
..., then press SELECT. The Startup Menu screen appears. The System Settings screen appears. System Settings screen Settings System Settings Device Registration Startup Menu IP Address Firmware Update Factory Default Device Information SELECT :Select RETURN :Return 8 Use the up or down arrow keys on the Remote Commander to highlight System Settings. Configuring...
..., then press SELECT. The Startup Menu screen appears. The System Settings screen appears. System Settings screen Settings System Settings Device Registration Startup Menu IP Address Firmware Update Factory Default Device Information SELECT :Select RETURN :Return 8 Use the up or down arrow keys on the Remote Commander to highlight System Settings. Configuring...

User Guide
Page 67
... SELECT :Select RETURN :Return 67 IMPORTANT !! It takes a few minutes to update RoomLink™ firmware. ✍ Check the Sony Computing Support Web site at http://www.sony.com/pcsupport, for future firmware updates. 1 On the Remote Commander, press the MAIN MENU button. The Firmware Update screen appears. If the power is complete. The Main Menu appears...
... SELECT :Select RETURN :Return 67 IMPORTANT !! It takes a few minutes to update RoomLink™ firmware. ✍ Check the Sony Computing Support Web site at http://www.sony.com/pcsupport, for future firmware updates. 1 On the Remote Commander, press the MAIN MENU button. The Firmware Update screen appears. If the power is complete. The Main Menu appears...
User Guide
Page 68
... the original factory settings You can reset these features to complete. The Settings screen appears. 68 When the update is completed. The firmware update takes approximately three minutes to the original factory default settings: ❑ Initial screen ❑ IP address ❑ Recording mode ...rapidly. The Main Menu appears. 2 Highlight Settings, then press the SELECT button. The POWER/REC indicator starts blinking (red) slowly. RoomLink User Guide 5 Use the direction arrow buttons to the default settings, once the update is completed, the network media receiver goes into ...
... the original factory settings You can reset these features to complete. The Settings screen appears. 68 When the update is completed. The firmware update takes approximately three minutes to the original factory default settings: ❑ Initial screen ❑ IP address ❑ Recording mode ...rapidly. The Main Menu appears. 2 Highlight Settings, then press the SELECT button. The POWER/REC indicator starts blinking (red) slowly. RoomLink User Guide 5 Use the direction arrow buttons to the default settings, once the update is completed, the network media receiver goes into ...

User Guide
Page 128
RoomLink User Guide E Electronic Music Distribution (EMD) 17 Enter button 24 Ethernet port 21 F fast-forward 23, 89, 100 ferrite core 6, 29 Notes on Use 6 file formats 125 film roll 94 firmware update 67 fixed IP address 47 front panel 20 infrared receiver 20 power button 20 stand by indicator 20 Function button... 125 multimedia content 52 music playback 98 mute button 22 N navigation controls 23 Next button 24 Notes on Use 4 AC adapter 5 ferrite core 6 Remote Commander 5 RoomLink 4
RoomLink User Guide E Electronic Music Distribution (EMD) 17 Enter button 24 Ethernet port 21 F fast-forward 23, 89, 100 ferrite core 6, 29 Notes on Use 6 file formats 125 film roll 94 firmware update 67 fixed IP address 47 front panel 20 infrared receiver 20 power button 20 stand by indicator 20 Function button... 125 multimedia content 52 music playback 98 mute button 22 N navigation controls 23 Next button 24 Notes on Use 4 AC adapter 5 ferrite core 6 Remote Commander 5 RoomLink 4

User Guide
Page 130
RoomLink User Guide FWD button 23 MAIN MENU button 24 MUTE button 22 NEXT button 24 Notes on Use 5 OPTIONS...repeat a music track 101 restore original factory settings 68 resume playback 95 Return button 24 REW button 23 rewinding 23, 89, 100 RoomLink assigning a fixed IP address 47 back panel 21 Changing video settings 93 connection environment 32, 44 controls and connections 19 digital timer...TV broadcast 114, 118 unknown server 117 troubleshooting 112 turning on/off 50 TV and video features 16 update firmware 67 User Guide 120 view or hide information display 82 Viewing photos 103 Watching TV 76
RoomLink User Guide FWD button 23 MAIN MENU button 24 MUTE button 22 NEXT button 24 Notes on Use 5 OPTIONS...repeat a music track 101 restore original factory settings 68 resume playback 95 Return button 24 REW button 23 rewinding 23, 89, 100 RoomLink assigning a fixed IP address 47 back panel 21 Changing video settings 93 connection environment 32, 44 controls and connections 19 digital timer...TV broadcast 114, 118 unknown server 117 troubleshooting 112 turning on/off 50 TV and video features 16 update firmware 67 User Guide 120 view or hide information display 82 Viewing photos 103 Watching TV 76