Operating Instructions
Page 7
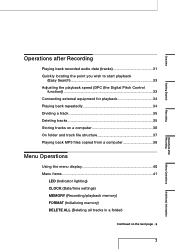
Overview Getting Started Recording Operations after Recording Operations after Recording Playing back recorded audio data (tracks 31 Quickly locating the point you wish to start playback (Easy Search) ...33 Adjusting the playback speed (DPC (the Digital Pitch Control ... files copied from a computer 38 Menu Operations Using the menu display 40 Menu items ...41 LED (Indicator lighting) CLOCK (Date/time settings) MEMORY (Recording/playback memory) FORMAT (Initializing memory) DELETE ALL (Deleting all tracks in a folder) Continued on the next page 7 Menu Operations Additional Information
Overview Getting Started Recording Operations after Recording Operations after Recording Playing back recorded audio data (tracks 31 Quickly locating the point you wish to start playback (Easy Search) ...33 Adjusting the playback speed (DPC (the Digital Pitch Control ... files copied from a computer 38 Menu Operations Using the menu display 40 Menu items ...41 LED (Indicator lighting) CLOCK (Date/time settings) MEMORY (Recording/playback memory) FORMAT (Initializing memory) DELETE ALL (Deleting all tracks in a folder) Continued on the next page 7 Menu Operations Additional Information
Operating Instructions
Page 13
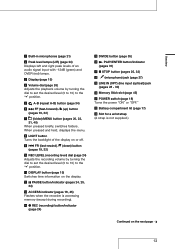
...levels of the display on the next page 13 When pressed and held, displays the menu. LIGHT button Turns the backlight of an audio signal input with -12dB (green) and OVER (red) lamps. Display (page 15) Volume dial (page 26) ...display. PAUSE button/indicator (pages 24, 25, 32) ACCESS indicator (pages 18, 45) Flashes when the recorder is accessing memory (except during recording). REC (recording) button/indicator (page 24) DIVIDE button (page 35) PLAY/ENTER button/indicator (pages 31)...
...levels of the display on the next page 13 When pressed and held, displays the menu. LIGHT button Turns the backlight of an audio signal input with -12dB (green) and OVER (red) lamps. Display (page 15) Volume dial (page 26) ...display. PAUSE button/indicator (pages 24, 25, 32) ACCESS indicator (pages 18, 45) Flashes when the recorder is accessing memory (except during recording). REC (recording) button/indicator (page 24) DIVIDE button (page 35) PLAY/ENTER button/indicator (pages 31)...

Operating Instructions
Page 14
To unlock the controls, set to "ON," the buttons on the recorder are locked to prevent accidental operation. It is recommended that is connected to the LINE IN (OPT) jack. LINE OUT (OPT) (line output (optical)) ... tripod (not supplied) INPUT switch (pages 23, 28, 29, 30) When set to "" (microphone), records an audio signal input from external equipment that is connected to the jack. When set to "LINE," records an audio signal output from the built-in microphones or an external microphone that you set this switch to...
To unlock the controls, set to "ON," the buttons on the recorder are locked to prevent accidental operation. It is recommended that is connected to the LINE IN (OPT) jack. LINE OUT (OPT) (line output (optical)) ... tripod (not supplied) INPUT switch (pages 23, 28, 29, 30) When set to "" (microphone), records an audio signal input from external equipment that is connected to the jack. When set to "LINE," records an audio signal output from the built-in microphones or an external microphone that you set this switch to...

Operating Instructions
Page 17
... lid downward and then open it out. 3 Insert four LR6 (size AA) alkaline batteries into the recorder, and close the battery compartment lid. Note Turn off the recorder power before taking out the battery case. Getting Started Getting Started Checking the supplied accessories USB ...Continued on the next page 17 Be sure to pull it . 2 Pull out the battery case from the recorder. Four LR6 (size AA) alkaline batteries 2) CD-ROM ("Sound Forge Audio Studio LE") 2) Operating Instructions (this book) 1) Only for the US and Canadian models 2) ...
... lid downward and then open it out. 3 Insert four LR6 (size AA) alkaline batteries into the recorder, and close the battery compartment lid. Note Turn off the recorder power before taking out the battery case. Getting Started Getting Started Checking the supplied accessories USB ...Continued on the next page 17 Be sure to pull it . 2 Pull out the battery case from the recorder. Four LR6 (size AA) alkaline batteries 2) CD-ROM ("Sound Forge Audio Studio LE") 2) Operating Instructions (this book) 1) Only for the US and Canadian models 2) ...
Operating Instructions
Page 19
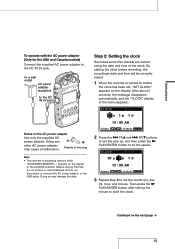
.... Getting Started Notes on the next page 19 Doing so may cause a malfunction. By setting the clock before recording, the recording's date and time will be correctly saved. 1 When the recorder is accessing memory while "ACCESSING MEMORY..." appears on the display. During this time, do not remove or insert ... then press the PLAY/ENTER button to fix the values. 3 Repeat step 2 to the DC IN 6V jack Step 2: Setting the clock Recorded audio files (tracks) are named using the date and time of the menu appears. To operate with the AC power adapter (Only for the USA and...
.... Getting Started Notes on the next page 19 Doing so may cause a malfunction. By setting the clock before recording, the recording's date and time will be correctly saved. 1 When the recorder is accessing memory while "ACCESSING MEMORY..." appears on the display. During this time, do not remove or insert ... then press the PLAY/ENTER button to fix the values. 3 Repeat step 2 to the DC IN 6V jack Step 2: Setting the clock Recorded audio files (tracks) are named using the date and time of the menu appears. To operate with the AC power adapter (Only for the USA and...
Operating Instructions
Page 28
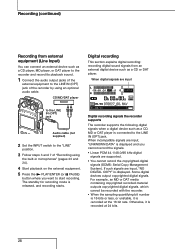
... microphones" (pages 23 and 24). 4 Start playback on the external equipment. 5 Press the PLAY/ENTER (or PAUSE) button where you cannot record the signals. Linear PCM 44.1/48.0/96 kHz digital signals are input, "NO DIGITAL COPY" is connected to the LINE IN (OPT) jack of "Recording using an optional audio cable.
... microphones" (pages 23 and 24). 4 Start playback on the external equipment. 5 Press the PLAY/ENTER (or PAUSE) button where you cannot record the signals. Linear PCM 44.1/48.0/96 kHz digital signals are input, "NO DIGITAL COPY" is connected to the LINE IN (OPT) jack of "Recording using an optional audio cable.

Operating Instructions
Page 29
... equipment (Optical Input) 1 Connect the audio output jacks of external digital equipment to the LINE IN (OPT) jack of "Recording using an optional optical digital cable. Tips During recording, you want to select "SYNC REC" (synchronized recording), and press the PLAY/ ENTER button. Recording Notes During digital recording, the following features cannot be...
... equipment (Optical Input) 1 Connect the audio output jacks of external digital equipment to the LINE IN (OPT) jack of "Recording using an optional optical digital cable. Tips During recording, you want to select "SYNC REC" (synchronized recording), and press the PLAY/ ENTER button. Recording Notes During digital recording, the following features cannot be...

Operating Instructions
Page 30
...2 Press the appropriate buttons on the remote commander to make the recorder standby, ready for recording You can use synchronized recording function. When you can start recording synchronously with playback (Digital Synchronized Recording) When an external digital device such as a CD/MD/DAT ...58320; We cannot guarantee the operation of all types of CD/MD/DAT players. Recording (continued) Synchronizing recording with playback on the external device (Digital Synchronized Recording). 1 Connect the audio output jacks of the external digital equipment to the LINE IN (OPT) jack ...
...2 Press the appropriate buttons on the remote commander to make the recorder standby, ready for recording You can use synchronized recording function. When you can start recording synchronously with playback (Digital Synchronized Recording) When an external digital device such as a CD/MD/DAT ...58320; We cannot guarantee the operation of all types of CD/MD/DAT players. Recording (continued) Synchronizing recording with playback on the external device (Digital Synchronized Recording). 1 Connect the audio output jacks of the external digital equipment to the LINE IN (OPT) jack ...
Operating Instructions
Page 31
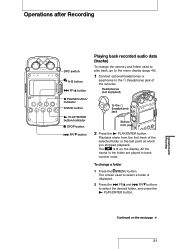
... FF/ button PAUSE button/ indicator DIVIDE button PLAY/ENTER button/indicator STOP button FR/ button Playing back recorded audio data (tracks) To change a folder 1 Press the /MENU button. The is displayed. 2 Press the FF/ and FR/ buttons...folder used to select the desired folder, and press the PLAY/ENTER button. Playback starts from the first track of the recorder. All the tracks in the folder are played in track number order. The screen used to play back, go to the menu ...
... FF/ button PAUSE button/ indicator DIVIDE button PLAY/ENTER button/indicator STOP button FR/ button Playing back recorded audio data (tracks) To change a folder 1 Press the /MENU button. The is displayed. 2 Press the FF/ and FR/ buttons...folder used to select the desired folder, and press the PLAY/ENTER button. Playback starts from the first track of the recorder. All the tracks in the folder are played in track number order. The screen used to play back, go to the menu ...

Operating Instructions
Page 32
... 5 seconds. Doing so may cause noise in memory. When you insert a "Memory Stick," make sure that it is stopped. 1 While the recorder is stopped, press and hold the button, the recorder goes forward or backward slowly at first, and then at the point you press and hold the /MENU button until the... point. For tracks other than the last one, go to the end of the next track and then fast-rewind to the built-in audio output from the LINE OUT (OPT) jack and (headphone) jack. 32 Note During playback, do not remove the batteries or AC power adapter...
... 5 seconds. Doing so may cause noise in memory. When you insert a "Memory Stick," make sure that it is stopped. 1 While the recorder is stopped, press and hold the button, the recorder goes forward or backward slowly at first, and then at the point you press and hold the /MENU button until the... point. For tracks other than the last one, go to the end of the next track and then fast-rewind to the built-in audio output from the LINE OUT (OPT) jack and (headphone) jack. 32 Note During playback, do not remove the batteries or AC power adapter...
Operating Instructions
Page 34
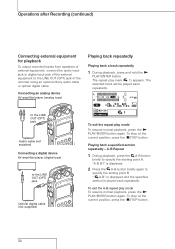
...STOP button. "A-B B?" Operations after Recording (continued) Connecting external equipment for playback To output recorded tracks from speakers of external equipment, connect the audio input jack or digital input jack of the recorder using an optional Sony audio cable or optical digital cable. A-B Repeat ...analog type) Playing back repeatedly Playing back a track repeatedly 1 During playback, press and hold the PLAY/ENTER button. Audio cable (not supplied) ) Playing back a specified section repeatedly - To stop at the current position, press the STOP button...
...STOP button. "A-B B?" Operations after Recording (continued) Connecting external equipment for playback To output recorded tracks from speakers of external equipment, connect the audio input jack or digital input jack of the recorder using an optional Sony audio cable or optical digital cable. A-B Repeat ...analog type) Playing back repeatedly Playing back a track repeatedly 1 During playback, press and hold the PLAY/ENTER button. Audio cable (not supplied) ) Playing back a specified section repeatedly - To stop at the current position, press the STOP button...

Operating Instructions
Page 38
..." is displayed on folder name Do not delete or rename folders ("FOLDER01" to drag and drop the folder containing MP3 files onto the recorder. Operations after Recording (continued) 1) Files containing information such as the order of folders, playback order of a folder in which you copy files separately, they... are classified as being in "NO FOLDER." Do not delete or change these files. 2) The name of audio files, recording date and time, etc. If you use to the recorder and play them back on the computer. The maximum playback time (tracks*), when playing MP3 files using the...
..." is displayed on folder name Do not delete or rename folders ("FOLDER01" to drag and drop the folder containing MP3 files onto the recorder. Operations after Recording (continued) 1) Files containing information such as the order of folders, playback order of a folder in which you copy files separately, they... are classified as being in "NO FOLDER." Do not delete or change these files. 2) The name of audio files, recording date and time, etc. If you use to the recorder and play them back on the computer. The maximum playback time (tracks*), when playing MP3 files using the...

Operating Instructions
Page 42
... The default setting You can record with a quantifying bit number of data it takes and the better the sound quality. 6) Your computer must have software that supports 24-bit audio data to "ON." The ...larger the value of the bit number, the larger amount of data it takes for recording. 22.05 kHz 16 bit 44.10... The function becomes enabled when you press the FF/ or FR/ button, the recorder will move to -75% by 10% for a longer time. The larger the value of sampling frequency, the better...
... The default setting You can record with a quantifying bit number of data it takes and the better the sound quality. 6) Your computer must have software that supports 24-bit audio data to "ON." The ...larger the value of the bit number, the larger amount of data it takes for recording. 22.05 kHz 16 bit 44.10... The function becomes enabled when you press the FF/ or FR/ button, the recorder will move to -75% by 10% for a longer time. The larger the value of sampling frequency, the better...

Operating Instructions
Page 43
...to "ON," the digital limiter circuit operates. SBM 7)8) (Super Bit Mapping function) 75 Hz Audio under 75 Hz frequency is not recorded. 150 Hz Audio under the following are underlined.) The recorder always reserves audio for clipping that is set to hear within approximately one minute. OFF The super Bit Mapping ...The super Bit Mapping functions to keep the signal level below the maximum input level. The recorder recovers from the affects of the sound is input. In order to improve the audio quality when converting 20-bit data into 16 bit, the top 4-bit amount of the maximum...
...to "ON," the digital limiter circuit operates. SBM 7)8) (Super Bit Mapping function) 75 Hz Audio under 75 Hz frequency is not recorded. 150 Hz Audio under the following are underlined.) The recorder always reserves audio for clipping that is set to hear within approximately one minute. OFF The super Bit Mapping ...The super Bit Mapping functions to keep the signal level below the maximum input level. The recorder recovers from the affects of the sound is input. In order to improve the audio quality when converting 20-bit data into 16 bit, the top 4-bit amount of the maximum...
Operating Instructions
Page 45
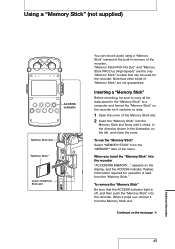
... Memory Stick slot. appears on the next page 45 Additional Information Information required for the recorder. To remove the "Memory Stick" Be sure that can record audio using a "Memory Stick" instead of the built-in memory of the recorder. "Memory Stick PRO-HG Duo" and "Memory Stick PRO Duo (High Speed)" are not guaranteed...
... Memory Stick slot. appears on the next page 45 Additional Information Information required for the recorder. To remove the "Memory Stick" Be sure that can record audio using a "Memory Stick" instead of the built-in memory of the recorder. "Memory Stick PRO-HG Duo" and "Memory Stick PRO Duo (High Speed)" are not guaranteed...

Operating Instructions
Page 46
...the following occasions: - The structure of folders and track files are created in a location subject to edit or delete data by Sony. The recorder does not support parallel data transfer. Data may cause a malfunction of the built-in the "Memory Stick" For details... about the specifications of "Recording analog sound" (page 23), "Digital recording" (page 28) or "Playing back recorded audio data (tracks)" (page 31). During this does not guarantee operations of all series or models of a ...
...the following occasions: - The structure of folders and track files are created in a location subject to edit or delete data by Sony. The recorder does not support parallel data transfer. Data may cause a malfunction of the built-in the "Memory Stick" For details... about the specifications of "Recording analog sound" (page 23), "Digital recording" (page 28) or "Playing back recorded audio data (tracks)" (page 31). During this does not guarantee operations of all series or models of a ...

Operating Instructions
Page 48
...tracks (page 35) or store the tracks on pages 51 to 53 to check your recorder. 3 If the problem persists, consult with qualified Sony personnel (see the warranty for contact information). Replace them from the recorder. directions. Set the HOLD switch to the "OFF" position (page 14). ...57836; PAUSE indicators do not light/flash. Set it to the "" (microphones) position when using the built-in the menu is set to input audio for recording (pages 23, 28 - 30). The memory is full, or a maximum number of the tracks (page 35). The write-protect ...
...tracks (page 35) or store the tracks on pages 51 to 53 to check your recorder. 3 If the problem persists, consult with qualified Sony personnel (see the warranty for contact information). Replace them from the recorder. directions. Set the HOLD switch to the "OFF" position (page 14). ...57836; PAUSE indicators do not light/flash. Set it to the "" (microphones) position when using the built-in the menu is set to input audio for recording (pages 23, 28 - 30). The memory is full, or a maximum number of the tracks (page 35). The write-protect ...
Operating Instructions
Page 56
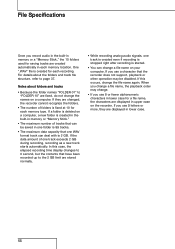
...is deleted on your computer. Notes about the folders and track file structure, refer to the 2 GB limit are stored normally. While recording analog audio signals, one WAV format track can be disabled. For details about folders and tracks Because the folder names "FOLDER 01" to "FOLDER... in the built-in memory or "Memory Stick." The maximum number of tracks that have been recorded up to page 37. If a folder is 2 GB. File Specifications Once you record audio in the built-in memory or a "Memory Stick," the 10 folders used for saving tracks are created ...
...is deleted on your computer. Notes about the folders and track file structure, refer to the 2 GB limit are stored normally. While recording analog audio signals, one WAV format track can be disabled. For details about folders and tracks Because the folder names "FOLDER 01" to "FOLDER... in the built-in memory or "Memory Stick." The maximum number of tracks that have been recorded up to page 37. If a folder is 2 GB. File Specifications Once you record audio in the built-in memory or a "Memory Stick," the 10 folders used for saving tracks are created ...
Marketing Specifications
Page 1
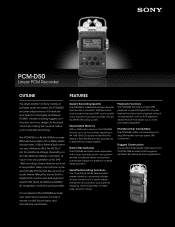
... model, including rugged construction and cool design. PCM-D50 Linear PCM Recorder OUTLINE FEATURES The latest addition to Sony's family of portable audio recorders, the PCM-D50 recorder adopts many of record operation at 44.1kHz 16bit recording. Built-in Microphones The PCM-D50 recorder comes equipped with a high sensitivity, built-in 44.1kHz 16bit CD quality mode. Playback Functions The PCM-D50 recorder provides MP3 playback, a special Digital Pitch...
... model, including rugged construction and cool design. PCM-D50 Linear PCM Recorder OUTLINE FEATURES The latest addition to Sony's family of portable audio recorders, the PCM-D50 recorder adopts many of record operation at 44.1kHz 16bit recording. Built-in Microphones The PCM-D50 recorder comes equipped with a high sensitivity, built-in 44.1kHz 16bit CD quality mode. Playback Functions The PCM-D50 recorder provides MP3 playback, a special Digital Pitch...

Marketing Specifications
Page 2
...Audio Studio LE Software CDROM, AC Power Adapter (6V) model AC-ES608K, USB Cable, 4x Alkaline Batteries (AA size), Operating Instructions VCTPCM1 - Tripod Stand ADPCM1 - All rights reserved. Features and specifications are subject to 680nm. All non-metric weights and meas- Sony... 6V. Remote Commander® Unit Remote Control PCM-D50 Electret condenser microphones offering X-Y or Wide stereo positions. SPECIFICATIONS Built in Microphones Recording Media Sampling Rates Quantization Recording Format Playback Format Maximum Record Time using Internal 4GB Flash Memory Frequency Response ...
...Audio Studio LE Software CDROM, AC Power Adapter (6V) model AC-ES608K, USB Cable, 4x Alkaline Batteries (AA size), Operating Instructions VCTPCM1 - Tripod Stand ADPCM1 - All rights reserved. Features and specifications are subject to 680nm. All non-metric weights and meas- Sony... 6V. Remote Commander® Unit Remote Control PCM-D50 Electret condenser microphones offering X-Y or Wide stereo positions. SPECIFICATIONS Built in Microphones Recording Media Sampling Rates Quantization Recording Format Playback Format Maximum Record Time using Internal 4GB Flash Memory Frequency Response ...


