NASCZ1 Instructions (main component system)
Page 2
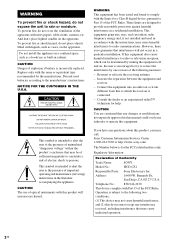
... a particular installation. Sony Customer Information Services Center 1-800-222-7669 or http://www.sony.com/ The Number below is subject to the manufacturer's instructions. Discard used in a residential installation. CAUTION You are designed to operate this manual could void your authority to provide reasonable protection against harmful interference in accordance with the instructions, may cause undesired operation. 2GB Replace only with this product will not...
... a particular installation. Sony Customer Information Services Center 1-800-222-7669 or http://www.sony.com/ The Number below is subject to the manufacturer's instructions. Discard used in a residential installation. CAUTION You are designed to operate this manual could void your authority to provide reasonable protection against harmful interference in accordance with the instructions, may cause undesired operation. 2GB Replace only with this product will not...
NASCZ1 Instructions (main component system)
Page 4
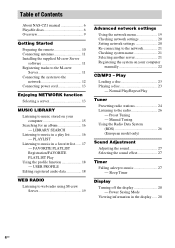
... music in a favorite list....... 17 - PLAYLIST Listening to music in a play list 16 - Normal Play/Repeat Play Tuner Presetting radio stations 24 Listening to music 27 - Power Saving Mode Viewing information in the display...... 28 4GB Table of Contents About NAS-CZ1 manual 6 Playable discs 6 Overview 9 Getting Started Preparing the remote 10 Connecting antennas 11 Installing the supplied M-crew Server software 11 Registering tracks to the M-crew Server 11 Connecting the system to the network 12 Connecting power cord 13 Enjoying NETWORK...
... music in a favorite list....... 17 - PLAYLIST Listening to music in a play list 16 - Normal Play/Repeat Play Tuner Presetting radio stations 24 Listening to music 27 - Power Saving Mode Viewing information in the display...... 28 4GB Table of Contents About NAS-CZ1 manual 6 Playable discs 6 Overview 9 Getting Started Preparing the remote 10 Connecting antennas 11 Installing the supplied M-crew Server software 11 Registering tracks to the M-crew Server 11 Connecting the system to the network 12 Connecting power cord 13 Enjoying NETWORK...

NASCZ1 Instructions (main component system)
Page 7
...start playback. - There can be in the 8.3 format (no more than eight characters in the name, no more than eight nested folder levels. Notes on CD-R and CD-RW • Some CD-Rs or CD-RWs cannot be no more information, see the operating instructions for the recording device. • Discs recorded on this system...be played on CD-R/CD-RW drives may not be played back because of a session. continued 7GB Furthermore, the disc will be no longer than ISO9660 level 1 and 2, folder names or file names may not be displayed correctly. • The following discs take a longer time to...
...start playback. - There can be in the 8.3 format (no more than eight characters in the name, no more than eight nested folder levels. Notes on CD-R and CD-RW • Some CD-Rs or CD-RWs cannot be no more information, see the operating instructions for the recording device. • Discs recorded on this system...be played on CD-R/CD-RW drives may not be played back because of a session. continued 7GB Furthermore, the disc will be no longer than ISO9660 level 1 and 2, folder names or file names may not be displayed correctly. • The following discs take a longer time to...
NASCZ1 Instructions (main component system)
Page 19
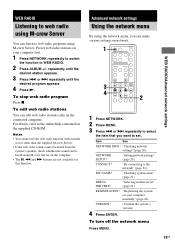
... web radio sound cannot be heard from the system's speaker, check whether the sound can make various settings on your computer first. 1 Press NETWORK repeatedly to switch the function to the network" (page 21). MY NAME? Item See NETWORK INFO? or > repeatedly until the desired station appears. 3 Press . Advanced network settings Using the network menu By using M-crew Server. "Registering the system on network. 1 WEB RADIO/Advanced network settings 3 4 2 1 Press NETWORK. 2 Press MENU. 3 Press . CONNECT? "Checking network settings...
... web radio sound cannot be heard from the system's speaker, check whether the sound can make various settings on your computer first. 1 Press NETWORK repeatedly to switch the function to the network" (page 21). MY NAME? Item See NETWORK INFO? or > repeatedly until the desired station appears. 3 Press . Advanced network settings Using the network menu By using M-crew Server. "Registering the system on network. 1 WEB RADIO/Advanced network settings 3 4 2 1 Press NETWORK. 2 Press MENU. 3 Press . CONNECT? "Checking network settings...

NASCZ1 Instructions (main component system)
Page 24
... "REP1" is canceled. TUNED Preset number 5 Press TUNING + or - We recommend that track is repeated endlessly until "1ALBM" appears. 24GB Tuner Presetting radio stations You can then tune in the following cases. - The frequency changes as disabled playback, sound interruptions, and noise. • When playing back an MP3 audio track, the playback elapsed time indication may encounter such problems as the system scans for some files...
... "REP1" is canceled. TUNED Preset number 5 Press TUNING + or - We recommend that track is repeated endlessly until "1ALBM" appears. 24GB Tuner Presetting radio stations You can then tune in the following cases. - The frequency changes as disabled playback, sound interruptions, and noise. • When playing back an MP3 audio track, the playback elapsed time indication may encounter such problems as the system scans for some files...
NASCZ1 Instructions (main component system)
Page 31
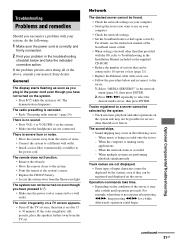
... troubleshooting checklist below and reconnect to a wall outlet. The remote does not function. • Remove the obstacle. • Move the remote closer to the system. • Point the remote at the system's sensor. • Replace the CR2025 battery. • Locate the system away from the TV set once, then turn it may not be registered and displayed on the supplied CD-ROM. • Reduce the number...
... troubleshooting checklist below and reconnect to a wall outlet. The remote does not function. • Remove the obstacle. • Move the remote closer to the system. • Point the remote at the system's sensor. • Replace the CR2025 battery. • Locate the system away from the TV set once, then turn it may not be registered and displayed on the supplied CD-ROM. • Reduce the number...

NASCZ1 Instructions (main component system)
Page 32
..., reset the system as follows: 1 Disconnect the power cord. 2 Reconnect the power cord. 3 Press ?/1 to turn on the system. 4 Press x, USER PROFILE 5 and ?/1, on the discs, playback may take more time than MPEG1, 2, 2.5 Audio Layer-3 files cannot be received. • Set the proper band and frequency (page 24). • Connect the antenna properly (page 11). • Find a place and an orientation that conforms with the connected component and start play...
..., reset the system as follows: 1 Disconnect the power cord. 2 Reconnect the power cord. 3 Press ?/1 to turn on the system. 4 Press x, USER PROFILE 5 and ?/1, on the discs, playback may take more time than MPEG1, 2, 2.5 Audio Layer-3 files cannot be received. • Set the proper band and frequency (page 24). • Connect the antenna properly (page 11). • Find a place and an orientation that conforms with the connected component and start play...

NASCZ1 Instructions (main component system)
Page 33
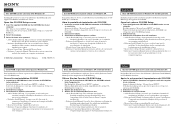
... the operation again. CD/MP3 No Disc • There is not present in step 1, device registration must be played in the following method: Right-click the task tray icon, then click "Start Music Service" in the Installation Manual included on this system. Select "MEDIA SERVERS?" in the player. Select Server • Follow the procedure below to change the computer's network settings, restart the server on the supplied CD-ROM...
... the operation again. CD/MP3 No Disc • There is not present in step 1, device registration must be played in the following method: Right-click the task tray icon, then click "Start Music Service" in the Installation Manual included on this system. Select "MEDIA SERVERS?" in the player. Select Server • Follow the procedure below to change the computer's network settings, restart the server on the supplied CD-ROM...
NASCZ1 Instructions (main component system)
Page 34
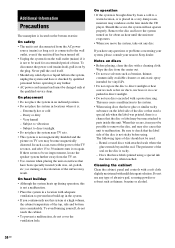
...sets may also cause this occur, the system will not operate properly. Wipe the disc from a cold to parts inside the CD player. Rental or used for about an hour until the moisture evaporates. • When you continuously use any questions or problems concerning your system, please consult your nearest Sony... hole. Remove the disc and leave the system turned on the lens inside this occurs, it on the bottom exterior. Never pull the cord itself has been turned off the power of time. The following types of disc should not be changed only at a high volume, the ...
...sets may also cause this occur, the system will not operate properly. Wipe the disc from a cold to parts inside the CD player. Rental or used for about an hour until the moisture evaporates. • When you continuously use any questions or problems concerning your system, please consult your nearest Sony... hole. Remove the disc and leave the system turned on the lens inside this occurs, it on the bottom exterior. Never pull the cord itself has been turned off the power of time. The following types of disc should not be changed only at a high volume, the ...
NASCZ1 Instructions (main component system)
Page 35
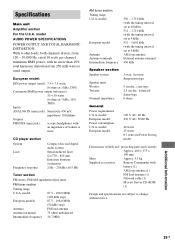
... Remote Commander with no more CD player section System Laser Frequency response Compact disc and digital audio system Semiconductor laser (λ=770 - 810 nm) Emission duration: continuous 2 Hz - 20 kHz (±0.5 dB) Tuner section FM stereo, FM/AM superheterodyne tuner FM tuner section Tuning range U.S.A. rated 10 watts per channel minimum RMS power, with battery (1) AM loop antenna (1) FM lead antenna (1) Network cable (1) M-crew Server CD-ROM (1) Design and specifications are subject to rated output. model...
... Remote Commander with no more CD player section System Laser Frequency response Compact disc and digital audio system Semiconductor laser (λ=770 - 810 nm) Emission duration: continuous 2 Hz - 20 kHz (±0.5 dB) Tuner section FM stereo, FM/AM superheterodyne tuner FM tuner section Tuning range U.S.A. rated 10 watts per channel minimum RMS power, with battery (1) AM loop antenna (1) FM lead antenna (1) Network cable (1) M-crew Server CD-ROM (1) Design and specifications are subject to rated output. model...
Installation instructions for M-CREW Software
Page 1
.... Si no olvide leerlo antes de iniciar la instalación. Open the CD-ROM Setup screen 1 Insert the supplied CD-ROM into the CD-ROM drive of the installation procedures. • M-crew Server Setup: This installs M-crew Server. • Reference Connection Manual: This introduces system connection methods that match your computer. Deutsch Diese CD-ROM kann nur mit Windows XP verwendet werden. Installieren Sie diese...
.... Si no olvide leerlo antes de iniciar la instalación. Open the CD-ROM Setup screen 1 Insert the supplied CD-ROM into the CD-ROM drive of the installation procedures. • M-crew Server Setup: This installs M-crew Server. • Reference Connection Manual: This introduces system connection methods that match your computer. Deutsch Diese CD-ROM kann nur mit Windows XP verwendet werden. Installieren Sie diese...

M-Crew Operating Instructions
Page 4
... websites while enjoying radio programs. • Set playback and recording timers. • Print out MD labels. Recording/editing • Input disc and track names from a radio to control Sony system stereo components equipped with a PC LINK jack. Through M-crew, you to an MD. Other operations • Create virtual media for the CD player). • Tune in the CD-ROM drive (only when the connected system stereo does not have any controls for the management...
... websites while enjoying radio programs. • Set playback and recording timers. • Print out MD labels. Recording/editing • Input disc and track names from a radio to control Sony system stereo components equipped with a PC LINK jack. Through M-crew, you to an MD. Other operations • Create virtual media for the CD player). • Tune in the CD-ROM drive (only when the connected system stereo does not have any controls for the management...

M-Crew Operating Instructions
Page 5
... a CONTROL A 1 or A 1 II, or CONTROL I connector. If your system stereo has a CONTROL A 1 or A 1 II connector, you must use the M-crew (ver. 1.05E) software. Note The PC LINK connector is not compatible with Pentiumcompatible CPU chips, such as the AMD K6 (e.g., sound skipping may occur during playing of an audio file). *2 Another 15 MB of hard disk space is required to install PictureGear Label Maker. *3 If your CD...
... a CONTROL A 1 or A 1 II, or CONTROL I connector. If your system stereo has a CONTROL A 1 or A 1 II connector, you must use the M-crew (ver. 1.05E) software. Note The PC LINK connector is not compatible with Pentiumcompatible CPU chips, such as the AMD K6 (e.g., sound skipping may occur during playing of an audio file). *2 Another 15 MB of hard disk space is required to install PictureGear Label Maker. *3 If your CD...

M-Crew Operating Instructions
Page 7
... connect your personal computer with a system stereo component. Connections Connecting your personal computer with a system stereo component Use the supplied PC connecting adaptor, USB cable, and optical digital connecting cable to control the connected system component or the sound may not be output properly. 7GB The diagram below shows an example of the MDS-PC3 connected with a computer. To an analog audio input jack Notes • Make sure each plug is straight when you connect the two units via a USB hub. With the plug...
... connect your personal computer with a system stereo component. Connections Connecting your personal computer with a system stereo component Use the supplied PC connecting adaptor, USB cable, and optical digital connecting cable to control the connected system component or the sound may not be output properly. 7GB The diagram below shows an example of the MDS-PC3 connected with a computer. To an analog audio input jack Notes • Make sure each plug is straight when you connect the two units via a USB hub. With the plug...
M-Crew Operating Instructions
Page 9
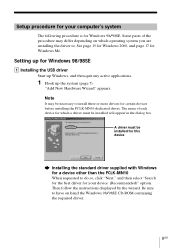
... Windows 2000, and page 17 for Windows 98/98SE 1 Installing the USB driver Start up Windows, and then quit any active applications. 1 Hook up the system (page 7). Then follow the instructions displayed by the wizard. Setup procedure for your device. (Recommended)" option. "Add New Hardware Wizard" appears. A driver must be installed will appear in the dialog box. Some parts of each device for Windows 98/98SE.
... Windows 2000, and page 17 for Windows 98/98SE 1 Installing the USB driver Start up Windows, and then quit any active applications. 1 Hook up the system (page 7). Then follow the instructions displayed by the wizard. Setup procedure for your device. (Recommended)" option. "Add New Hardware Wizard" appears. A driver must be installed will appear in the dialog box. Some parts of each device for Windows 98/98SE.
M-Crew Operating Instructions
Page 15
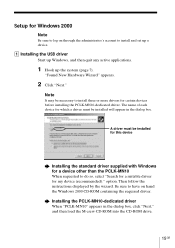
... CD-ROM containing the required driver. Be sure to have on through the administrator's account to install and set up a device. 1 Installing the USB driver Start up Windows, and then quit any active applications. 1 Hook up the system (page 7). The name of each device for my device (recommended)." b Installing the PCLK-MN10-dedicated driver When "PCLK-MN10" appears in the dialog box. option. Then follow the instructions displayed...
... CD-ROM containing the required driver. Be sure to have on through the administrator's account to install and set up a device. 1 Installing the USB driver Start up Windows, and then quit any active applications. 1 Hook up the system (page 7). The name of each device for my device (recommended)." b Installing the PCLK-MN10-dedicated driver When "PCLK-MN10" appears in the dialog box. option. Then follow the instructions displayed...
M-Crew Operating Instructions
Page 17
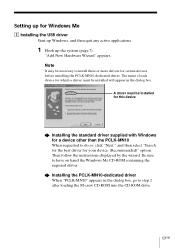
... be installed for this device b Installing the standard driver supplied with Windows for a device other than the PCLK-MN10 When requested to install three or more drivers for Windows Me 1 Installing the USB driver Start up Windows, and then quit any active applications. 1 Hook up for certain devices before installing the PCLK-MN10-dedicated driver. "Add New Hardware Wizard" appears. Be sure to step 2 after loading the M-crew CD...
... be installed for this device b Installing the standard driver supplied with Windows for a device other than the PCLK-MN10 When requested to install three or more drivers for Windows Me 1 Installing the USB driver Start up Windows, and then quit any active applications. 1 Hook up for certain devices before installing the PCLK-MN10-dedicated driver. "Add New Hardware Wizard" appears. Be sure to step 2 after loading the M-crew CD...

M-Crew Operating Instructions
Page 30
The USB connector on the PC connecting adaptor is not properly connected to the USB port on the hard disk with prerecorded tracks). t Check the USB connector connection. No screen response or screen error. t Text input, recording, editing, etc., are not possible on , and then restart M-crew. The PC LINK connector on the PC connecting adaptor is not properly connected to the system stereo component. t Turn the power of the system stereo component off and on commercial...
The USB connector on the PC connecting adaptor is not properly connected to the USB port on the hard disk with prerecorded tracks). t Check the USB connector connection. No screen response or screen error. t Text input, recording, editing, etc., are not possible on , and then restart M-crew. The PC LINK connector on the PC connecting adaptor is not properly connected to the system stereo component. t Turn the power of the system stereo component off and on commercial...
M-crew Server Help File
Page 40
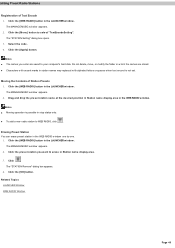
Editing Preset Radio Stations Registeration of Station Presets 1. Note s The names you w ant to WEB RADIO, click . The MANAGE MUSIC w indow appears. 2. Click . Click the [M e nu] button to your computer's hard disk. The "STATION Setting" dialog box opens. 3. Moving the Contents of Text Encode 1. Note s Moving operation is not set. Click the preset station you enter are saved to s e le ct "TextEncode Se tting". Click...
Editing Preset Radio Stations Registeration of Station Presets 1. Note s The names you w ant to WEB RADIO, click . The MANAGE MUSIC w indow appears. 2. Click . Click the [M e nu] button to your computer's hard disk. The "STATION Setting" dialog box opens. 3. Moving the Contents of Text Encode 1. Note s Moving operation is not set. Click the preset station you enter are saved to s e le ct "TextEncode Se tting". Click...

M-crew Server Help File
Page 51
... e content of the firew all softw are no sound from the system. Right-click the task tray icon. Try uninstalling M-crew Server and then re-installing it again. appears. The proxy settings are incorrect. Click [Start Music Service]. appropriate port number manually. Server specifications. Click [Start] - [All Programs] - [M-crew Server] - [TOOLS] - [ICF Settings] in the "PROXY SETTINGS" dialog box. Should any problem using [CD Recording] is lighting. Troubleshooting If you use the [Update] button.
... e content of the firew all softw are no sound from the system. Right-click the task tray icon. Try uninstalling M-crew Server and then re-installing it again. appears. The proxy settings are incorrect. Click [Start Music Service]. appropriate port number manually. Server specifications. Click [Start] - [All Programs] - [M-crew Server] - [TOOLS] - [ICF Settings] in the "PROXY SETTINGS" dialog box. Should any problem using [CD Recording] is lighting. Troubleshooting If you use the [Update] button.


