SonicStage v2.0 Operating Guide
Page 2
... designated. • Please note that the installed OS is compatible with this software as a result of the software supplied with this manual. • CD and music-related data from Gracenote, Inc., copyright © 2000-2003 Gracenote. Gracenote and CDDB are registered trademarks...event will SONY be liable for any financial damage, or loss of profits, including claims made by Gracenote" logo are trademarks of the following U.S. Gracenote CDDBR Client Software, copyright 2000-2003 Gracenote. • Copyright laws prohibit reproducing the software or the manual accompanying it...
... designated. • Please note that the installed OS is compatible with this software as a result of the software supplied with this manual. • CD and music-related data from Gracenote, Inc., copyright © 2000-2003 Gracenote. Gracenote and CDDB are registered trademarks...event will SONY be liable for any financial damage, or loss of profits, including claims made by Gracenote" logo are trademarks of the following U.S. Gracenote CDDBR Client Software, copyright 2000-2003 Gracenote. • Copyright laws prohibit reproducing the software or the manual accompanying it...
SonicStage v2.0 Operating Guide
Page 4
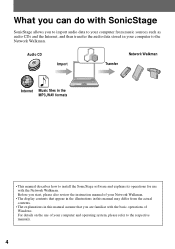
...your computer from the actual contents. • The explanations in this manual assume that you start, please also review the instruction manual of your Network Walkman. • The display contents that appear in the illustrations in this manual may differ from music sources such as audio CDs and the Internet..., and then transfer the audio data stored in the MP3,WAV formats • This manual describes how to install the SonicStage software and explains its operations for use of your computer and operating system, please refer to the ...
...your computer from the actual contents. • The explanations in this manual assume that you start, please also review the instruction manual of your Network Walkman. • The display contents that appear in the illustrations in this manual may differ from music sources such as audio CDs and the Internet..., and then transfer the audio data stored in the MP3,WAV formats • This manual describes how to install the SonicStage software and explains its operations for use of your computer and operating system, please refer to the ...
SonicStage v2.0 Operating Guide
Page 5
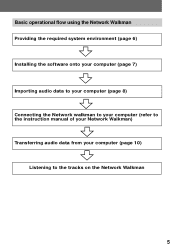
Basic operational flow using the Network Walkman Providing the required system environment (page 6) Installing the software onto your computer (page 7) Importing audio data to your computer (page 8) Connecting the Network walkman to your computer (refer to the instruction manual of your Network Walkman) Transferring audio data from your computer (page 10) Listening to the tracks on the Network Walkman 5
Basic operational flow using the Network Walkman Providing the required system environment (page 6) Installing the software onto your computer (page 7) Importing audio data to your computer (page 8) Connecting the Network walkman to your computer (refer to the instruction manual of your Network Walkman) Transferring audio data from your computer (page 10) Listening to the tracks on the Network Walkman 5
SonicStage v2.0 Operating Guide
Page 10
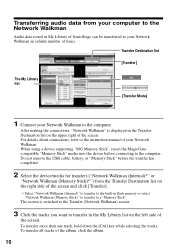
... selecting the tracks. To transfer all tracks of the screen. Do not remove the USB cable, battery, or "Memory Stick" before connecting to the instruction manual of the screen. The screen is displayed in the Transfer Destination list on the left side of your Network Walkman to transfer in the My...
... selecting the tracks. To transfer all tracks of the screen. Do not remove the USB cable, battery, or "Memory Stick" before connecting to the instruction manual of the screen. The screen is displayed in the Transfer Destination list on the left side of your Network Walkman to transfer in the My...
SonicStage v2.0 Operating Guide
Page 12
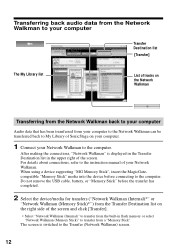
...)" to transfer from the Transfer Destination list on your computer. 1 Connect your Network Walkman to the computer. For details about connections, refer to the instruction manual of your Network Walkman. After making the connections, "Network Walkman" is switched to the Transfer (Network Walkman) screen. 12 Do not remove the USB cable...
...)" to transfer from the Transfer Destination list on your computer. 1 Connect your Network Walkman to the computer. For details about connections, refer to the instruction manual of your Network Walkman. After making the connections, "Network Walkman" is switched to the Transfer (Network Walkman) screen. 12 Do not remove the USB cable...
Operating Instructions
Page 3
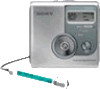
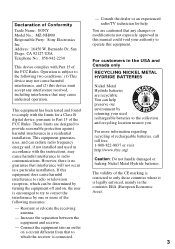
...authority to operate this device must accept any interference received, including interference that any changes or modifications not expressly approved in this manual could void your used in the countries EEA (European Economic Area). 3 This equipment has been tested and found to the ...comply with the limits for help preserve our environment by one or more information regarding recycling of Conformity Trade Name: SONY Model No.: MZ-NH900 Responsible Party: Sony Electronics Inc. Connect the equipment into an outlet on , the user is legally enforced, mainly in accordance with Part...
...authority to operate this device must accept any interference received, including interference that any changes or modifications not expressly approved in this manual could void your used in the countries EEA (European Economic Area). 3 This equipment has been tested and found to the ...comply with the limits for help preserve our environment by one or more information regarding recycling of Conformity Trade Name: SONY Model No.: MZ-NH900 Responsible Party: Sony Electronics Inc. Connect the equipment into an outlet on , the user is legally enforced, mainly in accordance with Part...
Operating Instructions
Page 4
... the copyright holder. • In no other countries. • IBM and PC/AT are omitted in this software as a result of this recorder with this manual. • CD and music-related data from Gracenote, Inc., copyright © 2000-2003 Gracenote. in the United States and/ or other countries. • ...• The software provided with this recorder cannot be liable for users On the supplied software • Copyright laws prohibit reproducing the software or the manual accompanying it . However, SONY bears no event will SONY be used with equipment other patents issued or pending.
... the copyright holder. • In no other countries. • IBM and PC/AT are omitted in this software as a result of this recorder with this manual. • CD and music-related data from Gracenote, Inc., copyright © 2000-2003 Gracenote. in the United States and/ or other countries. • ...• The software provided with this recorder cannot be liable for users On the supplied software • Copyright laws prohibit reproducing the software or the manual accompanying it . However, SONY bears no event will SONY be used with equipment other patents issued or pending.

Operating Instructions
Page 6
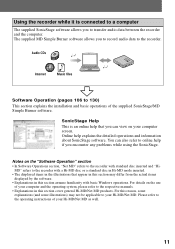
Table of contents About available functions and supplied manuals 10 Recorder Operation Looking at controls 13 Getting started 17 Recording a disc right away 21 Playing a disc right away 25 Using menus 27 How to ... Viewing various information 33 Recording from a microphone 35 Recording from a TV or radio (Analog Recording 37 Selecting the recording mode 37 Adjusting the recording level manually 38 Adding track marks while recording 39 Using the group function when recording 40 To start/stop recording in sync with the sound source (Synchro...
Table of contents About available functions and supplied manuals 10 Recorder Operation Looking at controls 13 Getting started 17 Recording a disc right away 21 Playing a disc right away 25 Using menus 27 How to ... Viewing various information 33 Recording from a microphone 35 Recording from a TV or radio (Analog Recording 37 Selecting the recording mode 37 Adjusting the recording level manually 38 Adding track marks while recording 39 Using the group function when recording 40 To start/stop recording in sync with the sound source (Synchro...

Operating Instructions
Page 10
... to solve them, and about Hi-MD "Hi-MD" is a new MiniDisc format with advanced capabilities over the standard MD format. Please refer to the manual that applies to 104) This section explains all of the recorder functions. Learning more explanation Refer to do with the Hi-MD Walkman" flyer This... more about what to "Troubleshooting and explanations" (page 88). 10 Recorder Operation (pages 12 to each use of the recorder. About available functions and supplied manuals This section explains the functions of this portable MiniDisc recorder and the...
... to solve them, and about Hi-MD "Hi-MD" is a new MiniDisc format with advanced capabilities over the standard MD format. Please refer to the manual that applies to 104) This section explains all of the recorder functions. Learning more explanation Refer to do with the Hi-MD Walkman" flyer This... more about what to "Troubleshooting and explanations" (page 88). 10 Recorder Operation (pages 12 to each use of the recorder. About available functions and supplied manuals This section explains the functions of this portable MiniDisc recorder and the...
Operating Instructions
Page 11
... help if you can also refer to 130) This section explains the installation and basic operations of your computer screen. MD" refers to the respective manuals. • Explanations in this reason, some explanations (and some illustrations) may differ from the actual items displayed by the software. • Explanations in the illustrations...
... help if you can also refer to 130) This section explains the installation and basic operations of your computer screen. MD" refers to the respective manuals. • Explanations in this reason, some explanations (and some illustrations) may differ from the actual items displayed by the software. • Explanations in the illustrations...

Operating Instructions
Page 31
... 37 LP for Hi-MD mode/SP, LP2, LP4, or monaural for tracks by track name, group name, page 52 artist name, or album name. Manually adjusts the recording level. Sets the microphone sensitivity to a connected component. Adjusts the contrast of the display window on the display page 79 when turning...
... 37 LP for Hi-MD mode/SP, LP2, LP4, or monaural for tracks by track name, group name, page 52 artist name, or album name. Manually adjusts the recording level. Sets the microphone sensitivity to a connected component. Adjusts the contrast of the display window on the display page 79 when turning...
Operating Instructions
Page 36
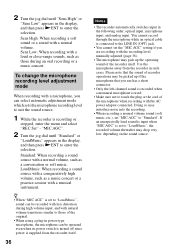
... with a musical instrument. Please note that the sound of recorder operations may pick up if the microphone that you are recording with the recording level manually adjusted (page 38). • The microphone may be picked up the operating sound of the recorder itself . 36 Notes • The recorder automatically switches input...
... with a musical instrument. Please note that the sound of recorder operations may pick up if the microphone that you are recording with the recording level manually adjusted (page 38). • The microphone may be picked up the operating sound of the recorder itself . 36 Notes • The recorder automatically switches input...

Operating Instructions
Page 38
...slide zREC. on a 1GB Hi-MD disc When recording on a 1GB Hi-MD disc • Approx. 610 min. Adjusting the recording level manually The recording level is because of the special digital audio compression technology that you use the AC power adaptor for recording. 2 Enter the menu and... select "REC Set" - "Manual". 3 Play the source. 38 on a disc used in linear PCM stereo. Transferring such tracks and editing them on an 80minute standard disc •...
...slide zREC. on a 1GB Hi-MD disc When recording on a 1GB Hi-MD disc • Approx. 610 min. Adjusting the recording level manually The recording level is because of the special digital audio compression technology that you use the AC power adaptor for recording. 2 Enter the menu and... select "REC Set" - "Manual". 3 Play the source. 38 on a disc used in linear PCM stereo. Transferring such tracks and editing them on an 80minute standard disc •...
Operating Instructions
Page 39
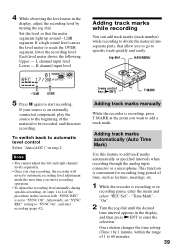
... the recorder will revert to automatic recording level adjustment mode the next time you start a recording operation. • To adjust the recording level manually during synchro-recording, do steps 1 to 4 of the procedure in this feature to 60 minutes. 39 Adding track marks automatically (Auto Time ... is set "SYNC REC" setting to "SYNC On", and start recording (page 42). 5-way control key (NENT) T MARK Adding track marks manually While the recorder is an externally connected component, play the source to the beginning of 1 to add track marks automatically at the point you to...
... the recorder will revert to automatic recording level adjustment mode the next time you start a recording operation. • To adjust the recording level manually during synchro-recording, do steps 1 to 4 of the procedure in this feature to 60 minutes. 39 Adding track marks automatically (Auto Time ... is set "SYNC REC" setting to "SYNC On", and start recording (page 42). 5-way control key (NENT) T MARK Adding track marks manually While the recorder is an externally connected component, play the source to the beginning of 1 to add track marks automatically at the point you to...

Operating Instructions
Page 42
... from a CD player) since the need to operate the recorder or the sound source is eliminated. If the recorder is no sound on or off manually during synchro-recording, the recorder goes into the standby mode automatically. This simplifies digital recordings (e.g., from the player again, the recorder resumes synchrorecording. z When there...
... from a CD player) since the need to operate the recorder or the sound source is eliminated. If the recorder is no sound on or off manually during synchro-recording, the recorder goes into the standby mode automatically. This simplifies digital recordings (e.g., from the player again, the recorder resumes synchrorecording. z When there...

Operating Instructions
Page 89
... using a connecting cord with an attenuator. , Use a connecting cord without an attenuator. • Recording level is too small to record (when adjusting the recording level manually). , Pause the recorder and adjust the recording level (page 38). • The recorder is connected to the computer. , Disconnect the recorder from a portable CD player...
... using a connecting cord with an attenuator. , Use a connecting cord without an attenuator. • Recording level is too small to record (when adjusting the recording level manually). , Pause the recorder and adjust the recording level (page 38). • The recorder is connected to the computer. , Disconnect the recorder from a portable CD player...

Operating Instructions
Page 91
... to "Headphone" (page 57). A disc is not played from • The "Audio Out" parameter is low. • The track was low. , Adjust the recording level manually while recording (page 38). Virtual Surround or 6- • The "Audio Out" parameter is heard.
... to "Headphone" (page 57). A disc is not played from • The "Audio Out" parameter is low. • The track was low. , Adjust the recording level manually while recording (page 38). Virtual Surround or 6- • The "Audio Out" parameter is heard.

Operating Instructions
Page 104
...tracks (Combine)", page 72). Recorded sound level Same as both digital and analog input jacks. Note Track marks may be adjusted manually ("Adjusting the recording level manually", page 38). 1) You can erase unnecessary marks after more than 2 seconds of this case, play the source in shuffle or... a TV or radio (Analog Recording)" (page 37) to the recorder is paused while recording. Can also be adjusted manually (Digital REC level control) ("Adjusting the recording level manually", page 38). In this recorder works as the source. To record, see "Recording a disc right away!" (page ...
...tracks (Combine)", page 72). Recorded sound level Same as both digital and analog input jacks. Note Track marks may be adjusted manually ("Adjusting the recording level manually", page 38). 1) You can erase unnecessary marks after more than 2 seconds of this case, play the source in shuffle or... a TV or radio (Analog Recording)" (page 37) to the recorder is paused while recording. Can also be adjusted manually (Digital REC level control) ("Adjusting the recording level manually", page 38). In this recorder works as the source. To record, see "Recording a disc right away!" (page ...

Operating Instructions
Page 131
... 40 releasing 64 setting 62 H Hard disk free space 108 Hi-MD 100 HOLD 14 I Importing 115 Installing 108 L Labeling 59, 61 Linear PCM 100 M Manual recording 38 MD Simple Burner 111 MDLP 37 Menu 27 Menu Mode 74 Move groups 65 tracks 64 My Library 115 N Net MD 111 O OpenMG...
... 40 releasing 64 setting 62 H Hard disk free space 108 Hi-MD 100 HOLD 14 I Importing 115 Installing 108 L Labeling 59, 61 Linear PCM 100 M Manual recording 38 MD Simple Burner 111 MDLP 37 Menu 27 Menu Mode 74 Move groups 65 tracks 64 My Library 115 N Net MD 111 O OpenMG...


